On the Training tab of your KnowBe4 console, you can create training campaigns, edit training notification templates, prepare policies for user acknowledgment, and view training reports. Training campaigns allow you to select the content that your users will see in their Learner Experience.
If you prefer video tutorials, see our Setting Up a Training Campaign video and our Monitoring Training Campaigns video
Preparing for Your Training Campaign
Before you create a training campaign, we recommend you follow the steps below:
- Customize your Learner Experience (LX). For more information, see our Learner Experience Guide.
- If you have policies that you’d like your users to acknowledge, add these policies to your KnowBe4 console. For more information, see our How to Create and Manage Policies in Your KnowBe4 Console article.
- Add our training content to your library or upload your own training content. For more information, see our ModStore and Library Guide and our Uploading Custom Content to Your KnowBe4 Platform article.
- Review our training notifications or customize your own training notifications. See our Training Campaign Notifications article or our Customizing Training Notifications article for more information.
Creating a Training Campaign
To create a training campaign, log in to your KnowBe4 console and click the Training tab. Then, click the + Create Training Campaign button at the top-right corner of the page. Once you click this button, you will see the Create New Training Campaign page.
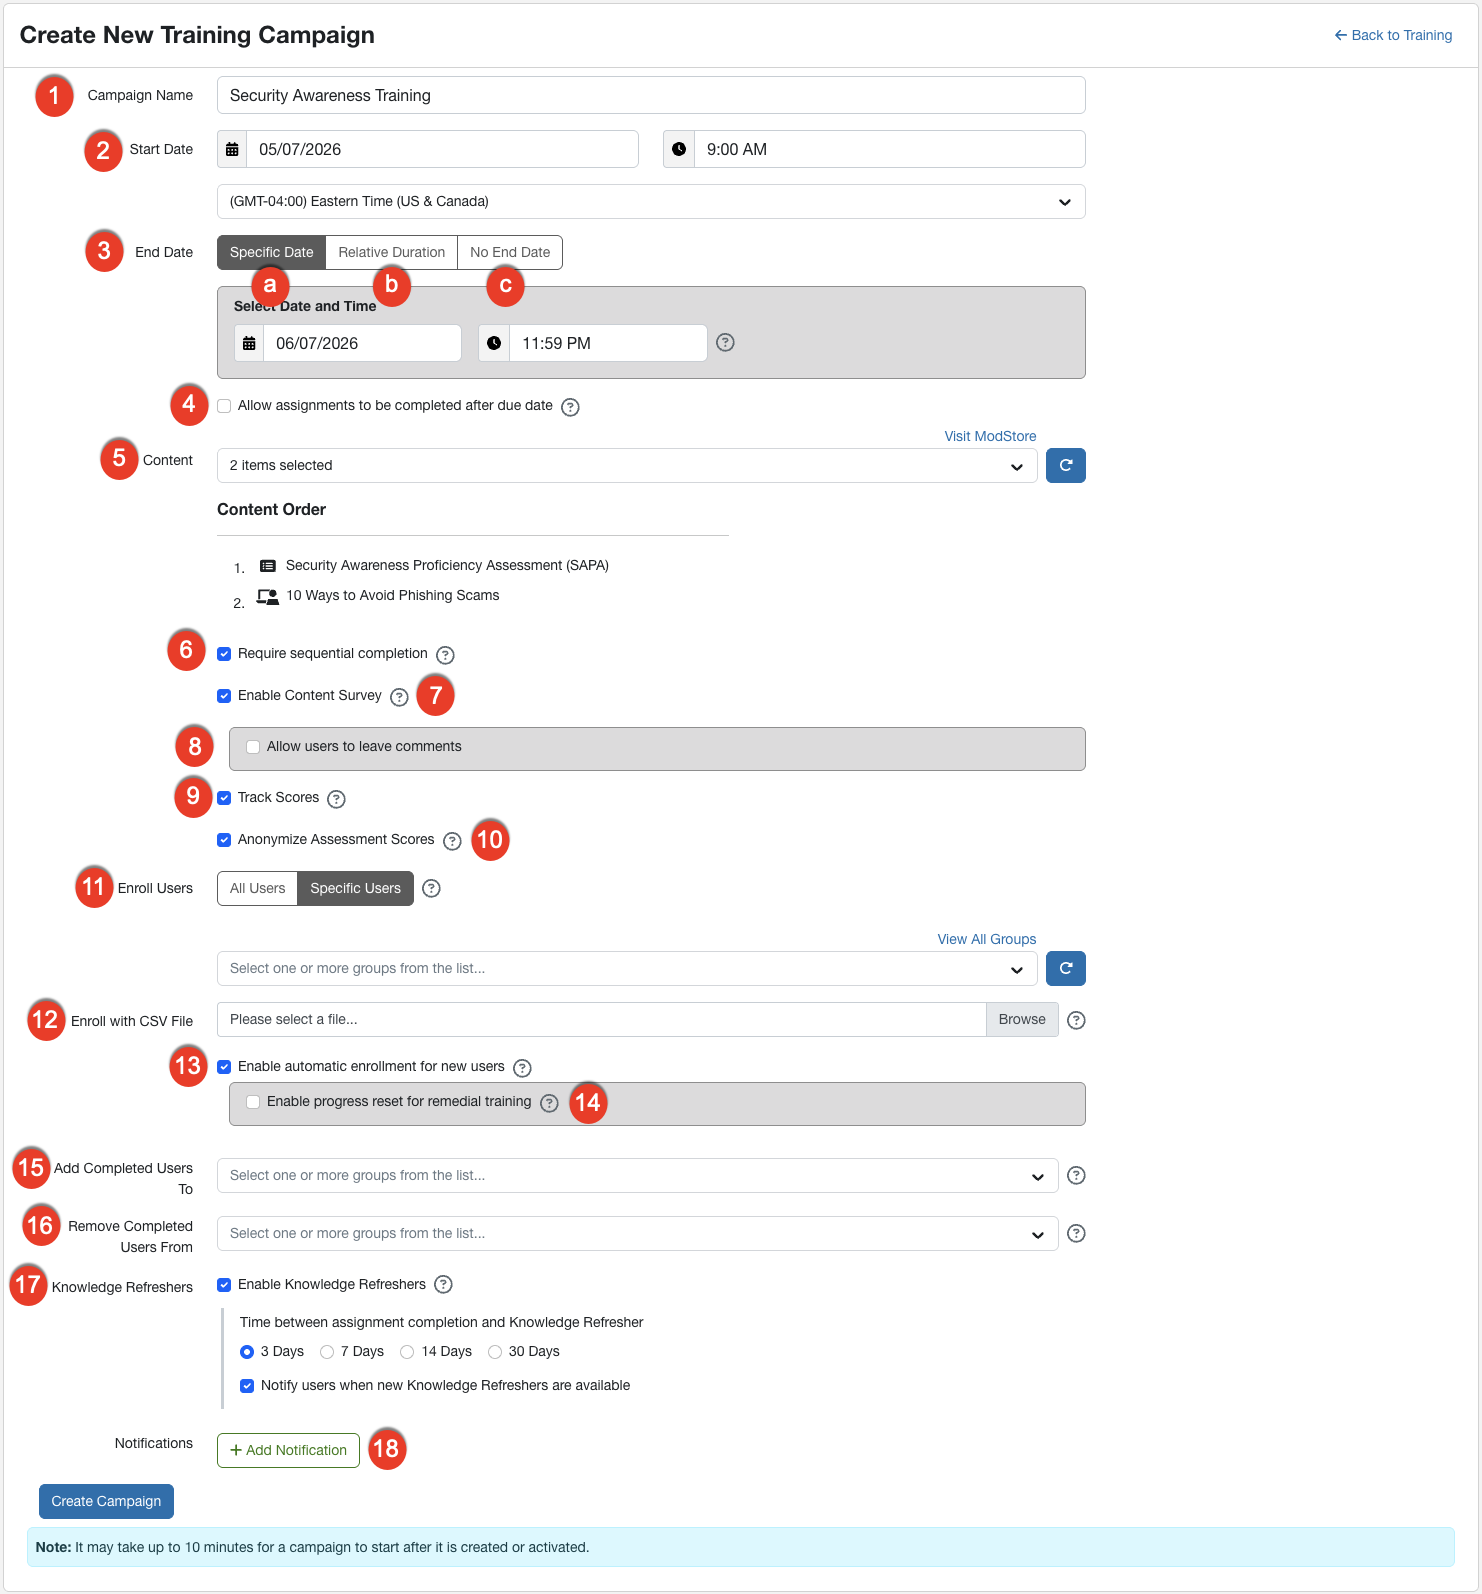
Campaign Name, Content, and Enroll Groups are the only fields required to create a campaign. However, we encourage you to customize the campaign settings as much as you'd like. When you are satisfied with your campaign settings, click the Create Campaign button at the bottom-left corner of the page.
For more information about a specific field, click the field name in the drop-down list below.
-
Name your campaign something descriptive, such as "Work from Home Training" or "Remedial Training". The campaign name can help you remember the purpose or scope of your campaign.
Note: Enrolled users will see the campaign name in the Training tab of their Learner Experience (LX) and in some training notifications. -
Set the time that this campaign should start. This field is helpful if you want to create a campaign that starts at a later date.
Note: By default, training campaigns will use the time zone that is set in your Account Settings. If you would like the campaign to use a different time zone, you can select the desired time zone from the drop-down menu. For more information about setting a time zone in your Account Settings, see our How to Edit Your Account Settings article. -
Select when this training should be completed by. There are three end date options:
- Specific Date: Select a specific date and time for this campaign to end. Training must be complete by this date, regardless of when users enroll in the campaign.
- Relative Duration (Recommended): This option sets the due date based on when a user was enrolled in the campaign. You can set this duration in days, weeks, or months. For example, if a user enrolls in the campaign on March 1 and the relative duration is set to three weeks, the user will have until March 21 to complete the training in this campaign.
- No End Date: Select this option if you’d like the campaign to not have an end date. If you have enabled Optional Learning in your Account Settings, this training campaign will be considered optional. The selected training content will be added to the Library tab of each user’s Learner Experience (LX). See our Optional Learning Guide for more information.
Important: If you change a campaign's end date after the campaign starts, training notifications based on the campaign end date will be affected. For example, if you extend your campaign's due date after you send a Remind Before Due Date notification, your users will receive extra notifications. -
Select the Allow assignments to be completed after due date check box to allow users to complete their assignments after the campaign end date. When this option is enabled, a clock icon is displayed next to the campaign duration on the Campaigns subtab.
Note:If you have enabled the Allow assignments to be completed after due date setting and your campaign is completed, your users will still be able to complete their training after the campaign end date. If your campaign is completed and you enable this setting, you can also continue to send your users Past Due notifications, if you'd like. However, if you have enabled the Allow assignments to be completed after due date setting and your campaign is closed, your users will not be able to complete training after the campaign end date. If the campaign has been closed, your users will not receive any Past Due notifications. For more information about the different campaign statuses, see the Managing and Editing Training Campaigns section below.For more information about this setting, see our How to Modify Training Deadlines article.
-
Use the Content drop-down menu to add content to your campaign. You can select policies that you’ve added as well as training content that has been added to your library.
Tip: If you would like to add content to your library, you can click the Visit ModStore link. This link will open the ModStore subtab in a new browser tab, where you can add content to your library. After you add content, return to the Create New Training Campaign page and click the refresh button to refresh your available content.Within the drop-down menu, you can sort the content by title, duration, and date published. You can also type a keyword into the Search field to filter content.

By default, retired training content will not be listed in the drop-down menu. To view retired content, select the Include Retired Content check box in the drop-down menu.
Once you select your content, click out of the drop-down menu to view your content list. If you’d like to change the content order, click the content titles and drag them into the order that you’d like users to see their training listed.
Note: Once a campaign starts, you can’t add or remove content to the campaign. Include all necessary training and policies before your campaign starts. If you forget to include content, you can assign the content to another training campaign. - If you select the Required sequential completion checkbox, your users must complete their training assignments in the order they are listed, creating a structured learning path. For details on learning paths, see the ModStore and Library Guide for more information.
- If you select the Enable Content Survey check box, users will be prompted to take a survey after they complete each training assignment. Enabling surveys allows users to provide you with feedback about your training plan. If you select the Allow users to leave comments check box, users will be able to leave comments on their survey. See our How to Use Surveys article for more information.
- Select the Allow users to leave comments check box to allow users to add an additional text comment to their survey feedback. Leave this feature disabled if you do not want text comments.
- Select the Track Scores check box to save individual user scores for all eligible content in this campaign. To see these scores, go to the Users subtab of your training campaign or the User Timeline subtab of a user’s profile.
- Select Anonymize Assessment Scores to hide user assessment scores on the Users subtab of the training campaign overview page. You will only see this option if you select an assessment from the Content drop-down menu.
-
Use the Enroll Users option to enroll users in this campaign. To enroll all your users, click All Users. To enroll specific users, click Specific Users and select any user groups from the drop-down menu that displays.
Tip:If you would like to create a group to enroll specific users, you can click the View All Groups link. This link will open the Users subtab in a new browser tab, where you can create a new group. After you create a group, return to the Create New Training Campaign page and click the refresh button to refresh your available groups. -
Click the Browse button to select a CSV file to bulk enroll users with. This option allows you to enroll multiple users with a CSV file and is only available if you selected Specific Users.
Important:You can only attach one CSV file at a time. If you remove and replace your existing CSV file, only the users from the new CSV file will be enrolled when the campaign begins. If you remove and replace your existing CSV file during an active campaign, new users will be added and existing users will not be deleted. -
Select the Enable automatic enrollment for new users check box to automatically enroll users in this campaign when they’re added to a group that is enrolled in this campaign.
If you choose to enroll all users, any user who is added to the console after the campaign starts will be automatically enrolled in this campaign.
Remember: Automatic enrollment settings are not retroactive. If you enable automatic enrollment or update a campaign's end date, it will not affect users already in the related group. These users will not be automatically enrolled. To apply the new settings to an existing user list, you must either recreate the campaign or manually enroll the specific users. - The Enable progress reset for remedial training setting should only be used for remedial training campaigns. This setting resets a user's original training progress if they've re-enrolled in this campaign. See our Using Groups for Remedial Training article for more information.
-
You have the option to add users who complete this training campaign to a specific group. To add these users to a group, select the desired group from the Add Completed Users To drop-down menu.
Tip: If you would like to create a group, you can click the Visit All Groups link above the Enroll Groups drop-down menu. This link will open the Users subtab in a new browser tab, where you can create a new group. After you create a group, return to the Create New Training Campaign page and click the refresh button to refresh your available groups.You can use this setting to make sure your users are being sent simulated phishing emails as soon as they complete training to reinforce the skills they learned as part of training. For example, you can create an ongoing phishing campaign targeting a Trained Users group. Then, in your training campaigns, you can use this setting to add completed users to the Trained Users group upon completion of their assigned training.
-
You have the option to remove users who complete this training from a specific group. To remove these users, select the desired group from the Remove Completed Users From drop-down menu.
You can use this setting to help with remedial training campaigns and to assign training on a staggered or ordered basis. For more information about how to effectively use groups with training campaigns, read the Groups and Training Campaigns section of the Users and Groups article.
- Select the Enable Knowledge Refreshers check box to enable Knowledge Refreshers in the Learner Experience. You can also select the number of days between when a user completes a training module and when the knowledge refresher for that module is available, and notify users when new Knowledge Refreshers are available. See Accessing Knowledge Refreshers in the Learner Experience for more information.
-
In the Notifications section, you have the option to set up automatic notifications to send to users, managers, and admins in your account. There is no limit to the number of notifications you can set up. To set up notifications for a campaign, click the +Add Notification button. See below for an overview of the notification options. For more details on this section, see our Training Campaign Notifications article.
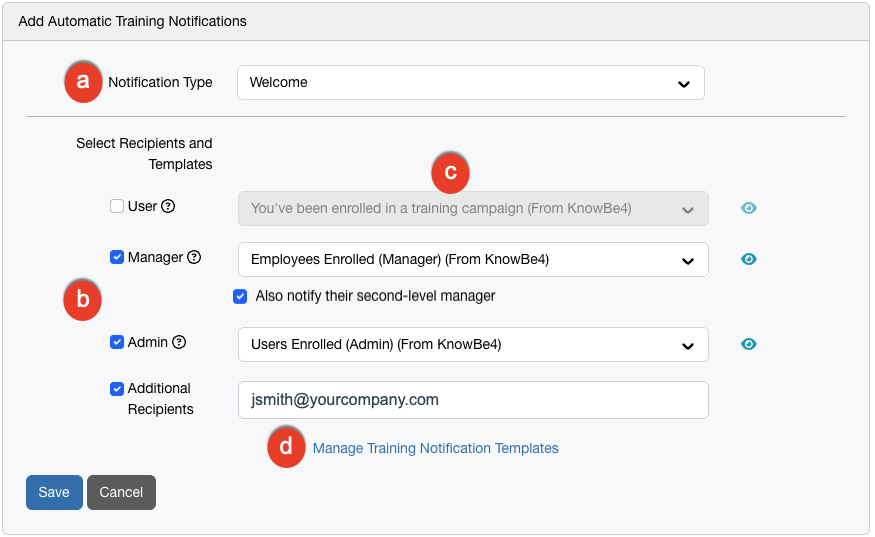
- Notification Type: From this drop-down menu, select when the notification will be sent. Select from the following options: Welcome, Remind After Enrollment, Remind Before Due Date, Campaign Completion, or Past Due.
-
Select Recipients and Templates: Select the appropriate check box to send notifications to your desired recipients. ou can select from the following options: User, Manager, Admin, Additional Recipients, or a combination of these four options.
If you select Manager, you will also have the option to Also notify a second-level manager. The system dynamically identifies the direct manager's supervisor based on the organizational hierarchy in your console. For Additional Recipients, you can enter up to 10 email addresses and use commas to separate each address. For security, every entered email must match an authorized domain already configured in your console. -
Select Template: From the drop-down menu, select which notification template to send to the recipient type. To preview the selected template, click the eye icon on the right side of the field.
Note:If you have enabled password-less logins in your Account Settings, be sure to select the training notifications that are labeled as "(Password-less)”. -
Manage Training Notification Templates: Click this link to view available notification templates in a new window. We provide several system email templates for you to choose from. You can click this option to customize our notifications or create your own notifications.
When you are satisfied with your notification selections, click the Save button. To add another notification, click the +Add Notification button again.
Managing and Editing Training Campaigns
Once you have created training campaigns, you can manage or edit the campaign at any time. To manage and edit your training campaigns, navigate to Training > Campaigns.
To learn more about the options in this section, see below:

-
Active, Inactive, and All: Use these buttons to filter which type of campaigns you would like to view. For more information about the filters, see the list below:
- Active: Use this filter to view only campaigns in Created and In Progress status.
- Inactive: Use this filter to view only campaigns in Completed and Closed status.
- All: Use this filter to view all campaigns.
- Training Campaigns: This table lists training campaigns by name. For each campaign, you can see which groups are enrolled, what content is included, and the percentage of users that have completed the training.
-
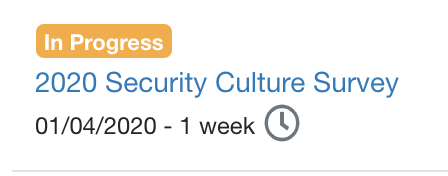
Campaign Status: Above the campaign name, you can see a banner that displays the status of the campaign. For example, the campaign in the screenshot above is displaying the In Progress status. For more information about the campaign statuses, see the list below:
- Enrolling: The campaign is being created and users are being enrolled.
- Created: The campaign has not started yet.
-
In Progress: The campaign is active and ongoing because the campaign either has not reached its end date or has a relative duration. While a campaign is in this status, you can continue to enroll additional users.
Note:Campaigns that have a relative duration will always display the In Progress status, even if the completion percentage is 100 percent. These campaigns are active so that you can enroll users in the campaign at a later date. -
Completed: The campaign is inactive because the campaign has passed its end date.
Note:If the campaign's Allow assignments to be completed after due date check box is selected and the campaign is in the Completed status, the enrolled users will still be able to complete their training and receive training notifications for the campaign. - Closed: The campaign is inactive because an admin manually closed the campaign. Users will no longer receive training notifications for this campaign.
- Name: Click the name of a campaign to view the details of the campaign. For more information, see the Individual Campaign Overview section below.
- Total Duration: This column lists the combined time of all modules included in the campaign.
-
Actions: Click the drop-down arrow in the rightmost column to view the available actions for a campaign. These actions include:
-
Edit: Click Edit to open the Edit Training Campaign screen, which is similar to the Create New Training Campaign screen. Edit options as needed, then click the Update Campaign button at the bottom-left corner of the page to save your changes. Options in gray cannot be changed.
Note:If you edit or add automated notifications, these notifications will not be sent retroactively. For example, if you add a Welcome notification, users who were already enrolled in this training will not receive the new notification. We recommend that you send manual training notifications for a campaign in progress. - Clone: Click Clone to create a copy of an existing campaign. The new campaign will have the same settings and content as the original campaign except for a new start time and the word "Clone" in the campaign name. Once you click Clone, you’ll be redirected to the Clone Training Campaign screen where you can change the campaign name and other settings before you save the cloned campaign.
-
Close: Click Close to end a campaign and save user completion data.
Note:A closed campaign is different from a completed campaign. For more information about the difference between the Closed campaign status and the Completed campaign status, see letter C above. -
Delete: Click Delete to permanently delete a training campaign and all associated data. This includes the completion data of all enrolled users.
Important:Be cautious when clicking Delete for a training campaign. This action will permanently delete the campaign and all data associated with it. -
Enroll Users: Click Enroll Users to individually enroll additional users in this campaign. For more information see our Can I Enroll Users in a Training Campaign That Is in Progress? article.
Note:This option will only display for active training campaigns that are In Progress.
-
Editing Training Campaign Due Dates
If you have manually extended the due date for specific users, their individual dates will stay the same even if you update the campaign's overall relative duration. This feature prevents the system from overwriting the custom changes you've already made.
If you want these users to use the new campaign end date, you can update their due dates individually or all at once using bulk actions.
Individual Campaign Overview
From the Campaigns tab, click the name of a campaign to view the Campaign Overview subtab. To learn more about the individual campaign overview, see our Monitoring Training Campaigns video or see the information below.

- The Users subtab provides more detailed information about each user and their progress during the training campaign. You can also manually change a user’s progress, send manual notifications, and download completion certificates. For more information, see our User Training Progress article.
- The Survey Results subtab will only display if you have enabled content surveys for the training campaign. This tab lists the results of these surveys. See our How to Use Surveys article for more information.
- In the Campaign Content section, you can see a list of all content included in the campaign and the completion percentage for all content.
- Similar to the Users subtab, the User Progress button takes you to a page with specific user details for that training assignment. For more information, see our User Training Progress article.
- The Assessment Results button will only display if you have assigned a Security Awareness Proficiency Assessment (SAPA) or Security Culture Survey (SCS) to your users. Click this button to view the results of the assessment. See our How to Use Assessments article for more information.
- Click the Notify Users button to send manual training notifications to users, managers, or account admins.
- The Campaign Summary section includes a graph that shows which users have completed all the content in the campaign. This section also lists the status, start date, relative duration, number of users, auto-enroll option, and scheduled notifications for the campaign.