You can use our Policy Management feature to store, distribute, and track your organization’s policy acknowledgments. This feature allows you to assign policies and training content in the same training campaign while tracking your users’ policy acknowledgment progress.
In your KnowBe4 console, you have the option to add your policy as a PDF file or as a URL. After you’ve added your policy, you can create a training campaign to assign the policy to your users. Once you’ve assigned the policy to a campaign, you can track your users’ progress and acknowledgments.
Click the links below to learn more about our policy feature. If you prefer video tutorials, you see our Adding Policies to the KnowBe4 Console video or our Assigning and Monitoring Policies in a Campaign video.
Adding PDF Policies
You have the ability to upload your organization's policies to your console as a PDF file or a URL. To upload a policy as a PDF file, follow the steps below:
- Log in to your KnowBe4 console and navigate to Training > Policies.
- Click the + Add Policy drop-down menu.
- Select PDF.
- Fill out the fields on the Add PDF Policy page.
For information about each of these fields, see the list below.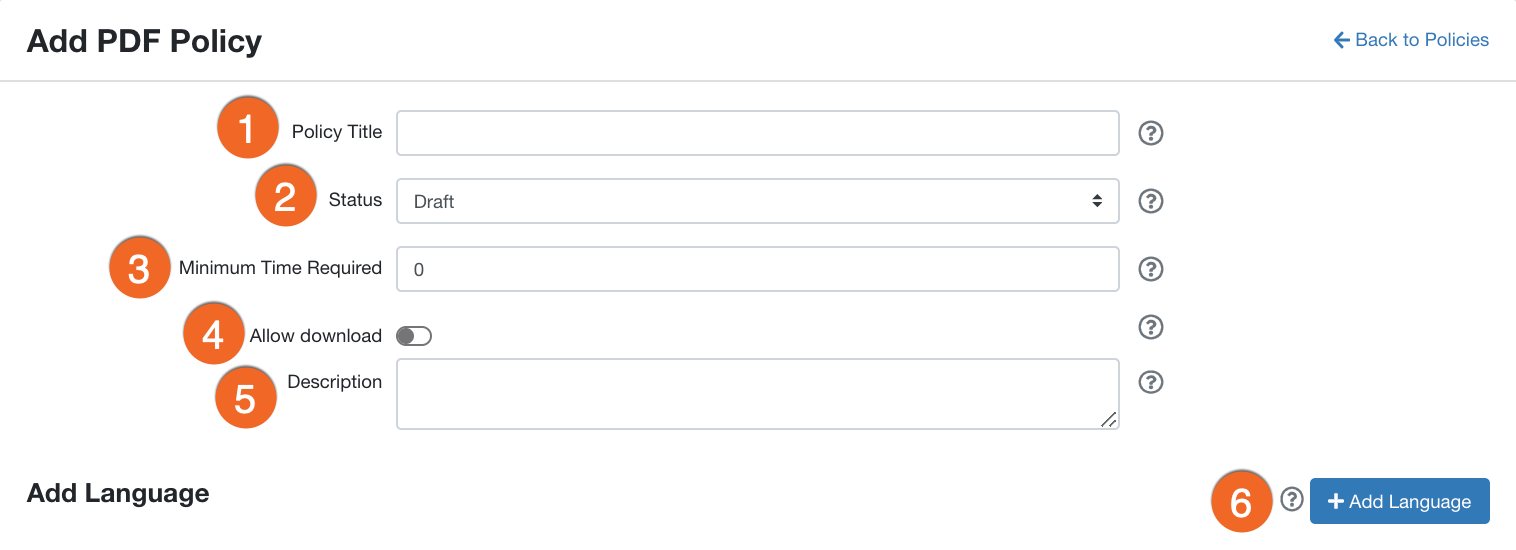
- Policy Title: Enter the title of your policy or agreement. We recommend that you include the policy version or creation date in the title. This title will display on the interface your users will see when reading the policy.
- Status: Select the policy status. You can choose Draft, Published, or Archived. For more information about each of these statuses, see the Policy Statuses section of this article.
- Minimum Time Required: (Optional) Specify the minimum number of minutes that users must spend reviewing the policy before they can acknowledge the policy.
- Allow Download: (Optional) If you select this check box, your users will have the ability to download the policy from the Policy Viewer interface. For more information about the Policy Viewer, see the User Experience section of this article.
- Description: (Optional) In this field, you can enter a description of this policy for future reference.
-
+ Add Language: Click this button to add a version of your policy. When you click, you’ll be taken to the Add Language page.
Important:You can add as many language versions of your policy as you’d like, depending on your organization's needs. The first version that you add to the policy will be the default version for all users.
Once you’ve filled out the fields above, fill out the fields on the Add Language page. For more information about the fields on the Add Language page, see the list below.
- Policy Name: Enter a name for your policy. This name will be displayed to your users.
-
Policy File: Click the Browse button to upload a PDF file of your policy.
Important:If you would like to upload a PDF file that was downloaded from DocuSign, the file must be unsigned. Signed PDF files from DocuSign will not upload successfully.
- Acceptance Requirements: Select your desired acknowledgment requirements. You can require your users to acknowledge each page of the policy or only the final page of the policy.
- Language: Select the language that the policy is written in. The first language that you add to the policy will be the default selection for all users.
- Acceptance Text: (Optional) Enter the text that you want to be displayed next to the acceptance check box when your users accept a policy.
- Per Page Acceptance Text: (Optional) Enter the text that you want to be displayed on all pages of the policy except the final page.
- Final Page Acceptance Text: (Optional) Enter the text that you want to be displayed on the final page of the policy.
- Save: Click this button to save this language version of the policy.
You can add as many language versions of your policy as you’d like. Once you've added all language versions of the policy and customized your policy settings, click Create.
Adding URL Policies
You have the ability to upload your organization's policies to your console as a PDF file or as a URL. To add a URL policy, follow the steps below:
- Log in to your KnowBe4 console and navigate to Training > Policies.
- Click the + Add Policy drop-down menu.
- Select URL.
- Fill out the fields on the Add URL Policy page.
For information about each of these fields, see the list below.
- Policy Title: Enter the title of your policy or agreement. We recommend that you include the policy version or creation date in the title. This title will display on the interface your users will see when reading the policy.
- Status: Select the policy status. You can choose Draft, Published, or Archived. For more information about each of these statuses, see the Policy Statuses subsection below.
- Required Review: (Optional) You can enable this setting to require your users to open the URL before they can accept the policy.
- Description: (Optional) Enter a description of this policy for future reference.
- + Add Language: Click this button to add a language version of your policy. The first version that you add to the policy will be the default version for all users.
For more information about adding a language version, see the list below.
- Policy Name: Enter a name for your policy. This name will be displayed to your users.
-
Policy URL: Enter the URL for your policy.
Important:We only accept Fully Qualified Domain Names, or FQDNs. Please enter a complete URL, not a shortened version of the URL.
- Language: Select the language that the policy is written in.
- Acceptance Text: (Optional) Enter the text you want to be displayed next to the acceptance check box when your users accept a policy.
- Save: Click this button to save this language version of the policy.
You can add as many language versions of your policy as you’d like. Once you've added all language versions of the policy and customized your policy settings, click Create.
Editing Policies
After you have created a policy, you can edit the policy or add additional language versions of the policy as needed.
Edits to the policy take effect immediately. Users who have already been assigned the policy will be able to see your changes the next time they view the policy.
To edit a policy, follow the steps below:
- Log in to your KnowBe4 console and navigate to Training > Policies.
- Find the policy you’d like to edit from the policy list.
- Click the drop-down arrow next to the policy you’d like to edit.
- Select Edit.
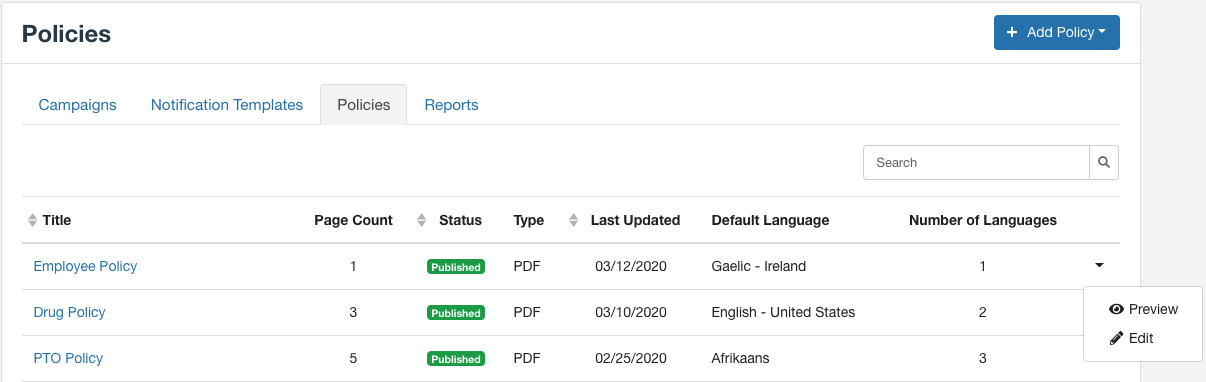
From the policy editing page, you can edit the policy details, add additional language versions to the policy, edit existing language versions of the policy, and change the default policy language option. The default language is the first language shown in the drop-down menu that users see before they open the policy.
After you’ve made your changes to the policy, click Update Policy.
Policy Statuses
Your policy can be in one of three statuses: Draft, Published, or Archived. You can change these statuses at any time by editing your policy.
For more information about each of these statuses, see the table below:
| Draft | Use this status if you want to save your current policy progress but you don't want the policy to be available when you create a campaign. |
|---|---|
| Published | Use this status when you are ready to use this policy in a campaign. This is the only status that makes the policy available on the Create New Training Campaign page. |
| Archived | Use this status to archive the policy. You cannot assign an archived policy in a new campaign. However, if you included the archived policy in an active campaign, users will still be able to see the policy. |
Assigning Policies
Once you've added a policy to your account, you can create a training campaign to assign and distribute the policy to your users.
To create a training campaign for your policy, follow the steps below:
- Log in to your KnowBe4 console and navigate to Training > Campaigns.
- Click + Create Training Campaign.
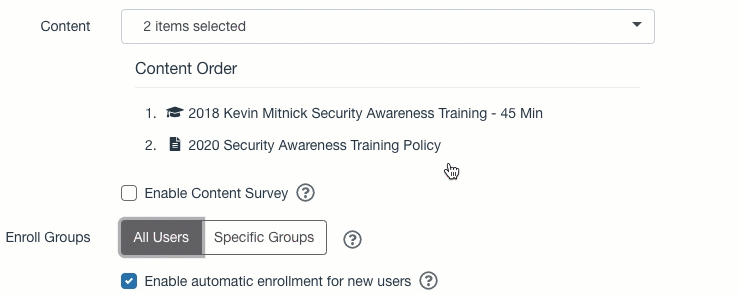
- From the Content drop-down menu, select the policy you would like to add.
Note: You have the ability to assign both policies and training content in the same campaign.
- Set up the rest of your training campaign however you’d like. For more information about creating a training campaign, see our Creating and Managing Training Campaigns article.
- Once you’ve created your campaign, click Create Campaign.
Monitoring Policy Acknowledgments
Once your campaign has started, you can monitor your users’ policy acknowledgments as well as any other training content included in your campaign.
To view details about your campaign, follow the steps below:
- Log in to your KnowBe4 console and navigate to Training > Campaigns.
- Click on the name of the campaign you’d like to view to go to the campaign’s Overview page.

On the campaign’s Overview page, you can see what content and policies were assigned in the campaign, see the campaign’s status, see how many users were enrolled in the campaign, and more. For more information about the Overview page, see the Individual Campaign Overview section of our Creating and Managing Training Campaigns article.
You can also monitor specific users’ policy acknowledgments from the Users subtab. On this page, you can view specific information about a specific user, such as the content assigned to the user, if they’ve completed their content, and more. For more information about the Users subtab, see our User Training Progress article.
User Experience
If you've set up campaign notifications to remind your users to acknowledge a policy, your users can click the link in the notification to access their account.
As an account admin, you can customize the notifications that you send to your users. You can send these notifications to your users, users' managers, and account admins at a frequency that you choose. For more information about creating and customizing training campaign notifications, see our Training Campaign Notifications article and our Customizing Training Notifications article.
When your users log in to their account, they'll see the active campaigns that they're enrolled in. They can click Start to open and view their policy assignment.
When they click Start, the policy will open in a new window.
If you've added multiple language versions of the policy, your users can click the Globe drop-down menu to choose their preferred language.
Once your users click Start, they will be able to view your policy in the Policy Viewer.
In the Policy Viewer, your users can navigate through the policy by clicking the forward navigation arrow. If you've required users to agree to each page of the policy, they must select the acceptance check box before they can proceed to the next page of the policy.
If you have not required users to agree to every page of the policy, your users will navigate through the entire policy then select the acceptance check box on the final page.
If you've enabled the Allow Download feature, your users can click the Download button at the top of the Policy Viewer to save a copy of the PDF file.
If you've set Required Review Minutes for the policy, users must spend this amount of time reviewing the policy before they can accept the policy. If users attempt to select the final acknowledgment check box before they’ve reviewed the policy for the required amount of time, they will be prompted with a warning message.
Frequently Asked Questions (FAQs)
-
Question: Will edits I make to a policy be reflected in the policy if I’ve already added the policy to a campaign?
Answer: Yes. Any edits made to the policy will be automatically reflected in the policy campaign. This includes any additional language versions of the policy that you may add.
-
Question: Can you preview all language versions of the policy?
Answer: You can only preview the default version of the policy in the console. If you'd like to preview the remaining language versions, temporarily change the default version of the policy to the language version you’d like to preview.
-
Question: Can I arrange the order of the content I assign through training campaigns?
Answer: Yes. From the Create New Training Campaign page, drag and drop the content in the desired order. When your users log in to complete their training or acknowledge policies, they'll see the content in the order you set. For an example of how to rearrange content, see the gif below.
-
Question: Why can't I see or select my policy when I create a training campaign?
Answer: Before you can add the policy to a training campaign, the policy must be in the Published status. To change the status of a policy, click the drop-down arrow to the far right of the policy name. Select Edit. Then, select Published from the Status drop-down menu and click Update Policy.
-
Question: Why don't the "Users who did not acknowledge their course policies" and "Users who acknowledged their course policies" reports under the Reports subtab include my policy campaign users?
Answer: These specific reports are related to the alternative method of mandating policy acknowledgments through your console. If you would like reports for your training campaigns that include PDF policies, see the Monitoring Policy Acknowledgments section of this article.
-
Question: Can I assign Security Roles to a user that I want to handle policy management, distribution, and acknowledgment?
Answer: Yes. You can add one or more users to a group in your console for the purpose of assigning the necessary Security Roles for policy management. For more information, see our How to Use Security Roles article.
-
Question: Is there a maximum file size for policy PDF files?
Answer: No. However, the system may time out if the PDF file is large. If the system times out, try to reduce the file size and upload the file again.
-
Question: I included links in my policy and I can't click them. Why can’t I click the links?
Answer: If you are using a MacBook and you want to include clickable links in your policy, you must use a PDF file that has been created in Adobe Acrobat.