In this article, you will learn how to integrate Splunk vendors with SecurityCoach. Once you set up this integration, data provided by the Splunk vendors will be available under the SecurityCoach tab of your KnowBe4 console. This data can be viewed in SecurityCoach reports and used in your real-time coaching campaigns. For general information about SecurityCoach, see our SecurityCoach Product Manual.
Supported Vendors
The Splunk integration for SecurityCoach currently supports the following vendors. These vendors can also be integrated directly with SecurityCoach by following their linked direct integration guides:
- Bitdefender GravityZone
- Carbon Black
- Cisco Umbrella
- Cloudflare Area 1 Email Security
- Crowdstrike Falcon Insight
- Fortigate Cloud
- Malwarebytes
- Microsoft 365 and Microsoft Defender for Cloud Apps
- Microsoft Defender for Endpoint
- Microsoft Edge for Business
- Microsoft Entra ID Protection
- Mimecast
- Okta
- Palo Alto Next-Generation Firewall (NGFW)
- SentinelOne
- Sophos
- TrendAI (formerly Trend Micro)
- Zscaler
Whitelisting Splunk
Before setting up any integrations in your Splunk console, you must ensure your Splunk IP address is whitelisted for your SecurityCoach console. To ensure Splunk is whitelisted, submit a support ticket to KnowBe4 that indicates if you are using Splunk Cloud or Splunk Enterprise and includes the public static IP address associated with your Splunk instance. A member of our support team will whitelist your IP address and ensure that Splunk has been successfully integrated.
If you are using Splunk Cloud, follow these steps to locate your public static Splunk Cloud IP address:
- Open the Command Prompt (Windows) or Terminal (MacOS or Linux) program on your device.
- Enter “nslookup” in the command line text field. A new text field will appear.
-
In the new text field, enter the domain for your Splunk Cloud instance.
Tip:The start of your Splunk Cloud domain is unique to your organization, but always ends with: ".splunkcloud.com" -
Your Splunk Cloud IP address will be shown in the search results.

- Copy or screenshot the IP address to share with KnowBe4 support.
Setting Up the Integration in SecurityCoach
To set up the Splunk vendor integration in your KSAT console, follow the steps below:
- Log in to your KSAT console.
- Navigate to SecurityCoach > Setup > Security Vendor Integrations.
- Navigate to your desired Splunk vendor.
-
Click Configure on the vendor’s card and then click Splunk Integration from the drop-down menu to navigate to the integration setup page.

-
Under Step 1, click Enable Splunk for [[vendor]] to generate a unique Splunk Alert Title value.
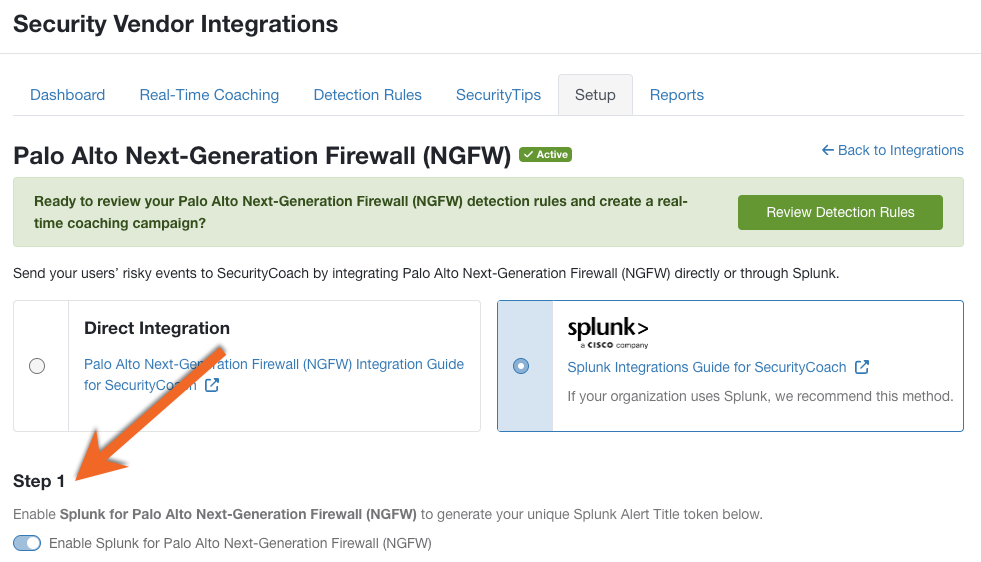 Warning:Each time Splunk is enabled, a new Splunk Alert Title value is generated, and previously generated values will no longer be connected to your SecurityCoach console.
 -
Under Step 2, copy the Splunk Alert Title value by clicking the copy icon to the right of the value. You will need this value for the Setting Up the Integration in Splunk section.

-
For Step 3, proceed to the steps in the Setting Up the Integration in Splunk section.

Setting Up the Integration in Splunk
To set up the SecurityCoach integration for a supported vendor in your Splunk console, create an associated vendor index alert by following the steps below:
- Log in to your Splunk admin portal.
-
From the Splunk homepage, click Search & Reporting from the Apps menu on the left side of the screen.

-
Search for the name of the vendor you set up in the Setting Up the Integration in SecurityCoach section of this article. To search for a vendor, enter “index = [[vendor name]]” in the Search text field.
 Tip:To send only specific event data from the vendor to SecurityCoach, see the Limiting Events Sent to SecurityCoach section below to create a custom index and enter that custom index into the Search field instead.
 -
Verify that the index search for the vendor has incoming data in the Event column and that the data is accurate.

-
Create an alert from the search results. To create an alert, click Save As near the top-right corner of the screen, then click Alert from the drop-down menu.

-
To configure and save the alert, see the screenshot and list below:

- Enter the Splunk Alert Title token you copied earlier in Step 7 of the Setting Up the Integration in SecurityCoach section.
- Set the top Alert Type selection to Scheduled.
-
Set the bottom Alert Type selection to Run on Cron Schedule.

-
Click the Time Range selection to open a new window. From there, click Advanced, set the Earliest field to “-6m” and the Latest field to “-1m”, then click Apply.

- Set Cron Expression to “*/5 * * * *”.
-
Set Expires to the length of time that you want this alert to show on your Triggered Alert page in Splunk.
Tip:We recommend setting this value to 365 days. - Set Trigger alert when to Number of Results, is greater than, and “0”.
-
Click Add Actions to open a drop-down menu. Click Webhook to add the When triggered > Webhook > URL field to your configuration.

-
In the URL field, enter your KnowBe4 instance’s Webhook URL from the table below:
KnowBe4 Instance Webhook URL United States https://splunk.vendor.training.knowbe4.com/v1 European Union https://splunk.vendor.eu.knowbe4.com/v1 Canada https://splunk.vendor.ca.knowbe4.com/v1 United Kingdom https://splunk.vendor.uk.knowbe4.com/v1 Germany https://splunk.vendor.de.knowbe4.com/v1
- Click Save to save the vendor index alert.
If you are using Splunk Cloud, follow these steps to allow the Webhook URL for your KnowBe4 instance:
- Log in to your Splunk Web console.
-
Navigate to Settings > Server Settings > Webhook Allow List.

- In the Name field, enter “SecurityCoach Webhook” or your preferred title.
-
In the Value field, enter your KnowBe4 instance’s Webhook URL from the table below:
KnowBe4 Instance Webhook URL United States https://splunk.vendor.training.knowbe4.com/v1 European Union https://splunk.vendor.eu.knowbe4.com/v1 Canada https://splunk.vendor.ca.knowbe4.com/v1 United Kingdom https://splunk.vendor.uk.knowbe4.com/v1 Germany https://splunk.vendor.de.knowbe4.com/v1 - Click Save.
Limiting Events Sent to SecurityCoach
To send only specific events from a Splunk vendor to SecurityCoach, create a custom index in Splunk to filter which events are sent. For more information, see Splunk’s Create Custom Indexes Create Custom Indexes (link opens in new window) article.
Mapping Your Users
After you’ve finished integrating your Splunk vendor, the final step is to map your users. Some vendors map your users automatically, which will be indicated on the vendor’s Setup page.

Other vendors need to be mapped to your users, which will also be indicated on the vendor’s Setup page. For these vendors, map your users either through mapping rules (recommended) or through a CSV file upload. For more information about user mapping, see our Map Users in SecurityCoach article.
Managing System Detection Rules
Once you’ve successfully integrated the Spunk vendor, use the Detection Rules subtab to manage detection rules for the integration data. For more information, see our Detection Rules Guide. For a full list of available system detection rules available for Splunk vendors, see our System Detection Rules by Vendor article.
Deleting a Splunk Integration
To delete a Splunk vendor integration with SecurityCoach, we recommend first deleting the integration in your Splunk console, and then you must delete the integration in your SecurityCoach console.
Deleting the Vendor Index Alert in Splunk
To delete the associated vendor index alert from Splunk, follow the steps below:
- Log in to your Splunk admin console.
- From the Splunk homepage, click Search & Reporting from the Apps menu on the left side of the screen.
- Click the Alerts subtab.
-
Locate your Splunk Alert Title in the Title column.
Note:The Splunk Alert Title can be found in your SecurityCoach console on the associated vendor’s Setup page. For more information, see Step 7 of the Setting Up the Integration in SecurityCoach section. - In the Actions column to the right of your Splunk Alert Title, click Edit.
- From the drop-down menu, click Delete to open a pop-up confirmation window. Click Delete again to confirm deletion.
Deleting the Integration in SecurityCoach
To delete the Splunk vendor integration from SecurityCoach, follow the steps below:
- Log in to your KSAT console.
- Navigate to SecurityCoach > Setup > Security Coach Vendor Integrations.
- Locate the Splunk vendor tile and click View.
- Click Delete Integration near the bottom of the page.
- A new pop-up window will open. If you are sure you want to delete the integration, click Confirm.