In this article, you will learn how to integrate Palo Alto Next-Generation Firewall (NGFW) with SecurityCoach. Once the integration is complete, data provided by Palo Alto NGFW will be available in the SecurityCoach tab of your KnowBe4 Security Awareness Training (KSAT) console. This data can be viewed in SecurityCoach reports and can be used to create detection rules for real-time coaching campaigns. For more information about SecurityCoach, see our SecurityCoach Product Manual.
API Integration
Setting Up Your Admin Role Profile
To set up your admin role profile, follow the steps below:
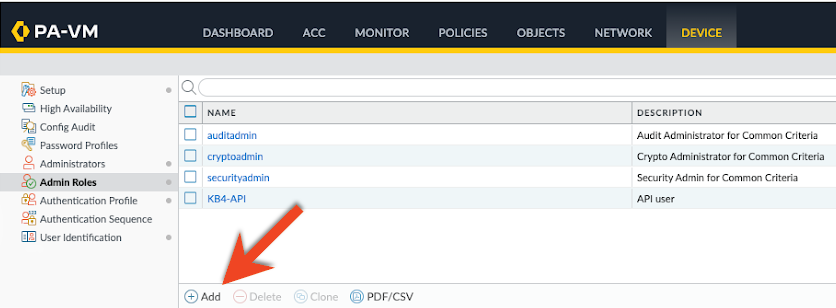
- Log in to your Palo Alto NGFW admin account.
- Navigate to the Device tab > Admin Roles subtab.
-
Select + Add near the bottom of the page. An Admin Role Profile pop-up window will open.
-
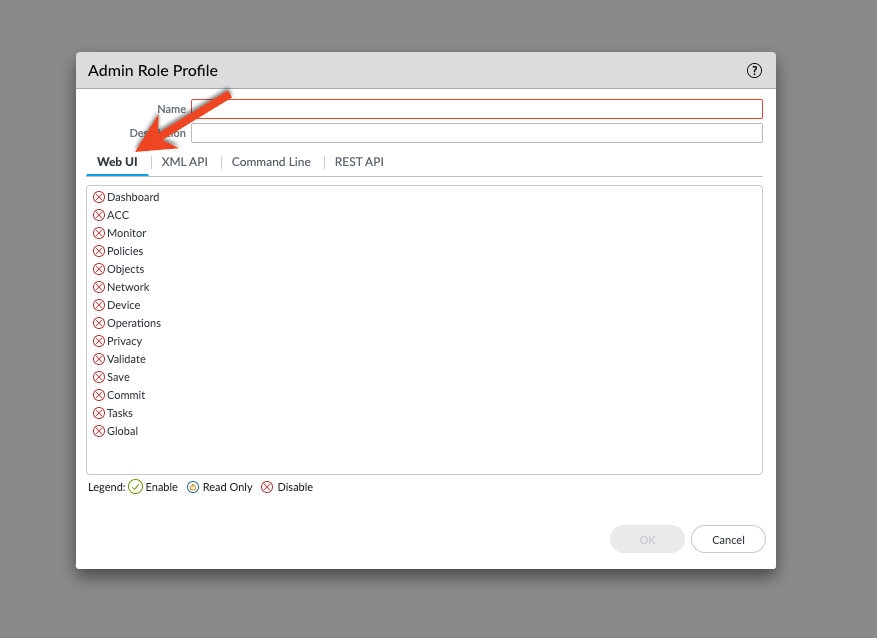
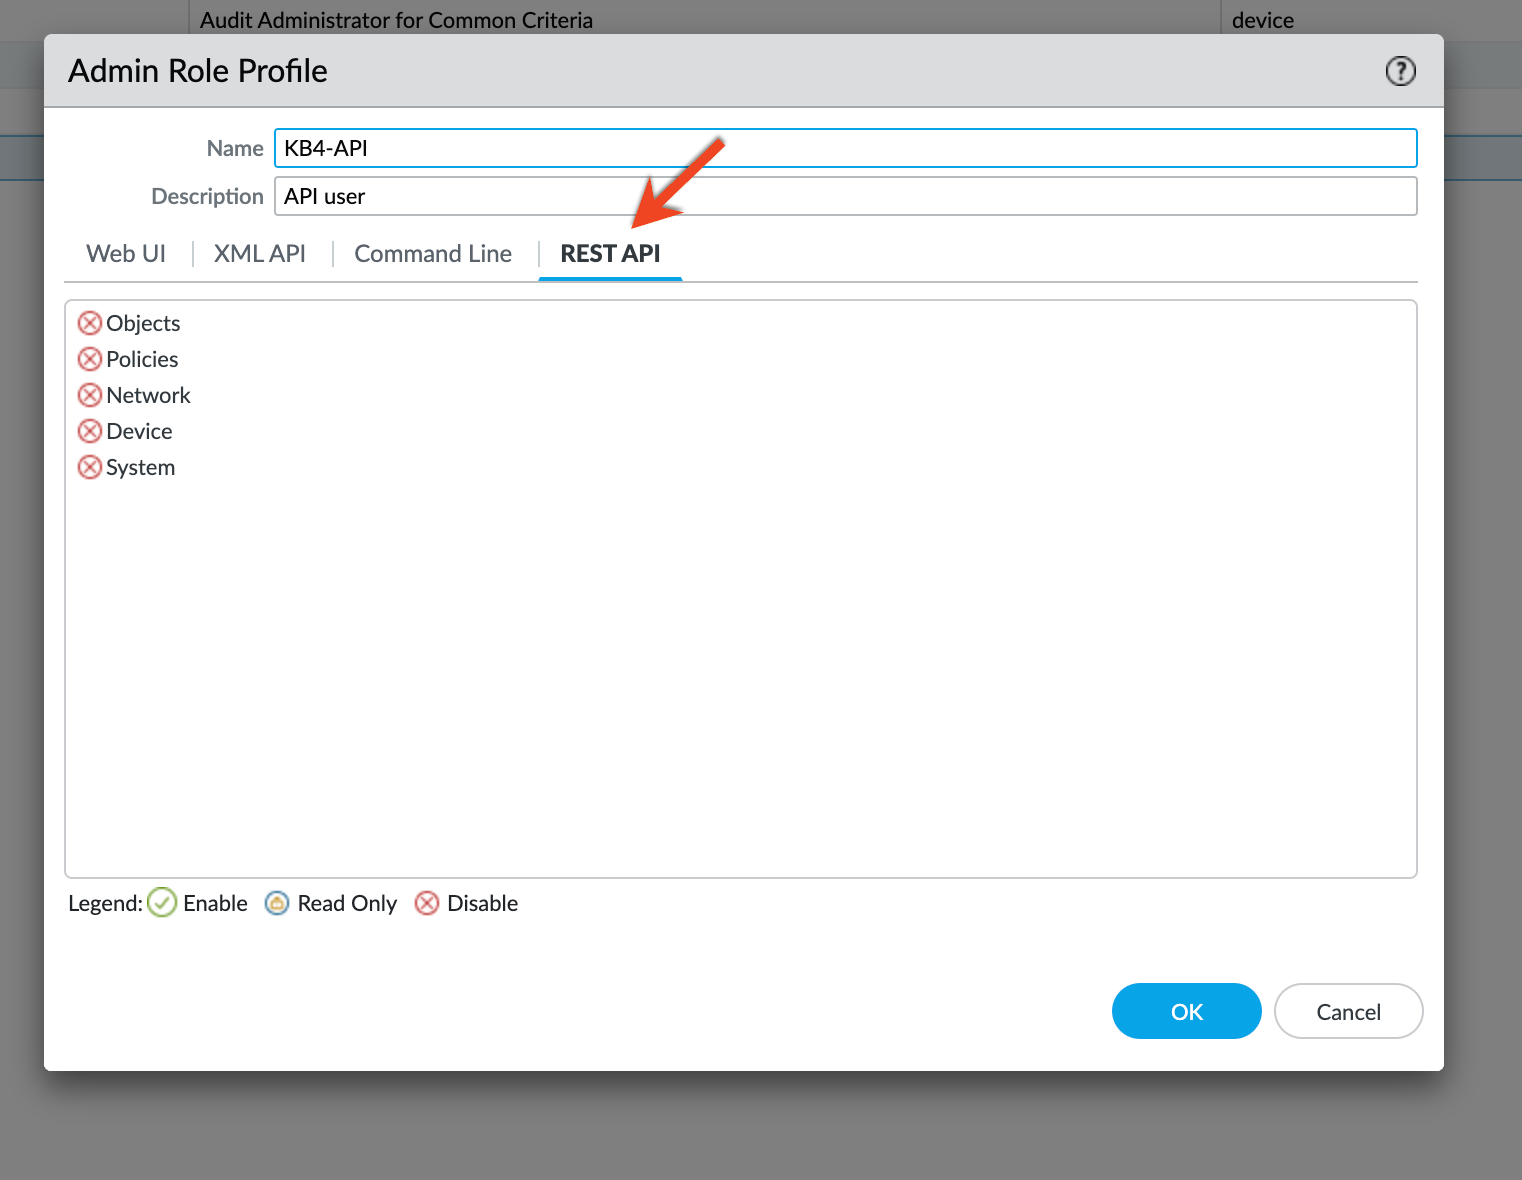
In the Name and Description fields, enter your desired name and description.

-
In the Web UI and REST API tabs, disable all access options.
-
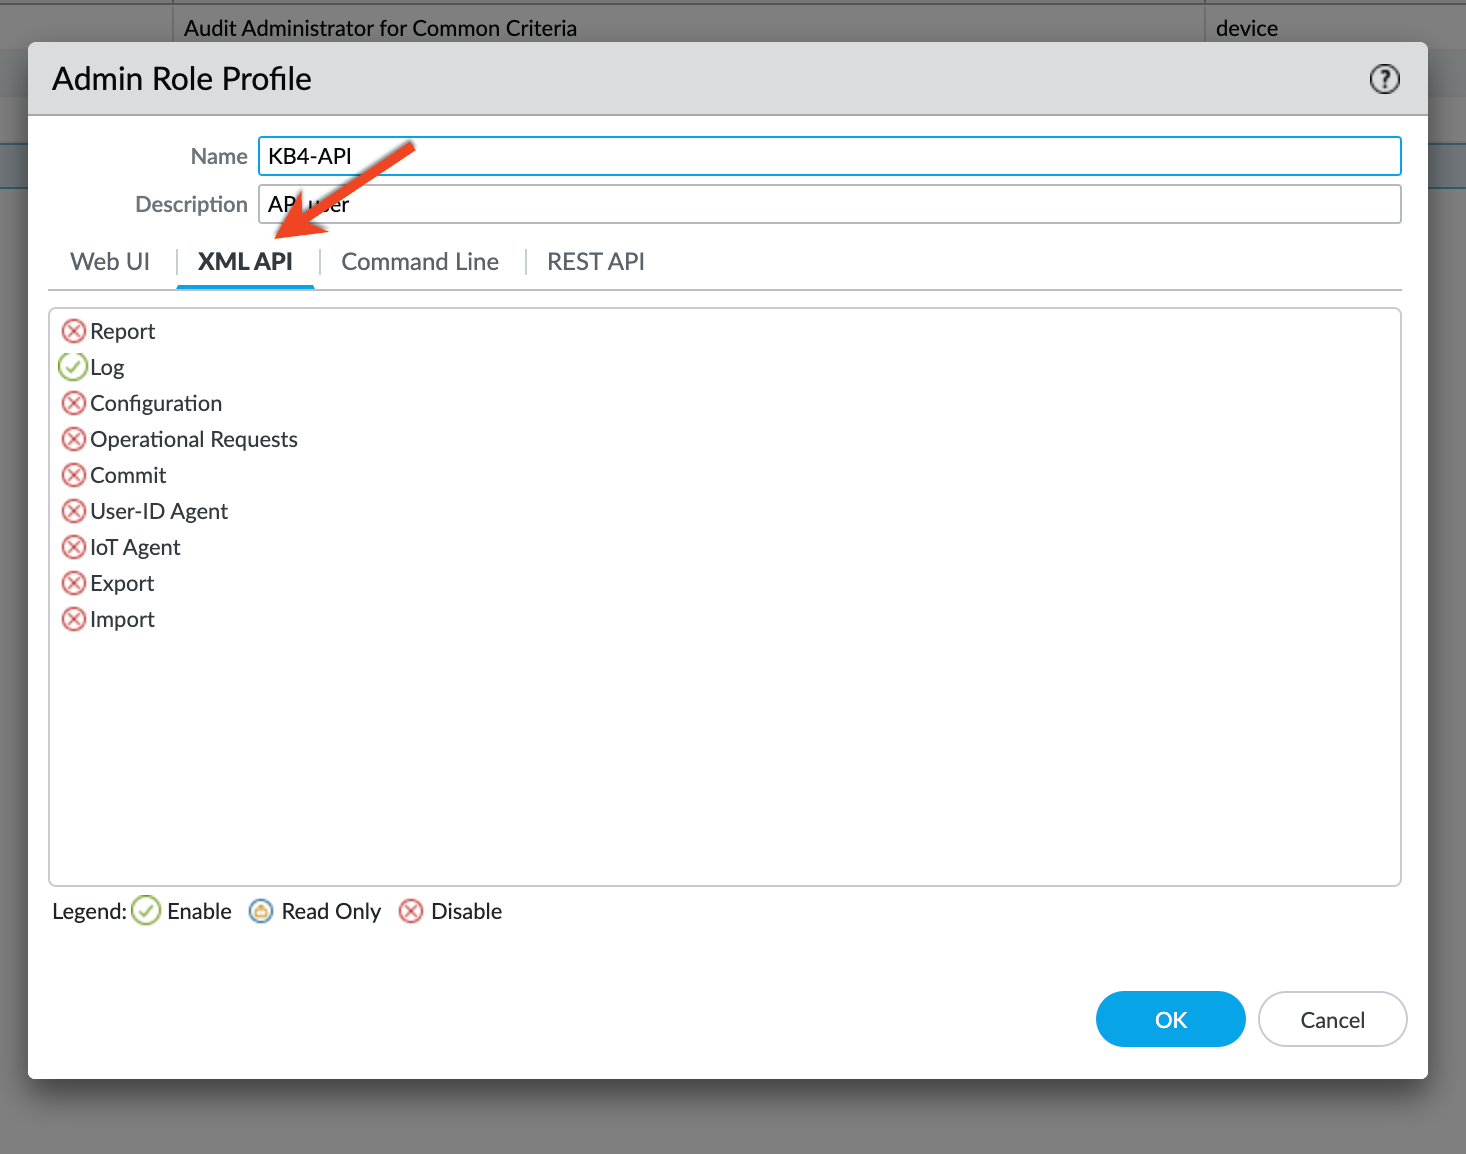
In the XML API tab, enable Log access.
- In the bottom-right corner, select OK to save your changes.
Setting Up Your Admin Account
To set up your admin account, follow the steps below:
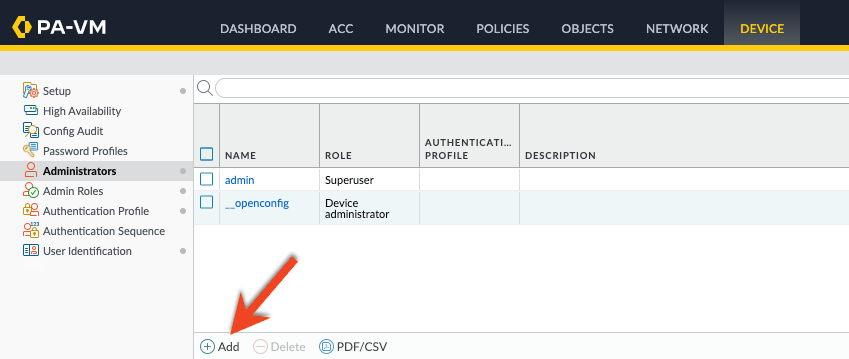
- Navigate to the Device tab > Administrators subtab.
-
Select + Add near the bottom of the page. An Administrator pop-up window will display.
-
To fill in the required Administrator information, see the screenshot and list below:
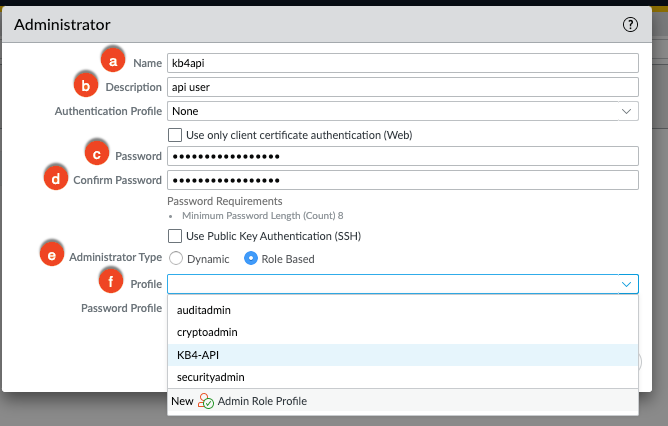
- Name: Enter your desired name.
- Description: Enter your desired description.
- Password: Enter your desired password.
- Password: Enter your desired password again to verify.
- Administrator Type: Select Role Based.
- Profile: Select the drop-down menu and choose the name of the admin role you created earlier in the Setting Up Your Admin Role Profile article section.
- In the bottom-right corner, select OK to save your changes.
Committing Your Changes
To commit your changes, follow the steps below:
-
In the top-right corner of the page, select Commit. A Commit pop-up window will display.

-
At the bottom of the window, select Commit to start committing your changes.
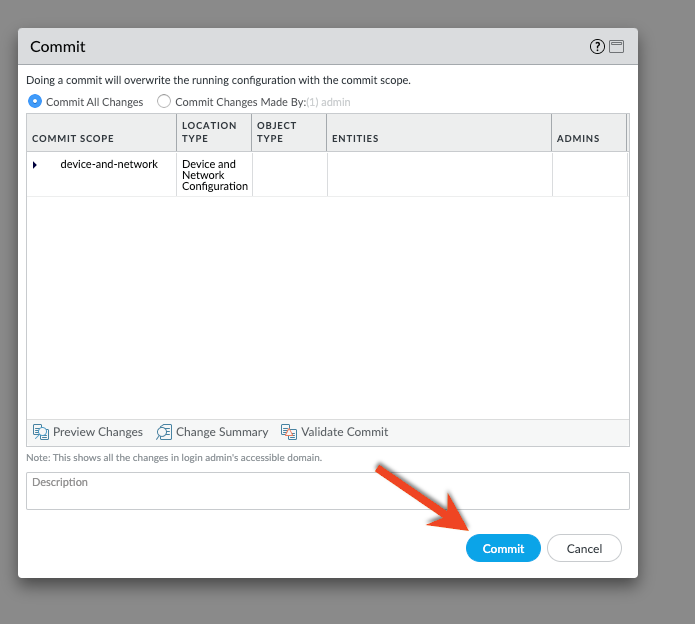
- Wait until the Progress bar reaches 100% to indicate completion. “Configuration committed successfully” will display next to Details, and you can then Close the window.
Finding Your Firewall Domain
Once your changes are committed, you can find your Firewall Domain name in the URL of the webpage. An example would be: https://[your firewall domain name]/

Configuring the API Integration in KSAT
To configure the API integration, follow the steps below:
- Log in to your KSAT console.
- Navigate to SecurityCoach > Setup > Security Coach Vendor Integrations.
-
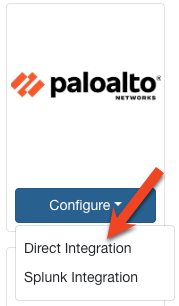
Locate the Palo Alto vendor tile, select Configure, then select Direct Integration. This action will open the Palo Alto Next-Generation Firewall (NGFW) integration page.
-
To complete the integration, see the screenshot below and fill in the required information:
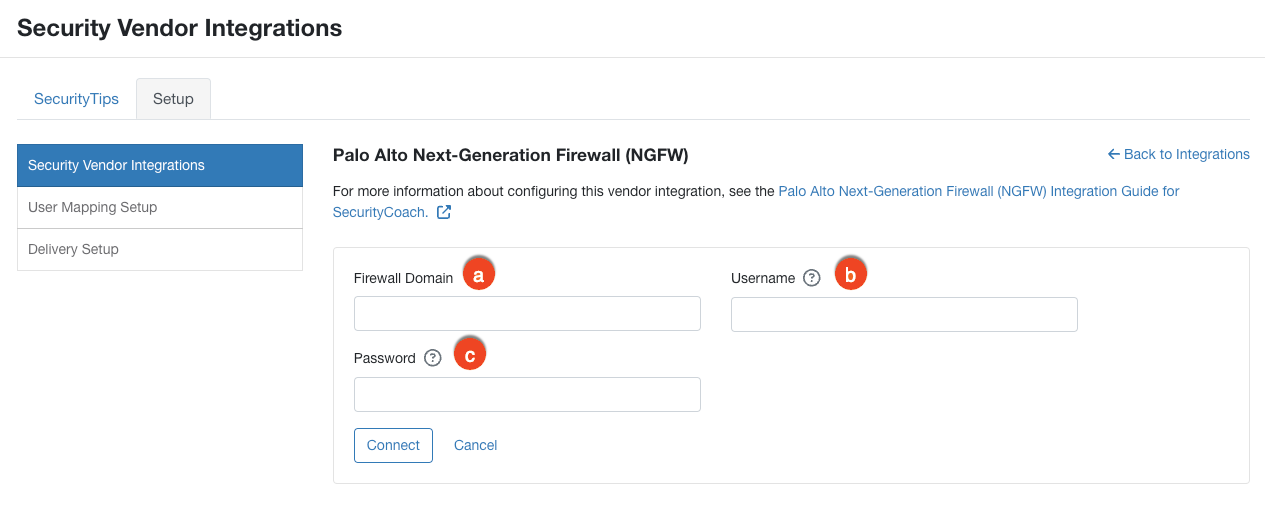
- Firewall Domain: Copy and paste your Firewall Domain from the Finding Your Firewall Domain article section.
- Username: Enter the admin name that you used in the Setting Up Your Admin Account article section.
- Password: Enter the admin password that you used in the Setting Up Your Admin Account article section.
- Select Connect to complete the integration.
Deleting the API Integration in KSAT
If you want to delete the Palo Alto NGFW integration from SecurityCoach, follow the steps below:
- Log in to your KSAT console.
- Navigate to SecurityCoach > Setup > Security Vendor Integrations.
- Locate the Palo Alto vendor tile and select Edit.
- Select Delete Integration near the bottom of the page. A new pop-up window will open.
- If you are sure you want to delete the integration, click Confirm.
Webhook Integration
To set up a webhook integration with Palo Alto NGFW, you’ll need to save your organization key, then set up an HTTP profile, log forwarding, and a security policy. For more information, see the sections below.
Saving Your Organization Key
To save your organization key, follow the steps below:
- Log in to your KSAT console.
- Navigate to SecurityCoach > Setup > Security Vendor Integrations.
-
Locate the Palo Alto NGFW tile and select Configure > Direct Integration.
-
Select Webhook.
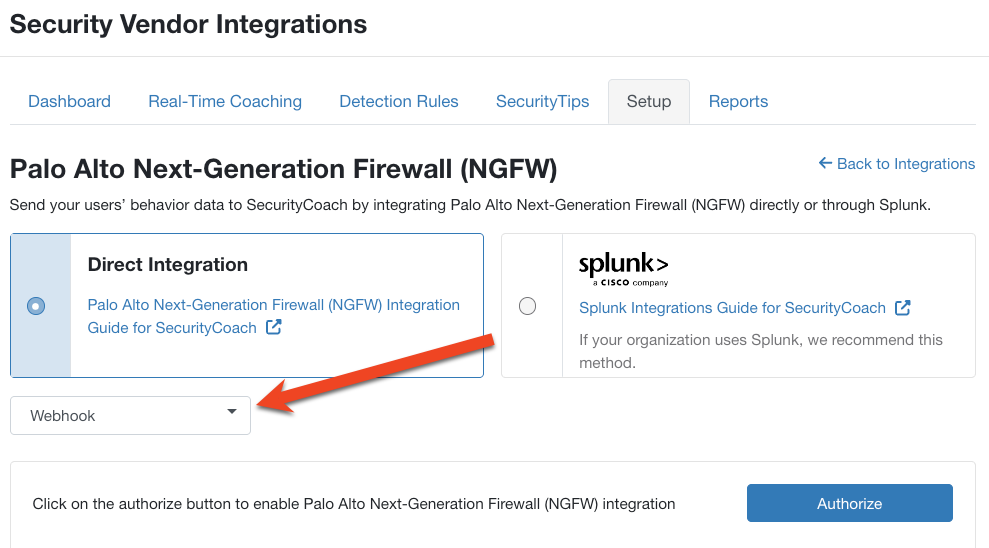
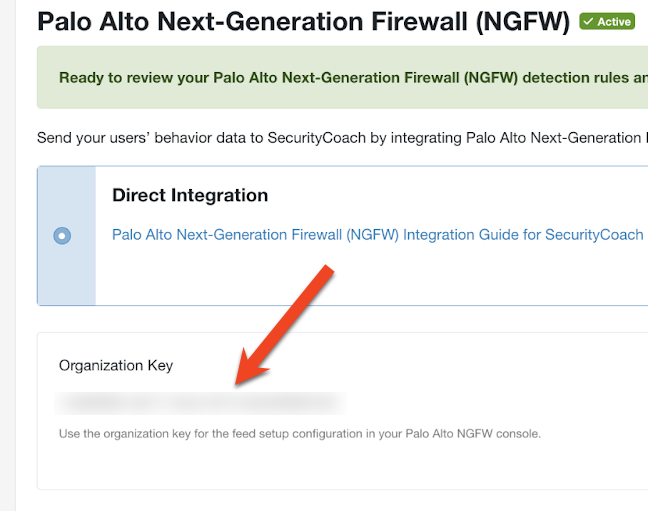
- Select Authorize to authorize the webhook integration. Your organization key will then display on the page.
-
Copy your Organization Key and save it somewhere that you can easily access. You’ll need this key to set up your HTTP profile.
Setting Up Your HTTP Profile
To set up your HTTP profile, follow the steps below:
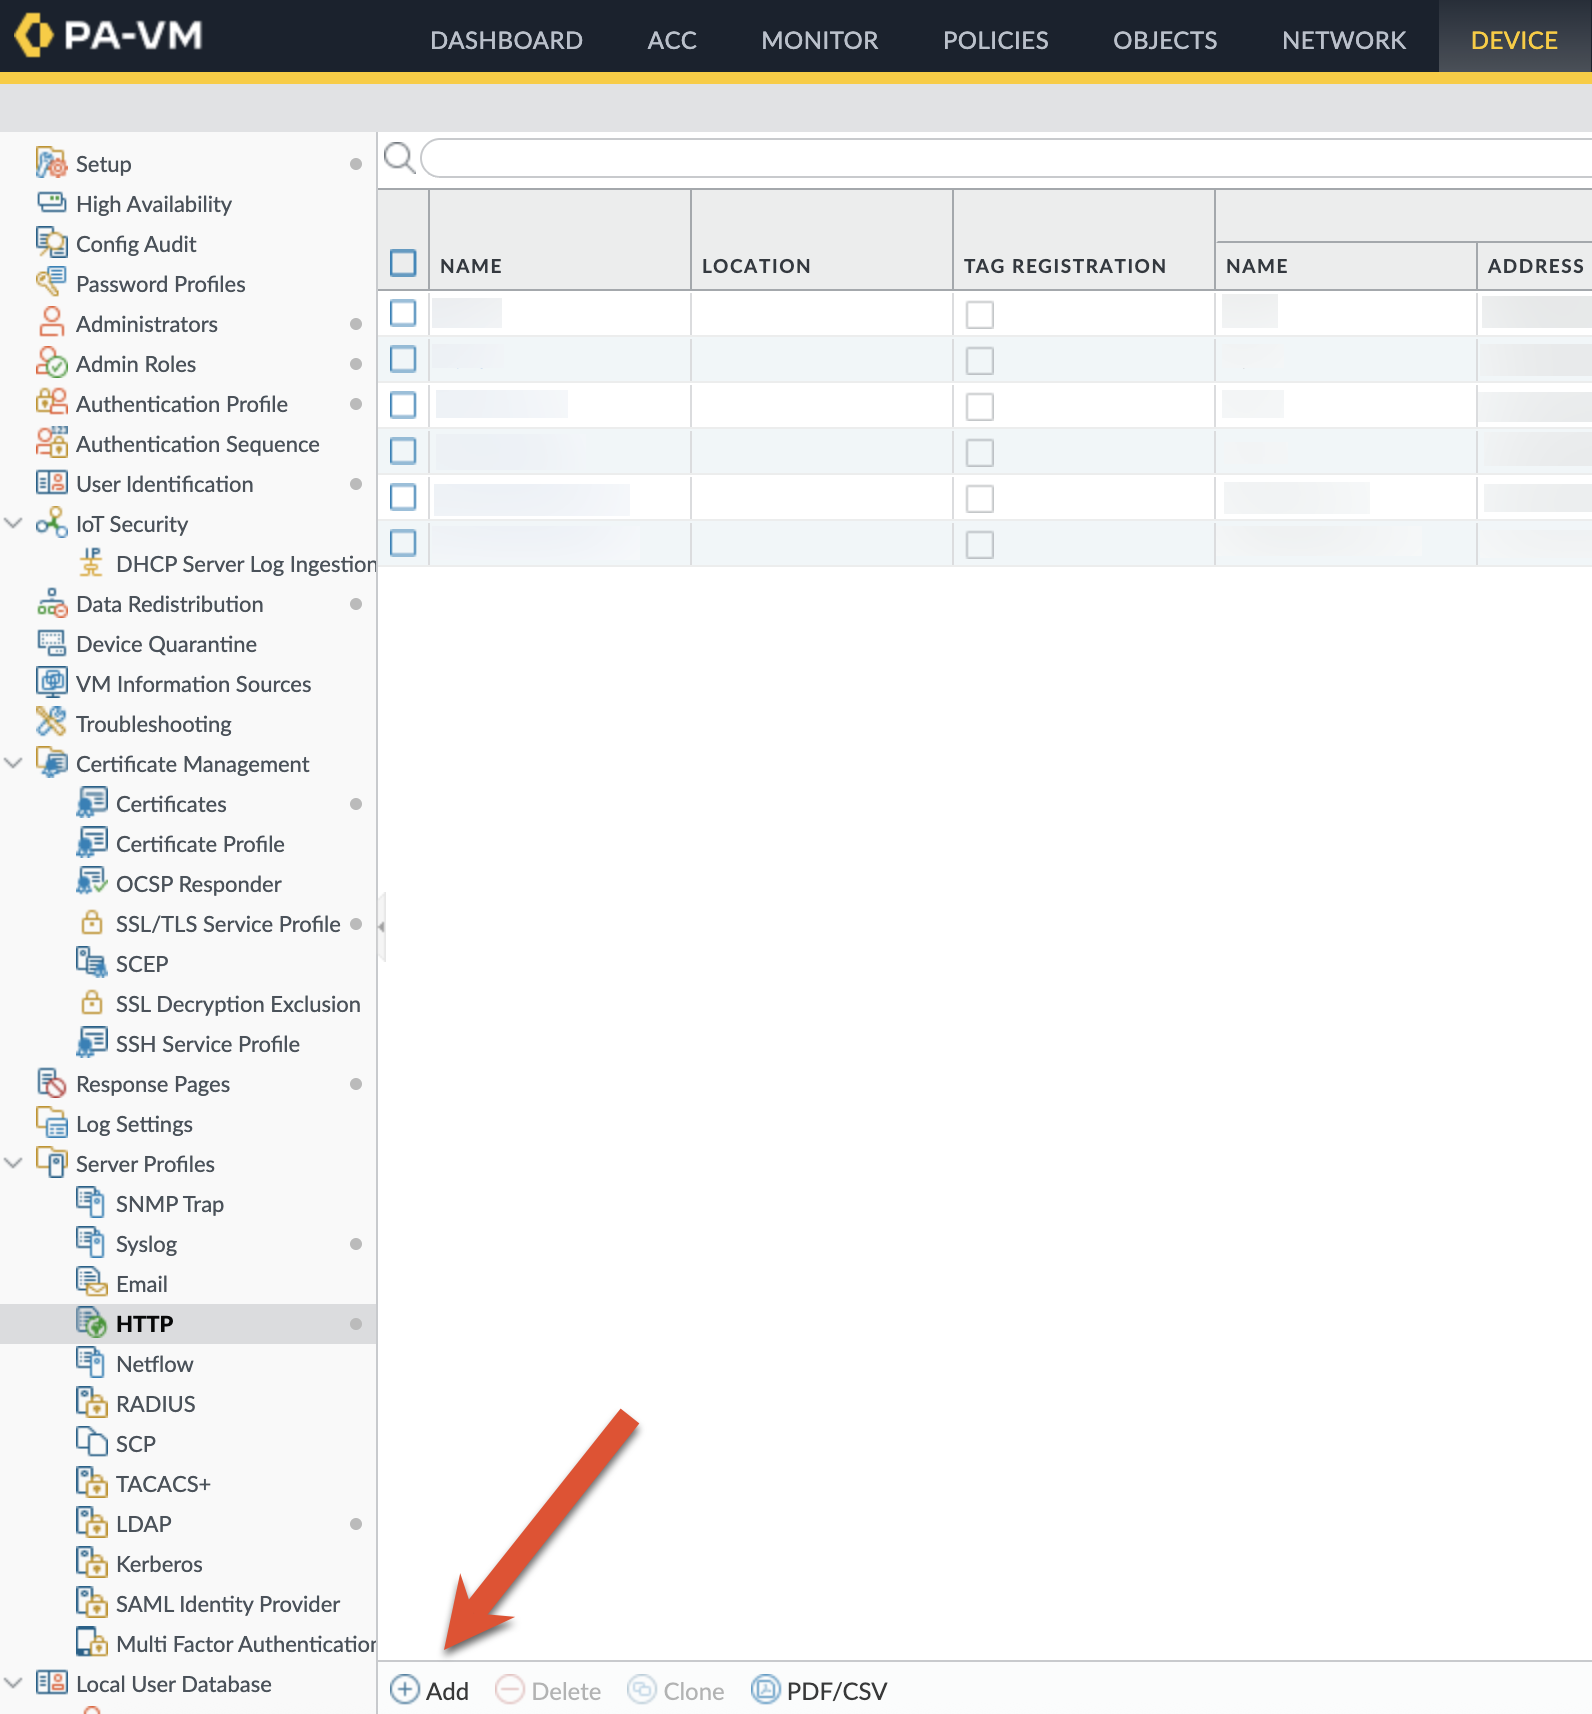
- Log in to your Palo Alto NGFW console.
- Navigate to the Device tab > Server Profiles subtab > HTTP.
-
Select + Add near the bottom of the screen. An HTTP Server Profile window will open.
-
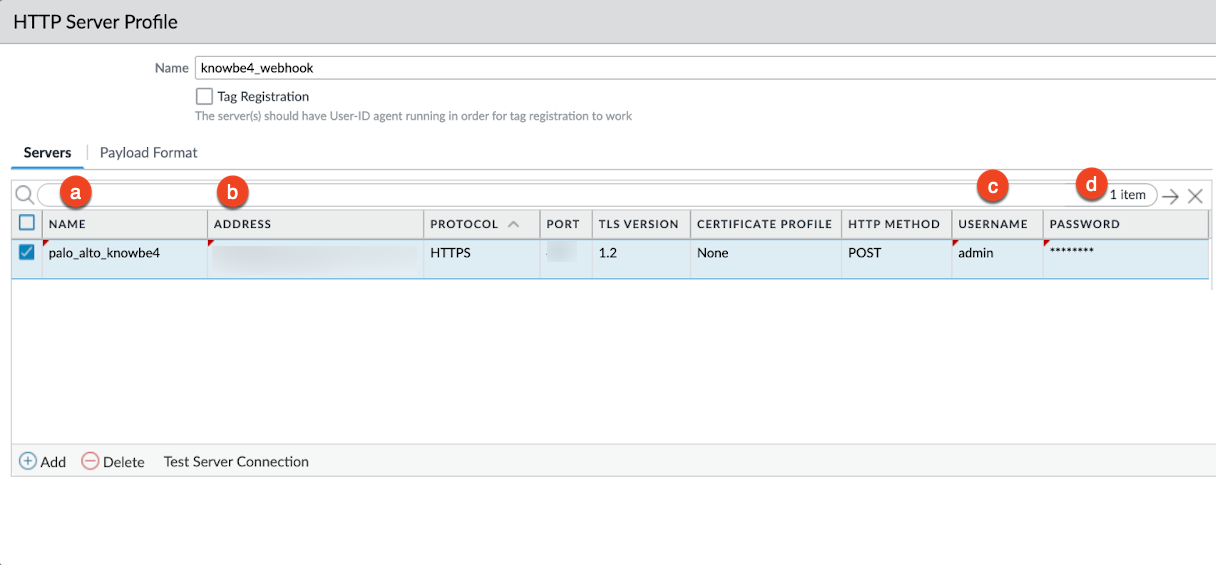
In the Servers subtab, select + Add. To fill out the required server information, see the screenshot and list below:
-
Name: Enter your preferred name.
Note:Save this name to a place you can easily access. You’ll need this name later in the Setting Up Log Forwarding article section. -
Address: Enter the webhook URL for your KnowBe4 instance. To find your webhook URL, see the table below:
KnowBe4 Instance Webhook URL KnowBe4 Instance Webhook URL United States paloalto.vendor.training.knowbe4.com European Union paloalto.vendor.eu.knowbe4.com Canada paloalto.vendor.ca.knowbe4.com United Kingdom paloalto.vendor.uk.knowbe4.com Germany paloalto.vendor.de.knowbe4.com - Username: Enter your preferred username.
- Password: Enter your preferred password.
-
- Select the Payload Format subtab.
- In the Log Type column, select URL. A Payload Format window will open.
-
To fill out the required information in the Payload Format window, see the screenshot and list below:

- Pre-defined Formats: Select ServiceNow Incident from the drop-down menu.
- Payload: Between the <org_key> brackets, enter your organization key. An example would be: <org_key>yourorgkeyhere</org_key>
- To save your changes, select OK.
Setting Up Log Forwarding
To set up log forwarding, follow the steps below:
- Log in to your Palo Alto NGFW console.
- Navigate to the Objects tab > Log Forwarding subtab.
-
Select + Add. A Log Forwarding Profile window will open.
-
To fill out the required information in the Log Forwarding Profile window, see the screenshot and list below:
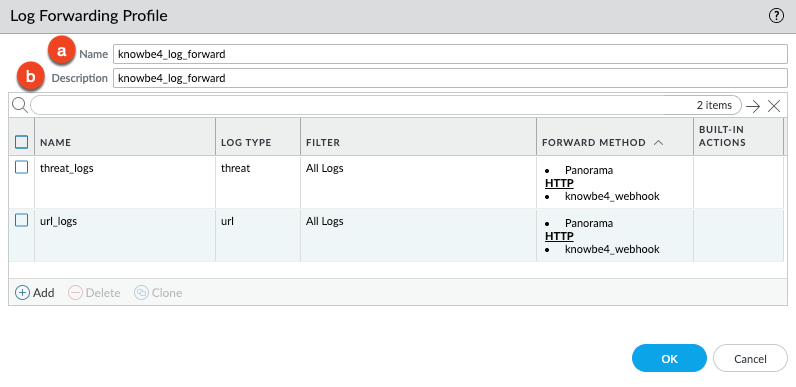
- Name: Enter your preferred name.
- Description: Enter your preferred description.
- You’ll now need to add two match lists to your Log Forwarding Profile. To set these up, select + Add. A Log Forwarding Profile Match List window will display.
-
To configure your first match list, see the screenshot and list below:
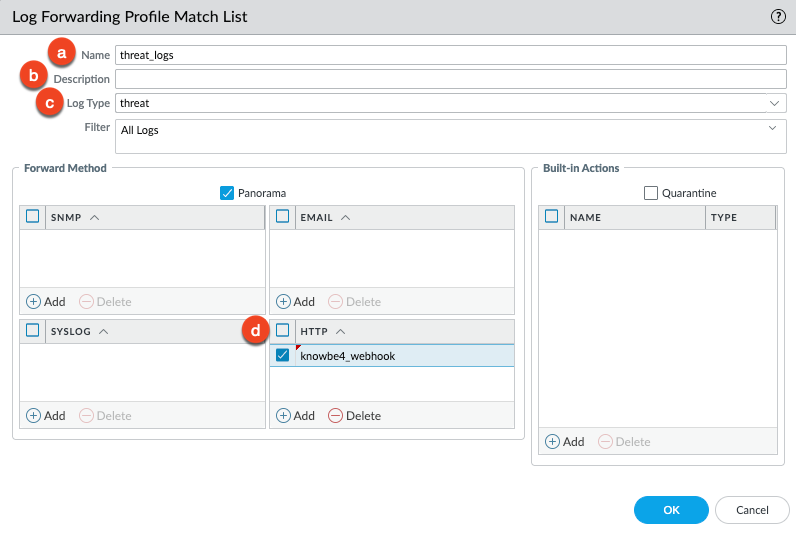
- Name: Enter your preferred name. We recommend “threat_logs”.
- Description: Enter your preferred description.
- Log Type: Select threat from the drop-down menu.
- HTTP: Select + Add and then choose the HTTP profile you set up earlier in the Setting Up Your HTTP Profile article section.
- To save your first match list, select OK. You’ll be returned to the Log Forwarding Profile window.
-
To configure your second match list, select + Add again, then see the screenshot and list below:
- Name: Enter your preferred name. We recommend “url_logs”.
- Description: Enter your preferred description.
- Log Type: Select url from the drop-down menu.
- HTTP: Select + Add and then choose the HTTP profile you set up earlier in the Setting Up Your HTTP Profile article section.
- To save your second match list, select OK.
Setting Up Your Security Policy
To set up your security policy, follow the steps below:
- Log in to your Palo Alto NGFW console.
- Navigate to the Policies tab > Security subtab.
-
At the bottom of your screen, select + Add. A Security Policy Rule window will open.
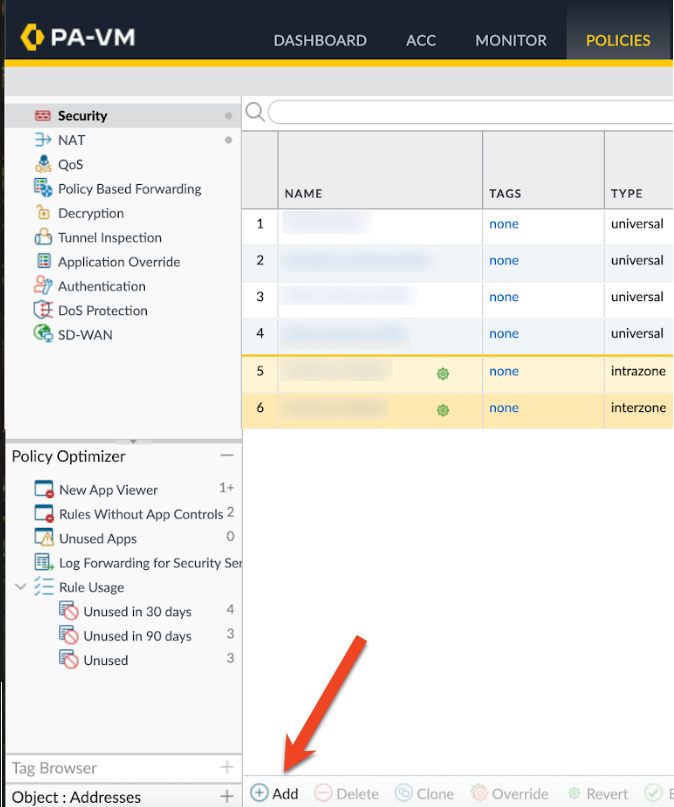
- In the General subtab > Name field, enter your preferred name for the policy.
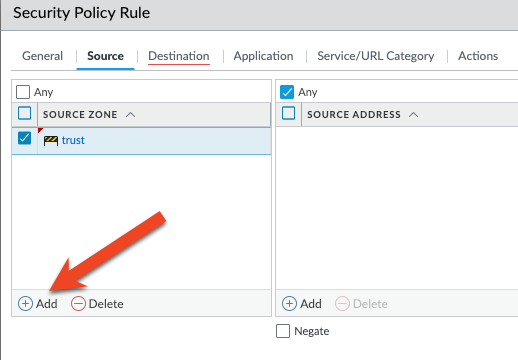
-
In the Source subtab > Source Zone section, select + Add and then choose trust.
-
In the Destination subtab, use the dropdown menu to select any.
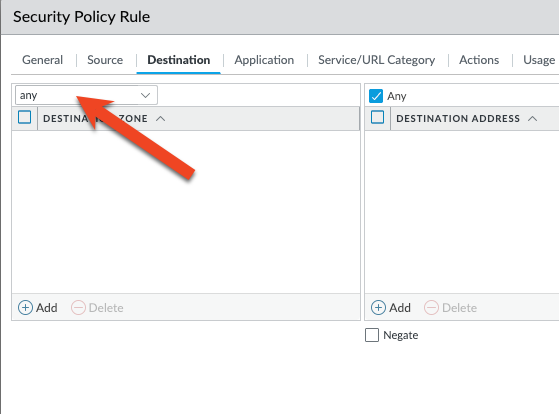
-
In the Service/URL Category subtab, use the dropdown menu to select any.

-
To configure the Actions subtab, see the screenshot and list below:
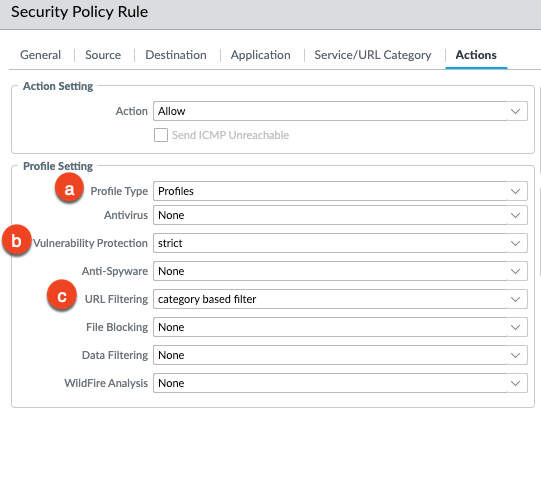
- Profile Type: Select Profiles.
- Vulnerability Protection: Select strict.
- URL Filtering: Select category based filter.
- To save your changes, select OK.
- In the top-right corner of your screen, select Commit.
- Select Commit again to commit your changes.
Once the changes are committed, your webhook integration will become active.