In this article, you will learn how to integrate Gmail, Google Drive, and Google IAM with SecurityCoach. Once you set up this integration, data provided by Google will be available under the SecurityCoach tab of your KSAT console. This data can be viewed in SecurityCoach reports and used to create detection rules for real-time coaching campaigns.
For general information about SecurityCoach, see our SecurityCoach Product Manual.
Set Up the Integration in Your Google Cloud Platform
Before you can set up the SecurityCoach integration in your KSAT console, you'll need to set up the integration in your Google Cloud platform by creating a project and a service account. You will also need to enable APIs for your project and obtain a JSON file and a unique ID from your service account.
For more information, see the article subsections below.
Create a Project
To create a project in your Google Cloud platform, follow the steps below:
- Log in to your Google Cloud platform. If this is your first time logging in to the Google Cloud platform, a Google Cloud pop-up window will appear. Review the terms of service. If you agree to the terms of service, enable the check box and select Agree and continue.

- Navigate to the Google Cloud search bar near the top of the page and search for “IAM & Admin Create a Project”. Select Create a Project from the drop-down menu below the search bar.

- Enter “KB4VendorIntegration” in the Project name field. The Organization and Location fields will automatically fill.

- Select Create.
Enable APIs for Your Project
To enable APIs for the project you created in the Create a Project section above, follow the steps below:
- Navigate to https://console.cloud.google.com.
- At the top of your Google Cloud platform, click the drop-down arrow and select KB4VendorIntegration as the current project.
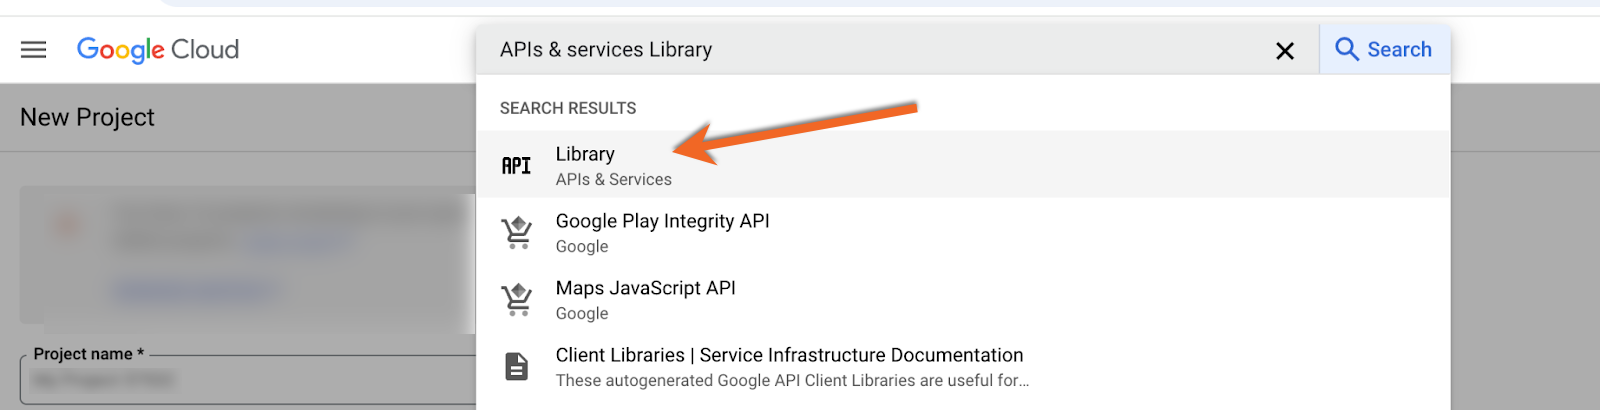
- Navigate to the Google Cloud search bar near the top of the page and search for “APIs & Services Library”. Click Library from the drop-down menu below the search bar.
- Use the API Library search bar to search for Enter “Admin SDK API”. Click Admin SDK API from the drop-down menu below the search bar.

- Click Enable.

Create a Service Account
To create a service account in your Google Cloud platform, follow the steps below:
- At the top of your Google Cloud platform, click the drop-down arrow and select KB4VendorIntegration as the current project.
- Navigate to the Google Cloud search bar near the top of the page and search for “IAM & Admin Service Accounts”. Click Service Accounts from the drop-down menu below the search bar.

- In the menu bar at the top of the page, click + Create Service Account.

- Enter a name for your new service account in the Service account name field. We recommend “KB4MyOrganizationGSuiteServiceAcc”, with “MyOrganization” being your organization’s name.
- For the Service account description field, enter “This is the service account for integration with KnowBe4”
- Click Create And Continue.

- Click the Role drop-down menu and select Basic > Viewer.

- Click the white Continue button.
- Skip the Grant users access to this service account step and click the blue Done button.

Obtain Your Service Account JSON File and Unique ID
After you have created your service account, you will need to obtain your service account JSON file and unique ID. You will need both of these items later in the integration setup process.
To obtain your JSON file and unique ID, follow the steps below:
- At the top of your Google Cloud platform, click the drop-down arrow and select KB4VendorIntegration as the current project.
- Navigate to the Google Cloud search bar near the top of the page and search for “IAM & Admin Service Account”. Click Service Accounts from the drop-down menu below the search bar.
- Click the service account’s name in the Email column. When you click, the service account’s Details page will open. This page lists the Unique ID.


- Copy the Unique ID and save it to a place that you can easily access later. You will need it to complete the steps in the Assign Domain-Wide Delegation and Scopes section of this article.
- To obtain the JSON file, click Keys in the top menu bar.
- Click Add Key drop-down menu and select Create new key from the drop-down menu.

- In the pop-up window that opens, select JSON for the Key type and then click Create. The JSON file will automatically download to your device, and the private key will save in the service account's Keys tab.

Assign Domain-Wide Delegation and Scopes
After you have set up the integration in your Google Cloud Platform and your KSAT console, you can assign domain-wide delegation and scopes.
To assign domain-wide delegation and scopes, follow the steps below:
- Navigate to admin.google.com and enter your administrator login credentials.
- Navigate to the Google Admin search bar near the top of the page and search for “Security Access and data control API controls”. Click API controls from the drop-down menu below the search bar.
- Scroll down in the sidebar on the right side of the page until you see the Domain wide delegation section. In this section, click Manage Domain Wide Delegation.

- Click Add new. When you click this button, the Add a new client window will open.
- In the Client ID field, enter your service account ID. This is the ID from Step 3 in the Obtain Your Service Account JSON File and Unique ID section of this article.
- In the OAuth scopes (comma-delimited) field, enter “https://www.googleapis.com/auth/admin.reports.audit.readonly”.
- Once you have entered your service account ID and scope, click Authorize.

Set Up the Integration in Your KSAT Console
Once you've set up the integration in your Google Cloud platform, you can set up the integration in your KSAT console.
To set up the integration in your KSAT console, follow the steps below:
- Log in to your KSAT console.
- Navigate to SecurityCoach > Setup.
- In the Available Integrations section, locate the card for the Google integration you want to set up.
- At the bottom of the card, click Configure.

- To enter the required Google Workspace information, see the screenshot and list below:

- In the Admin Email field, enter your Google Workspace admin email address.
- In the Credentials File field, click Browse and select the JSON file you downloaded in the Obtain Your Service Account JSON File and Unique ID section of this article.
- Click Connect
Map Your Users
After you’ve finished configuring your Google integration, you can map your users either through mapping rules (recommended) or through a CSV file upload. For more information about user mapping, see our Map Users in SecurityCoach article.

Once you’ve successfully authorized this integration, you can manage detection rules for your Google integration on the Detection Rules subtab of SecurityCoach. For a full list of available system detection rules for Gmail, Google Drive, and Google IAM, see our System Detection Rules by Vendor article.