In this article, you'll learn how to integrate FortiGate Cloud with Real-Time Coaching. Once the integration is complete, data from FortiGate Cloud will be available under the Coaching tab in your KnowBe4 Security Awareness Training (SAT) console. This data can be viewed in Real-Time Coaching reports and used to create Real-Time Coaching categories. For general information about Real-Time Coaching, see our product overview.
Prerequisites
Before you integrate FortiGate Cloud with Real-Time Coaching, make sure you meet the following prerequisites:
- You have access to a FortiGate Cloud admin account.
- FortiGate configuration management is enabled.
- The FortiGate management tunnel is online.
- Your FortiGate device supports disk logging and has it enabled. To verify this, see the Verify Disk Logging subsection below.
- Your FortiGate Outbound traffic policy contains your firewall user group. To verify this, see the Verify the Outbound Traffic User Group subsection below.
Verify Disk Logging
For some low-end FortiGate devices, disk logging may be unavailable. To verify if your FortiGate device has disk logging enabled, follow the steps below:
- Log in to your FortiGate Cloud Virtual Machine console.
- Navigate to Log & Report > Log Settings > Local Logs.
-
Verify that the Disk logging setting has Enable selected.
Important:If no Disk logging option is available, your device might not support disk logging. - Select Apply at the bottom of the screen.
For more information, see Fortinet's article on disk logging Fortinet's article on disk logging (link opens in new window).
Verify the Outbound Traffic User Group
To verify or add a user group to FortiGate's Outbound Traffic policy, follow the steps below:
- Log in to your FortiGate Cloud Virtual Machine console.
- Navigate to Policy & Objects > Firewall Policy.
-
Select Outbound traffic.
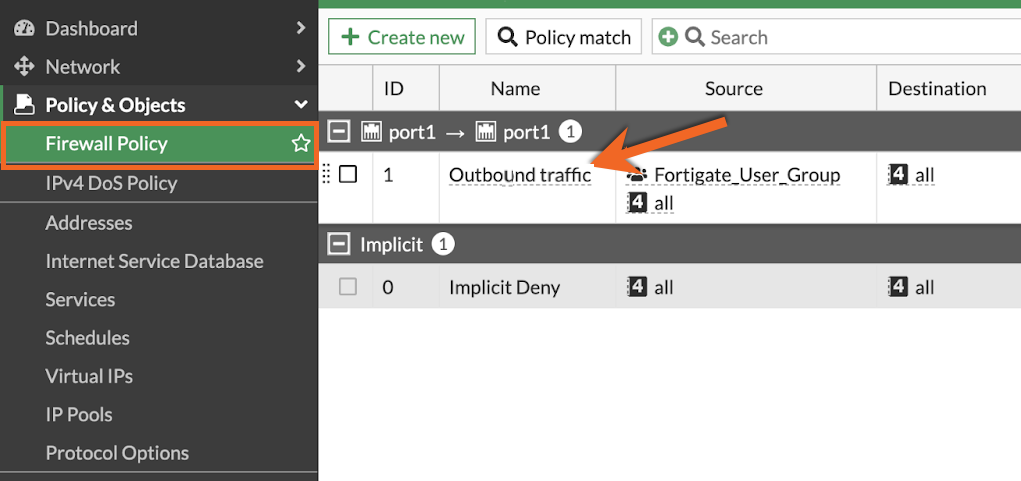
-
In the Source field, verify that your firewall user group is selected. If your group isn't selected, add it to the field.

- Select OK.
Set Up the Integration in FortiGate Cloud
To set up this integration in your FortiGate Cloud account, you'll need to create a permission profile, add an API user, and identify your API domain by following the subsections below.
Create a Permission Profile
To set up the integration in FortiGate Cloud, you'll first need to create a permission profile by following the steps below:
- Log in to your FortiCloud IAM account.
- From the left sidebar, select Permission Profiles. A Permission Profiles page will display.
- Select Add New. A New Portal Permission Profile page will display.
- In the Basic Info section, enter your Permission Profile Name and Status fields.
- Select Add Portal. An Add These Portals To My Account pop-up window will display.
- Select FortiGate Cloud, then select Add.
- In the Permission Profile section, select Read Only for all the permissions.
- In the top-right corner of the page, select Submit.
Add an API User
After you've created a permission profile, you'll then need to use that profile to create an API user by following the steps below:
- From the left sidebar, select Users. A Users page will display.
- Select Add New, then from the drop-down menu, select API User. An Add API User page will display.
- In the Permission Profile section, select the permission profile you created earlier. Then, select Next.
-
Verify the API User Details information is correct, then select Next again.

- Select Download Credentials. A Security Check window will display.
- In the Password field, enter a secure password to encrypt your file. Then, select Proceed.
- Open the file you just downloaded, then enter the password you just created.
- The text file will contain an apiId and a password. Copy the ID and password and save them to a secure location. These credentials will be needed later in the setup.
Identify Your API Domain
Finally, you'll need to identify and save your API domain for the correct region by following the steps below:
- Log in to your FortiGate Cloud portal.
-
On the top-right corner of the page, locate your Region code.

Then, use the table below to identify the associated API domain name. You'll need this domain to set up the integration in Real-Time Coaching.
| Region Name | API Domain |
|---|---|
| Global | api.fortigate.forticloud.com |
| US | usapi.fortigate.forticloud.com |
| EU | euapi.fortigate.forticloud.com |
| Japan | jpapi.fortigate.forticloud.com |
Set Up the Integration in Real-Time Coaching
To register FortiGate Cloud with Real-Time Coaching, follow the steps below:
- Log in to your KnowBe4 SAT console.
- Navigate to Coaching > Setup > Security Vendor Integrations.
- Locate the FortiGate Cloud vendor tile and select Configure.
- Enter the API Domain, API ID, and API Password that you saved earlier.
- Select Connect.
Map Your Users
FortiGate Cloud's events are automatically mapped to users based on their email addresses.
Manage Detection Rules
Once you've successfully authorized this integration, you can also manage FortiGate Cloud detection rules from Coaching > Detection Rules. For a full list of available system detection rules for this vendor, see our System Detection Rules by Vendor article.
Delete the Integration in Real-Time Coaching
If you want to delete the FortiGate Cloud integration from Real-Time Coaching, follow these steps:
- Log in to your KnowBe4 SAT console.
- Navigate to Coaching > Setup > Security Vendor Integrations.
- Locate the FortiGate Cloud vendor tile and select Edit.
- Select Delete Integration near the bottom of the page.