Phishing campaigns help your organization identify users who are vulnerable to phishing attacks. With phishing campaigns, you can train your users to reduce the chance of them falling for phishing attacks. To learn more about creating phishing campaigns, follow the steps below or watch our Creating Phishing Campaigns video.
Create a Phishing Campaign
To create a phishing campaign, go to your KSAT console and navigate to Phishing > +Create Phishing Campaign. On the New Phishing Campaign page, you can customize your phishing campaign.
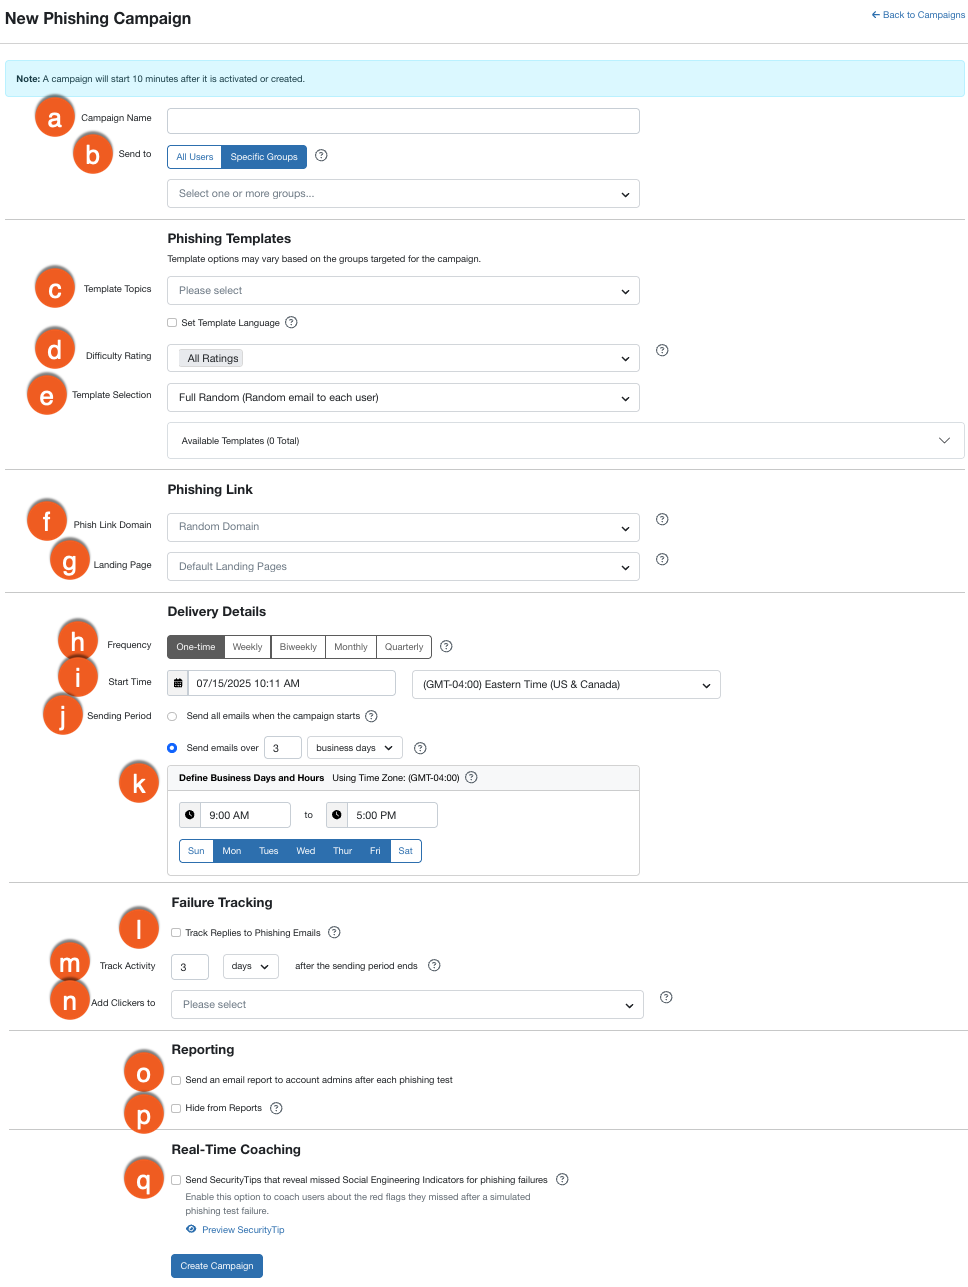
- Campaign Name: Enter a name for your phishing campaign here. This field is required.
- Send to: Select either All Users or Specific Groups to receive your phishing campaign. If you choose Specific Groups, you must select a group from the drop-down menu. This field is required.
-
Template Topics: Select the phishing template topics you want to use. You can select one or more phishing template topics. By default, no template topics are selected, and your templates will be random. This field is required.
-
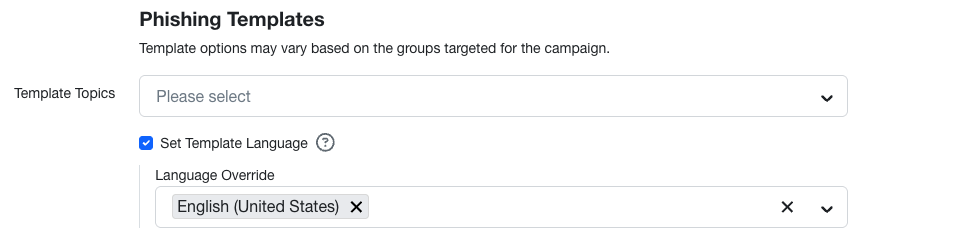
Set Template Language: Use this check box to select the languages you want to use in this phishing campaign. If multiple languages are selected, users will receive templates in any of the selected languages. This setting will override the account’s default phishing language and the language set in the user’s profile. When this check box is selected, the Language Override drop-down menu will appear. You can select a maximum of five languages.
-
- Difficulty Rating: Select the difficulty rating for your phishing campaign from the drop-down menu. For more information about difficulty levels, see our Template Difficulty Ratings Overview article.
-
Template Selection: Select what type of template you would like to use. You can select a specific template or use one of our Automated Template Selections: AIDA Selected, Full Random, or Random. For more information, see our Automated Template Selection article. If you select to use a specific template, a Specific Template drop-down menu will appear.
Tip:If you’re interested in further customizing your phishing templates, see our Hide Phishing Templates or Categories and KnowBe4 Console Account Settings: Phishing articles. - Phish Link Domain: Select the domain you would like to display for phishing links in your campaign from the drop-down menu. Each domain is owned by KnowBe4 and is only used for PSTs. By default, this field will select a random domain. For more information on available domains or how to hide a domain from use, see our Manage Phish Link Domains article.
- Landing Page: Select the landing page you want to use for your phishing campaign from the drop-down menu. Landing pages are what your users see when they fail a phishing test. If you customized a landing page for your campaign, it will be automatically selected in this field. For more information about landing pages, see our Change the Landing Page on Your Phishing Campaign and Create and Edit Email Templates and Landing Pages articles.
- Frequency: Select how often you would like to send Phishing Security Tests (PSTs) for this campaign. If you select One-time, this campaign will send one PST to each user and then finish. We recommend selecting either Bi-weekly or Monthly.
- Start Time: Set the date, time, and time zone you would like your phishing campaign to start. Your default time zone is the one set in your Account Settings.
-
Sending Period: Select when to start sending PSTs. You can choose to send all of the emails at once or over a period of time.
- Send all emails when the campaign starts: Emails will begin sending as soon as the campaign begins. The timing of sending and delivery will vary, depending on the number of users in the campaign. In most campaigns, all emails will be sent within an hour after the campaign starts. Users will not receive the email at the same time, but they will receive it on the same day.
-
Send emails over…: Selecting this option will send phishing tests to the users at random, during the time period selected. You can enter a number between one and six and pick business days, weeks, or months. For more information about sending and tracking periods, see our Monitor and Review Phishing Campaigns article.
Note:Weeks max out at four. For campaigns longer than four weeks, select months (up to six months).
-
Define Business Days and Hours: By default, your campaign will only send emails during the business hours set in your Account Settings. You can change the hours your emails are sent by entering a start and end time in this field. You can also choose what days you would like emails to be sent by selecting the date check boxes.
Note:If the Auto-Adjust Time Zone setting is enabled, phishing emails can be sent based on each user's local time zone, so they arrive during their normal working hours. The text Using Each Users' Time Zone will also appear near the text Define Business Days and Hours. For more information on how to manage your users’ time zones, see our Manage Your Account’s Time Zones, Business Days, and Business Hours article. - Track Replies to Phishing Emails: Select this check box to track your user’s replies to phishing emails. For more information about tracking replies, see our Reply-To Phishing Guide.
-
Track Activity: Select how long you would like to track phishing failures after the sending period ends. You can enter a number between one and six and choose from either days, weeks, or months. Here, days refer to calendar days rather than business days. A campaign will track activity until the campaign’s end date. The campaign’s end date is a combination of three values: the date of the first email, the sending duration, and the tracking duration.
- Date of the first email: This represents the date, in Pacific Standard Time (PST), of the first email sent during the phishing campaign.
- Sending duration: This represents the period of time when your phishing campaign emails were all sent out.
- Tracking duration: This represents the period of time you track emails from your phishing campaign. For more information about sending and tracking periods, see our Monitor and Review Phishing Campaigns article.
- Add Clickers to: Select a user group you want to add your users who failed their phishing tests. For more information about setting up remedial training, see our Create a Remedial Training Campaign article.
- Send an email report to account admins after each phishing test: Select this check box to automatically send a report to all account admins each time a phishing test finishes. The reports include metrics such as Phish-prone Percentage, number of attachments opened, and more.
- Hide from Reports: Select this check box to hide the phishing campaign from user profiles and phishing reports. Hidden campaigns will not impact Risk Scores or Phish-prone Percentages. We recommend using this option when running a test campaign for whitelisting or other phishing functionality tests.
- Send SecurityTips that reveal missed Social Engineering indicators for phishing failures: Customers with a SecurityCoach subscription can send SecurityTips to users that reveal missed Social Engineering Indicators (SEIs) for phishing failures. This feature lets users receive real-time coaching about the red flags they missed after a simulated phishing test failure. For more information, please visit our Real-Time Coaching With Social Engineering Indicators (SEI) article in the Knowledge Base.
Once you’ve finished customizing your phishing campaign, click Create Campaign to save all changes.
You can test your users with different types of phishing tests. For more information about different types of phishing tests, see our What Types of Simulated Phishing Tests Can I Send to My Users? article.
Localization and Template Selection
When you create a phishing campaign and review your available templates, the language of the templates and their names will depend on your localization settings.
To determine which templates to display, the console looks at your preferences in the following order:
- Admin Console Language: If you haven't set a specific template language, the console uses the admin console language you selected.
-
Set Template Language: If you use this option during campaign creation, it overrides all other settings and displays templates in your chosen language.
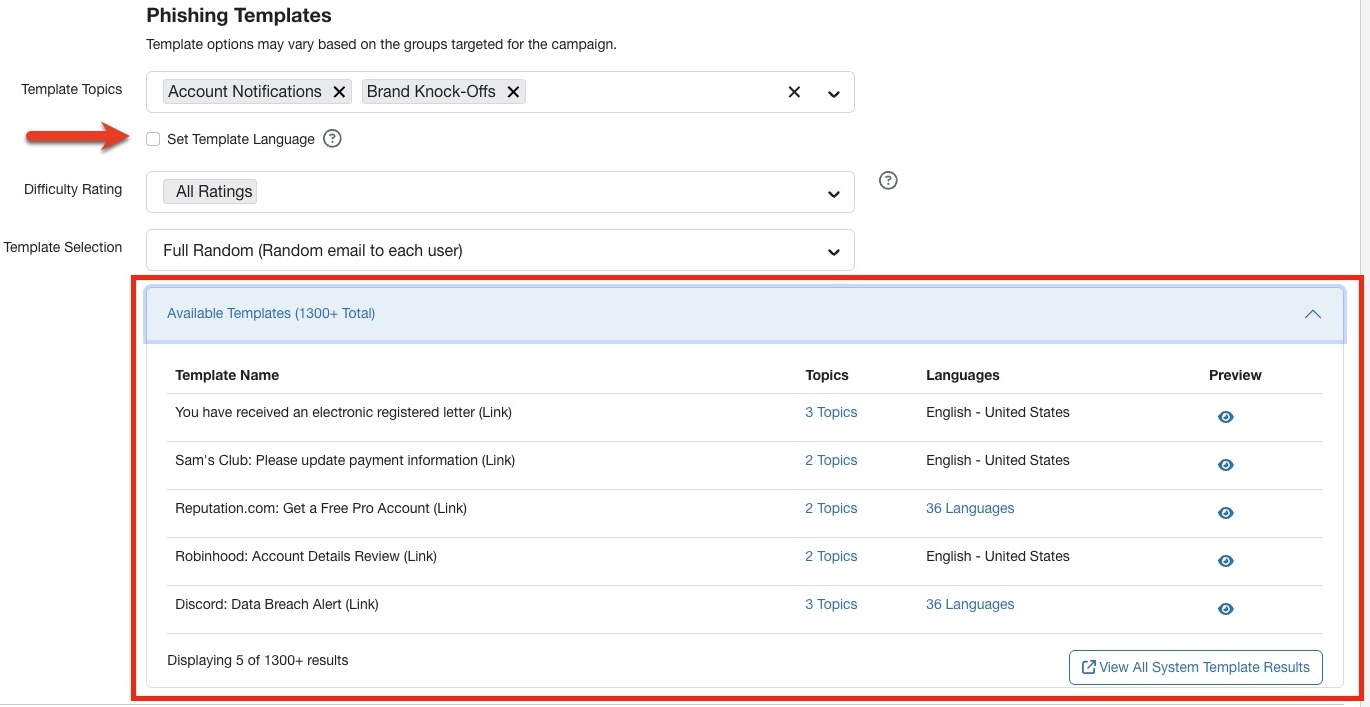
For example, if your admin console is set to Dutch and you choose AI-selected templates for a campaign, you will only see templates localized in Dutch, and their names will appear in Dutch. However, if you select Set Template Language and choose Spanish, your available templates will switch to Spanish. If you select multiple languages, you will see all available templates translated into those specific languages.
Managing Phishing Campaigns
To manage your phishing campaigns, go to your KSAT console and navigate to Phishing > Campaigns.
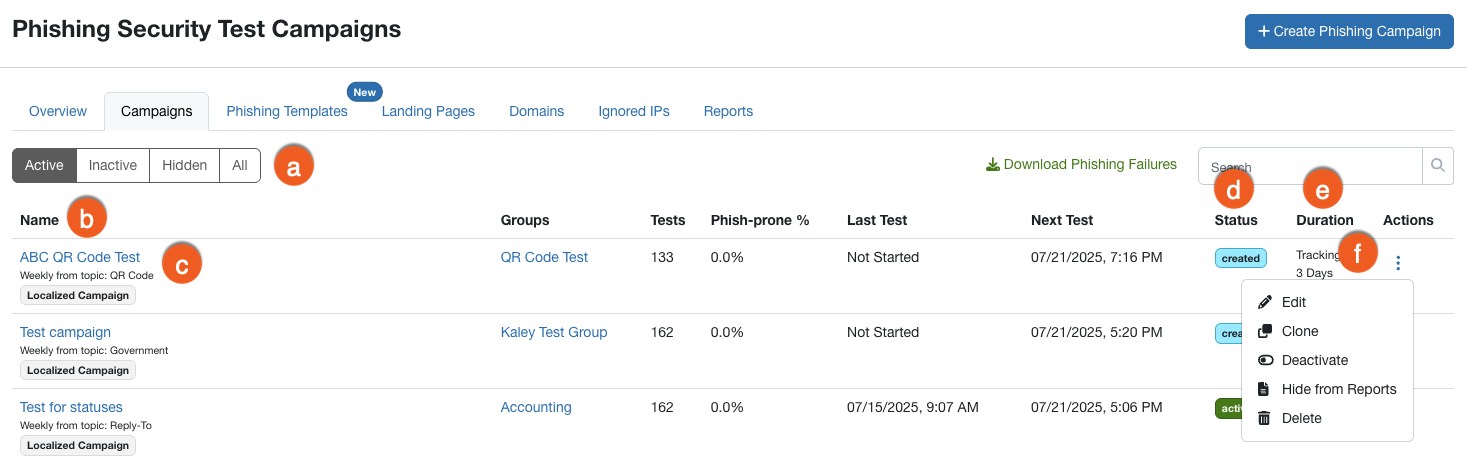
- You can filter campaigns by clicking Active, Inactive, Hidden, or All.
- Here you can find a list of phishing campaigns sorted by their name in alphabetical order. You can see each campaign’s groups, amount of tests, Phish-prone Percentage, the date and time of the last test, the campaign status, and the duration of the campaign.
- Click the campaign name to view details about that campaign. For more information, see our How to Monitor and Review Phishing Campaigns article.
- The status of the phishing campaign will be listed here. The status can be Pending, Scheduling, Created, Active, Closed, and Error:
- Pending: The campaign is being created.
- Scheduling: The campaign’s PSTs are being scheduled to send.
- Created: The campaign is created but is not currently active. For one-time phishing campaigns, Created indicates the campaign is scheduled to start.
- Active: The phishing campaign is ongoing.
- Closed: The campaign is inactive. If the campaign is in the Active subtab and has the Closed status, the campaign is temporarily inactive until the next PST begins. If the campaign is in the Inactive subtab and has a Closed status, either the campaign had a one-time frequency and ended, or the campaign was manually deactivated by an admin.
-
Error: The campaign has an issue that may prevent it from operating as expected. For more information on what is causing the error, you can hover over the error icon.

- View the duration of your campaign. The duration will either be Sending or Tracking:
- Sending: Your campaign is sending out phishing emails.
- Tracking: Your campaign is tracking user information.
- Click the drop-down arrow in the Actions column to Edit, Clone, Deactivate, Hide from Reports, or Delete a campaign:
-
Edit: Opens the Edit Phishing Campaign page. You can adjust your phishing campaign as needed and click Update Campaign to save your changes. Options that are grayed out cannot be changed.
Note:If you want to change the frequency of your campaign to One-time, we recommend deactivating the campaign and creating a new one. - Clone: Create a copy of an existing campaign. Your cloned campaign will have the same settings aside from a new start time and the word "Clone" in the campaign name. You can remove “Clone” from the title by editing the campaign.
-
Deactivate: Stop your campaign from running or recurring.
-
Once a campaign is deactivated, you will see Activate as an option in the Actions drop-down menu. If you'd like to run the campaign again, we recommend creating a new campaign instead of reactivating the existing campaign. Creating a new campaign will help prevent discrepancies and gaps in your reporting that could be caused by a campaign being inactive.
Note:One-time phishing campaigns can’t be reactivated.
-
-
Hide From Reports: Remove this phishing campaign from all reports, Phish-prone Percentages, and user timelines.
- Once a campaign is hidden, you will see Show in Reports as an option in the Actions drop-down menu. This will include the phishing campaign data in your reports, Phish-prone Percentages, and user timelines.
- Delete: Permanently delete a phishing campaign and all data, including recipients, failures, reports, and more. This action can’t be undone.
-
Phishing Test Report Discrepancies
There may be discrepancies in phishing test reports due to multiple factors:
- Reporting Delay: Console updates can take up to 24 hours.
- Whitelisting Issues: Incorrect or outdated whitelisting could cause inaccurate timestamps, such as email scans causing the opened event to be logged after a clicked event. For more information on how to verify your whitelisting was set up correctly, read our Whitelisting Guide.
- Manual Forwarding: Using manual forwarding instead of the Phish Alert Button (PAB) can cause false positives.