From the Users tab, you can manage your users and groups, assign admins, and create and assign various security roles.
Adding Users
You have four options for importing users:
- User Provisioning (Recommended)
- Quick Import
- CSV Import
- Create Single User
Alternatively, you can enable the Allow Users to Create Accounts setting in your User Settings to have users added automatically when they sign up for their own accounts. This setting is disabled by default.
User Provisioning
You can use Active Directory Integration (ADI), SCIM, or Google User Provisioning (GUP) to bulk import users and add optional information about your users. For more information, see our Active Directory Integration (ADI) article, SCIM Configuration Guide, or Google User Provisioning (GUP) Guide.
Quick Import
The Quick Import allows you to import your users' email addresses. If you'd like to import additional information about your users, we recommend using CSV Import or User Provisioning.

- Navigate to Users > Import Users.
-
Enter or paste your list of users’ email addresses into the text box, one email address per line. The email addresses must match the following format: user@example.com.
Note:In most cases, the only email addresses the import will accept are addresses that use the domain your organization signed up with. If your organization uses multiple email domains, see our Add and Verify Domains article for more information. -
Once imported, users will be asked to create their own password when they first log in for training. If you prefer to set a single password for all imported users, select the Set Password for Users check box.
Note:We recommend only using this option in special cases. You can select the Require users to reset initial password set by admins check box to require users to change the set passwords after their first login. - If you would like to add the imported users to a specific group or groups, select the Select Groups for Users check box. Then, choose one or more groups from the drop-down list.
Once you've entered your users and details accordingly, click Import Users.
CSV Import
You can use our CSV import feature to bulk import users and add optional information about your users.
For more information, see our Import Users with a CSV File article.
Create a Single User
You can manually add a user with details such as their first and last name, email address, and job title. To add a user, navigate to the Users tab. Click the Add Users drop-down menu, then click Create Single User.
Managing Users
The Users tab lists all of your users. From this list, you can add users to or remove them from groups, promote or revoke admin rights, edit basic profile information, and export a list of your users to a CSV file.
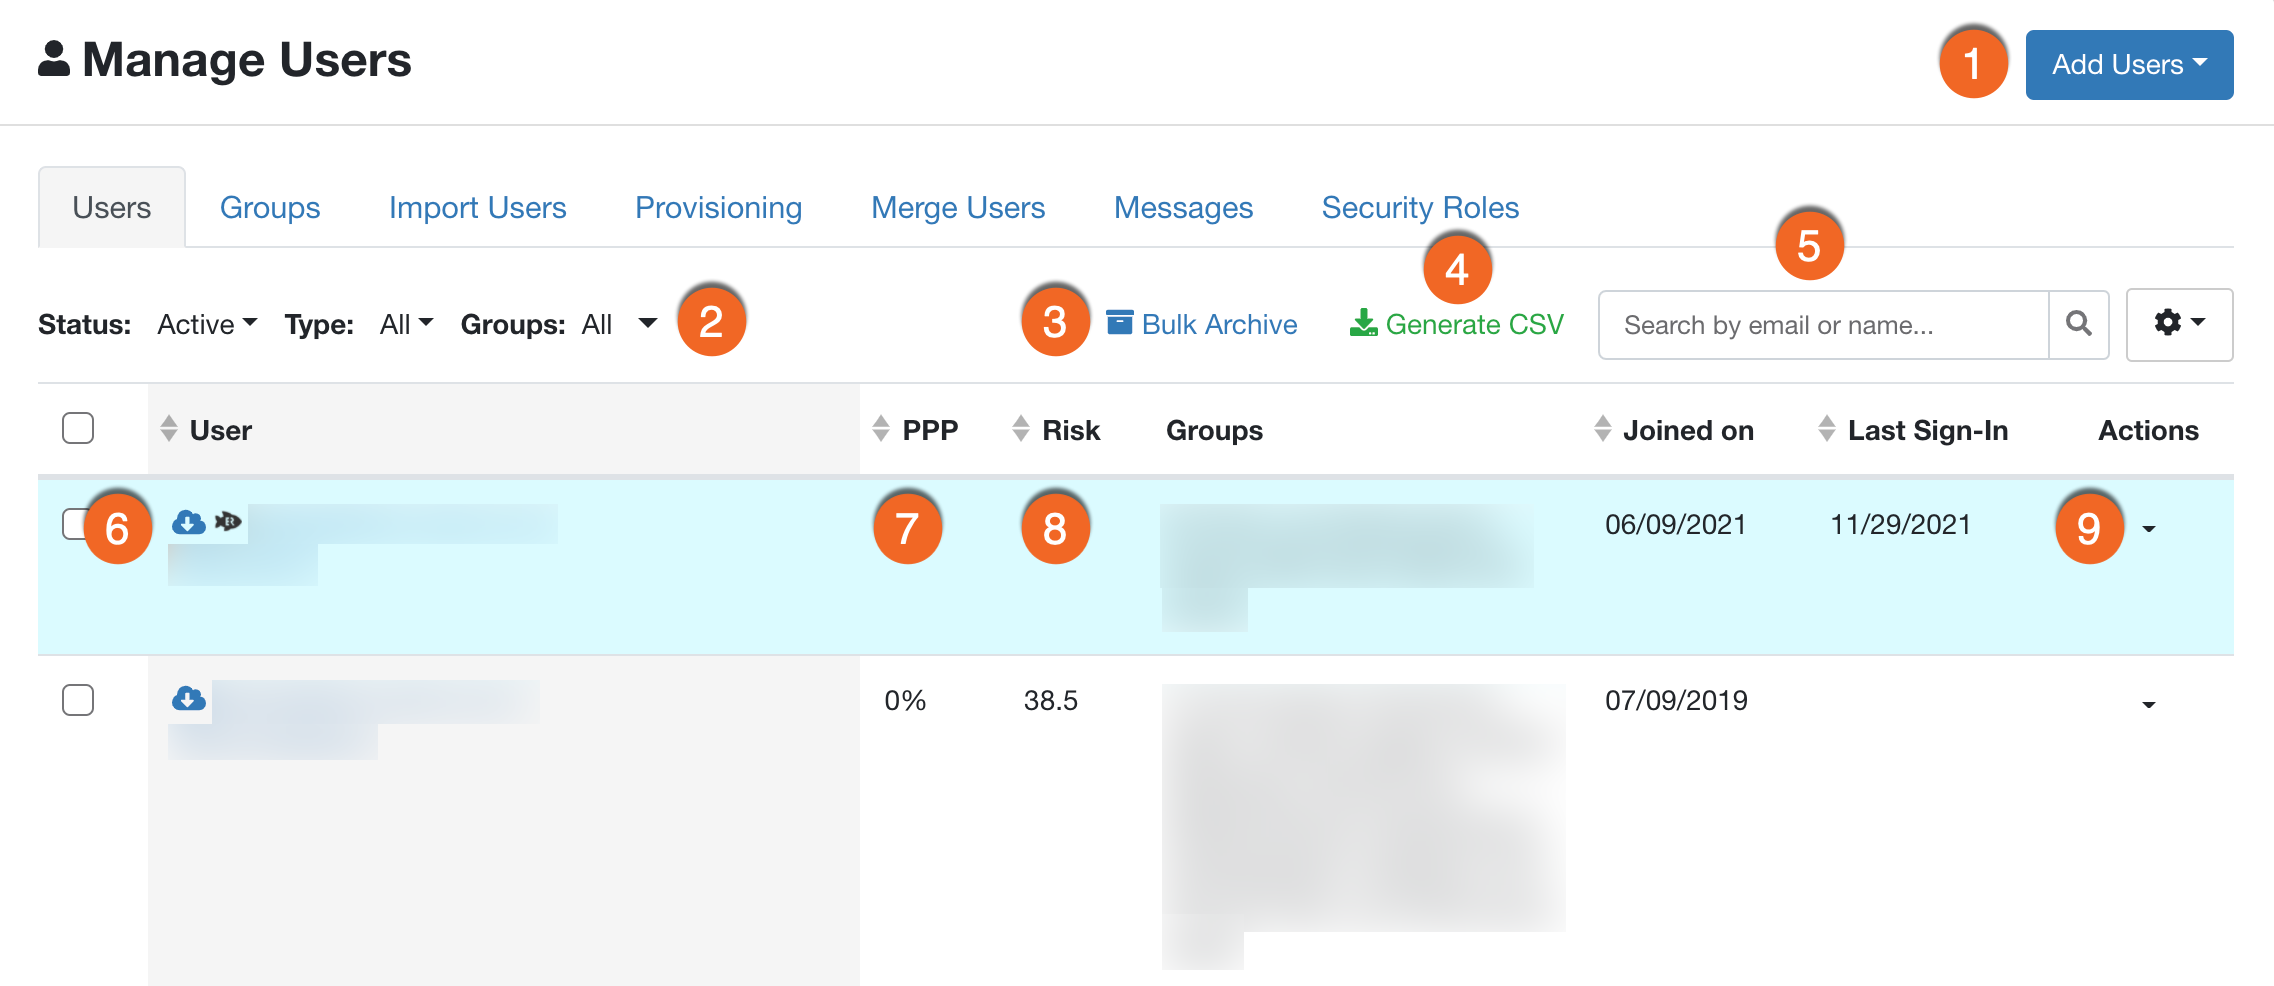
- Add Users: Create a single user or bulk import users.
- Filters: Filter this table by status, the type of user, whether you want to see end-users, admins, both, or by their assigned group or groups. You can select No Groups to filter by users who are not currently members of any group.
- Bulk Archive: Click this link will open the Bulk Archive window.
-
Generate CSV: Click this button to generate a CSV file. Once generated, you can download the CSV file from the Download Center.
Note:If you have more than 51,000 users, your download will be divided into multiple CSV files with a maximum of 50,000 users in each file. - Search: Filter the list by email or user name.
- Gear icon: Select which columns are displayed on the table. Your changes will be applied automatically.
-
User Email, Name, and Icon: Click a user's name to see more details on that user. The icons indicate different information about a user. See the following list to learn more about each icon.
- When ADI is enabled, the window icon indicates that the user is managed by ADI.
- When SCIM is enabled, the cloud icon indicates that the user is managed by SCIM.
- The phish icon indicates this user has access to your PhishER console.
- PPP: Shows the user's Phish-prone Percentage.
- Risk: Shows the user's Risk Score.
- Actions: Use the drop-down arrow to edit, archive, or change admin rights for the specified user.
Editing Users
You can click on any user’s email address to see detailed information about that user’s training history and phishing results. You can also manually edit any information you've imported into the system about that user from this window. See our User Profile Guide for more information.

Archiving and Deleting Users
To help manage your user list, you have the ability to archive, restore, and delete users. See our Archive or Delete a User article for more information.
Assigning or Revoking Admin Privileges
Admins have access to all available features in the console. You can assign or revoke admin privileges to users from the Users tab. Users who have admin privileges are shown with a blue background in the Users list. See our Assign and Remove Admin Functions from a User article for more information.
Security Roles
Customers with SAT Advanced, Platinum, or Diamond subscriptions can use our Security Roles feature to provide additional access to areas in the console to specific groups of users. See our Security Roles Guide article or watch the Security Roles Overview video for more information.
Managing Groups
Groups can be used to target users with specific phishing or training campaigns. To view or manage your groups, navigate to Users > Groups.
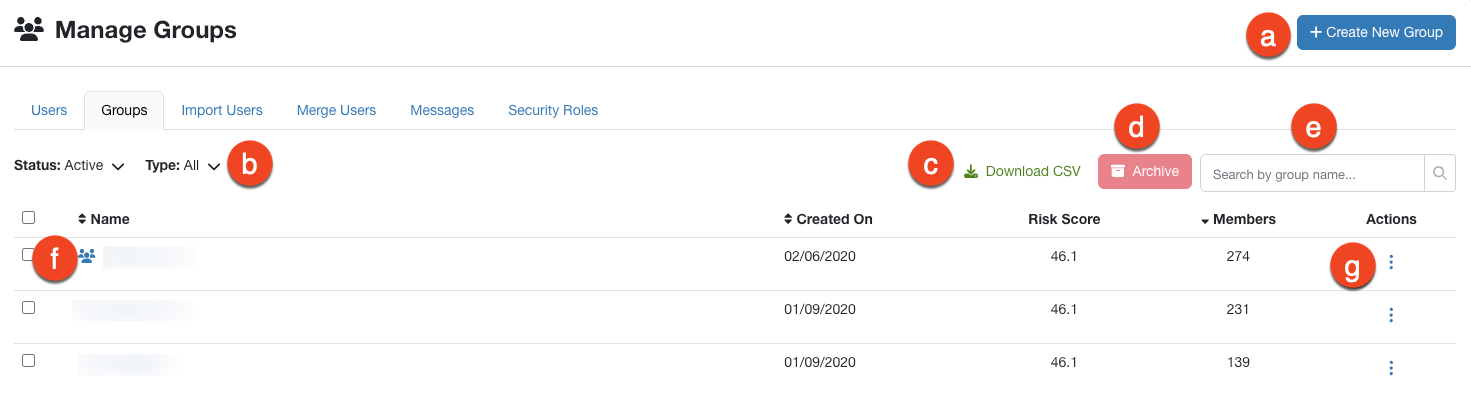
- + Create New Group: Click this button to create a new group.
- Status and Type Filters: Filter this table by the group status and by the type of group.
- Download CSV: Click this button to download a CSV file. Once generated, you can download the CSV file from the Download Center.
- Archive: Remove this group without deleting it from the console. See the Archiving Groups section for more information.
- Search: Filter the table by group names.
-
Group Name and Icon: Click on a group name to see more details on that group.
- The window icon indicates an AD-managed group
- The cloud icon indicates a SCIM-managed group
- The people icon indicates a Smart Group
- Actions: Use the three dots icon to clone, edit, or archive a group. You can also choose to remove all users from the group or archive all users within the group.
Creating Groups
You can create a group directly in your console by using the CSV Import function or by using Active Directory Integration. See our Create a Group article for more information.
Adding Users to Groups
After importing users, you can sort them into groups. Sorting can be done by department, location, domain, or any other characteristic you would like. Users can be in as many groups as needed, and there's no limit to the number of groups you can create. See our Add or Remove a User from a Group for more information.
Cloning Groups
You can make a copy of any existing group by cloning it. See our Clone a Group article for more information.
Archiving Groups
You can archive groups that you no longer need. Archiving groups allows you to remove your group from use while maintaining users who were a part of the groups. You can also unarchive the group at any time to reinstate the memberships. To archive a group, follow the steps below:
To archive a group:
- In your KnowBe4 console, navigate to Users > Groups.
- From the list of groups, find the group you would like to archive.
- Under the Actions column, click the drop-down arrow next to the desired group and select Archive.
To view your archived groups, use the Status drop-down menu above the groups list and select Archived.
To restore an archived group, click the drop-down arrow next to the desired group and select Restore.
Deleting Groups
You can delete groups that you no longer need. Any group you delete will be permanently deleted.
To delete a group, first archive the group. Then, view the archived groups by using the Status drop-down menu above the groups list and select Archived.

Click the red Delete button above the groups list. When a group is deleted, the users within that group will stay in the system. There are two options for deleting groups:
- The Delete Selected option allows you to delete the groups you’ve selected. Click the check box to the left of the group or groups you wish to delete. Once you've selected all the groups you want deleted, click the red Delete button and choose Delete Selected.
-
To use the Bulk Delete from CSV option, you must first prepare a CSV file to list each archived group you wish to delete. Groups named in the CSV that are not currently archived won't be deleted. When you’re ready to upload your CSV file, click the red Delete button and choose Bulk Delete from CSV. The following window will open:
- Click Browse to select and upload your prepared CSV file.
- Select which users you wish to notify of these deletions (if any). Then, click Delete Groups to permanently delete the groups in the CSV.

Smart Groups
Our Smart Groups feature, available for SAT Foundation, SAT Advanced, Platinum, and Diamond accounts, lets you create dynamic groups based on specific criteria that you define. These groups are beneficial for phishing tests, training campaigns, and generating a variety of reports.
To learn more about Smart Groups, see this list of Smart Group articles on our Knowledge Base.
Groups and Phishing Campaigns
Using groups in your phishing campaigns allows you to target a subset of users with specific phishing templates. Groups can be used to target certain departments or create spear-phishing attempts on key staff members. You can even target multiple groups in a single phishing campaign. By using groups, you can conduct phishing campaigns for specific regions or locations if you are interested in obtaining specific metrics from these campaigns.
We recommend that you create groups for different locations, repeat clickers, management, and other sets of high-risk users. Our Smart Groups feature helps with the creation of these types of groups. You can learn more about Smart Groups in our Smart Groups Overview article.
Groups and Training Campaigns
When you set up a training campaign, you can choose to enroll all users or only enroll specific groups of users.
You can also set up an automated remedial training to provide additional training to users who frequently fail tests from phishing campaigns. For more information about remedial training, read our Create a Remedial Training Campaign article.
You can use groups to track training progress and run reports on different groups of users. Group reports can be found on the Reports tab. See our Reporting Guide for more information.