In this article, you'll learn about the Phishing Settings section of your KSAT account settings. In the Phishing Settings section, you can update your phishing campaign settings, enable Direct Message Injection (DMI), and set up smart hosts.
Phishing Settings
In the Phishing Settings section, you can customize your phishing settings.
See below for more information about the settings in this section:
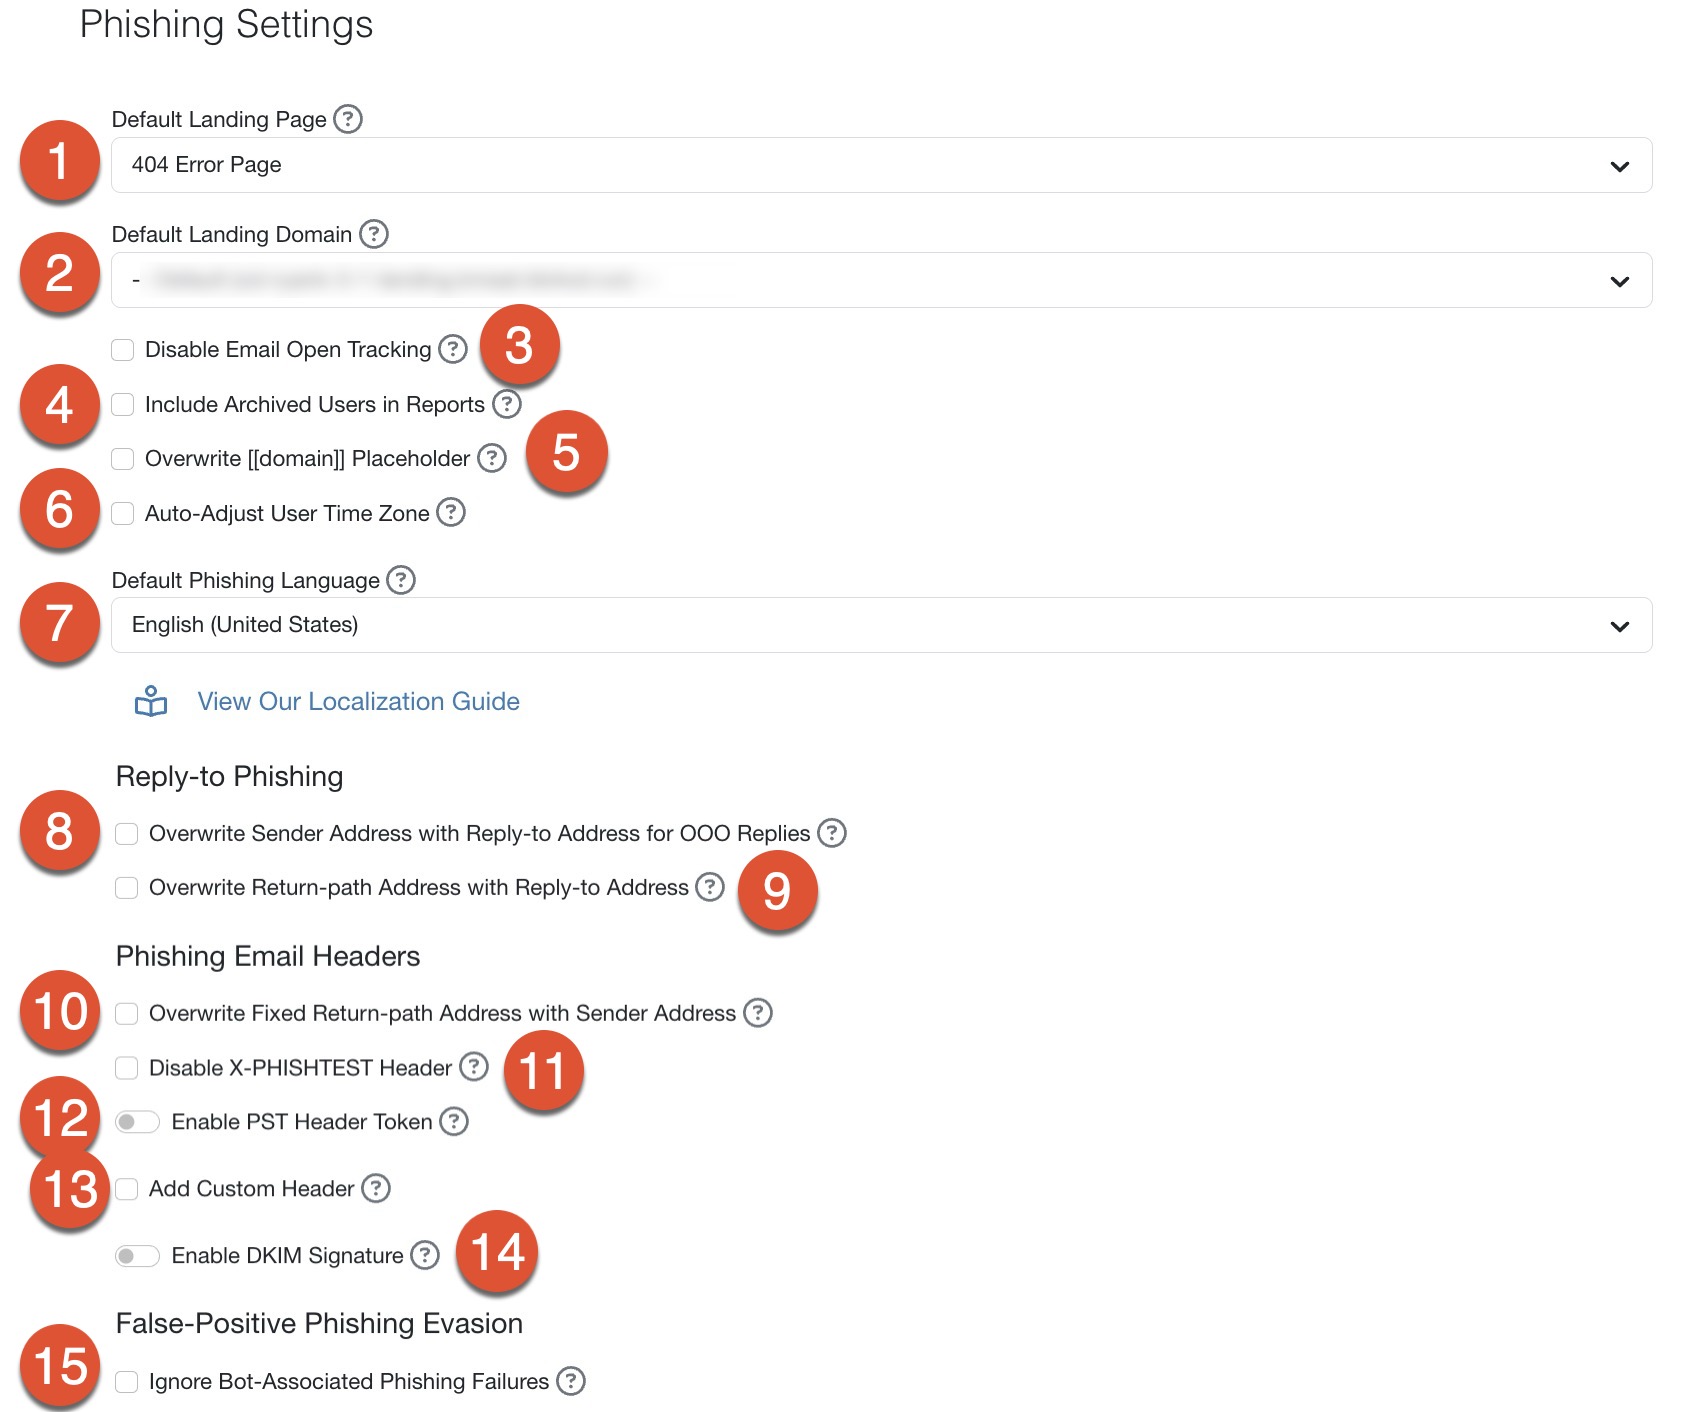
- Default Landing Page: To set a default landing page for all phishing campaigns, select a landing page from this drop-down menu. When you create a phishing campaign or edit an email template, you’ll have the option to override this setting and select a different landing page if you’d like.
- Default Landing Domain: To set a default landing page domain for all email templates, select a landing page domain from this drop-down menu. When you edit an email template, you’ll have the option to override this setting and select a different landing page domain if you’d like.
- Disable Email Open Tracking: Select this check box to remove the small tracking image that we place in each phishing email. This image tracks if and when your users open the email. For more information, see our Recording Email Opens in Phishing Security Tests (PSTs) article.
- Include Archived Users in Reports: Select this check box to include data from archived users in the phishing reports available on the Phishing > Reports subtab. If this setting is disabled, data from archived users will not be included in these reports. This setting does not affect the reports on the main Reports tab of your KSAT console.
-
Overwrite [[domain]] Placeholder: Select this check box to change what the [[domain]] placeholder displays in phishing templates and landing pages. This setting will not affect the [[domain]] placeholder in training notifications. After you select the check box, enter a domain in the text field.You may want to enable this setting if your organization does not want you to spoof your users' domains or if you use spoofing prevention to prevent emails spoofing your domain from being delivered successfully.If you do not enable this setting, the [[domain]] placeholder will use the recipient's email domain. For information on how the [[domain]] placeholder works by default, see our How the [[domain]] Placeholder Works article.
Note: If you use a look-alike domain or a domain that is similar to your organization’s real domain, we recommend that you purchase the look-alike domain. If someone else purchases the look-alike domain and your users reply to an email sent by the domain, your users may reply to the owner of the domain. Please be aware that using a real domain with anti-spoofing protection could affect email deliverability. - Auto-Adjust User Time Zone: When you enable this toggle, phishing emails can be sent based on each user's local time zone, so they arrive during their normal working hours. For more information about this setting, see our Manage Your Account’s Time Zones, Business Days, and Business Hours article.
- Default Phishing Language: From the drop-down menu, select the language that you’d like to use in phishing campaign emails. This language will be used in all users’ phishing emails unless a different Phishing Language has been set for a user. If a user’s language is not available, the account’s default language will be used. For more information, see our Localization Guide.
- Overwrite Sender Address with Reply-to Address For OOO Replies: We recommend that you select this check box if you use reply-to phishing, track out of office (OOO) replies, or use Microsoft Exchange or Microsoft 365. For more information, see the record out of office replies section of our Reply-to Phishing article.
-
Overwrite Return-path Address with Reply-to Address: Select this check box to change the return-path address to the reply-to address in a reply-to phishing campaign. We recommend that you enable this setting if your mail server settings require the return-path address to match the reply-to address. For more information, see our Reply-to Phishing article.
Note:If this setting is enabled, your envelope_from address will change, which is expected behavior. The envelope_from address is a header value within the email. - Overwrite Fixed Return-path Address with Sender Address: We recommend that you select this check box if you use Google Workspace (formerly G Suite) as your mail server. If you do not enable this setting, Google Workspace users may see "via KnowBe4" text beside the sender email address when they receive phishing test emails in their inbox. For more information, see our Why does my phishing test email show “Via psm.knowbe4”? article.
- Disable X-PHISHTEST Header: Select this check box to remove the X-PHISHTEST header from phishing emails.
- Enable PST Header Token: Select this check box to include the generated token in an X-KB4TOKEN header in phishing emails. If you enable this setting and would like to generate a new token, click the Regenerate Token button.
- Add Custom Header: Select this check box to add a custom header name and header value to phishing emails. If you select the check box, you must enter text in the Header Name and Header Value fields. If you whitelist our phishing emails by email header, you can enable this setting and then whitelist your custom header text for additional security.
- Enable DKIM Signature: Select this check box to add a DKIM signature to your phishing emails for additional security. You can choose to use KnowBe4's signing domain or customize your own signature. If your organization requires DMARC/DKIM checking for incoming messages, we recommend that you select this check box. For more information, see our Enable and Customize DKIM Signatures article.
-
Ignore Bot-Associated Phishing Failures: Select this check box to ignore bot-associated phishing failures that occur soon after a hidden link is accessed. Once this setting is enabled, you can also configure the Duration for Ignored Bot Failures and IP Address Match for Ignored Bot Failures. For more information, see our False-Positive Phishing Evasion Settings article.
Note:False-Positive Phishing Evasion settings are not meant to replace proper whitelisting. These settings are meant to be used as a tool to help with false positives along with whitelisting. You still need to troubleshoot false positives to confirm proper whitelisting. For more information on setting up whitelisting in your KSAT console, please consult our Whitelisting Guide.
Direct Message Injection (DMI)
In this section, you can enable Direct Message Injection (DMI). DMI eliminates the need to whitelist simulated phishing emails by creating a secure link between your KSAT console and your Google Workspace account.
For more information about enabling DMI, see our DMI Configuration Guide.
Smart Hosts
In this section, you can configure a smart host connection for KnowBe4 emails. This will allow you to set up a direct connection from our mail server to yours. For additional information regarding configuration, see our Smart Hosting Guide.