On the Real-Time Coaching subtab of SecurityCoach, you can create and manage real-time coaching campaigns. Real-time coaching campaigns allow you to coach your users about risky activity in real time. When risky activity is detected, your users will receive a SecurityTip with information about the activity and how to avoid it in the future.
For general information about SecurityCoach, see our SecurityCoach Product Manual.
Before you create your first real-time coaching campaign, we recommend setting up SecurityCoach by following the steps in our Quickstart Guide.
Creating a Real-Time Coaching Campaign
We offer several different methods for creating real-time coaching campaigns, depending on your organization’s needs. You can create a brand new campaign, a campaign based on our recommendations, a campaign based on specific SecurityTip content, or a limited campaign for a specific group of users.
To learn how to create a campaign using each of these methods, see the subsections below.
Creating New Real-Time Coaching Campaigns
To create a new real-time coaching campaign, follow the steps below:
- Log in to your KSAT console.
- Navigate to SecurityCoach > Real-Time Coaching.
- Click + Create Real-Time Coaching Campaign at the top-right corner of the page.
- Fill out the fields on the Create New Real-Time Coaching Campaign page. For more information about these fields, see the screenshot below:
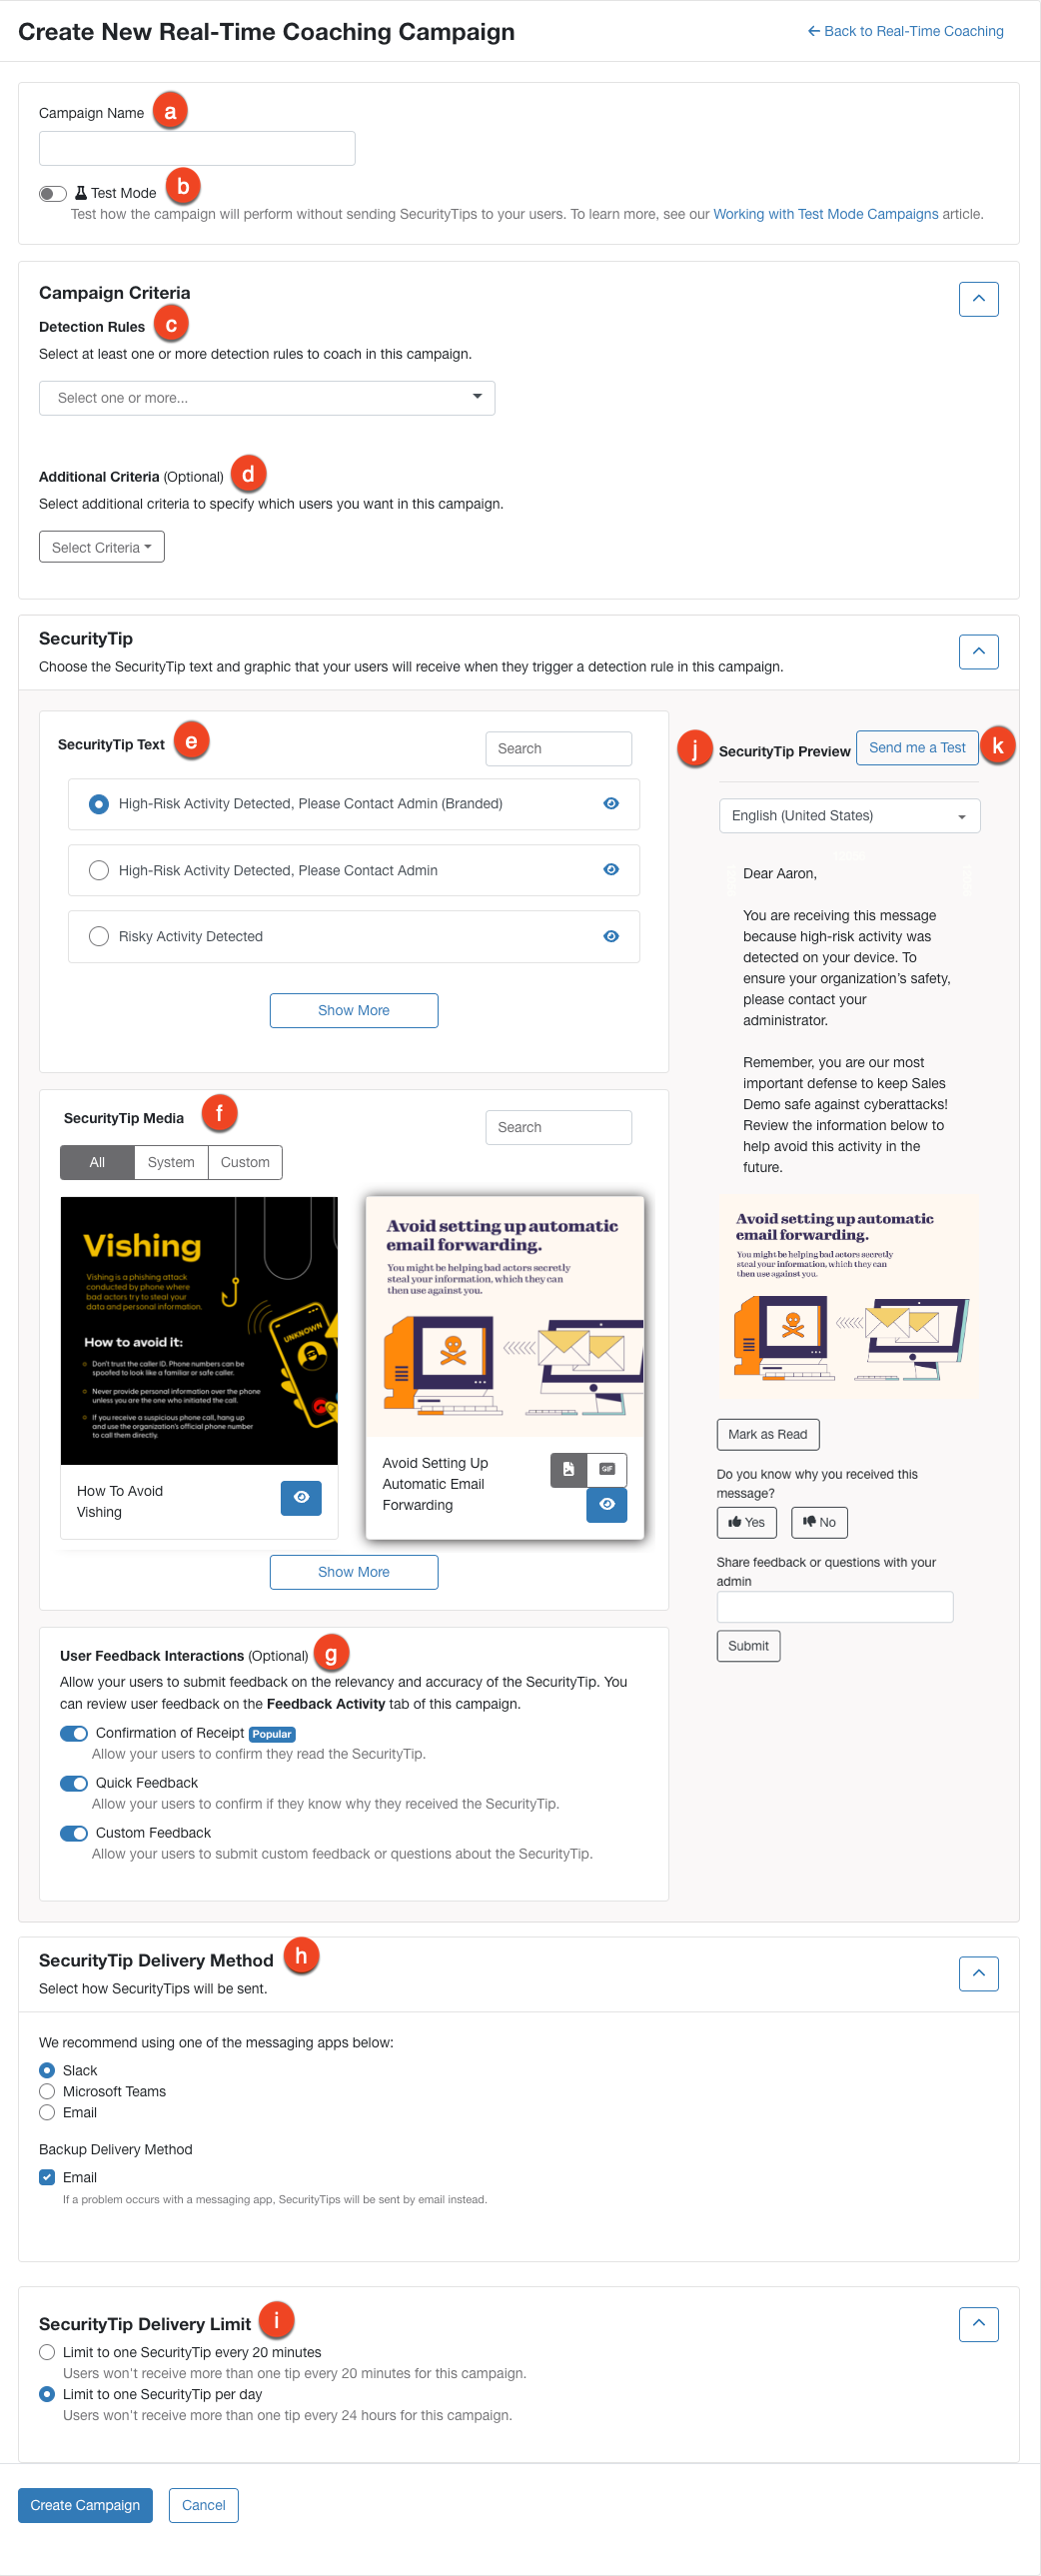
- Campaign Name: Enter a name for your real-time coaching campaign.
- Test Mode: Enable to test how the campaign will perform without sending SecurityTips to your users. You can turn off test mode at any time to begin real-time coaching. For more information, see our Working with Test Mode Campaigns article.
- Detection Rules: Select one or more detection rules for this campaign using the drop-down menu. For more information, see our Detection Rules Guide.
-
Additional Criteria: Use this optional drop-down menu to create additional criteria for the campaign. To create criteria, follow the steps below:
- Select the Select Criteria drop-down menu.
- Select one of the criteria from the drop-down menu.
- Complete the fields for the criterion.
- Select Save.
- SecurityTip Text: Select the SecurityTip notification text template that you would like to send to users enrolled in this campaign. Select the eye iconto preview the notification text template.
-
SecurityTip Content: Select the SecurityTip content that you would like to send to users enrolled in this campaign. Select the image icon to send the SecurityTip as an image, select the GIF icon to send the SecurityTip as a GIF, or select the video icon to send the SecurityTip as a video. You can also select the eye icon to preview the content.
Note: If a SecurityTip is not available as a GIF in the user's default training language, the SecurityTip will be sent as an image. If a localized SecurityTip is unavailable, it will display in English.
-
User Feedback Interactions: Use this section to choose which optional feedback you would like your users to submit for your review. You can enable any of these options:
-
Confirmation of Receipt: Allow your users to confirm they read the SecurityTip.
Tip: We recommend enabling Confirmation of Receipt for your campaigns to verify that your users have received and read their SecurityTips.
- Quick Feedback: Allow your users to confirm if they know why they received the SecurityTip.
- Custom Feedback: Allow your users to submit custom feedback or questions about the SecurityTip.
-
Confirmation of Receipt: Allow your users to confirm they read the SecurityTip.
-
SecurityTip Delivery Method: Select this drop-down menu to choose how you would like to send the SecurityTip to users. You can select a real-time delivery method and enable email as a backup delivery method. Backup notifications will only be sent if your real-time delivery method cannot be used or is disabled.
Note: The backup delivery method will only be used if your real-time delivery method cannot be used or if it is disabled.
-
SecurityTip Delivery Limit: Select how often you want SecurityTips to be sent to your users.
- Limit to one SecurityTip every 20 minutes: Users won’t receive more than one tip every 20 minutes for this campaign.
- Limit to one SecurityTip per day: Users won’t receive more than one tip every 24 hours for this campaign.
-
SecurityTip Delivery Limit: Select how often you want SecurityTips to be sent to your users.
- SecurityTip Preview: Use this section to preview your SecurityTip content selection, notification template selections, and User Feedback Interactions selections.
-
Send Me a Test: Select this option to send a test SecurityTip using your selected SecurityTip Delivery Method.
Note: The email address you provide for this test must be integrated with your selected SecurityTip Delivery Method. For more information, see our Configuring Delivery Methods articles. If your selected SecurityTip Delivery Method or backup delivery method is email, the email address you provide for this test must be an active user in your KSAT console.
- Create Campaign: Select Create Campaign to save your settings and create your real-time coaching campaign.
- Cancel: Select Cancel to cancel campaign creation.
Creating Recommended Real-Time Coaching Campaigns
If you’re not sure where to start, SecurityCoach offers recommended real-time coaching campaigns based on your detection rules. These campaigns can be found under the Real-Time Coaching Recommendations section of the Real-Time Coaching subtab.
The Top Recommendation card offers recommendations based on detection rules that are triggered but haven’t been used yet in a campaign. The card also displays the number of times an unused rule has been detected in the past 30 days.

To create a recommended real-time coaching campaign, select the Create Campaign button on a recommended campaign card. You will be taken to the Create New Real-Time Coaching Campaign page. The campaign criteria will already be selected for you, and you will only need to fill out the remaining fields to create the campaign.
Creating Real-Time Coaching Campaigns for SecurityTips
You can also create real-time coaching campaigns for individual SecurityTip content, including any custom graphics that you've uploaded. All of our available SecurityTip content is located in the SecurityCoach tab > SecurityTips subtab.
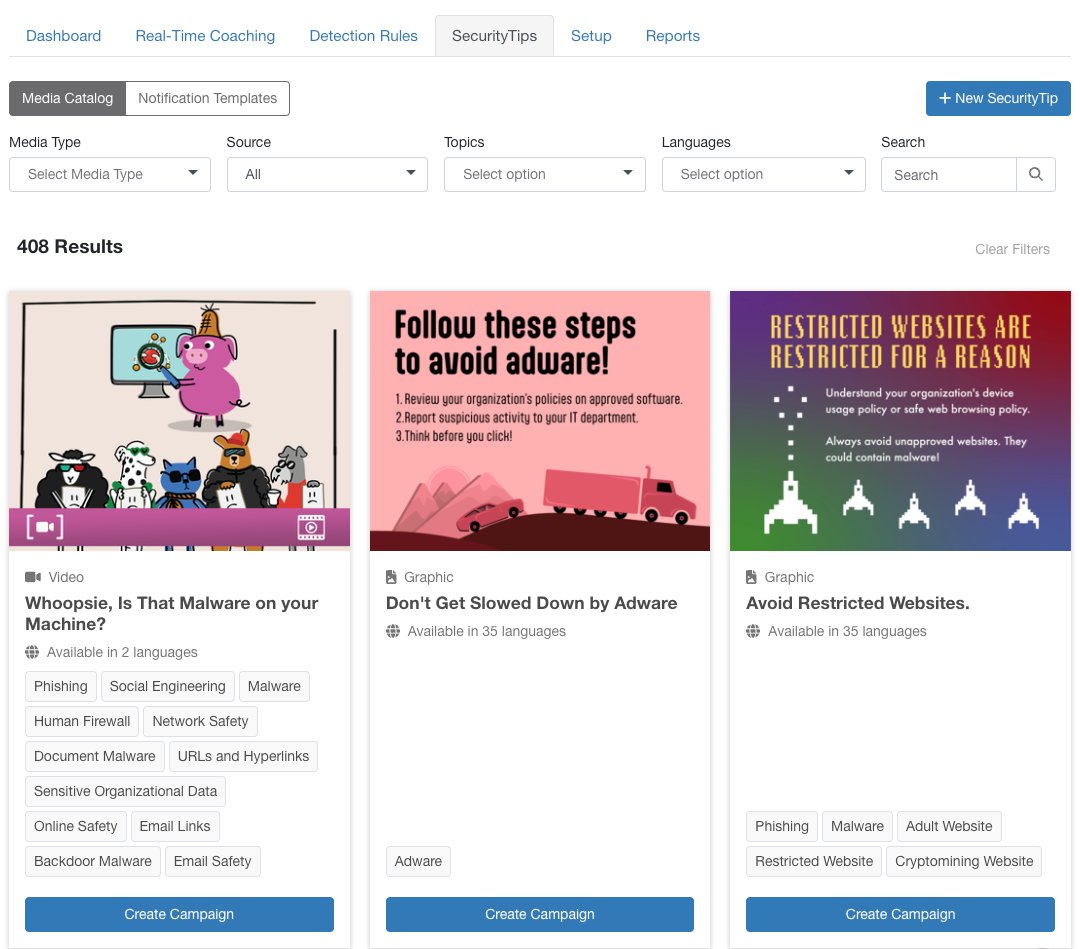
Some SecurityTip content is available as images, GIFs, or videos. If the GIF format is available, a GIF iconwill display on the SecurityTip card. If the video format is available, a video iconwill display on the SecurityTip card.
To create a campaign for a SecurityTip, select Create Campaign on a SecurityTip card, and you’ll be taken to the Create New Real-Time Coaching Campaign page. The SecurityTip content will already be selected for you, and you will only need to fill out the remaining fields to create the campaign.
Creating Limited Real-Time Coaching Campaigns
If you're not ready to coach your entire organization, you can run a campaign for a specific group of users. For example, you may want to run real-time coaching campaigns for your IT team before the rest of your organization.
To create a limited campaign, follow the steps below:
- While creating a real-time coaching campaign, select User Field in the Additional Criteria drop-down menu. A pop-up window will open.
- Edit the fields listed below.
- User Field: Select Group Name.
- Condition: Select Must.
- Comparison: Select Equal.
- Values: Select the groups you want to include in your test real-time coaching campaign.

- Select Save.
- Finish creating the real-time coaching campaign.
If you don’t want to use groups, you can also limit your campaign recipients by other criteria, such as name or email.
Managing and Editing Real-Time Coaching Campaigns
Once you have created a real-time coaching campaign or a test mode campaign, you can manage or edit the campaign at any time. To manage and edit your real-time coaching campaigns and test mode campaigns, navigate to SecurityCoach > Real-Time Coaching. You can find your existing real-time coaching campaigns under the Real-Time Coaching Campaigns section of the page.
To learn more about the options available in this section, see below:

- Real-Time Coaching Campaigns: This table lists your real-time coaching campaigns and test mode campaigns by name. For each campaign, you can see which detection rules are selected, the related vendor for each rule, and the campaign’s status.
- Preview: Select Preview to preview the SecurityCoach graphic and SecurityTip that users will receive from this campaign.
- Edit: Select Edit to open the Edit Real-Time Coaching Campaign page. On this page, you can edit your campaign as needed. Then, click the Save button at the bottom-left corner of the page to save your changes.
-
More Options: Select More Options to view the additional actions for a campaign. These actions include:
- Deactivate: Select this toggle to activate or archive your campaign.
- Activate Real-Time Coaching: Select this option to activate a test mode campaign.
- Delete: Select Delete to permanently delete a real-time coaching campaign and all associated data. This action is permanent and cannot be undone.
Individual Real-Time Coaching Campaigns
From the Real-Time Coaching subtab, you can select the name of a campaign to view the Overview, Campaign Activity, and Feedback Activity subtabs for your individual campaign. For more information, see the subsections below.
Overview
In the Overview subtab, you can see a summary of important data for your Real-Time Campaign. To learn more, see the screenshot below:
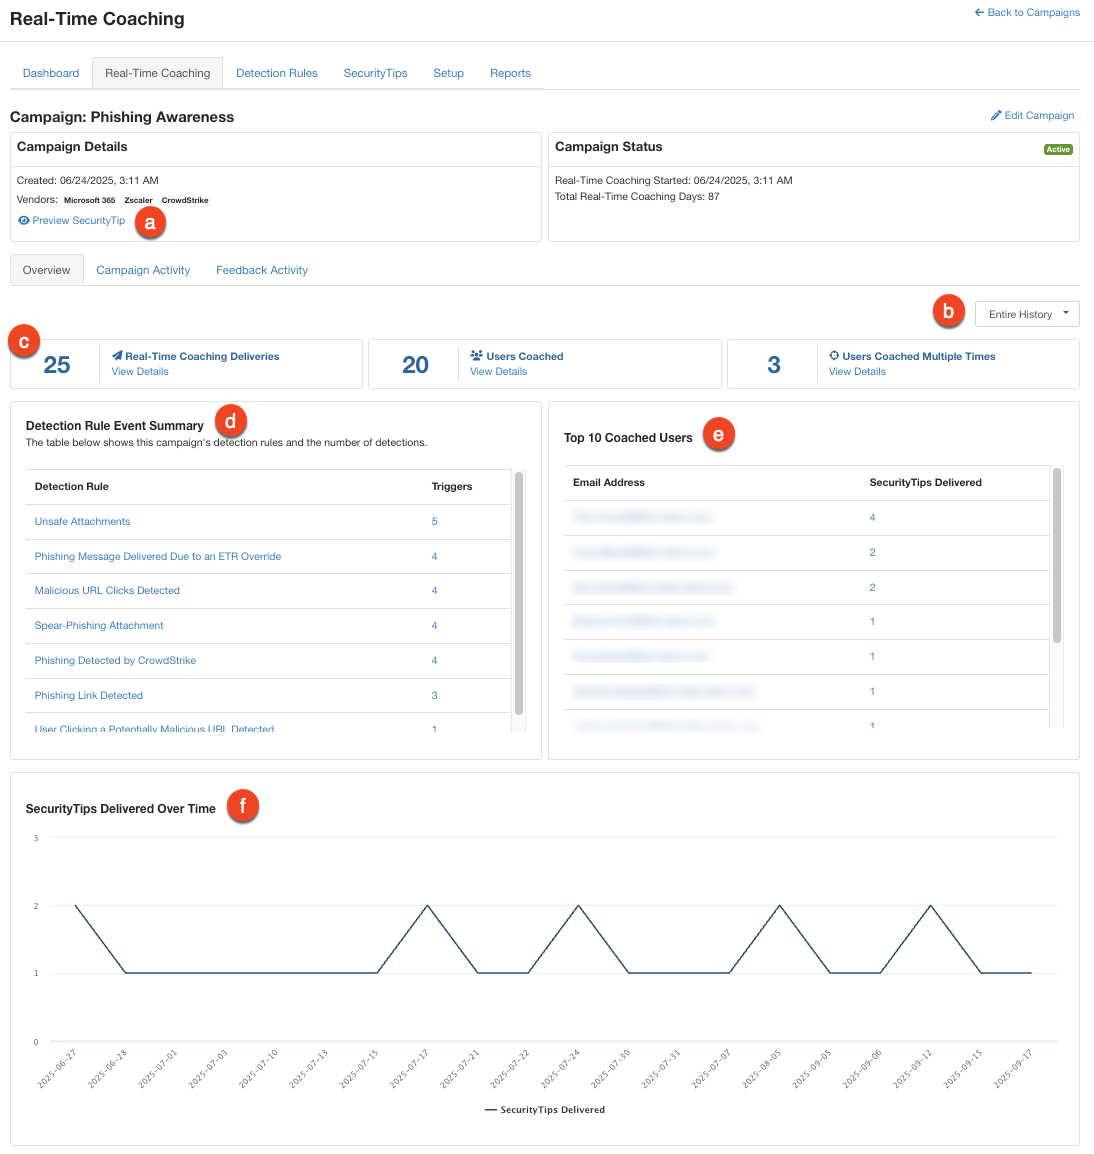
- Preview SecurityTip: Select this button to preview the SecurityTip for the selected campaign.
- Entire History: Select this dropdown menu to select a date range for your data.
- Campaign Activity information: This section displays the number of detection events, SecurityTips delivered, new users coached, and users coached multiple times during the selected date range. Selecting any icon will redirect you to the Campaign Activity subtab, where the information displayed will correspond to the icon you selected.
- Detection Rule Event Summary: This table displays the selected campaign’s detection rules and the number of detections.
- Top 10 Coached Users: This table displays a list of your users who received the most SecurityTips during the selected date range. This report will include up to 10 users.
- SecurityTips Delivered Over Time: This graph displays the number of SecurityTips delivered for the selected campaign during the selected date range.
Campaign Activity
In the Campaign Activity subtab, you can use filters to customize and generate reports for your real-time coaching campaign. To learn more, see the screenshot below:

- Report Type: Use this filter to select the report type.
- Detection Rules: Use this filter to select the campaign’s detection rules that you would like to display in this report.
- Date Range: Use this filter to select the date range of this data. By default, this is set to show activity from the last 90 days.
- User Groups: Use this filter to select the user groups to include in this report.
- Delivery Method: Use this filter to select the delivery methods to include in this report. You can choose from All Delivery Methods, Email, Slack, Microsoft Teams, and Google Chat.
- Delivery Status: Use this filter to select a delivery status to include in this report. You can choose Delivered, Held, or Failed.
- User: Use this search bar to search for a specific user.
Feedback Activity
In the Feedback Activity subtab, you can use filters to customize and generate reports for your optional user feedback. To learn more, see the screenshot and list below:

- User: Use this filter to search for a specific user.
- Date Range: Use this filter to select the date range of this data.
- Detection Rules: Use this filter to select the campaign’s detection rules that you would like to display in this report.
- Confirmation of Receipt: Use this filter to select the Confirmation of Receipt feedback from your users that you would like to display in this report.
- Quick Feedback: Use this filter to select the Quick Feedback from your users that you would like to display in this report.
Once you have selected filters for your report, click Apply Filters to generate the new report. To learn more about your generated Feedback Activity report, see the screenshot and list below:

- Confirmation of Receipt: This chart displays how many users confirmed they read the SecurityTip. This optional feedback is provided when your users click the Mark as Read button for their SecurityTip.
- Quick Feedback: This chart displays how many users know why they received the SecurityTip. This optional feedback is provided when your users click the Yes or No buttons for their SecurityTip.
- Custom Feedback: This chart displays how many users provided custom feedback. This optional feedback is provided when your users fill out and submit the text field for their SecurityTip.
-
Generate CSV: Select this button to generate a CSV file of the selected table columns in the report.
Note:This file will only display columns that are included in the table. For example, if you deselect the Detection Rule check box from the Columns drop-down menu, the generated CSV file will not include the Detection Rule column.
- Add or Remove Columns: Select this button to open a drop-down menu and select which columns to display in the table.
Real-Time Coaching with Phishing Campaigns
SecurityCoach supports integration with your KnowBe4 Security Awareness Training phishing campaigns so that you can send real-time coaching SecurityTips to your users after a phishing failure. For a list of these KnowBe4 system detection rules, see the KnowBe4 Security Awareness Training (KSAT) section of our System Detection Rules by Vendor article.
SecurityCoach also offers a Social Engineering Indicators (SEI) coaching integration with your phishing campaigns. If your users fail a phishing test, SecurityCoach can send them a SecurityTip GIF revealing the Social Engineering Indicators, or red flags, that your users missed from the exact phishing test they failed. Once enabled, these notifications will be sent from a system real-time coaching campaign named Social Engineering Indicators (SEI). For more information, see our Real-Time Coaching with Social Engineering Indicators (SEI) article, SecurityTips Guide, and Social Engineering Indicators (SEI) Guide.