Test mode campaigns allow you to test how your real-time coaching campaigns will perform before you begin to coach your users. You can turn your test mode campaign into a real-time coaching campaign at any time.
Use Cases for Test Mode
For examples of common use cases for Test Mode, see the table below:
| New to SecurityCoach | Use Test Mode during your first real-time coaching campaign to see how often your users will receive SecurityTips. |
| Integrating a New Vendor | Use Test Mode while integrating a new security vendor to test the vendor’s detection rules and choose which rules you want to coach users on. |
| Testing Campaign Configuration | Use Test Mode when you’re creating a new real-time coaching campaign to test the campaign configuration before you begin sending live SecurityTips to your users. |
Create a Test Mode Campaign
To create a test mode campaign, follow the steps below.
- Navigate to SecurityCoach > Real-Time Coaching.
- Click the + Create Real-Time Coaching Campaign button at the top-right corner of the page.
- In the Campaign Name field, enter a name for your test mode campaign.
- Enable the Test Mode toggle.

- Fill out the fields on the Create New Real-Time Coaching Campaign page. For more information about these fields, see the below screenshot and list:

- Campaign Criteria: Select one or more detection rules for this campaign in the Detection Rule drop-down menu.
- Additional Criteria (optional): Use this drop-down menu to create additional criteria for this campaign.
- SecurityTip Delivery Limit: Select how you would like to send real-time SecurityTips to users. SecurityTips won't be sent while Test Mode is on. Select a delivery limit to get a realistic view of your campaign's performance once Test Mode is off. You can choose either option listed in this section: Limit to one SecurityTip every 20 minutes or Limit to one SecurityTip per day.
- Click Create Campaign to save your settings and create your test mode campaign. Or, click Cancel to cancel and return to the Real-Time Coaching subtab.
You can disable Test Mode at any time and activate real-time coaching at any time. After 30 days, the campaign will become inactive and you’ll receive an email summarizing your test mode campaign. To change the email recipient, click Change Recipient at the bottom of the Create New Real-Time Coaching Campaign page.
Individual Test Mode Campaigns
From the Real-Time Coaching subtab, you can click the name of a test mode campaign to view the Overview and Campaign Activity subtabs for your individual campaign. For more information, see the subsections below.
Individual Test Mode Campaign Overview
To learn more about the Overview subtab, see the screenshot below: 
- Complete Setup: Click this button to finish setting up your test mode campaign to begin real-time coaching. For more information, see the Activate a Test Mode Campaign section.
- Campaign Status: This section shows how many days are left for your test mode campaign and the date that testing will end.
- Entire History: By default, your test mode overview will display data from the last 90 days. However, you can change this date by clicking on the Entire History drop-down menu and selecting a different date range.
- Test Mode Campaign Activity information: This section displays the number of coaching opportunities available, users who would have been coached, and users who would have been coached multiple times during the selected date range. Clicking any icon will redirect you to the Campaign Activity subtab, where the information displayed will correspond to the icon you selected.
- Detection Rule Event Summary: This table displays the selected campaign’s detection rules and the number of detections.
- Top Coached Users: This table displays a list of your users that received the most SecurityTips during the selected date range. This table will include up to 10 users.
- SecurityTips Delivered Over Time: This graph displays the number of SecurityTips that would have been delivered for the selected date range.
Individual Test Mode Campaign Activity
To learn more about the Campaign Activity subtab, see the screenshot below: 
- Report Type: Use this filter to select the report type.
- Detection Rules: Use this filter to select the campaign’s detection rules that you would like to display in this report.
- Date Range: Use this filter to select the date range of this data. By default, this is set to show activity from the last 90 days.
- User Groups: Use this filter to select the user groups to include in this report.
- Delivery Status: Use this filter to select a delivery status to include in this report. You can choose Delivered or Held. SecurityTips aren’t delivered in test mode.
- User: Use this search bar to search for a specific user.
Activate a Test Mode Campaign
Once you’re ready to activate your test mode campaign, follow the steps below.
- Navigate to SecurityCoach > Real-Time Coaching.
- Click the Test filter.
- Find the test mode campaign you want to activate.
- Under the Actions column, click the three dots icon > Activate Real-Time Coaching.

- In the pop-up window that opens, click Complete Setup to finish activating your campaign. You’ll be taken to the Edit Real-Time Coaching Campaign page.
- Select a SecurityTip Graphic.
- Select a SecurityTip Delivery Method.
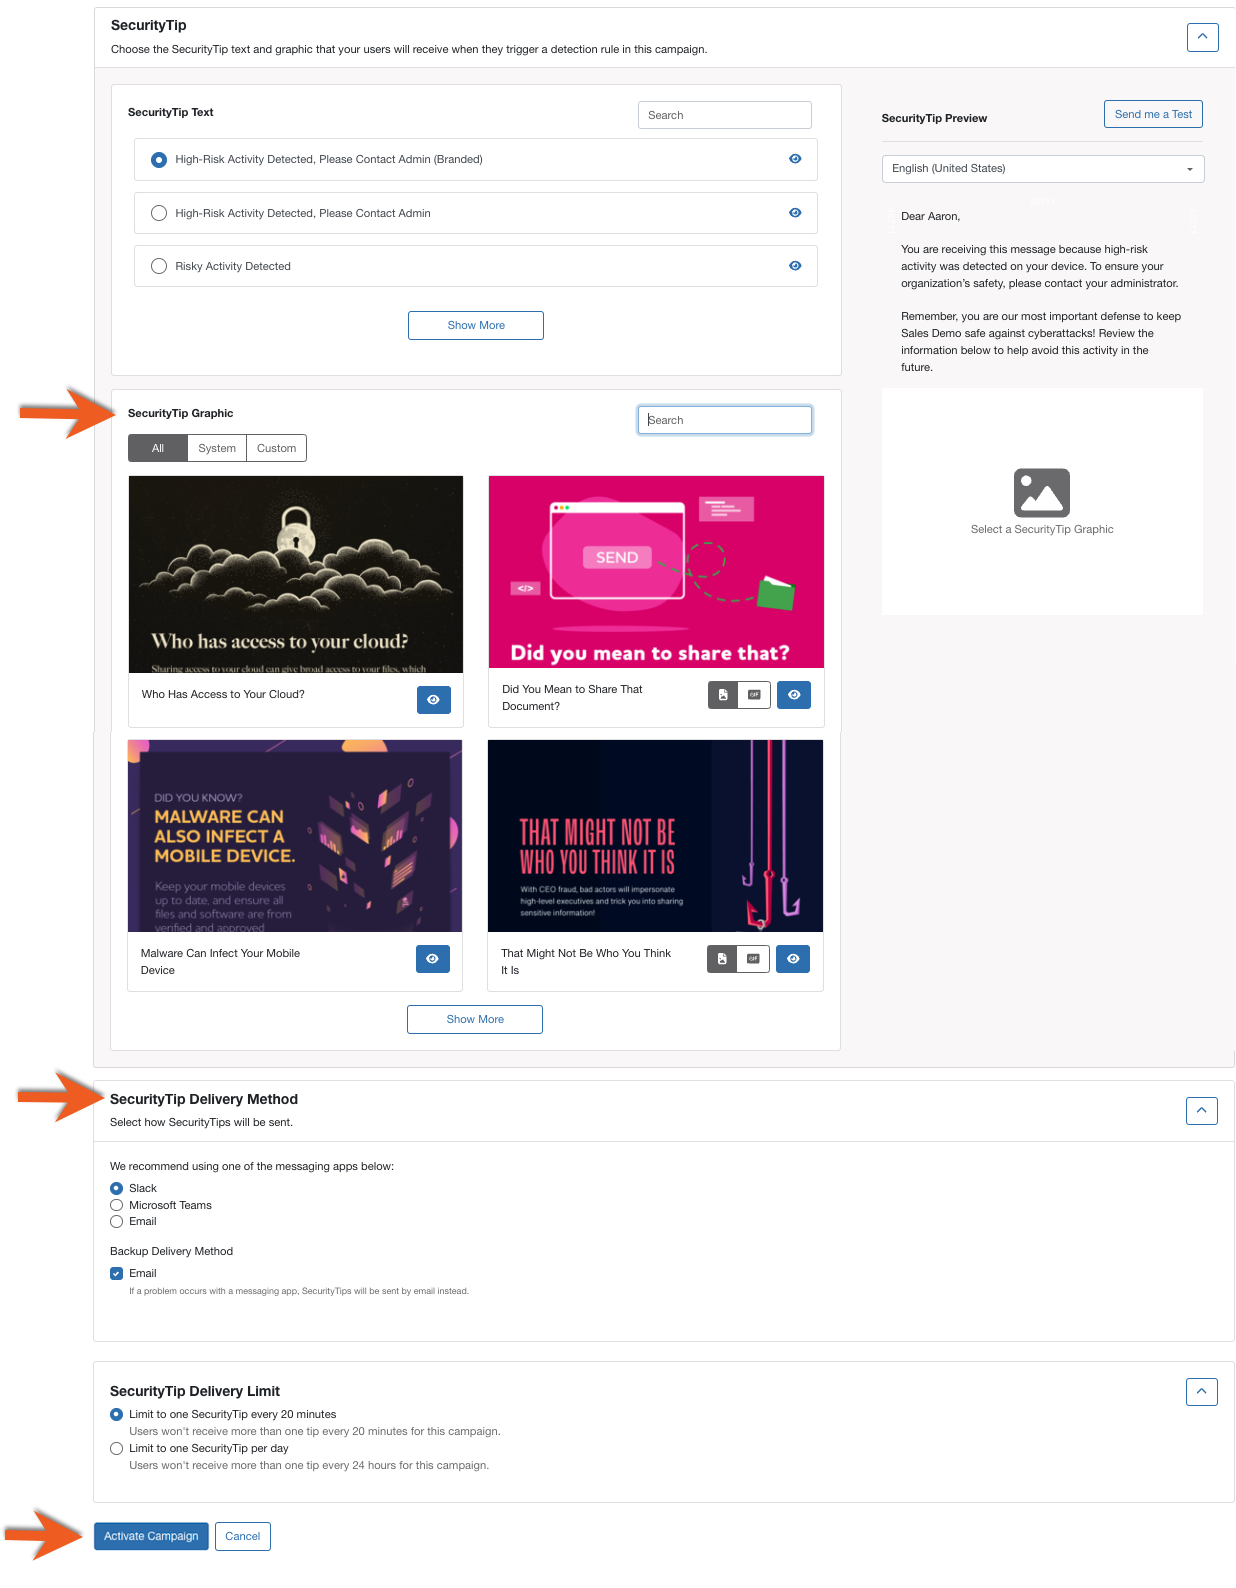
- After you’ve made your selections, click Activate Campaign to begin coaching your users.
Once your campaign is activated, it will appear in the Active subtab. For more information on managing real-time coaching campaigns, see the Managing and Editing Real-Time Coaching Campaigns section of our Real-Time Coaching Campaigns Guide.