In this article, you'll learn about the Training section of your KSAT account settings. In the Training section, you can update your training and Learner Experience (LX) settings.
Training Settings
In the Training Settings section, you can update your training settings.
See below for more information about the settings in this section:

- Add Content Surveys: Enable this setting to turn on the Add Content Survey option for all new training campaigns. If you enable this setting, you'll still have the option to disable content surveys when you create new training campaigns. See our Content Survey Guide for more information about surveys.
-
Use Direct Links in Notifications: Turn on this setting to enable direct links to training content in your training notifications. When enabled, the assignment list placeholders will take your users directly to their training content in the Learner Experience. When disabled, the assignment list placeholders will display as plain text instead of clickable links. See our Training Information Placeholders Guide for more information about placeholders.
Important: Direct links work best when the user is already authenticated. If the user is not authenticated, they must log in to the Learner Experience and select the direct-to-training link to open their training. - Track SCORM Interactions: Enable this setting to send the users’ responses in interactive SCORM activities to the KnowBe4 learning management system (LMS). When disabled, user responses are not recorded. KnowBe4’s SCORM files send quiz interaction data. SCORM files uploaded by customers through the Uploaded Content subtab of the ModStore can send data from other types of interactions. See the Frequently Asked Questions (FAQ) section of the Upload Custom Training Content article for a list of interaction types.
- Overwrite Fixed Return-path Address with Sender Address: We recommend selecting this check box if you use SPF alignment checks and want to spoof your domain. Please be sure to whitelist KnowBe4's servers before you select this check box.
- Add Custom Header: Select this check box to add a custom header name and header value to training notifications. If you select this check box, you must enter text in the Header Name and Header Value fields. If you whitelist your training notifications by email header, you can enable this setting and then whitelist your custom header text for increased security.
- Enable Custom DKIM Signature: Turn on this setting to enable a custom DKIM signature for training notifications. For more information about this setting, see our Enable and Customize DKIM Signatures article.
Learner Experience (LX)
In this section of your Account Settings, you can customize how your users interact with their training environment. These settings allow you to tailor the visual experience, accessibility, and management tools available to your learners. If you prefer video tutorials, you can also watch our Learner Experience (LX) Account Settings video for more information.
Learner Experience Language and Interface
Use these settings to establish the primary language for your learners and manage how the interface displays.
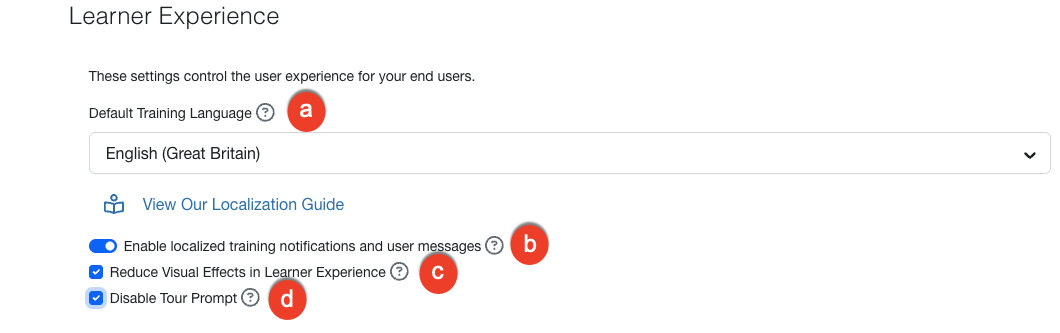
- Default Training Language: Select your preferred language from the drop-down menu. This language will apply to the Learner Experience (LX) and content available in that language unless a user selects a different Training Language. If a user’s language is not available, the account’s default language will be used.
- Enable Localized Training Notifications: Enable this setting to send training notifications in each user's language. If a user’s language is not available, the account’s default language will be used. For more information, see our Localization Guide.
- Reduce Visual Effects in Learner Experience: Select this check box to reduce visual effects in the Learner Experience. We recommend that you enable this setting if you have slow workstations in your environment or if you use Citrix or Flash-based browsers.
- Disable Tour Prompt: Select this check box to disable the tour prompt in the Learner Experience for your users. Users still have the option to launch the tour manually.
KnowBe4 Learner App and Learner Assistance
These options let you enable mobile training and customize the support information available to your users.
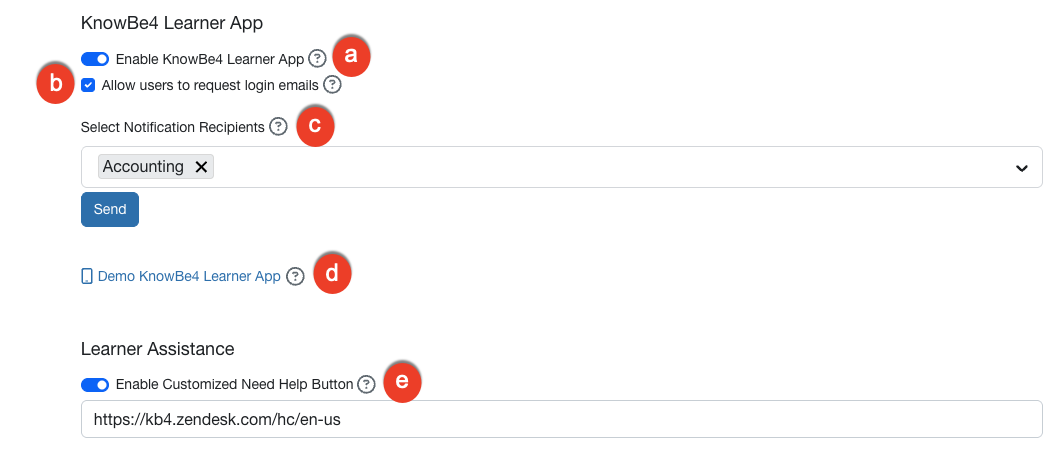
- Enable KnowBe4 Learner App: Enable this setting to allow your users to complete training through the KnowBe4 Learner App. You can select the Select Notification Recipients drop-down menu below to send an email notification with app setup instructions to your users and groups. Notifications will immediately be sent when you click the Send button.
- Allow users to request login emails: Select this check box to allow your users to request login emails that contain a link and QR code to log in to the KnowBe4 Learner App.
- Demo KnowBe4 Learner App: Click this link to activate the KnowBe4 Learner App tab in your Learner Experience for 30 minutes. Once the tab is activated, you will be able to demo the app. For more information, see our KnowBe4 Learner App Admin FAQ article.
- Enable Customized Need Help Button: Enable this setting to customize the information that users will see if they click the Need Help? button. When selected, a text field will display. In this text field, enter the URL or contact email address of your choice. For more information, see our Learner Experience Guide.
Learner Dashboard
The Learner Dashboard gives your users a centralized view of their training progress and security metrics.

- Enable Learner Dashboard: Enable this setting to allow your users to view their Learner Dashboard. The Learner Dashboard shows your users a summary of their training completion, including their training status and training due dates. For more information, see our Learner Dashboard Overview article.
- Enable Phishing Information: After you enable the Learner Dashboard, you can turn on this setting to allow users to view their own phishing test results.
- Enable Risk Information: Enable this setting to allow your users to view their Personal Risk Score on their Learner Dashboard. This setting also allows managers to view individual risk scores for their team members on the Team Dashboard.
Team Dashboard
The Team Dashboard provides managers with visibility into their team's overall security posture. These tools help managers identify which team members may need additional support or reminders.
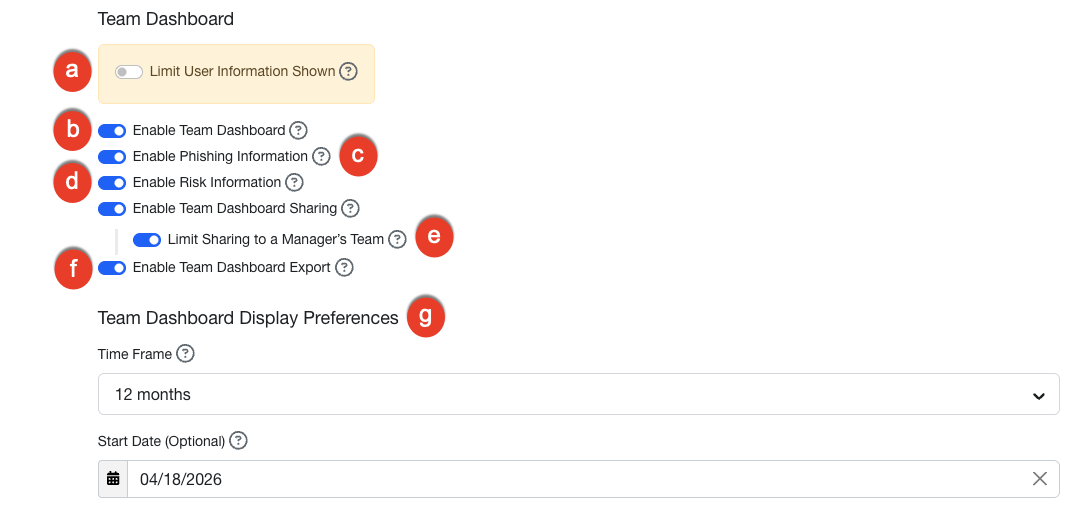
- Limit User Information Shown: After you enable the Team Dashboard, you can turn on this setting to limit the training and phishing details displayed on the Team Details for the Last Year tile. When this is enabled, the Team Dashboard will only show aggregated statistics for the team, and it will also disable the export feature.
- Enable Team Dashboard: Enable this setting to add a Team Dashboard to the LX that allows managers to view their team's training progress and other statistics.
- Enable Phishing Information: After you enable the Team Dashboard, you can turn on this setting to display the team’s phishing results.
- Enable Risk Information: After you enable the Team Dashboard, you can turn on this setting to display the team’s current combined Risk Score.
-
Enable Team Dashboard Sharing: Toggle this setting to allow managers to share their Team Dashboard with a designated user. When enabled, a Share Dashboard button appears on the Team Dashboard for all eligible managers.
You can also enable the Limit Sharing to Your Manager's Team toggle to limit dashboard sharing to users within the manager's direct reporting hierarchy. When disabled, managers can share access with any user in your organization. -
Enable Team Dashboard Export: Toggle this setting to allow managers to export their Team Dashboard data as a CSV file. When enabled, an Export CSV button appears on the Team Dashboard for all eligible managers.
Note: Team Dashboard exports are not supported from the Learner App. -
Team Dashboard Display Preferences: Customize how data displays on your team's dashboard. These settings help you track your team's security journey over specific periods.
- Time Frame: Select a time frame to see how your team's security journey is progressing.
- Start Date: Set a date so that only data from that date forward will appear on the dashboard.
Optional Learning
Use these settings to offer your users additional training content beyond their required assignments.

- Enable Optional Training Campaigns: Turn on this setting if you would like the option to enroll your users in optional training campaigns. After you create an optional training campaign, the optional content will be added to your users’ LX. To view this optional content, your users can log in to their LX and navigate to the Library tab. For more information, see our Optional Learning Guide.
- Enable AI-recommended learning, powered by AIDA: This feature is only available to Diamond accounts. Turn on this setting to provide relevant optional training content for your users without creating an optional training campaign. When this setting is enabled, all users will be able to view the Library tab in their LX. For more information, see our Optional Learning Guide.
Badges
Badges are digital rewards that users earn for reaching specific training milestones. Using badges adds a gamified element to your security program, which can increase user engagement and motivation.
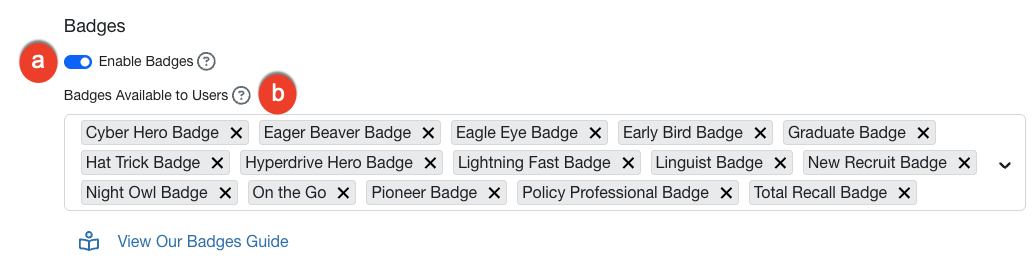
- Enable Badges: Turn on this setting if you would like to enable badges. For more information, see the Badges section of our Learner Experience Guide.
- Badges Available to Users: Select the badges that you would like to allow users to earn. For more information, see the Badges section of our Learner Experience Guide.
Leaderboard and Messages
The Leaderboard displays user rankings based on their training performance and security scores.
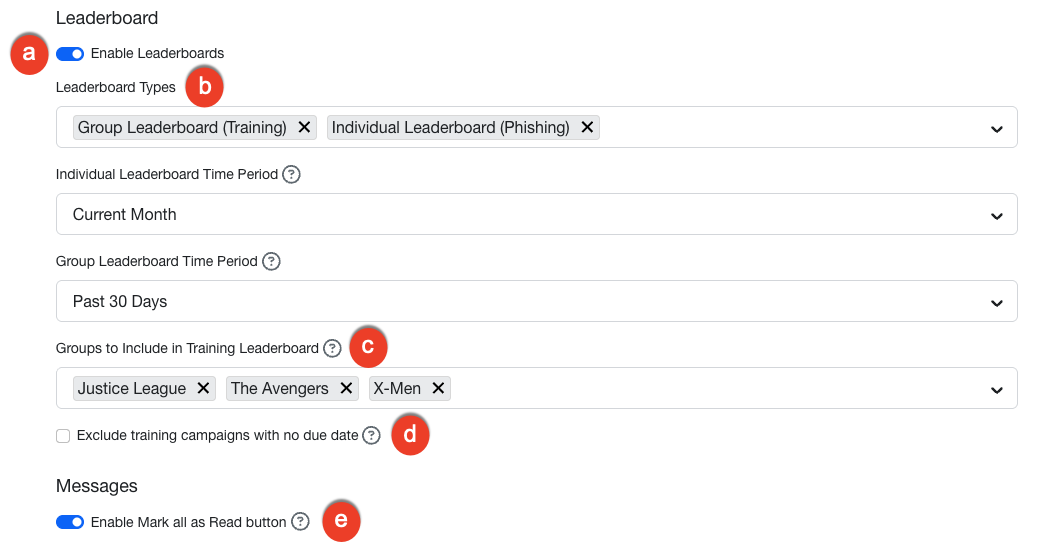
- Enable Leaderboards: Turn on this setting to enable leaderboards for your KSAT console.
- Leaderboard Types: Here, you can select either the Individual Leaderboard, Group Leaderboard, or both options from this drop-down menu. For more information, see the Leaderboards section of our Learner Experience Guide.
- Leaderboard Time Period: From this drop-down menu, select the timeframe for the leaderboard. If you have selected two leaderboards, you will need to select the timeframe for both. This timeframe will be used to calculate points and rankings.
- Groups to Include in Training Leaderboard: If you select the Group Leaderboard option above, this drop-down menu will display. Select three to 25 groups to include in the leaderboard.
- Exclude training campaigns with no due date: Select this check box if you would like to exclude training campaigns that do not have a due date from the leaderboard. You can enable this setting to keep optional content from impacting the leaderboard.
- Enable Mark all as Read button: Turn on this setting to allow users to mark all their messages as read with a single button.