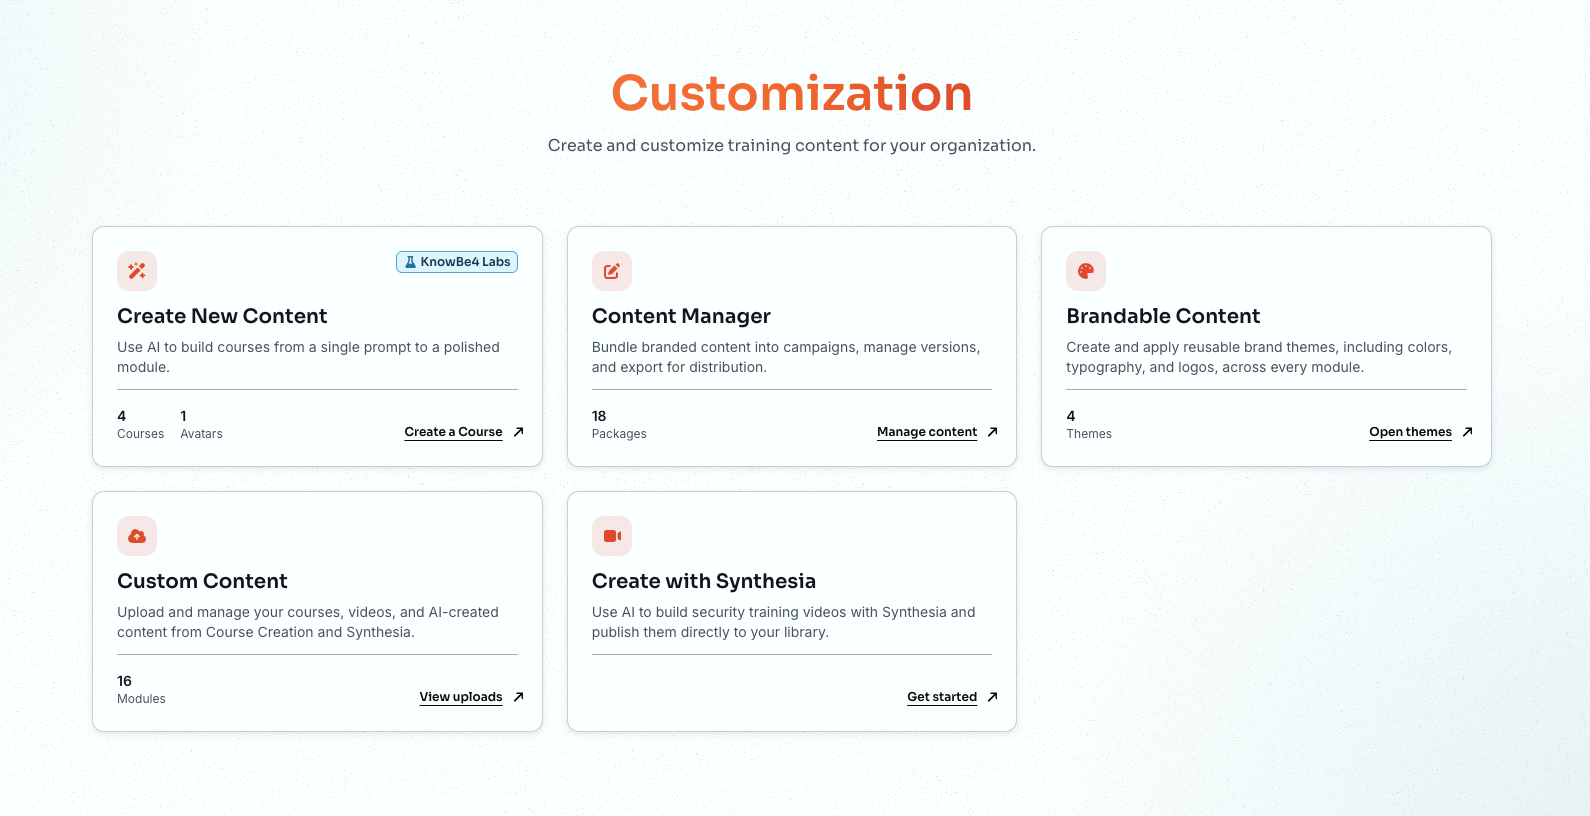
Log in to your KnowBe4 console, navigate to the ModStore tab, then select Customization from the side menu. This will open the Customization page.
Click View Uploads on the Custom Content card. This opens the Custom Content page.
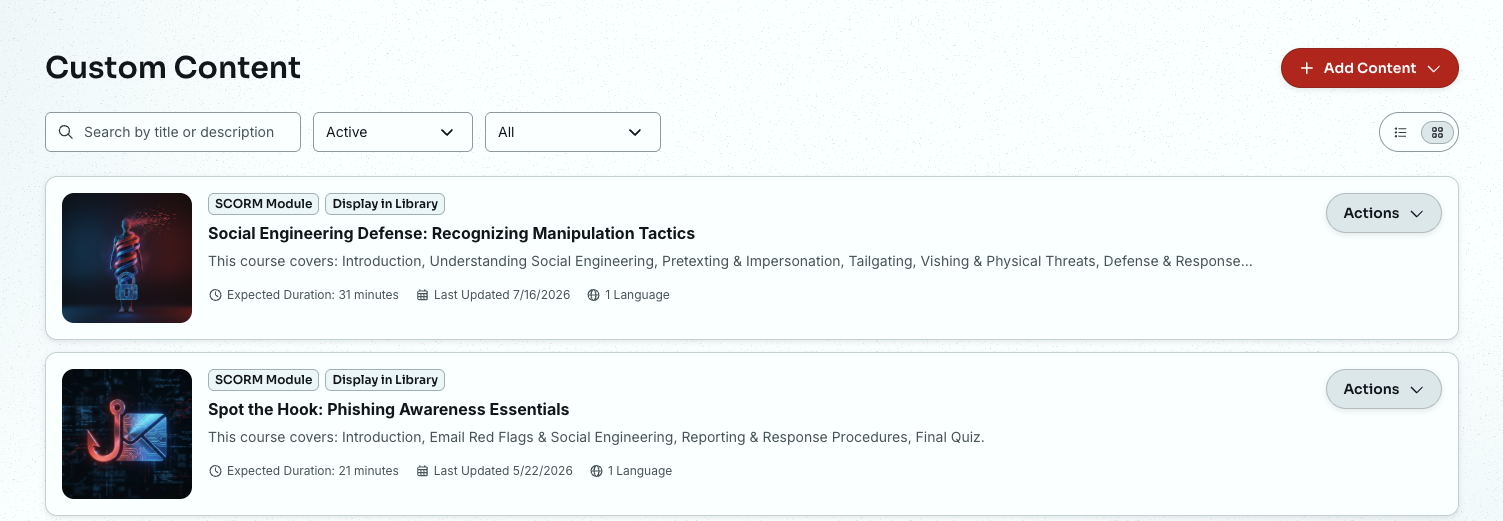
From here, you can upload and manage your organization's custom training content. Custom content is saved to your KnowBe4 account and can only be viewed by users in your organization.
Once uploaded, your custom content can be used the same way as any ModStore content. Custom content can be assigned to users via training campaigns, viewed in the Learner Experience (LX), and monitored by admins via training reports.
Content Requirements
See the sections below to review the compatibility requirements for uploading content to your KnowBe4 console.
Language Files
Language files refer to either Shareable Content Object Reference Model (SCORM) file packages or videos. You can upload one or more files, depending on how many languages the course is available in. If you only have the content available in one language, you only need to upload one language file.
Below are the requirements for each type of language file:
- SCORM File Packages:
- File Type: SCORM version 2004
- SCORM Edition: 4th
- Maximum File Size: 1 GB
- Reporting Status: Complete/Incomplete or Passed/Failed
- Content is included in the package and is not hosted on a third-party platform.
- The package only includes one language.
- Video Files:
- File Type: MP4
- Maximum File Size: 500 MB
- Optimized for Web Streaming*
If you're unsure how to optimize your video or you would like us to do it for you, see our Troubleshooting Uploaded Training Content article for more information.
Artwork
You're required to add a square thumbnail image for your custom content. Be sure the image follows the requirements listed below.
- File Type: JPEG or PNG
- Maximum File Size: 10 MB
- Maximum dimensions: 500px by 500px
- The width and height of the image must be the same value.
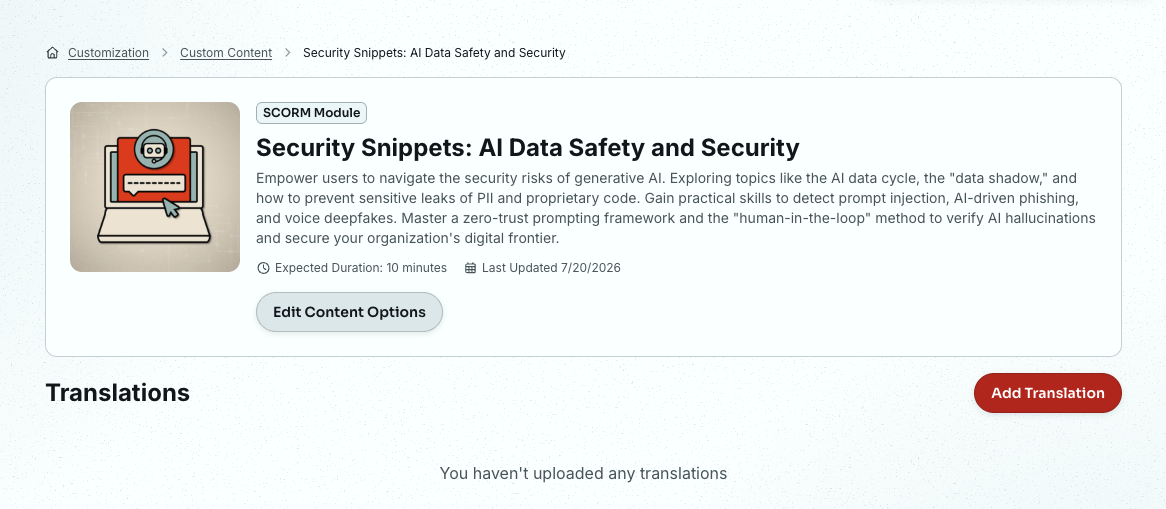
Adding Content Details
Before you upload custom content, you'll need to add general details, such as the title and the expected course duration.
Follow the steps below to begin creating your content:
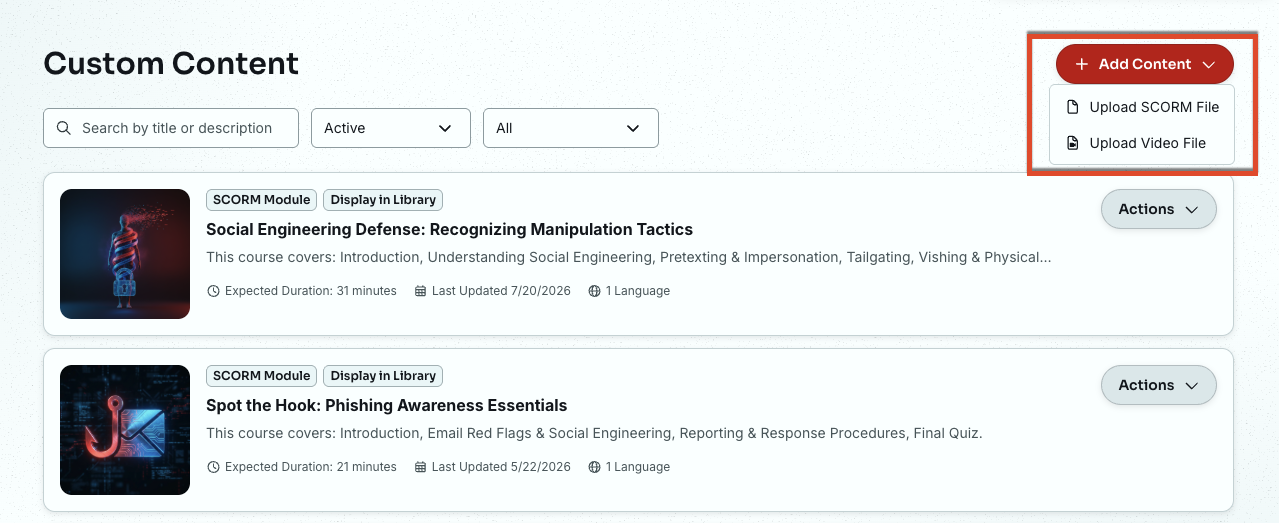
- Navigate to ModStore > Custom Content.
- Click the +Add Content button in the top-right side of the page, then select whether you would like to upload SCORM content or video content.
On this page, fill out the details about the content. Add the specifications outlined below:
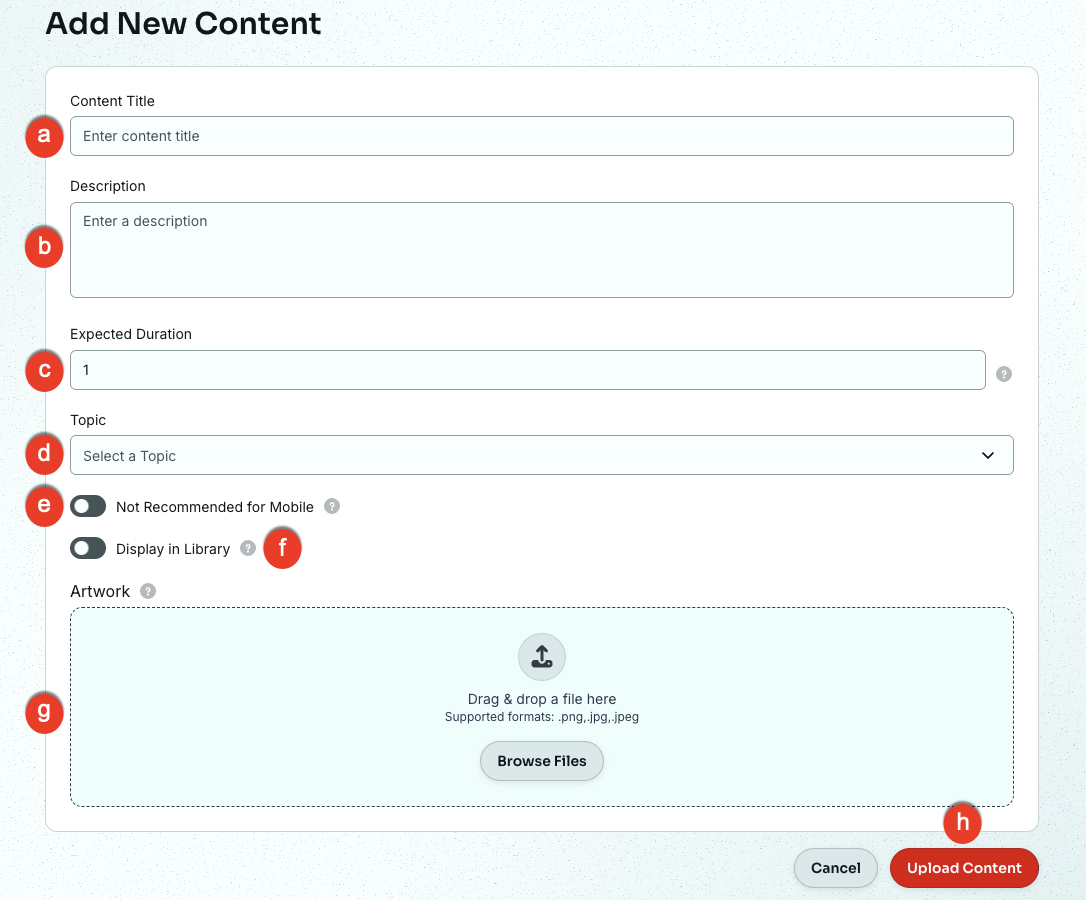
- Content Title: Add a descriptive title for your course. Your users will see this title when they log in to complete their training. This title cannot exceed 65 characters.
- Description: Provide a description of this content for future reference. The description will only be seen by admins and can't exceed 250 characters.
- Expected Duration (Minutes): Enter the estimated time it will take the user to complete the course. Enter a value between one and 360 minutes.
- Training Topic: Use this drop-down to select a topic for your module, like Email Security, Physical Security, and more.
- Not Recommended for KnowBe4 Learner App: Select this check box if you would prefer your users to access the training content through their LX. Users will still be able to access and complete the content in the KnowBe4 Learner App. For more information on this setting, see our FAQ: KnowBe4 Learner App for Admins article.
-
Display in Library: Select this check box if you would like to display this content in the LX library. This content will be visible to your users.
Important: If you have this option selected and want to archive the content, click View, click Edit Content Options, and unselect this check box. - Artwork: Use the Choose File button to upload a square image that follows the requirements listed above. Users will see this thumbnail image in the KnowBe4 LX before they start the course.
Click the Create button.
After providing the details above, you'll upload one or more language files to your content.
Uploading SCORM Language Files
After you create a new content set using the Adding Content Details section above, you'll upload at least one language file for your course. You can add as many language files to the course as necessary for your organization.
Click Add Translation, then follow the steps below to upload one or more language files for your SCORM module:
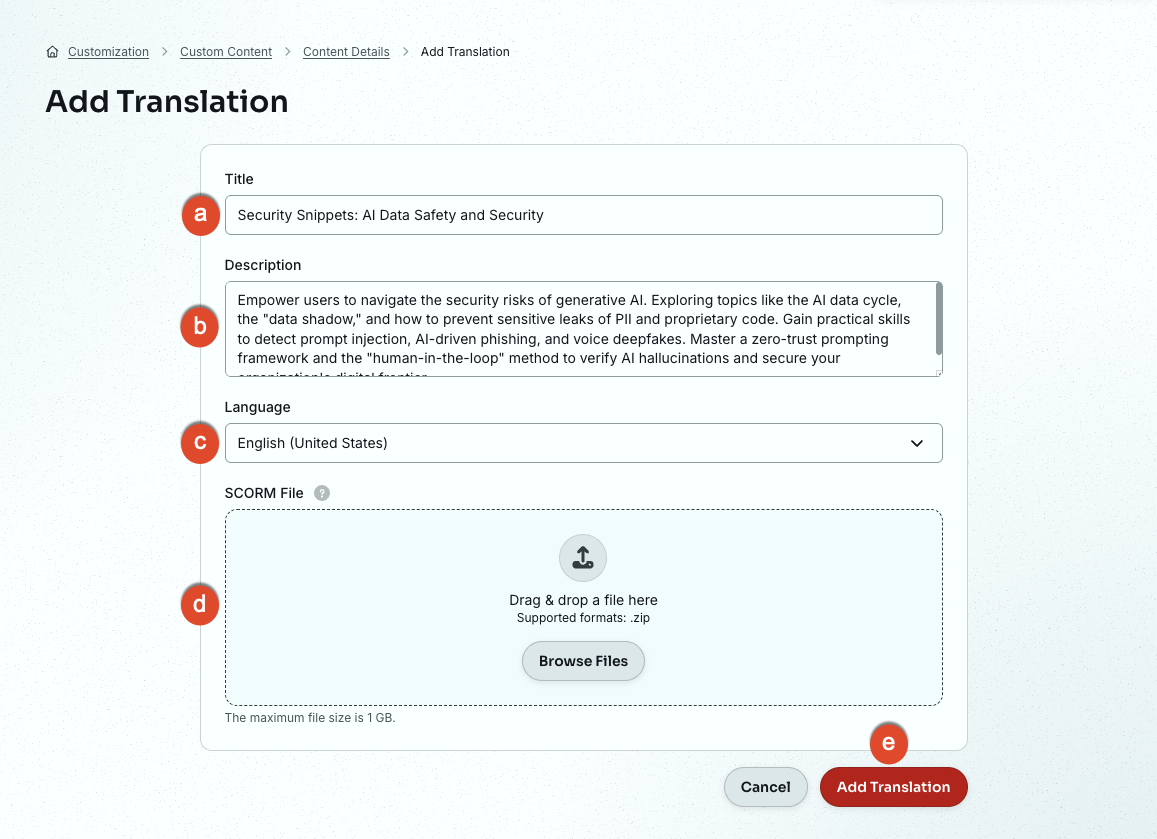
- Title: When you add a language file, the content title will populate by default. You can optionally change the language file title to the language of the content you're uploading. The content title will be displayed for all languages of the course. See our Learner Support: Change the Language of Training Content article for an example of the user experience.
- Description: Provide a description of this content for future reference. This description will only be seen by admins.
- Language: Select the language of the SCORM package. Users can select this language from a drop-down menu before they begin the training. The first language file you add for the content establishes the default language of the course. If users don't select a different language, the course will play in the default language. You can change the default language of the content after adding additional language files. See the Edit Content and Language Files section for details.
- SCORM File: Drag and drop a SCORM package into this box. See the Content Requirements section above to ensure your file package is compatible.
- Add Translation: Click this button to upload the language file to the content set. Your file will be scanned for viruses before it's uploaded to the console.
Once you've uploaded a language file, specifically a SCORM package, see the Verifying Language Files section below for instructions on the verification process.
Uploading Video Language Files
After you've created a new content set, as seen in the Adding Content Details section above, you'll upload at least one language file for your course. You can add as many language files to the course as necessary for your organization.
Follow the steps below to upload one or more language files for your video module:
- Navigate to ModStore > Custom Content > View.
-
From the Edit Content page, click Add Translation, and add the details outlined below:
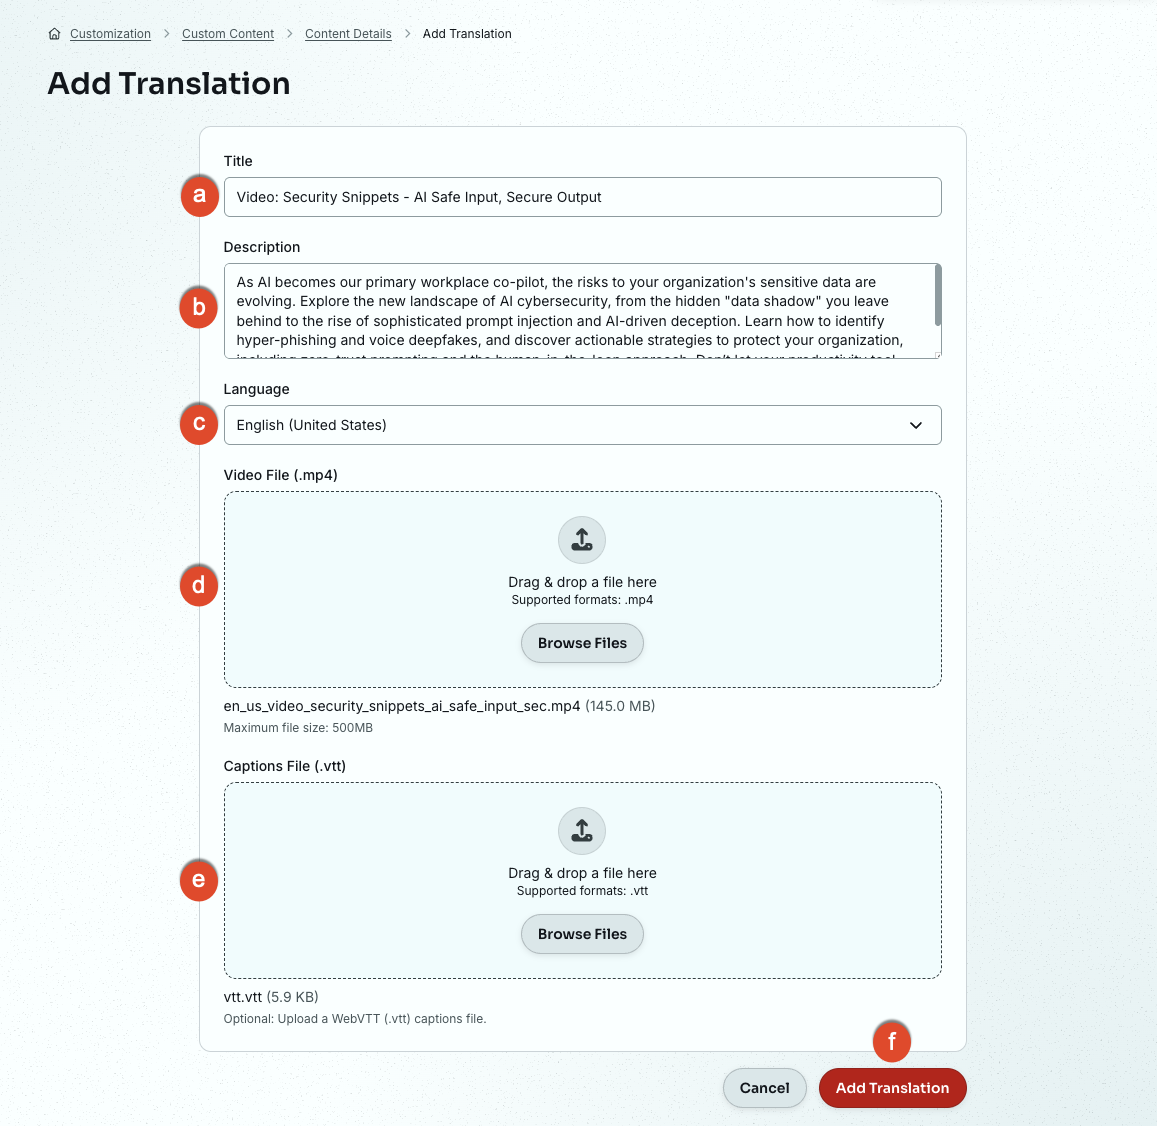
- Title: When you add a language file, the content title will populate by default. Changing the language file title is optional. Users won't see language file titles when they log in to complete their training. The content title will be displayed for all languages of the course.
- Description: Provide a description of this language file for future reference. The description will only be seen by admins.
- Language: Select the language of the video file's content. Users can select this language from a drop-down menu before they begin the training. The first language file you add for the content establishes the default language of the course. If users don't select a different language, the course will play in the default language. You can change the default language of the content after adding additional language files. See the Edit Content and Language Files section for details.
- Video File: Drag and drop a video file into this box. The video must be in MP4 format and smaller than 500 MB.
- Caption File (.vtt): Drag and drop a captions file into this box. The file must be in .vtt format.
- Add Translation: Click this button to upload the language file to the content set. Your file will be scanned for viruses before it's uploaded to the console.
Verifying Language Files
After you've uploaded your language file, an automated verification is performed. Once the automated verification is complete, follow the instructions below to manually review the file to determine whether your course will successfully play in the KnowBe4 learner experience.
If you're having trouble completing the review steps or if your course isn't behaving as expected, see our Troubleshooting Uploaded Training Content article.
For more information about this page, see the screenshot and details below:
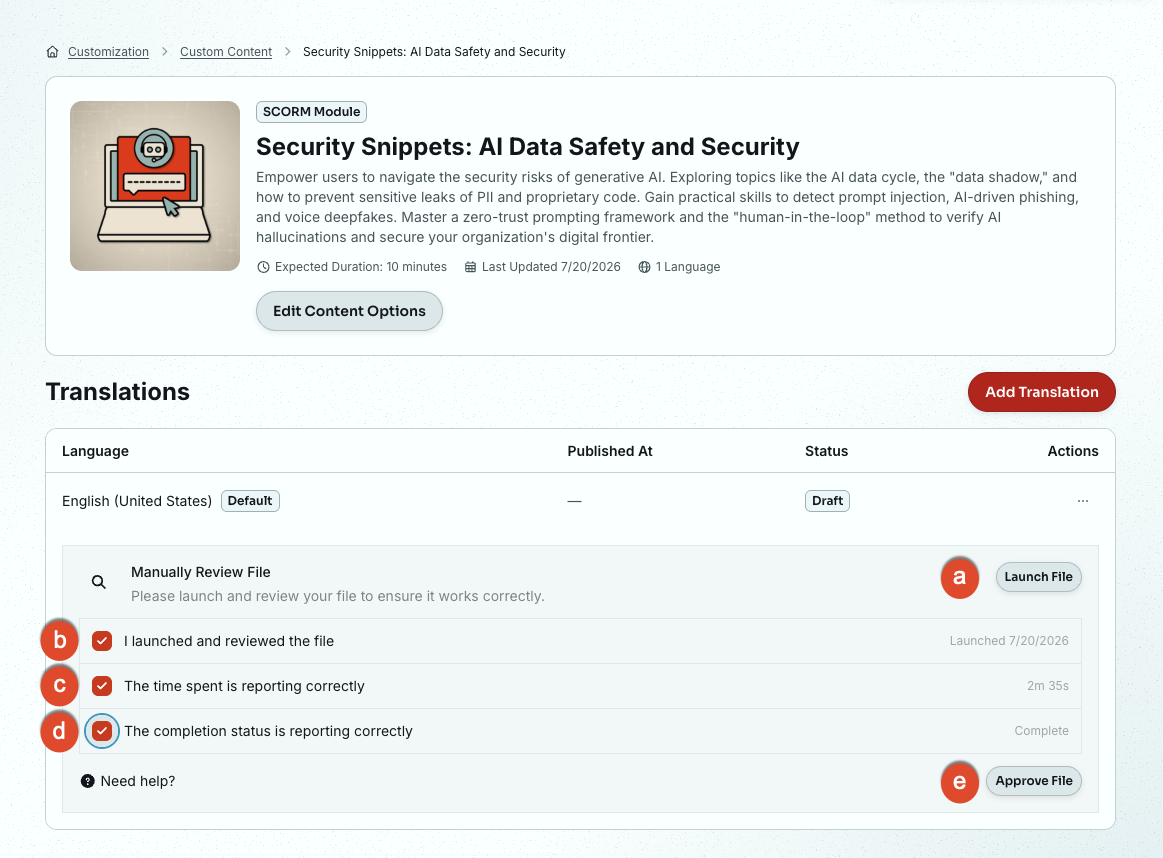
- Launch File: Click this button to launch your file in a new window. Take note of the time that you launched the course. Once you launch your file, the verifications should begin to auto-populate.
- I launched and reviewed the file: If the course successfully launches, the current date will populate to the right of this question. Click the check box to verify this step.
- The time spent is reporting correctly: Navigate through your course and note whether the amount of time you've spent in the course is accurately reflected to the right of this question. If so, click the check box to verify this step.
- The completion status is reporting correctly: Navigate through and complete your entire course. If you've uploaded a video module, play the entire video. If the course shows Complete to the right of this question, use the check box to verify this step.
- Approve File: Once you've confirmed the steps above, use this button to complete the review.
Publishing Language Files
After verifying that your language file is compatible, you must publish it before it can be used. Once published, the course will be available to assign in training campaigns.
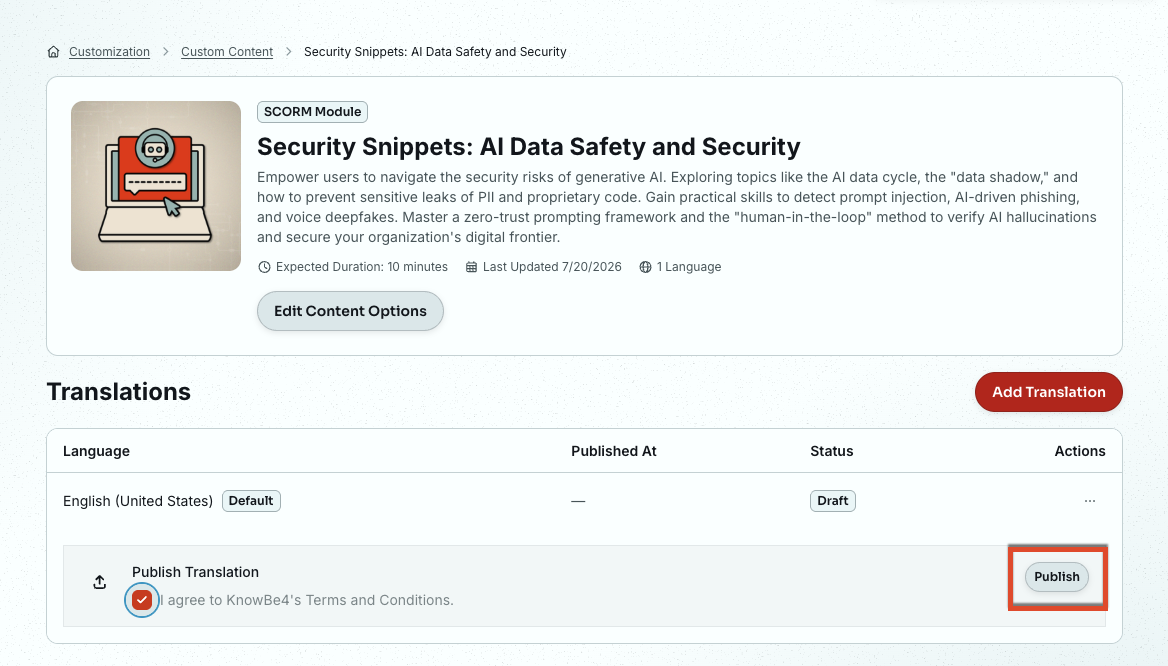
Use the link to read the Terms and Conditions for custom content, then select the check box to agree.
Click Publish on the right-hand side to make sure your language file is available in training campaigns.
Archiving and Restoring Content
You can archive content that you no longer want to use by following these steps:
- Navigate to the ModStore > Custom Content.
-
Click the Actions drop-down menu next to the content you would like to archive.
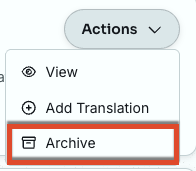
- Click Archive.
If you would like to restore archived content, follow the steps below:
- Navigate to ModStore > Custom Content.
-
Select Archived from the droplist to view all content you've archived in the past.
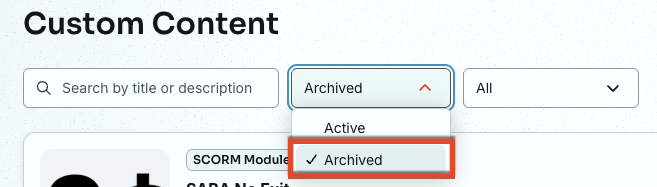
- Click the Restore button next to the content you would like to restore.
Assigning Custom Content in Training Campaigns
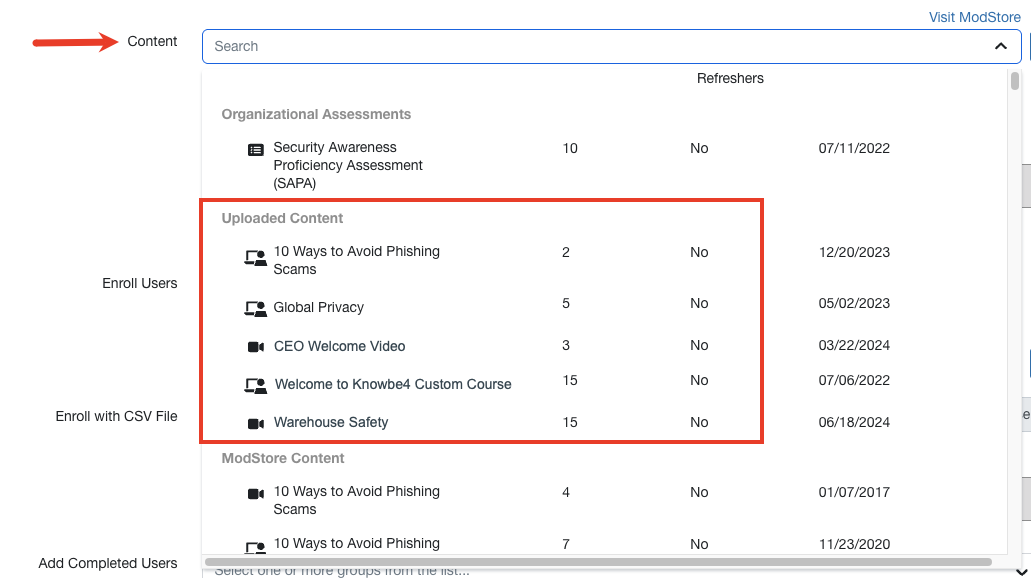
Once you've published one or more language files for your custom content, you can assign your course in training campaigns.
When creating your campaign, you'll find custom content in the Courses section of the Content drop-down menu, shown below. See the Editing Language Files section above for important information about updating language files when custom content is assigned in an active campaign.
Frequently Asked Questions (FAQ)
Why isn't my custom content available for selection when creating a training campaign?
Before you can assign custom content to your users, you must verify and publish one or more language files for the content set.
How can I preview my custom content before assigning it to a training campaign?
After your custom content has been verified and published, select View from the Actions menu. This opens the module description page. Select Preview from the Actions menu on the right side of any language file that has been added to the content set.
Why am I getting an error message when trying to upload my SCORM or video file?
If you're having trouble uploading your files, see our Troubleshooting Uploaded Training Content article.
How are antivirus detections performed on SCORM files?
The platform uses ClamAV ClamAV (link opens in new window) to scan all uploaded language files.
How many courses can I upload to my KnowBe4 account?
You can add up to 200 custom courses to your account. Each course, or content set, can contain as many language files as needed for your organization.
After users complete custom training content, can I view their quiz scores?
Yes. To save scores for eligible content, enable the Track Scores option when creating your training campaign. See our Training Campaigns Guide for more information.
Can I delete a custom module that I uploaded?
Custom modules that you have uploaded cannot be deleted due to their impact on reporting integrity. However, you can update existing content rather than create new uploads and archive old items. This approach allows you to maintain consistency in your reports while still modifying your custom modules as needed. We recommend editing your existing content uploads to ensure seamless reporting and efficient content management.
What types of information can a SCORM file share with the KnowBe4 learning management system (LMS)?
The following data can be sent from a SCORM file to our LMS:
- Completion Status: Displays whether or not the learner has completed the course or a specific learning objective in the course.
- Success Status: Displays whether or not the learner has mastered the material according to defined criteria, such as passing a quiz or achieving a certain score.
- Score: Consists of quantitative performance data, including raw scores, minimum or maximum possible scores, and scaled scores.
- Time: Displays the amount of time the learner has spent in the course or a specific learning activity.
-
Interactions: Displays detailed information about the learner's interactions with the course content, which can include:
- Interaction ID: The unique identifier for each interaction the learner has with content.
- Interaction Type: The type of interaction, such as true or false, multiple choice, fill-in-the-blank, matching, and Likert scales.
- Objectives: The objectives associated with the interaction.
- Timestamp: The exact time the interaction occurred.
- Correct Responses: The correct answers for the interaction.
- Learner Responses: The actual responses from the learner.
- Result: Whether the learner's response was correct, incorrect, or neutral.
- Path Navigation: Displays the choices the learner makes in terms of navigation through the course content, which might not be linear.
- Bookmarks: Saves the learner’s location in the course so they can resume it later.
Where is my custom content stored?
It depends on which KnowBe4 instance you use.
See the table below to find where your custom content is stored in Amazon Web Services’ Amazon Simple Storage Service (AWS S3).
| Instance | URL |
|---|---|
| https://training.knowbe4.com |
ccm-courses-production-us-east-1.s3.amazonaws.com ccm-scorm-production-us-east-1.s3.amazonaws.com |
| https://ca.knowbe4.com |
ccm-courses-production-ca-central-1.s3.amazonaws.com ccm-scorm-production-ca-central-1.s3.amazonaws.com |
| https://eu.knowbe4.com |
ccm-courses-production-eu-central-1.s3.amazonaws.com ccm-courses-production-eu-west-1.s3.amazonaws.com ccm-courses-production-eu-west-2.s3.amazonaws.com ccm-scorm-production-eu-central-1.s3.amazonaws.com ccm-scorm-production-eu-west-1.s3.amazonaws.com ccm-scorm-production-eu-west-2.s3.amazonaws.com |