In KCM GRC, you can create or import user accounts and assign user roles to each account. By assigning user roles, you can give users access to only the information that they need to perform their responsibilities. To learn about the user roles that KCM GRC offers, see our KCM GRC: User Roles article.
After you create user accounts and assign user roles, you can manage the accounts by updating user information, confirming user accounts, and disabling user accounts.
Creating User Accounts
To create a user account in your platform, follow the steps below:
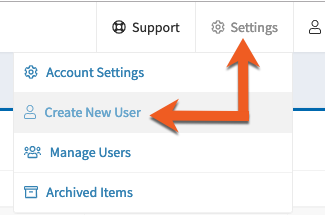
- Log in to your platform and click the Settings button at the top-right corner of the page.
-
Select Create New User from the drop-down menu.
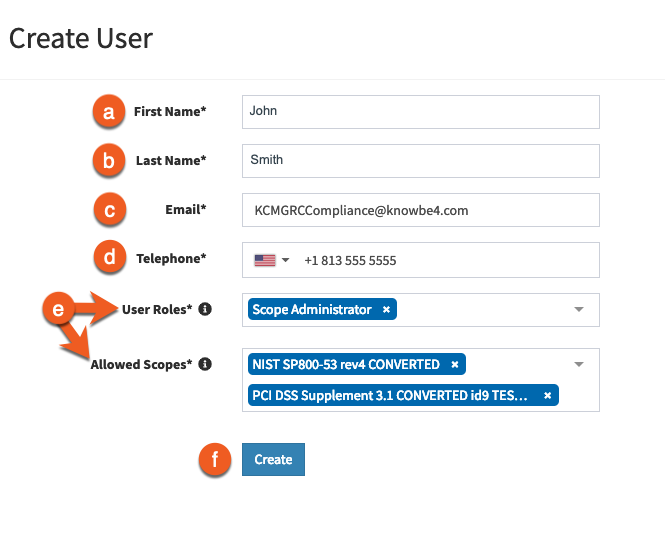
- On the Create User page, fill out each of the fields. To learn about each field, see the list below:
- First Name: Enter the user's first name. The user will be addressed by their first name in the automated emails sent from your KCM GRC account.
- Last Name: Enter the user's last name.
-
Email: Enter the user's business email.
Important: The user must be able to receive emails at this email address in order to confirm their account. - Telephone: Click the flag drop-down menu and select the telephone number format for your country. Then, enter the user's phone number.
-
User Roles: Click the drop-down menu and select one or more user roles to assign to the users. Please refer to our User Roles article to learn about the permissions for each user role.
- Allowed Scopes: Click the drop-down menu and select the scopes you'd like the user to have access to. This field is only applicable for Scope Administrator and Auditor roles.
- Allowed Campaigns: Click the drop-down menu and select the policy campaigns that you'd like the user to have access to. This field is only applicable to Campaign Administrator and Auditor roles.
-
Create: After entering all of the user's information, click this button.
Importing User Accounts
If you are creating multiple user accounts at once, you can save time by importing users with a CSV file. When you import users into your account, the users are automatically assigned the Contributor user role. After you import your users, you can change their user roles, or you can add additional user roles.
When you create your CSV file, follow the guidelines below:
-
The file should be a valid CSV file with a comma separator.
Important: If you are using Microsoft Excel, your file must be saved in the CSV UTF-8 (Comma delimited) format. -
The following header line is required:
email,first_name,last_name
To import users into your account with a CSV file, follow the steps below:
- Log in to your platform and click the Settings button at the top-right corner of the page.
- Select Manage Users from the drop-down menu.
-
Click the Import button at the top of the page.

-
In the Import Items window, click the Click to Upload button.

- Select the CSV file that contains your list of users.
-
(Optional) Review the users in the list. If you would like to remove a user from the import, click the trashcan icon.

- When you're ready to import these users, click the Import Items button.
After you click the Import Items button, user accounts will be created for all users that you imported. These users will receive an email that prompts them to activate their accounts. For information about account activation, see our How to Activate Your Account, Access Your Account, and Reset Your Password article.
Until they have been assigned to one or more tasks, Contributors are unable to access data in your KCM GRC platform. For more information, see our KCM GRC: User Roles article. If you'd like to change a user's user role, see the Managing Users section of our KCM GRC: User Roles article.
Managing User Accounts
If you're an Account Administrator, you can monitor and manage your users' details from the Manage Users page. To navigate to the Manage Users page, log in to your platform and click the Settings button in the top-right corner of the page. Then, select Manage Users from the drop-down menu.

For more information about the Manage Users page, see the list below:

-
Full Name: This column displays the user's full name. If you have created one or more user groups for your Compliance Management module, you can select the check box next to each user that you'd like to add to a group. Then, you can select the desired group from the Select a Group drop-down menu and click Add To Selected Group.
- To learn about working with user groups in the Compliance Management module, please see our Working with User Groups article.
-
Status: This column displays the status of the user account. The statuses are Active, Awaiting Confirmation, and Disabled.
- To learn about account confirmation, see the Confirming User Accounts section below.
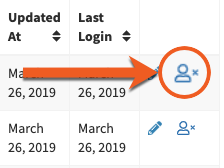
- Date Updated: This column displays the last date that changes were made to the user's account. This includes the user's email address, phone number, or user role.
-
Disable User Icon: Click this icon to disable the user account and transfer their responsibilities to a different user.
- For more information, see the Disabling User Accounts and Transferring Responsibilities section below.
-
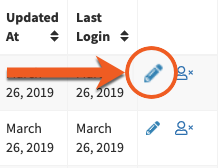
Pencil Icon: Click this icon to edit the user's account. When you click this icon, you'll be taken to the User Management page.
- For more information about the User Management page, see the Updating User Details section below.
Updating User Account Details
If you're an Account Administrator, you can update your users' details and account settings. For example, you can change a user's user roles or give the user access to additional scopes.
To view a user's profile, follow the steps below:
- Log in to your platform and click the Settings button at the top-right corner of the page.
- From the drop-down menu, select Manage Users.
- Click the pencil icon under the Actions column.
To learn about the settings that are available on the User Management page, see the details below:
-
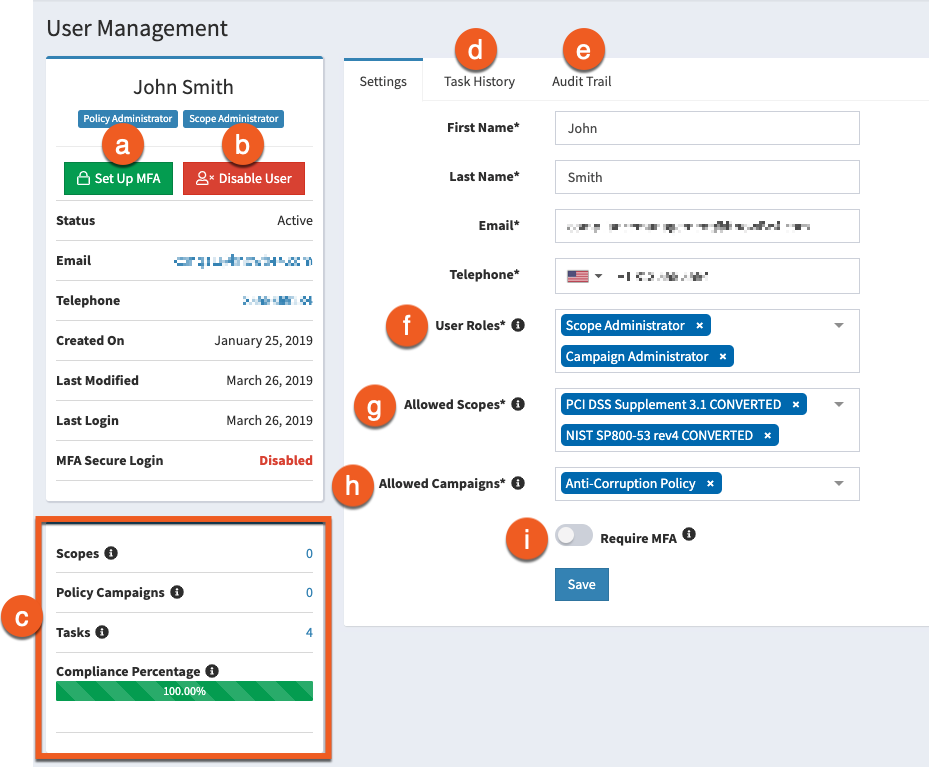
Set Up MFA: Click this button to connect your user account with your organization's multi-factor authentication (MFA) application.
- For details about configuring MFA for your user account, configuring MFA for individual accounts, and configuring MFA for all user accounts, see our Enable and Set Up Multi-factor Authentication article.
-
Disable User: Click this button to disable the user's account and transfer their responsibilities to another user.
- For more information, see the Disabling Users and Transferring Responsibilities section below.
- This widget provides an overview of the user's responsibilities in your KCM GRC console.
- Scopes: If the user is a Scope Administrator or an Auditor, this shows the number of scopes that the user has been granted access to.
- Policy Campaigns: If the user is a Campaign Administrator or an Auditor, this shows the number of policy management campaigns the user has been granted access to.
- Tasks: When applicable, this shows the number of tasks the user is currently assigned to. For more information, see our Working with Task Schedules for Controls article.
- Compliance Percentage: When applicable, this shows the percentage of this user's assigned tasks that were satisfied on time.
-
Task History: This tab shows all of the tasks the user is currently assigned to and the tasks the user has satisfied in the past. The Task History table lists the following information for all tasks that the user is Responsible for:
- Name: The task name. The task may have the same name as the associated control.
- Due At: The date the task evidence is due or was previously due.
- Completed On: The date the task was marked as complete.
- Status: The current task status. The statuses are Failed, Past Due, Active, Satisfied, or Closed Late.
- Stage: The current stage of satisfying the task. The stages are Awaiting Approval, Approved, or Open. All failed or unsatisfied tasks will show the Open stage. All closed tasks will show the Approved stage.
- Audit Trail: Click this tab to view actions that the user has made in your KCM GRC account.
-
User Roles: Click the drop-down menu and select additional user roles that you’d like to add. To remove a user role, click the x button to the right of the role name.
Note: Only Account Administrators can demote other Account Administrators' user roles. However, Account Administrators cannot demote their own user roles. - Allowed Scopes: Click this drop-down menu to select the scopes you'd like the user to have access to. This field is only available for users with Scope Administrator user roles.
- Allowed Campaigns: Click the drop-down menu to search for or select the policy campaigns you'd like your users to have access to. This field is only available for users with Campaign Administrator user roles.
-
Require MFA: Click the slider button to mandate MFA for this user's account. This button is only available for Account Administrator user roles.
- Before you enable this setting, ensure the user has installed an authenticator application. The user will be required to set up their MFA application the next time they log in to their KCM GRC account. For more information, see our Enable and Set Up Multi-Factor Authentication article.
Confirming User Accounts
Once you've created a new user, they must confirm their account before they can log in. The user will receive an account confirmation email at the email address you provided when you created the user's account. For more information about activating a user account, see our KCM GRC: Account Activation, Account Access, and Resetting Your Password article.
If the user did not receive the account confirmation email, be sure they've checked their Spam or Junk folder. If you need to resend the activation email to your user, see the Resending Account Confirmation Emails subsection below for instructions
Resending Account Confirmation Emails
If you're an Account Administrator and your user has not received an email to confirm their account, follow the steps below to resend their account confirmation email:
- Log in to your platform and click the Settings button at the top-right corner of the page.
-
From the drop-down menu, select Manage Users.
-
From the Manage Users page, find the user who needs the confirmation email and click the update user icon in the far-right column.
-
From the User Management page, click the Resend Activation button.
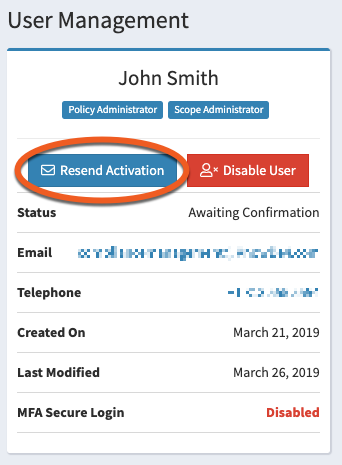
- In the Are you sure you want to reconfirm this user? prompt, select Yes.
If the user does not receive the account confirmation email, we recommend that the user checks their Spam and Junk folders.
To learn about account activation when SSO is enabled for your account, see our How to Activate Your Account, Access Your Account, and Reset Your Password article. If you are experiencing difficulty with the account activation process, contact our support team support team (link opens in new window) for help.
Disabling User Accounts and Transferring Responsibilities
If you're an Account Administrator, you can disable user accounts. For example, if one of your compliance users with Contributor or Scope Administrator user roles leaves your organization, you would need to disable the user's account. When you disable a user account, you can reassign the user's responsibilities for controls, tasks, and vendors.
To disable a user and transfer the user's responsibilities, follow the steps below:
- Log in to your platform.
- Click the Settings button at the top-right corner of the page.
-
From the drop-down menu, select Manage Users.
-
From the Manage Users page, find the user you need to disable and click the disable user icon.
- From the Disable User page, select a user or users to transfer the user's responsibilities to. To learn about the responsibilities you can transfer, see the list below:
-
Tasks: Transfer the tasks that the user was responsible for approving or completing to the new user. If the user is the User Assigned for tasks, the new user will become the User Assigned for those tasks. If the user is the Approving Manager or Second-level Approving Manager for tasks, the new user will become the Approving Manager of Second-level Approving Manager for those tasks. Only tasks that have not been satisfied will be transferred to the new user. To learn which tasks have been satisfied and which tasks have not been satisfied, see the list below:
- Tasks that have not been satisfied include the tasks in the list below:
- Tasks that have a task stage of Open and a task status of Active, Past Due, or Failed.
- Tasks that have a task stage of Awaiting Approval.
- All new tasks that will be created in the future for task schedules that the disabled user was assigned to.
- Tasks that have been satisfied include the tasks in the list below:
- Tasks that have a task status of Satisfied and a task stage of Approved.
- Tasks that have task status of Closed Late and a task stage of Approved.
- Tasks that have not been satisfied include the tasks in the list below:
- Controls: Transfer the controls that the user was responsible for to the new user. You can transfer controls to users who have the Account Administrator, Scope Administrator, or Risk Administrator user roles. If you do not want to transfer the controls to another user, you can select Unassigned.
-
Vendors: Transfer the vendors that the user was the Vendor Owner for to the new user. You can transfer vendor ownership to users who have the Account Administrator or Vendor Administrator user roles.

-
Tasks: Transfer the tasks that the user was responsible for approving or completing to the new user. If the user is the User Assigned for tasks, the new user will become the User Assigned for those tasks. If the user is the Approving Manager or Second-level Approving Manager for tasks, the new user will become the Approving Manager of Second-level Approving Manager for those tasks. Only tasks that have not been satisfied will be transferred to the new user. To learn which tasks have been satisfied and which tasks have not been satisfied, see the list below:
- Click the Disable and Transfer button to confirm any responsibility transfers and disable the user account.