In your KCM GRC platform, you can create user groups that will be responsible for completing control tasks, in order to satisfy your organization's compliance requirements or risk management objectives.
This article explains how to manage the user groups that will complete tasks for your risk management or compliance management controls. Before you begin, please see the How Do I Use User Groups? section below.
How Do I Use User Groups?
The first step is to create a user group and assign a user as the Group Lead. Then, you'll assign the user group to one or more controls. Assigning a user group to a control allows you to delegate task assignments and task evidence approvals to the Group Lead. Users who are assigned as a Group Lead have special permissions allowing them to reassign tasks to another user in their group. To learn more about user permissions and user roles, see our User Roles Guide.
Here are a few things you should know about assigning a user group to a control:
- When evidence is required for a task under this control, the Group Lead must approve the evidence before the task can be closed.
- The Group Lead is notified once evidence has been submitted for a task. To learn more, see Control Task Notifications.
- When creating task schedules or one-time tasks for the control, you must select one of the users from that group to be the User Assigned for the task. This means users who are not in the group cannot be assigned to task schedules for that control.
- The user who is assigned to the control's task schedule(s) will receive task reminder notifications from KCM GRC To learn more, see Control Task Notifications.
- Tasks must be completed by the User Assigned for the task.
- Group Leads or other group members cannot complete a task that is assigned to someone else unless they have a user role that allows them to do so, such as Scope Administrator. To learn more about user permissions, see our User Roles Guide.
- A Group Lead can reassign tasks for this control to another member in their user group.
- Group members can view all tasks that are created for the control that their group is assigned to. This includes tasks that may have been created before you assigned a group to the associated control.
Creating a User Group
You will start by creating one or more user groups. To create user groups you must have Account Administrator privileges. See our User Roles Guide to learn more about user permissions.
Follow the steps below to create a new user group:
- From the upper right-hand corner of your account, click Settings > Manage Users.

- Click the User Groups tab.

- Click the Create Group button. Then, add the details outlined below:
Note:We recommend that you avoid including the < and > special characters in these fields.
- Group Name: Create a title for the user group. This group name will be visible to group members, and to other users who can view tasks in your account.
- Group Description: Describe the purpose of the group. You can include details about the scopes and/or controls that this user group will be responsible for.
- Select Users: Select a user from the drop-down menu. You can also type a user's name or email address into this field to search for a user.
- Select Group Lead: Select a user from the list of users that you have added to the group.
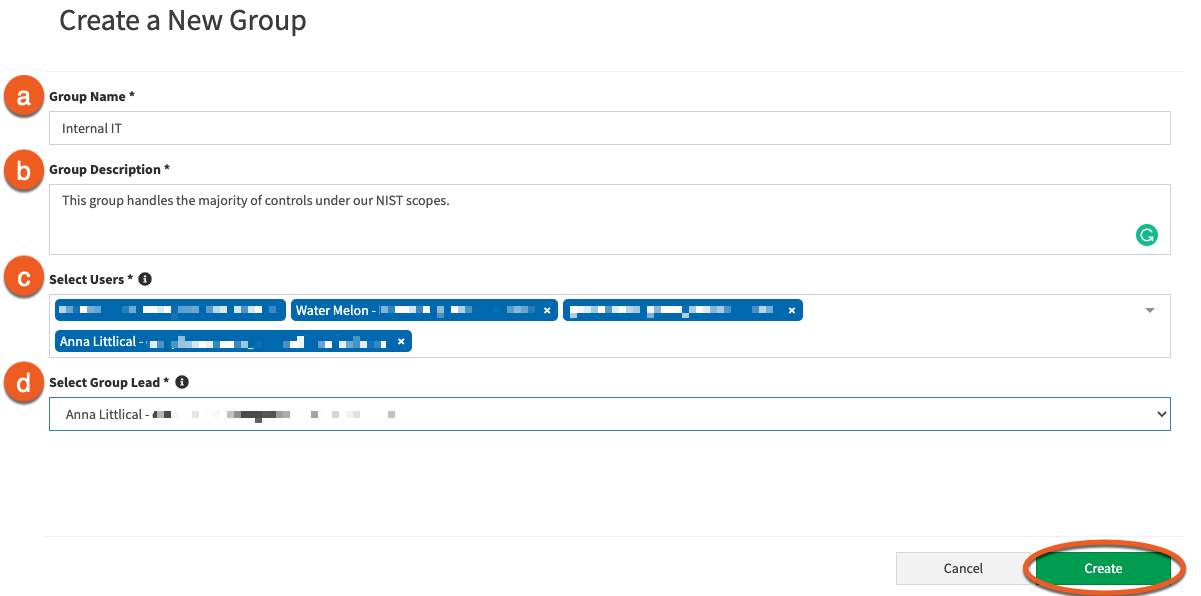
- Click Create to save the group.
Once you've created the group, you will assign the group to one or more controls. Proceed to the next section for instructions.
Assigning a User Group to a Control
Once you've created a user group, you can assign the group to one or more controls that the group will be responsible for. Once the group is assigned to a control, you can assign one of the group members to the control's task schedule or schedules.
Follow the steps below to assign a user group to a control:
- Navigate to the desired control using one of the following options:
- From the Controls Library:
- From the navigation menu on the left, click Controls.
- From the Controls Library, use the search bar under the Name or Description columns to find the appropriate control.
- Click a control name to open the control
- From a specific scope (to view controls that are mapped to the requirements under that scope):
- From the navigation menu on the left side, click Compliance > Scopes.
- From the View All Scopes page, click a scope name to open the scope.
- From the View Scope page, click the Controls tab.
- Click a control name to open the control.
Tip: If you will be assigning user groups to multiple controls in this scope, right-click the control name and open the control in a new tab, instead.
- From the Controls Library:
- From the View Control page, click the Update button.

- Click the User or Group Assigned drop-down menu, and search for the name of the desired user group.
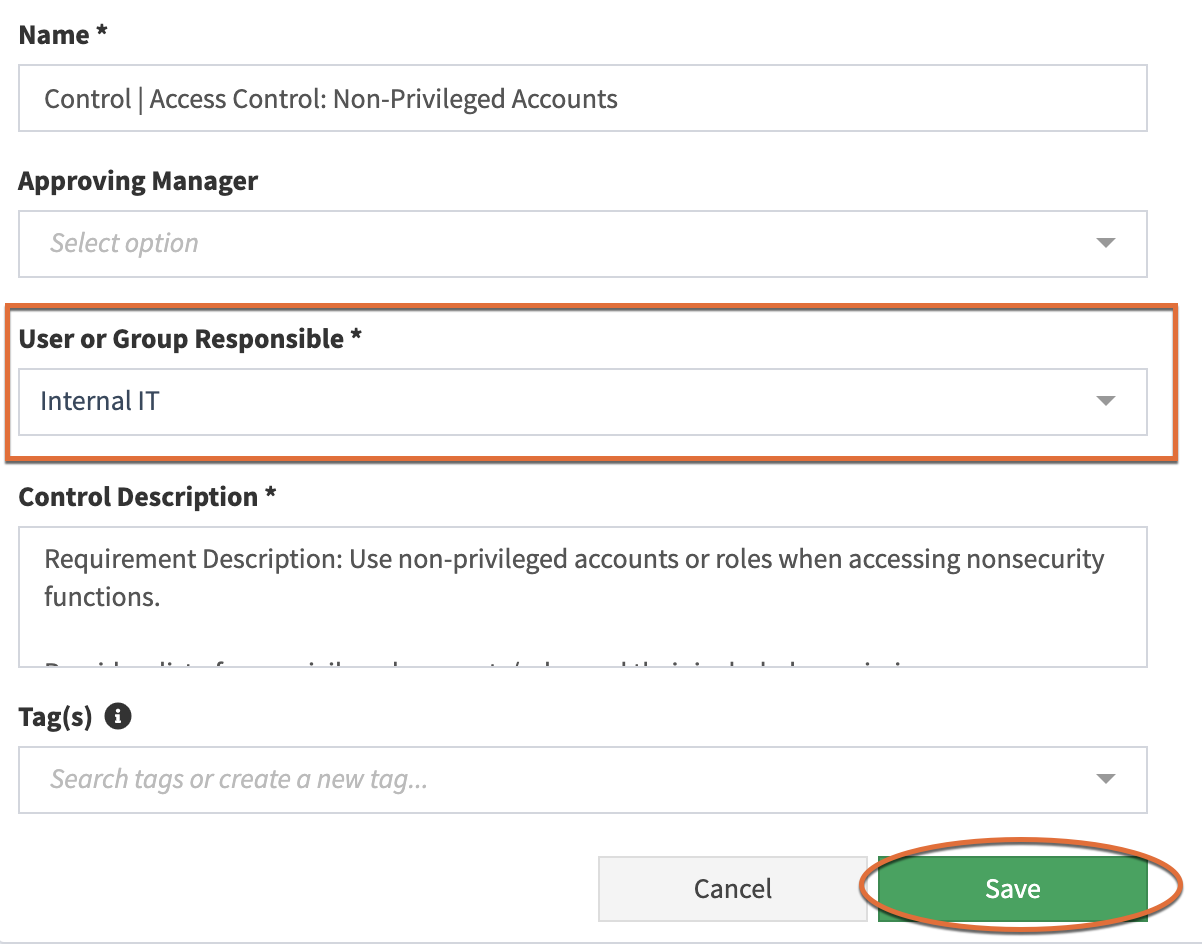
- Click Save to save your changes.
After you've assigned your group to a control, you can create one or more task schedules for this control and assign the group lead or another group member to the task schedule. For more information about control tasks, see our How to Work with Tasks and Task Schedules for Controls article.
Managing Group Memberships
See the following two subsections to add additional users to a group or to remove users from a group.
Adding Users to a Group
Follow the steps below to add users to a group:
- From the top-right, click Settings > Manage Users.
- Use the checkboxes in the far-left column to select the user or users that you would like to add to a group.
- Click the Select a Group drop-down and select the desired group. You can also click this field and type to search for the desired group.
- Then, click the Add Selected to Group button to add the selected users to this group.
Removing Users from a Group
Follow the steps below to remove users from a group:
- From the top-right, click Settings > Manage Users.
- Click the User Groups tab.
- Click a group name to open the group.
- Use the checkboxes in the far-left column to select the user or users that you would like to remove from the group.
Note: If you would like to remove the Group Lead from the group, first click the Update Group button to reassign the Group Lead role to a different user.
- Click the Remove Selected From Group button. Then, when prompted, click the Remove button.
Updating a User Group
You can make the following changes to a user group: Change the Group Name or Group Description, add or remove users from a group, and reassign the Group Lead role to a different user.
Follow the steps below to update a user group:
- From the top-right, click Settings > Manage Users.
- Click the User Groups tab.
- Click a group name to open the desired group.
- Click the Update Group button toward the top-right area of the page.
- Make the desired changes, then click the Save button.
Deleting a User Group
Follow the steps below to delete a user group:
- From the top-right, click Settings > Manage Users.
- Click the User Groups tab.
- Find the group you wish to delete from the list. Then, under the Actions column, click the trash can icon for that group.
- When prompted, click the Delete button to delete the group.