If your organization uses multi-factor authentication (MFA), you can enable MFA for your KCM GRC account. Enabling MFA will add an additional verification step when you log in to KCM GRC. Once MFA is configured for your account, KCM GRC will require that you enter an authentication code generated by your authenticator application each time you log in to your account.
If you're a KCM GRC Account Administrator or if your account contains sensitive information, we recommended that you set up MFA to make your account more secure. You can also require that all users use MFA to log in to your KCM GRC account.
Mandating MFA for All User Accounts
If you're an Account Administrator, follow the steps below to mandate MFA for all users in your account:
- Make sure your users have downloaded an authenticator application on their smartphone, such as Google Authenticator, Authy, or LastPass.
- Log in to KCM GRC.
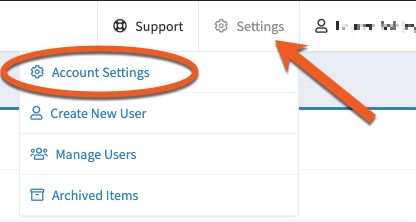
- In the top-right corner of the page, click the Settings button.
- In the drop-down menu, select the Account Settings tab. When you select this tab, you'll be taken to the View Account page.
- Select the Account Settings subtab
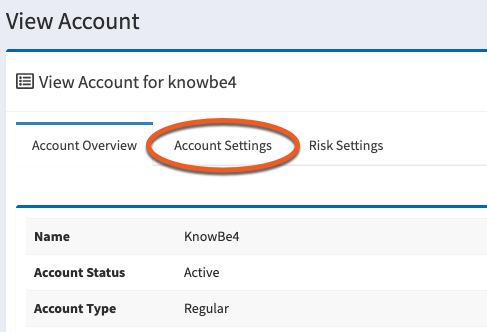
- In the Account Settings section of the page, click the Secure MFA Login drop-down menu.
- Select Mandatory to require that all of your users use an authenticator application to log in to KCM GRC.

- Click the Save button.
Once you've changed this account-wide setting to Mandatory, you'll have to configure MFA for your own account the next time you log in. To learn how to configure MFA for your account, see the Configuring Authenticator Applications for KCM GRC section below.
Mandating MFA for Individual User Accounts
As an alternative to requiring MFA for all user accounts, Account Administrators can mandate MFA for specific user accounts.
Follow the steps below to mandate MFA for individual user accounts:
- Log in to KCM GRC.
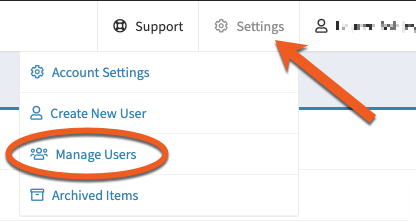
- In the top-right corner of the page, click the Settings button.
- In the drop-down menu, select the Manage Users tab. When you select this tab, you'll be taken to the Manage Users page.
- Click the pencil icon next to the user who you would like to require MFA for. When you click this icon, you'll be taken to the User Management page.

- Select the Require MFA toggle to enable this setting.

- Click the Save button.
Once you've updated this user setting, the user will be prompted to configure their Authenticator Application the next time they log in to their account.
Configuring Authenticator Applications for KCM GRC
If your Account Administrator has mandated MFA for your account, you will be prompted to configure your authenticator application the next time you log in.
Follow the steps below to learn how to configure MFA for your account:
- If you haven't already, download your organization's authenticator application on your smartphone, such as Google Authenticator, Authy, and LastPass, among others.
- Follow the prompts in the authenticator application to add a new account.
- Log in to your KCM GRC account. You will be prompted to set up MFA.
- From your authenticator application, capture the QR barcode from the KCM GRC Enable MFA page. If this method is not successful, you can manually enter the Secret Token displayed on this page.

- Once your authenticator application has recognized this QR code or secret token, it will add KB4 Compliance and begin to provide authentication codes. Enter the first code in the Verify Code 1 field of the KCM GRC Enable MFA page. KCM GRC will automatically verify the accuracy of the code you provide.

- Wait until your application provides another code, then input this code into the Verify Code 2 field.
- Once both codes have been verified, the Enable Secure MFA Login button will be enabled. Click this button to complete the setup
Setting Up MFA for Your Account
Follow the steps below to set up MFA for your own account:
- Make sure you've downloaded an authenticator application to your smartphone, such as Google Authenticator, Authy, and LastPass, among others.
- Log in to KCM GRC.
- In the top-right corner of the page, click your name.
- Click the Profile button.

- From the User Profile page, click the Set Up MFA button. When you click this button, you'll be taken to the Enable MFA page.

- Follow steps one through four from the Configure Authenticator Applications for KCM GRC section above to configure MFA for your KCM GRC account.
Disabling MFA
If MFA is optional for your account and you would like to reset or disable MFA, follow the instructions below:
- Log in to KCM GRC.
- In the top-right corner of the page, click your name.
- Click the Profile button.
- From the User Profile page, click the Reset MFA button.

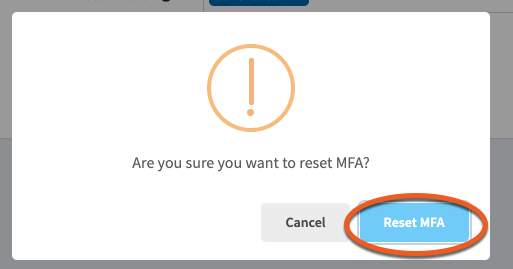
- In the pop-up window that opens, click the Reset MFA button to disable MFA.
- Click the OK button.
- (Optional) If you would like to set up MFA again, click the Set Up MFA button and follow the instructions in the Configuring Authenticator Applications for KCM GRC section above.
If you're an Account Administrator and you need to disable MFA for an individual user account, follow the steps below:
- Log in to KCM GRC.
- In the top-right corner of the page, click the Settings button.
- In the drop-down menu, select the Manage Users tab. When you select this tab, you'll be taken to the Manage Users page.
- Click the pencil icon next to the user who you would like to require MFA for. When you click this icon, you'll be taken to the User Management page.
- Select the Require MFA toggle to disable the setting.

- Click the Save button.
- Click the Reset MFA button to disable MFA for the user.

- In the pop-up window that opens, click the Reset MFA button to disable MFA.
- Click the OK button.
Troubleshooting MFA
If you're an Account Administrator and one of your users is unable to log in to their account due with MFA, you can reset the user's MFA.
Follow the steps below to reset a user's MFA:
- Log in to KCM GRC.
- In the top-right corner of the page, click the Settings button.
- In the drop-down menu, select the Manage Users tab. When you select this tab, you'll be taken to the Manage Users page.
- Click the pencil icon next to the user who you would like to reset MFA for. When you click this icon, you'll be taken to the User Management page.
- Click the Reset MFA button.
- In the pop-up window that opens, click the Reset MFA button.
- Click the OK button.
The next time the user logs in to KCM GRC, they will be prompted to reconfigure their authenticator application for KCM GRC. For instructions, see the Configuring Authenticator Applications for KCM GRC section above.
If resetting the user's MFA does not solve the issue or if you need additional help, contact our support team.