Training notifications are the emails your users, managers, and admins receive throughout a training campaign. They welcome users when they're enrolled, remind them about upcoming or past due assignments, and confirm when training is complete. You can use KnowBe4's built-in notifications as they are, customize them to match your organization, or create your own.
To manage your training notifications, navigate to Training > Notification Templates.
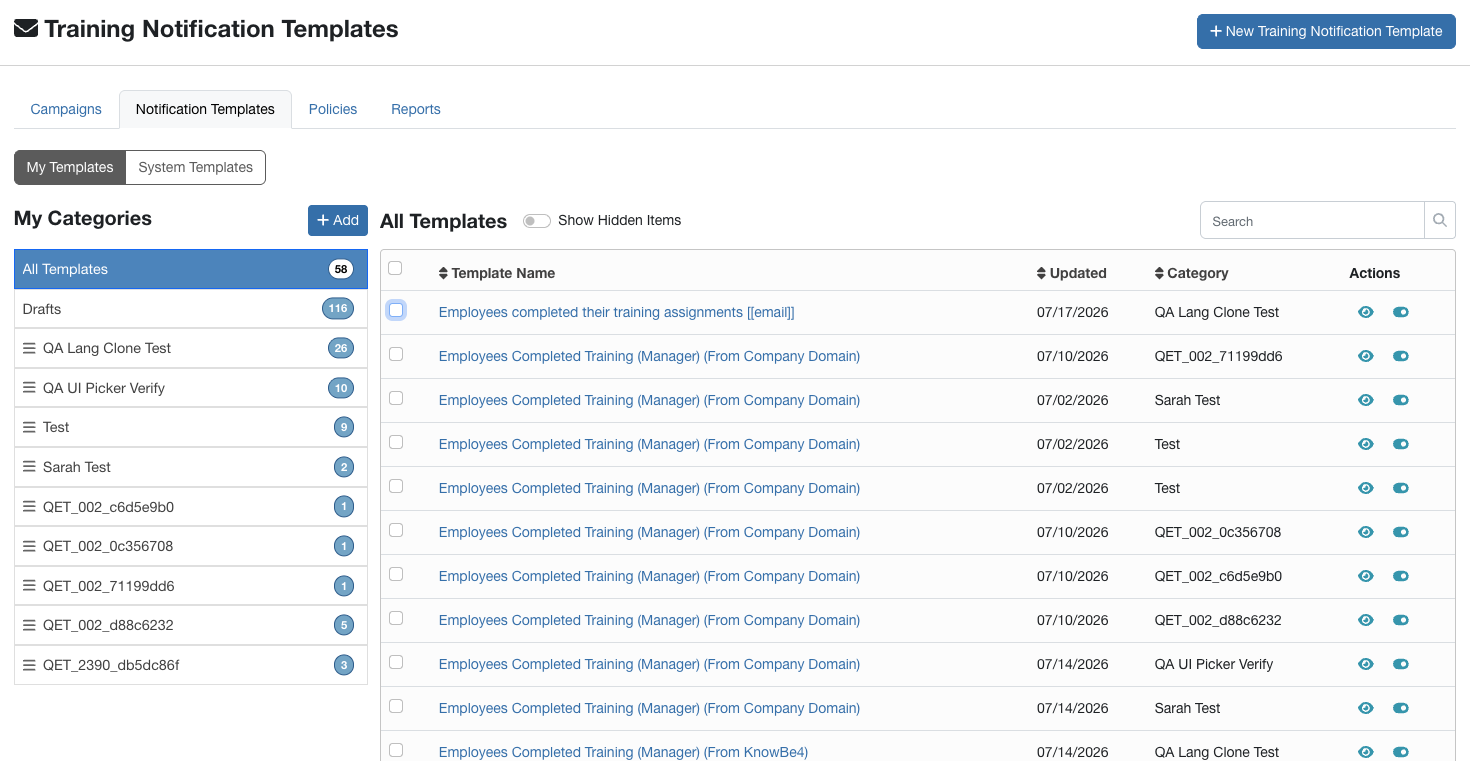
This page has two subtabs:
- My Templates: The templates you create or save, grouped into categories that you manage.
- System Templates: KnowBe4's built-in notification templates, grouped into system categories such as Welcome Notification, Past Due Notification, and Completion Notification.
From either subtab, you can preview a template, hide a template, and search for a template by name.
On the My Templates subtab, you can also create categories and move templates into them so your custom notifications are ready to use in a training campaign.
My Templates
Under My Templates, you can create or save templates. Your templates are grouped into categories that you manage. When you edit a system template, a version is saved in the Drafts category. From there, you can move the template to another category.
To learn more about the options in this section, see the screenshot and the list below:
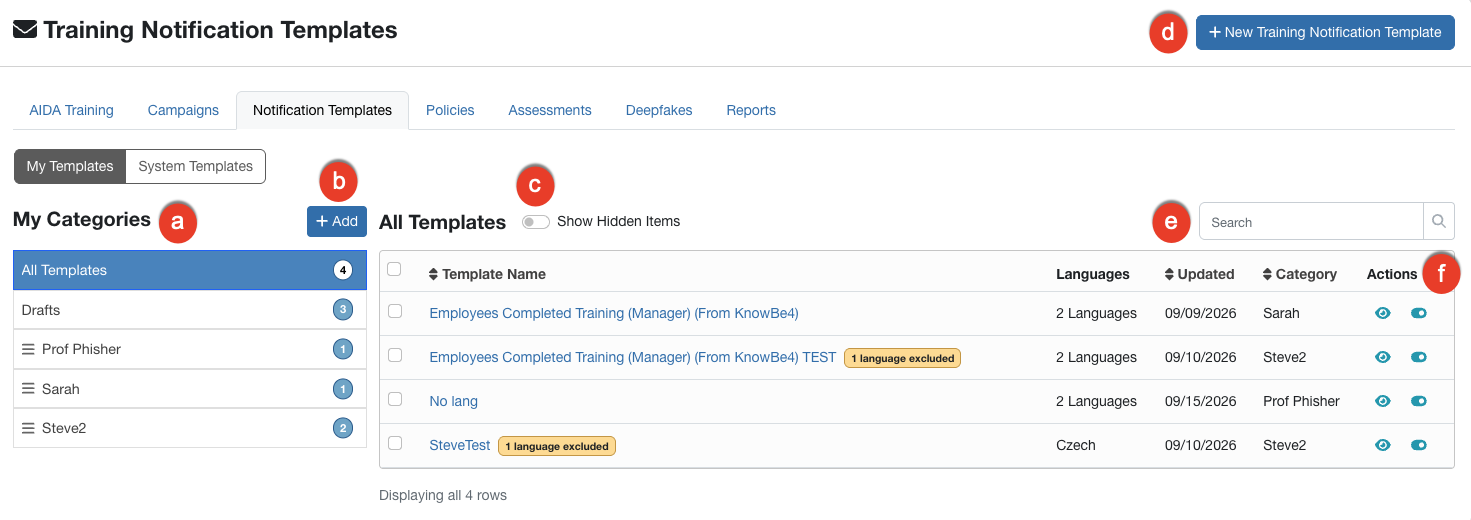
- My Categories: List of all categories under My Templates.
- + Add: Click this button to add a new category.
- Show Hidden Items: Select the toggle to show all templates, including ones you have hidden.
- + New Training Notification Template: Click this button to add a new template.
- Search: Use this field to search for templates.
-
Actions: In the Actions column, select the three-dot icon to open the actions menu, then select one of the following options for a template:
- Preview: Click this icon to preview the notification.
- Hide Template: select the toggle to hide the template from the list.
System Templates
Our built-in notification templates are grouped into system categories such as Welcome Notification, Past Due Notification, and Completion Notification. You can use these templates as they are, or use them as a starting point for your own.
To learn more about the options in this section, see the screenshot and the list below:
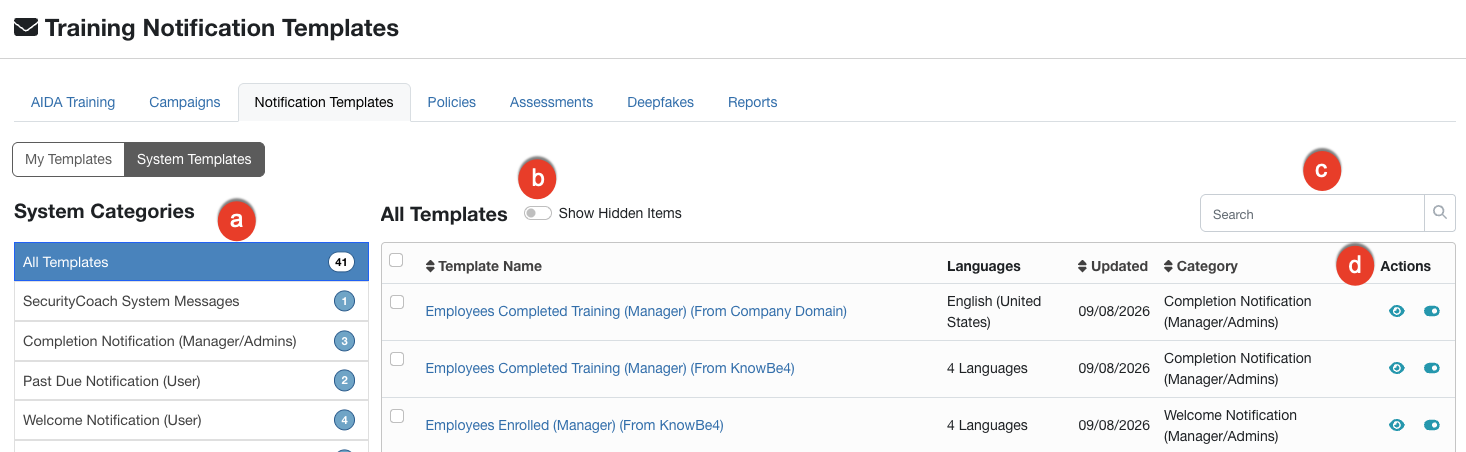
- System Categories: List of all categories under System Templates.
- Show Hidden items: select the toggle to show all templates, including ones you have hidden.
- Search: Use this field to search for templates.
-
Actions: Select one of two actions for a template:
- Preview: Click this icon to open a pop-up showing a preview of the notification.
- Hide Template: select the toggle to hide the template from the list.
Work with Templates in Multiple Languages
My Templates and System Templates can both include multiple languages. In either template list, the Languages column shows how many languages a template includes. Each template is one row in the list, regardless of how many languages it includes.
A template that includes one language shows that language, such as English (United States). A template that includes more than one language displays the number of languages as a link, such as 4 Languages.
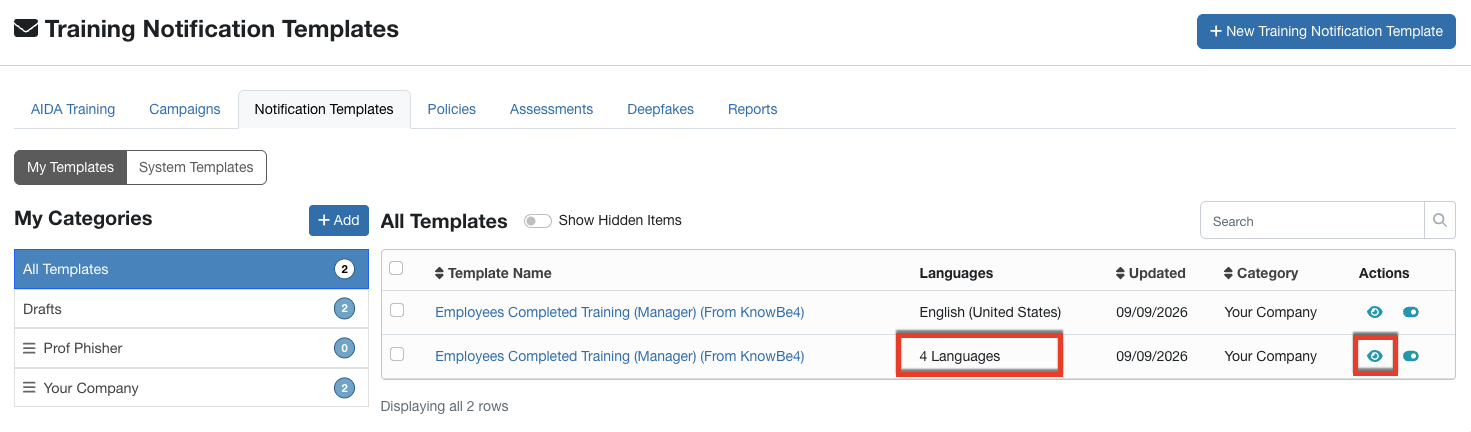
Each language in a template is a separate version of the notification, with its own subject line and body. You can preview, edit, or copy any of a template's languages. You can also choose which languages to copy when you add a template to one of your categories.
Two things must be true for your users to receive a notification in their own language. The template must include a version in that language, and localized training notifications must be enabled for your account. To learn how to enable this setting, see our Localization Guide.
Preview a Custom Template in Multiple Languages
To preview a custom template in multiple languages, follow the steps below:
-
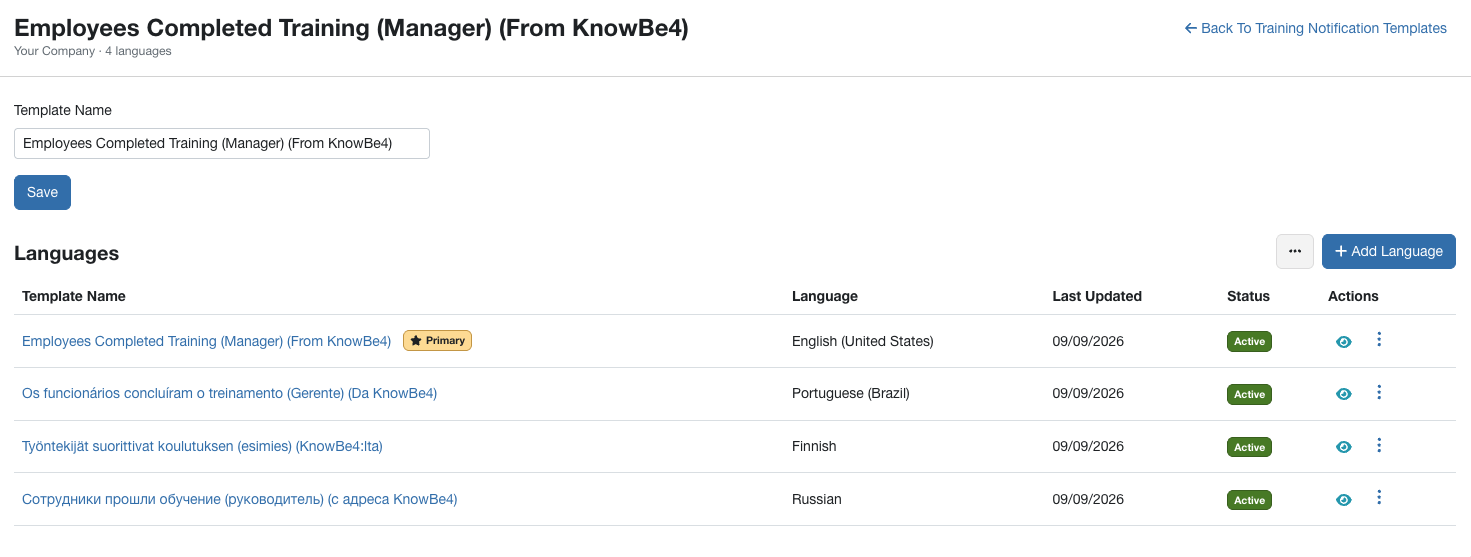
On the My Templates subtab, find the template you want to preview, then click the name of the template in the Template Name column. A page opens listing the template’s languages.
-
In the Actions column, click the preview icon. The Email Preview window will open.
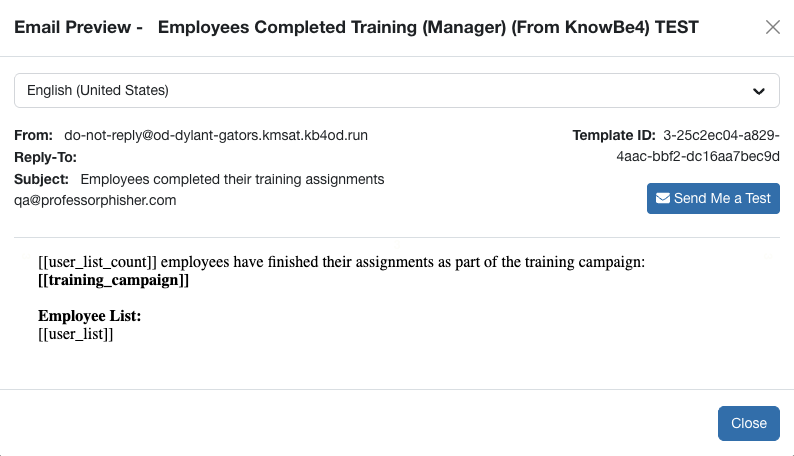
- Click Send Me a Test to email yourself a test of the notification in the language you have open.
- Note: Send Me a Test sends the language version you have open.
- Click Close to return to the template language page.
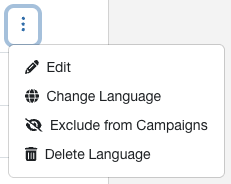
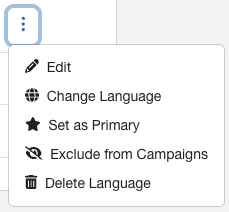
- To edit the template, click the ellipses icon in the Actions column. Your options differ depending on whether you edit a primary language or a non-primary language.
-
Primary language: This is the default language for your template. You have options to edit the template, change the language, exclude this language from a campaign, or delete the language. If you decide to delete the language, a pop-up window opens and requires you to select a new primary language.
-
Non-primary language: You have options to edit the template, change the language, set the language as the primary language, exclude this language from a campaign, or delete the language.
-
- To exit this page, click Back to Training Notification Templates in the top-right corner of the page.
Add a Language to Your Custom Template
To add a language to the template, follow the steps below:
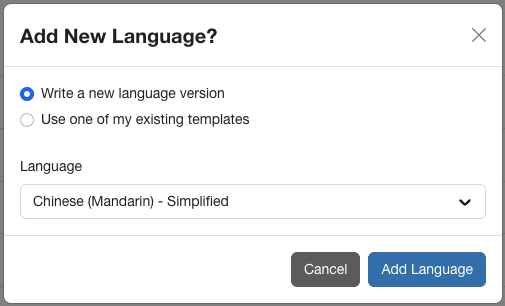
- Click +Add New Language. A pop-up window opens.
- Make a selection:
-
If you want to write a new language version, select the Write a new language version option, select the language from the Language drop-down menu, and then click Add Language.
-
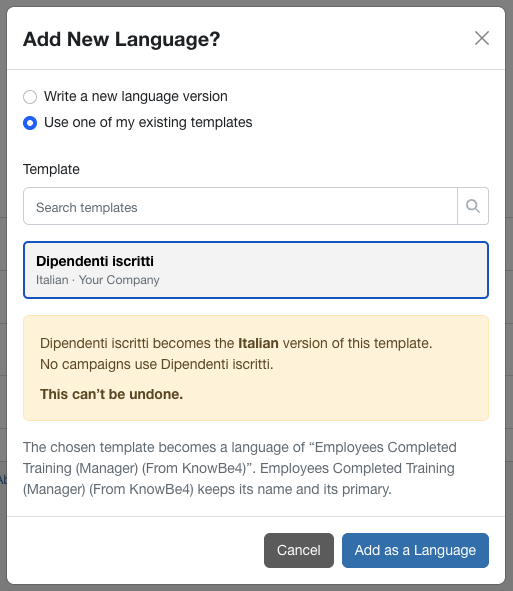
To use one of your existing templates, select the Use one of my existing templates option. Then, search for a template or select one from the list and click Add as a language. The list only includes templates in languages that this notification doesn't already have.
-
Edit a Custom Language Template in a Specific Language
To edit a template in a specific language, follow the steps below:
- Click the ellipses icon in the Actions column.
-
Click Edit to open the template in the edit form, in the language you selected.
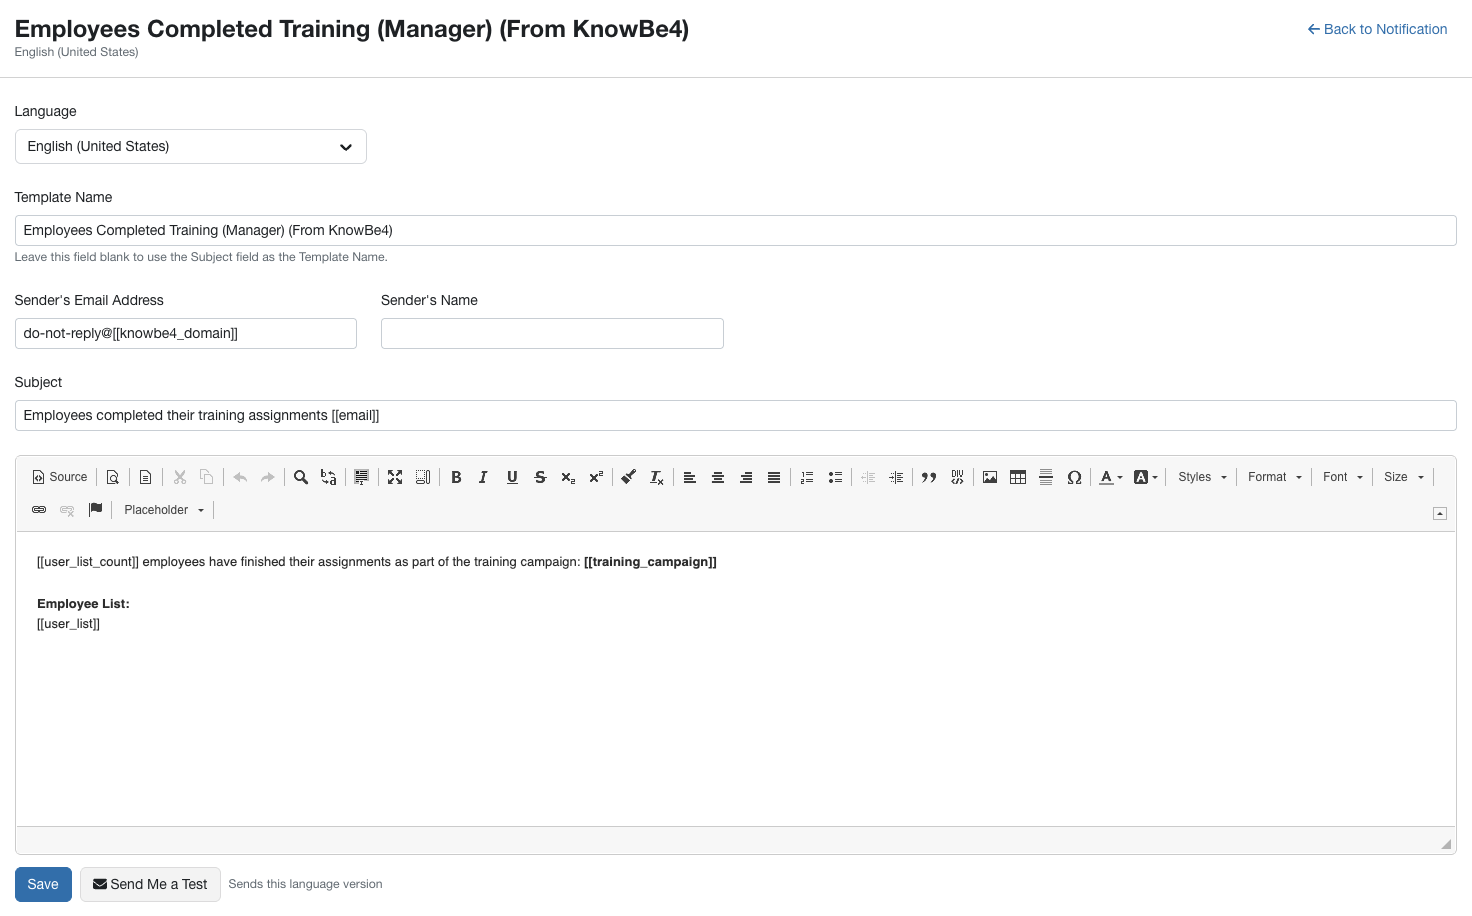
- Edit the details and content in the template.
- Click Save, then click Back to Notification at the top-right corner of the page to return to the notification page.
Manage the Languages on Your Custom Templates
After a custom template is in one of your categories, you can add a language to it, change a version's language, and remove or hide a version. You can also combine templates you built separately for each language into a single template.
When you combine two templates, any campaign that used either of the original templates is updated automatically, so you don't need to rebuild or reassign your campaigns.
To create a template that includes more than one language, the quickest way is to copy a system template and select multiple languages when you copy it. To learn more, see Copy a System Template to a Category from the Preview Window below.
Preview a System Template in Multiple Languages
To preview a template in multiple languages, follow the steps below:
- On the System Templates subtab, find the template you want to preview.
-
In the Actions column, click the preview icon. The Email Preview window opens.
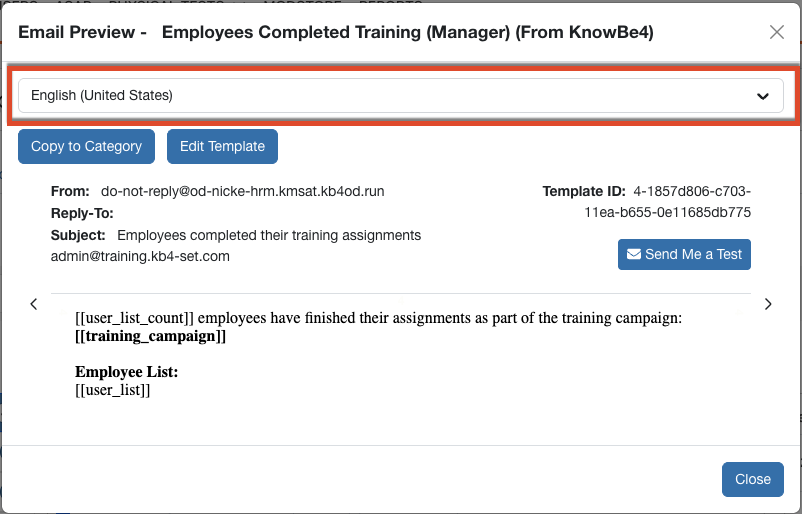
- To view the template in a different language, select the language from the drop-down menu at the top of the window.
From the Email Preview window, you can also copy the template into one of your categories or edit it. See the sections below.
Copy a System Template to a Category from the Preview Window
You can copy one or more of a template's languages into one of your categories without leaving the Email Preview window. To complete this action, follow the steps below:
-
In the Email Preview window, click Copy to Category.
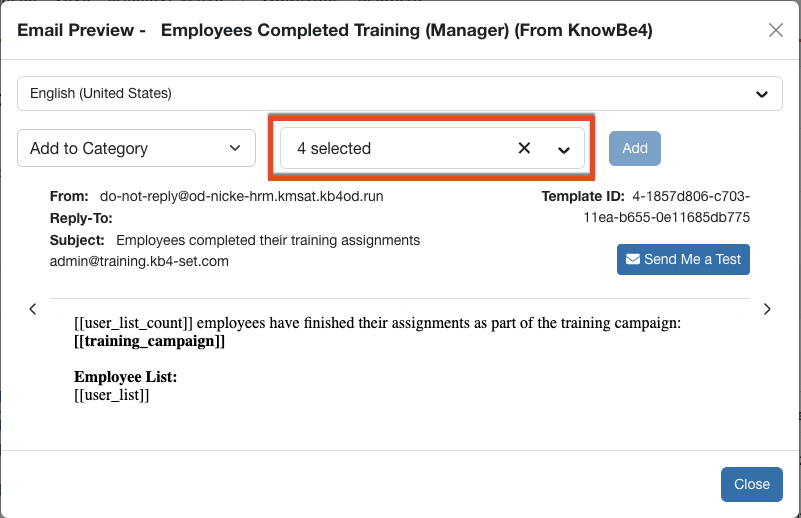
- From the Add to Category drop-down menu, select the category you want to copy the template into.
- From the languages drop-down menu, select the languages you want to copy. By default, all of the template's languages are selected.
- Click Add.
Edit a System Template in a Specific Language
To edit a template in a specific language, follow the steps below:
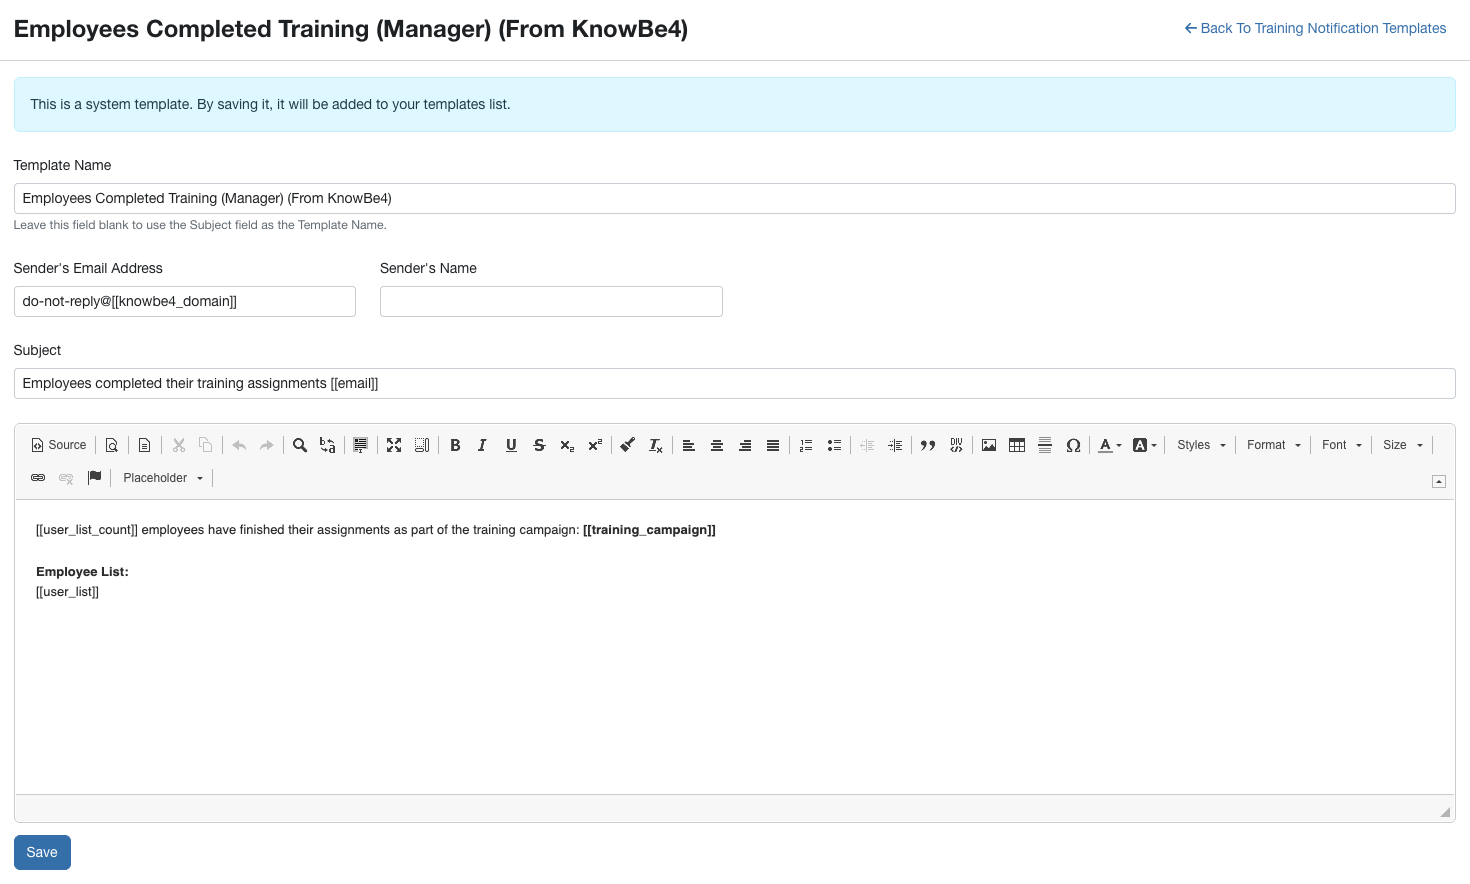
- In the Email Preview window, select the language you want to edit from the drop-down menu at the top.
-
Click Edit Template to open the template in the edit form, in the language you selected.
Add a System Template to a Category from the Template List
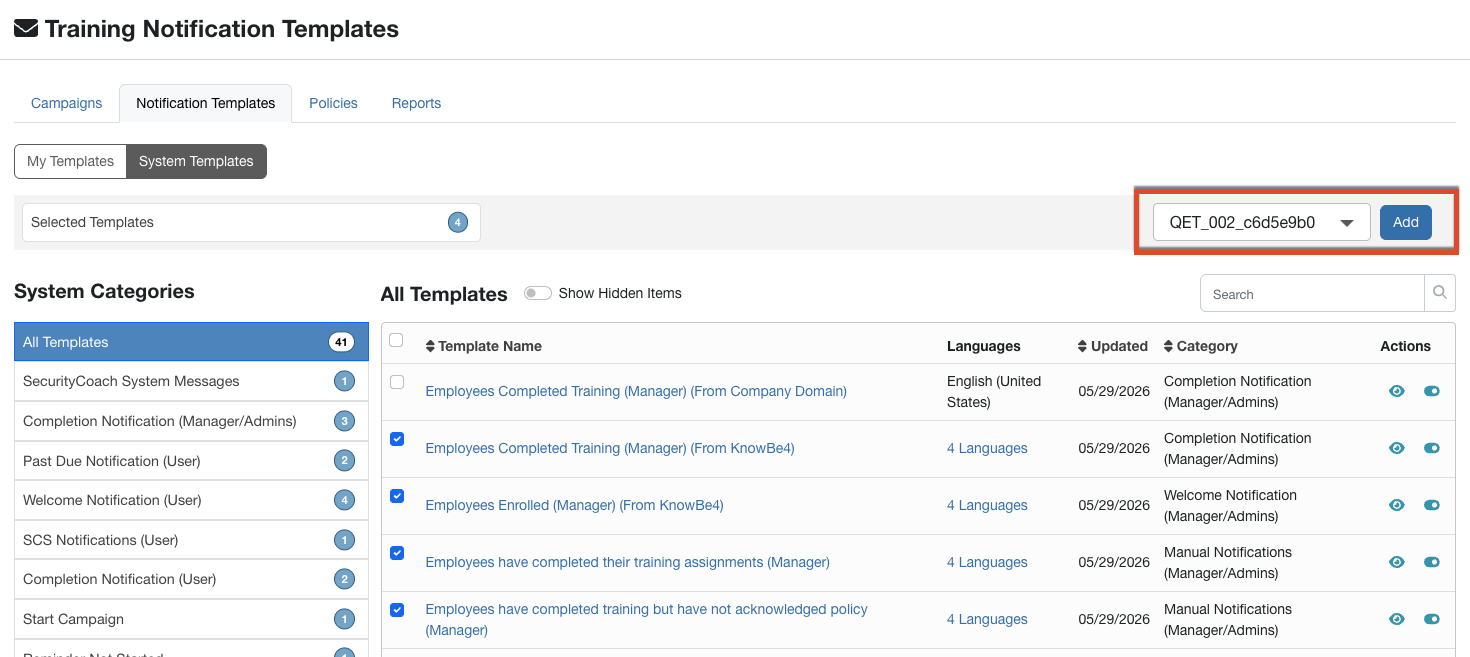
You can also copy templates into a category directly from the template list. When you add a template that includes multiple languages, you choose which languages to copy. To add a template to a category from the template list, follow the steps below:
- On the System Templates subtab, select the check box for each template you want to copy.
-
From the Add to Category drop-down menu, select the category you want to copy the templates into.
-
Click Add. If a selected template includes more than one language, the Select Languages to Add window opens.
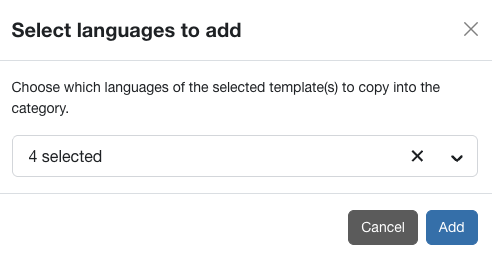
- In the Select Languages to Add window, select the languages you want to copy, then click Add. Only the languages you select are copied.
Customize Training Notifications
KnowBe4 provides several built-in training notifications that you can use when you enroll your users in training. You can customize these built-in notifications, modify our blank templates, or create your own notifications. To learn how to do this, review the steps below or check out our Customizing Training Notifications video.
To create or edit a training notification template, navigate to Training > Notification Templates. Under System Templates, click one of our built-in training notification templates to open it in our What You See Is What You Get (WYSIWYG) editor and make changes. Saving changes to a built-in system template will save a copy of your edit to the Drafts category under My Templates.
You can also create your own training notification templates by clicking the + New Training Notification Template button in the top-right corner of the My Templates subtab.
See the screenshot and list below to learn the tools you can use to create or edit a template with the What You See Is What You Get (WYSIWYG) editor: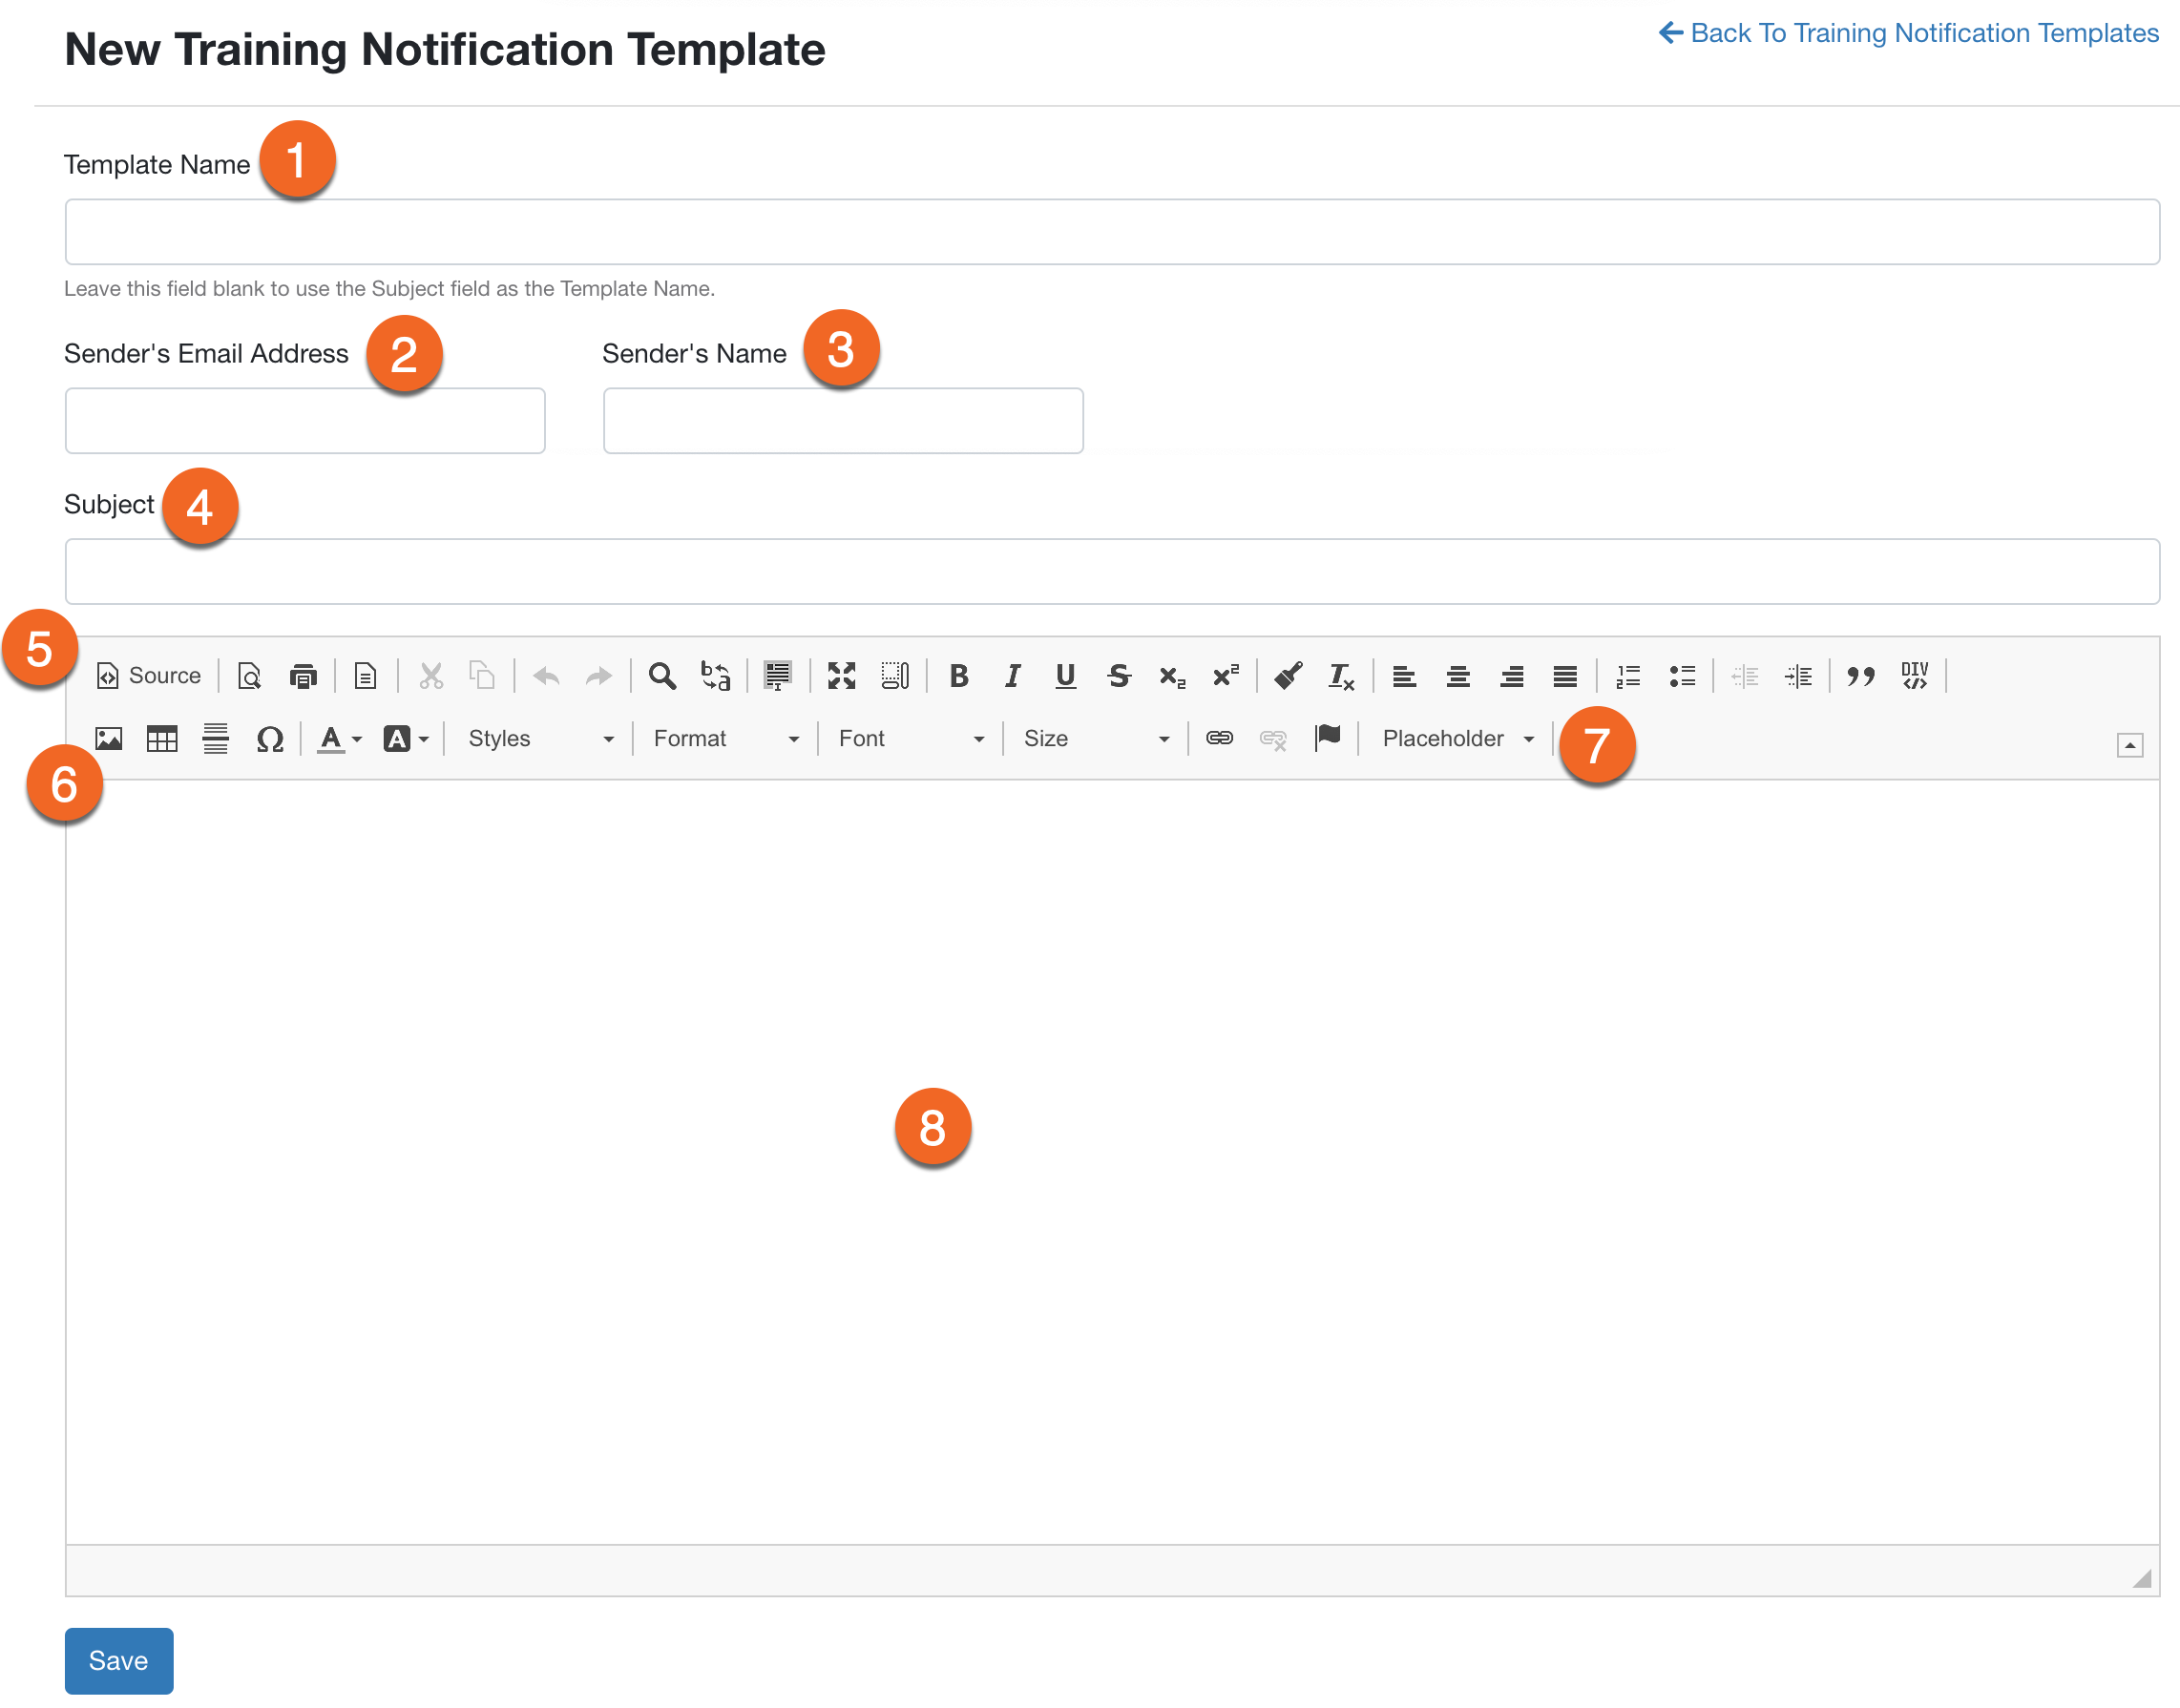
- Template Name (Optional): Enter a name for your template. Users will not see this field when they receive the training notification email.
- Sender's Email Address: Enter a sender's email address, which users will see in the email. You can enter any email address you would like.
- Sender's Name (Optional): Enter the name that will display in the email next to the sender's email address.
-
Subject: Enter the email’s subject line, which users will see in their inbox. This subject line will also be the title of the template if you haven't added a training notification template name. Here are a few examples:
- Mandatory Training Campaign
- You’ve been invited to training
- Oops, you clicked a phishing test!
- Source: Click this button to switch to a source code view of the template. If you're familiar with HTML, you can use it to create custom training notifications.
-
Image Icon: Click this icon to add a custom image to your training notification template. For more information, see our Add Custom Template Images article.
Note:Some versions of Microsoft Outlook will require adding additional tags to the source code of the image in order for it to display properly. See our Troubleshooting Template Image Issues article for more information. - Placeholder: Use the drop-down menu to add placeholders to your notifications. The placeholder options will automatically populate certain fields with your user, account, or training information. Training campaign notification placeholders can only be used in the body of a template. For more information, see our Placeholders Guide.
- Body: Enter your preferred text in the body of your training notification template. You can use the available text formatting options to customize the appearance of your template. You can also add tables, lines, and other details by clicking the buttons in the WYSIWYG editor. For more information about our body text recommendations, see below:
- The content of a training notification varies based on the information you want to provide to your users. We recommend including the training due date, as well as the login link or an explanation of how to log in.
- We recommend providing a brief explanation of the training and why the user is being enrolled. Feel free to add a personal touch so that your users feel more comfortable about receiving the email.
How to Use the Blank Templates Category
Under the System Templates section, the Blank Templates category includes blank versions of our training notification templates that have a custom design or style. All of our styled templates are tagged with the words (Banner) or (Border) in the template name. You can customize the style of these templates by making edits in the source code. If you're unfamiliar with HTML, each blank template includes instructional HTML comments in the source code to help guide you through the customization process. You can also visit the W3 schools website for more information on HTML.
Listed below are some of the customizations you can make using the blank templates:
- Border (click to view): Customize the color of the template border by adding your own RGB or hex color code.
- Visit the W3 schools website for more information on RGB or hex color codes.
- Alternatively, use the [[brand_color]] placeholder within the source code. This placeholder populates the hex code of your organization's brand color set in your Account Settings.
- Banner (click to view): Customize the background color of the banner by adding your own RGB or hex color code. Also, you can insert custom text for the banner.
- Visit the W3 schools website for more information on RGB or hex color codes.
- Alternatively, use the [[brand_color]] placeholder within the source code. This placeholder populates the hex code of your organization's brand color set in your Account Settings.
- Logo: Replace the KnowBe4 logo with your own organization's logo.
If you decide to use a blank template that has a (Logo) tag in the template name, be aware that this template will automatically populate your organization's logo using the [[company_logo_url]] placeholder. For this placeholder to work properly, add your organization's logo URL in your Account Settings. For more information about what placeholders you can use in training notifications, visit our Placeholders Guide.