If you're a Diamond-level customer, you can use callback phishing campaigns to allow you to see how likely users are to call unknown phone numbers and share sensitive information. With these campaigns, you can help prepare your users for real callback phishing attacks, also known as reverse vishing attacks. In these campaigns, users will receive an email with a phone number and a callback code. If they call the phone number, they'll be prompted to enter the callback code. Once they enter the callback code, they'll be asked to enter personal information.
Creating a Callback Phishing Campaign
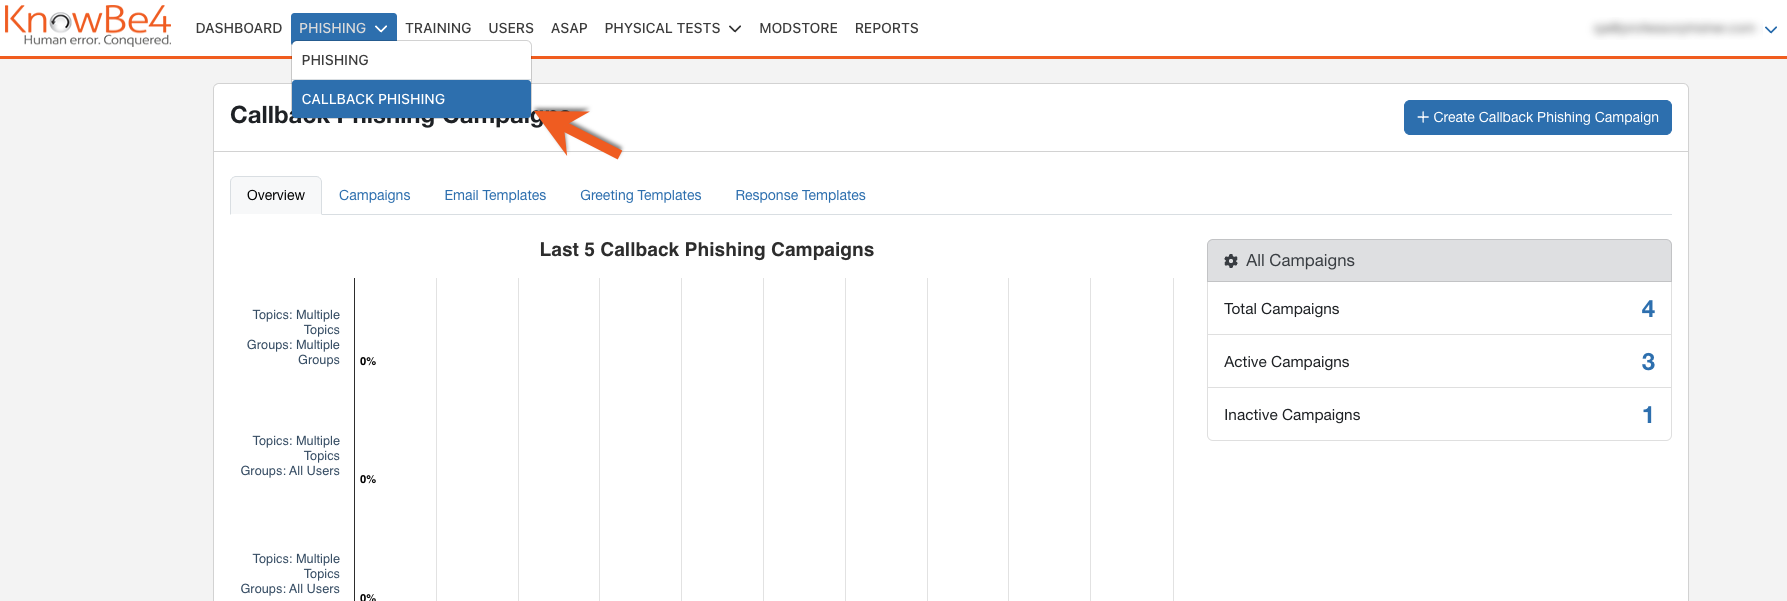
To create a callback phishing campaign, go to your KSAT console and navigate to Phishing > Callback Phishing. Then, click + Create Callback Phishing Campaign. On the New Callback Phishing Campaign page, you can customize your callback phishing campaign.
For more information about the New Callback Phishing Campaign page, see the screenshot and list below:
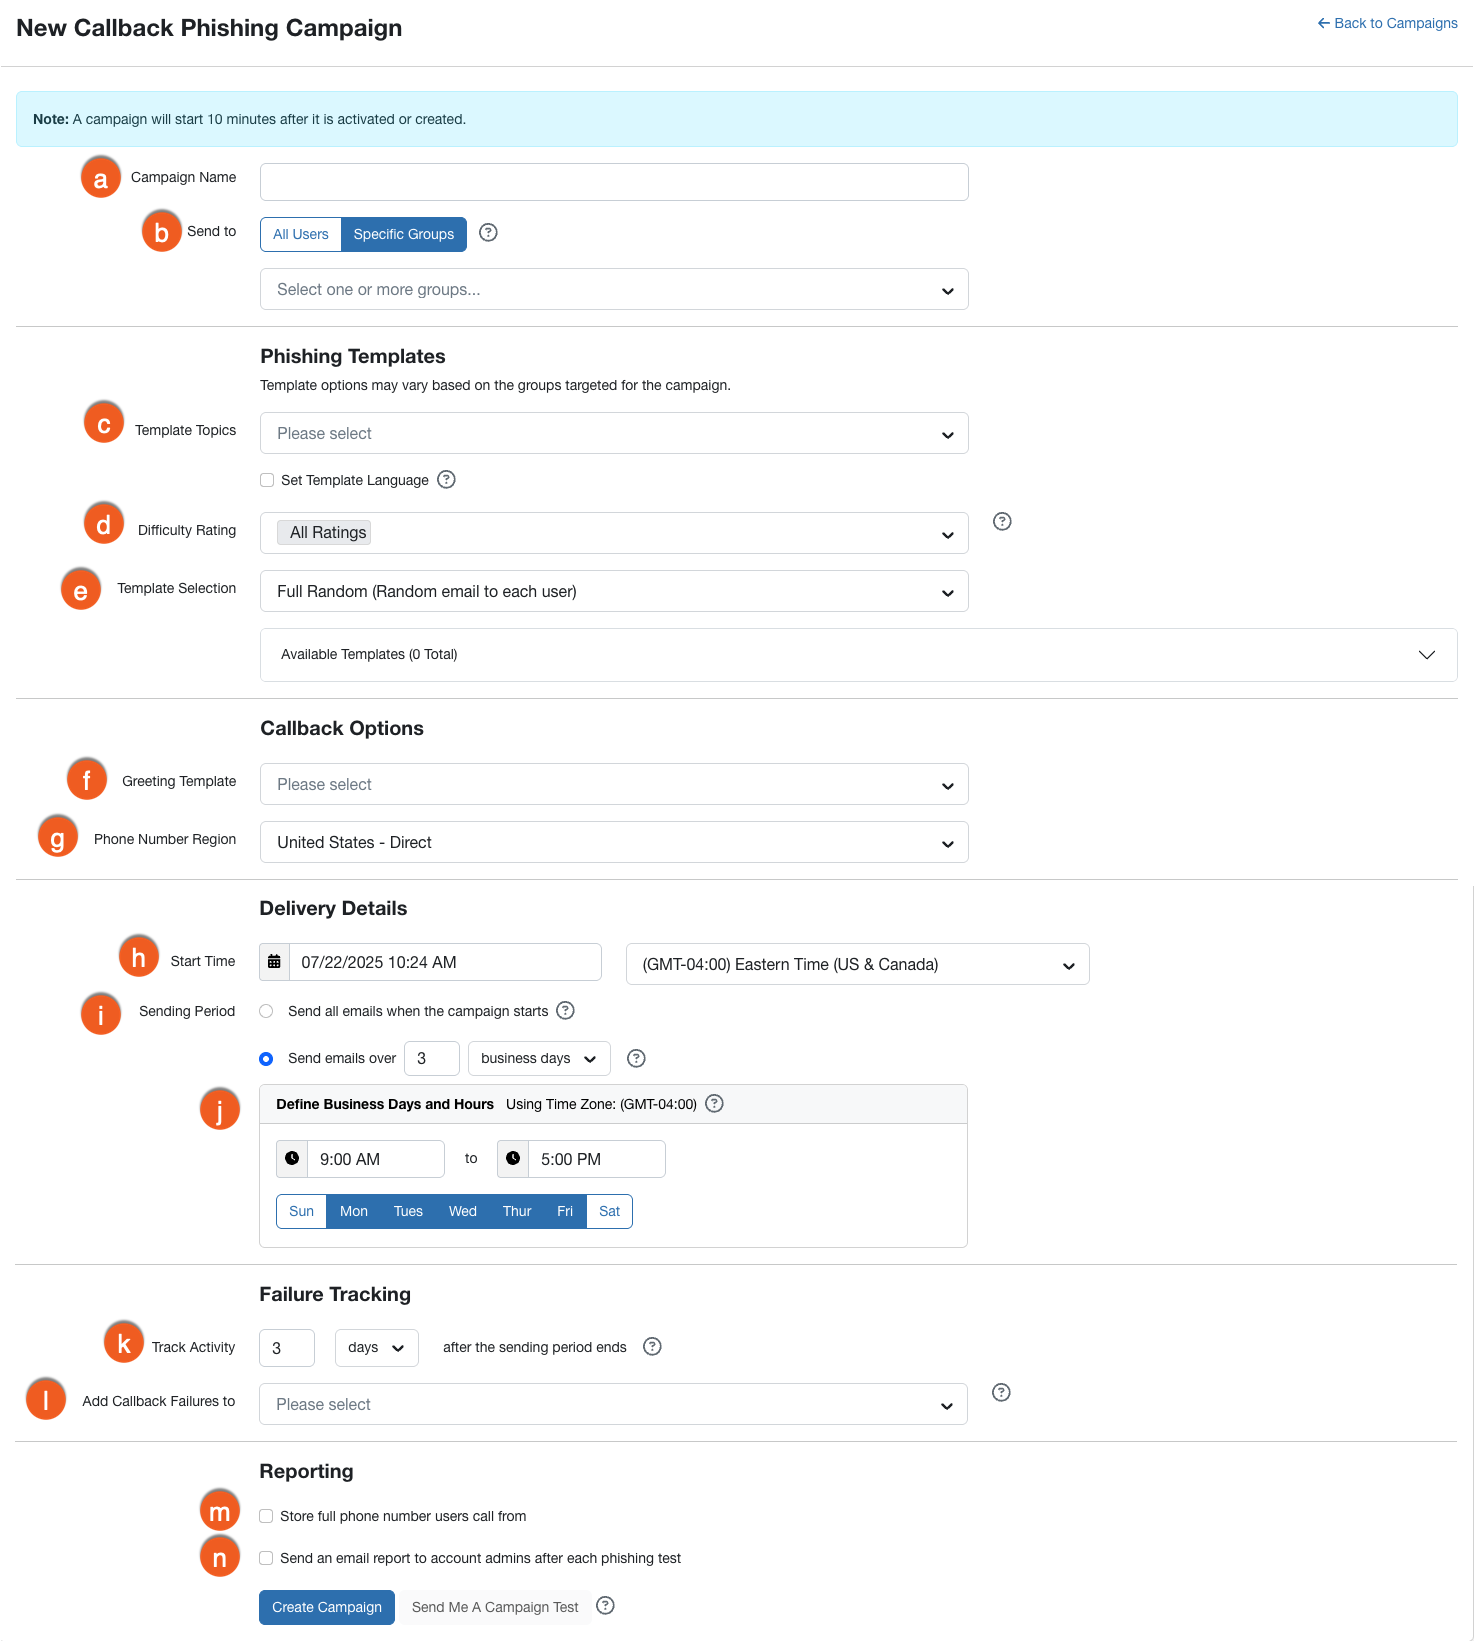
- Campaign Name: Enter a name for your callback phishing campaign. This is a required field.
- Send to: Select which users you would like to receive a callback phishing test. You can select either All Users or Specific Groups. If you choose Specific Groups, you must select a group from the drop-down menu. This is a required field.
- Template Topics: Select the type of callback phishing template you want to send. You can select one or more phishing template topics from the first drop-down menu. This is a required field.
- Difficulty Rating: Select the difficulty rating for your callback phishing campaign. For more information about difficulty levels, see our Template Difficulty Ratings Overview article.
- Template Selection: Select the specific callback phishing template you want to send. Full Random is selected by default. For more information, see our Automated Template Selection Overview article.
- Greeting Template: Select the greeting template you want to send. This will be the audio message that your users hear if they call the phone number in the email. If you select a custom email template, the drop-down menu will populate the associated greeting template. For more information on callback phishing templates, see our Create and Edit Callback Phishing Templates article.
- Phone Number Region: Select the phone number region that will be added to the phone number in your callback phishing emails. For a full list of available regions, see the Available Regions for Callback Phishing section at the end of this article.
- Start Time: Set the date, time, and time zone you would like your callback phishing campaign to start. Your default time zone is the one set in your Account Settings.
-
Sending Period: Select when to start sending callback phishing tests. You can choose to send all of the emails at once or over a period of time. For more information about the available options, see below:
- Send all emails when the campaign starts: If you select this option, callback phishing tests will be sent to all selected users when the campaign starts. Users will not receive the email at the same time, but they will receive it on the same day.
- Send emails over…: If you select this option, callback phishing tests will be sent to users at random during the time period selected. You can enter a number between one and four and pick business days or weeks. For more information about sending and tracking periods, see our Monitor and Review Phishing Campaigns article.
- Define Business Days and Hours: By default, your campaign will only send emails during the business hours set in your Account Settings. You can change the hours when your emails are sent by entering a start and end time in this field. You can also choose what days you would like emails to be sent by selecting the date check boxes.
-
Track Activity: Select how long you would like to track phishing failures after the sending period ends. You can enter a number between one and four and choose from either days, weeks, or months. Your KSAT console will track activity until the campaign’s end date. The campaign’s end date is a combination of three values: the date of the first email, the sending duration, and the tracking duration. For more information about these values, see below:
- Date of the first email: This value represents the date, in Eastern Time (US & Canada), of the first email sent during the callback phishing campaign.
- Sending duration: This value represents the period of time that your callback phishing campaign emails were all sent.
- Tracking duration: This represents the period of time when your KSAT console will track emails from your callback phishing campaign.
For more information about sending and tracking periods, see our Monitor and Review Phishing Campaigns article.
- Add Callback Failures to: Select a user group you want to add your users to if they fail a callback phishing test. You can then enroll the user group in remedial training. For more information, see our Recommended Callback Phishing Training section at the end of this article.
- Store full number users call from: Select this check box to store the full phone number used to call the callback phishing number. This setting can help you verify that the user called. This feature is disabled by default. If you do not enable this setting, your KSAT console will only store the area code associated with the phone number.
- Send an email report to account admins after each phishing test: Select this check box to automatically send a report to all account admins when a callback phishing test ends. The reports include metrics such as Phish-prone Percentage, callback failures, and more.
Once you’ve finished customizing your callback phishing campaign, click Create Campaign to save all changes.
Managing Callback Phishing Campaigns
To manage your phishing campaigns, go to your KSAT console and navigate to Phishing > Callback Phishing > Campaigns.
On the Callback Phishing Campaigns page, you can view and edit your campaign details. For more information about the Callback Phishing Campaigns page, see the screenshot and list below:
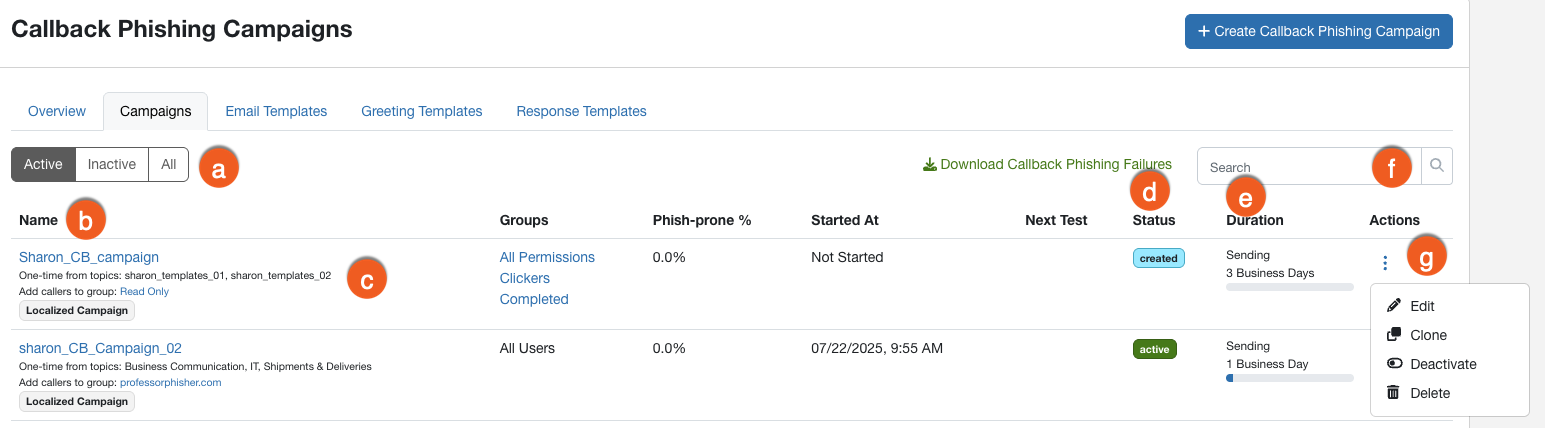
- Filters: You can use these filters to sort campaigns by Active, Inactive, or All.
- Campaign table: In this table, you can find a list of campaigns sorted by the Started At date, with the most recent campaign displaying at the top of the table. You can see each campaign’s groups, Phish-prone Percentage, when the campaign started, the campaign status, and the duration of the campaign.
- Name: Click the campaign’s name to view details about it. For more information, see our Monitor and Review Phishing Campaigns article.
-
Status: This column displays the campaign’s status. The status can be Created, Pending, Active, Closed, or Error:
- Created: The campaign is created but is not currently active. For one-time phishing campaigns, Created indicates that the campaign is scheduled to start.
- Pending: The callback phishing campaign is scheduled and waiting to be sent.
- Active: The callback phishing campaign is ongoing.
- Closed: The campaign is inactive. If the campaign is in the Active subtab and has the Closed status, the campaign is temporarily inactive until the next PST begins. If the campaign is in the Inactive subtab and has a Closed status, either the campaign had a one-time frequency and ended, or the campaign was manually deactivated by an admin.
-
Duration: This column displays the campaign’s duration. The duration will either be Sending or Tracking:
- Sending: Your campaign is sending out callback phishing emails.
- Tracking: Your campaign is tracking user information.
- Search: Here you can search for your callback phishing campaign.
-
Actions: Click the drop-down arrow in this column to edit, clone, deactivate, or delete a campaign. For more information about these options, see below:
- Edit: This option opens the Edit Callback Phishing Campaign page. You can adjust your campaign as needed and click Update Campaign to save your changes. Options that are grayed out cannot be changed.
- Clone: You can click this option to create a copy of an existing campaign. Your cloned campaign will have the same settings, except for a new start time and the word "Clone" in the campaign name. You can edit the campaign to remove the word “Clone.”
-
Deactivate: You can click this option to stop your campaign from running.
Important:Once a campaign is deactivated, it cannot be reactivated. - Delete: You can click this option to permanently delete a campaign and all data, including recipients, failures, reports, and more. This action can’t be undone.
Monitoring Your Callback Phishing Results
To monitor your callback phishing results, navigate to Phishing > Callback Phishing > Campaigns. Click on the Campaign Name to view an Overview of your callback phishing campaign.
-
To learn more about the information available on the Overview page for a callback phishing campaign, see the list below:
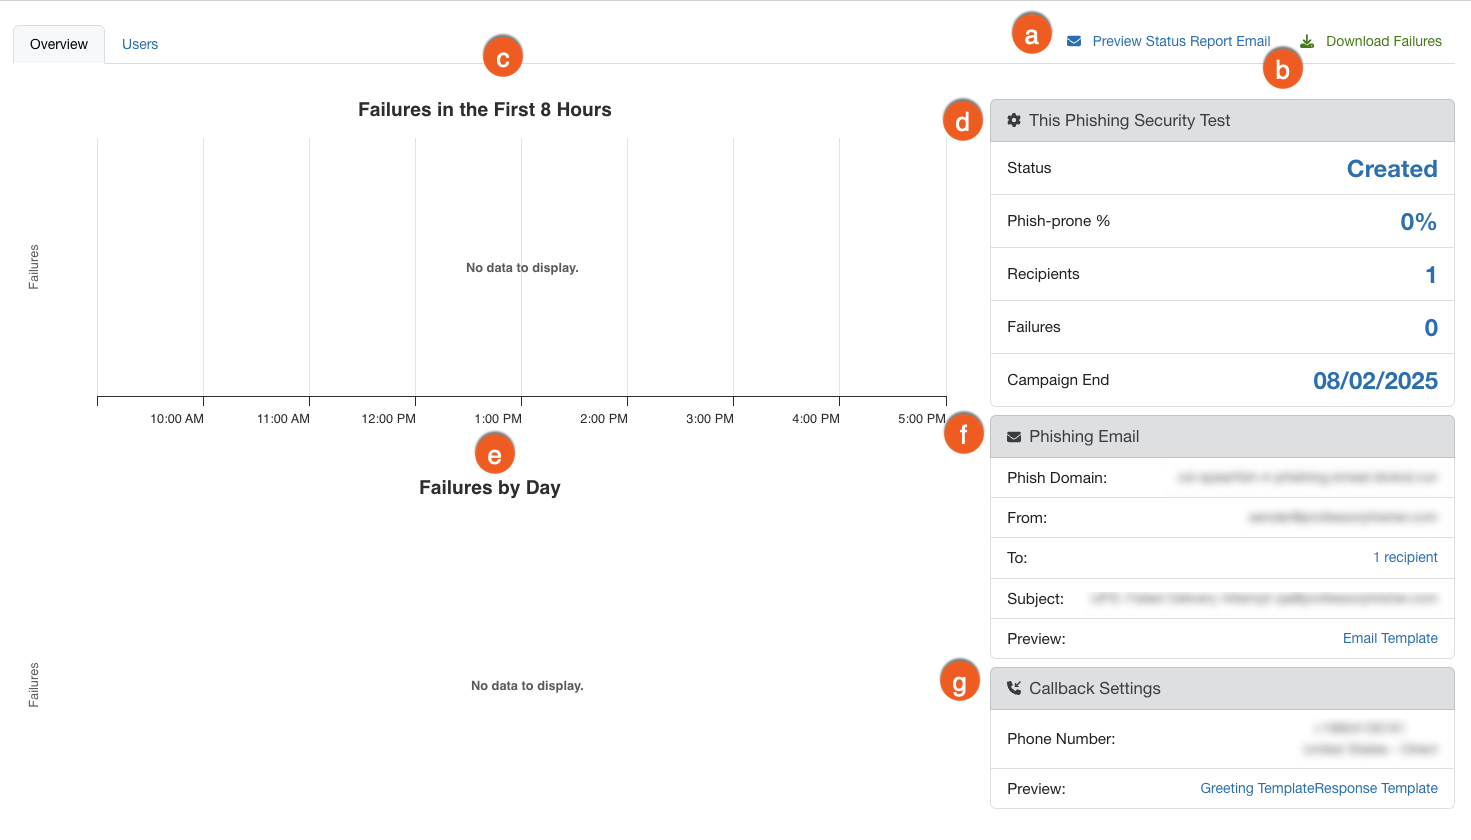
- Preview Status Report Email: You can click this button to open a window that displays the current report for the callback phishing campaign. At the bottom of the window, you can also enter an email address to send the current report.
- Download Failures: You can click this button to download a CSV file with information about these failures.
- Failures in the First 8 Hours: This graph shows how many failures occurred in the first eight hours and at what time they occurred.
- This Phishing Security Test: This chart shows information about your callback phishing security test. The chart will display the campaign’s status, Phish-prone Percentage, number of users who received the phishing test, number of users who failed the phishing test, and the campaign’s end date.
- Failures by Day: This graph shows how many failures occurred on specific days during the callback phishing campaign.
- Phishing Email: This chart shows information about the email used in the callback phishing test, including the From address, To address, number of email recipients, Subject, Phish Domain, and a preview of the email template.
- Callback Settings: This chart shows information about your callback settings, including the phone number used and a preview of the greeting template and response template used.
-
To the right of the Overview subtab, you will see the Users subtab. Click on this tab for more insights into your callback phishing campaign. To learn more about the information available on the Users page, see the list below:
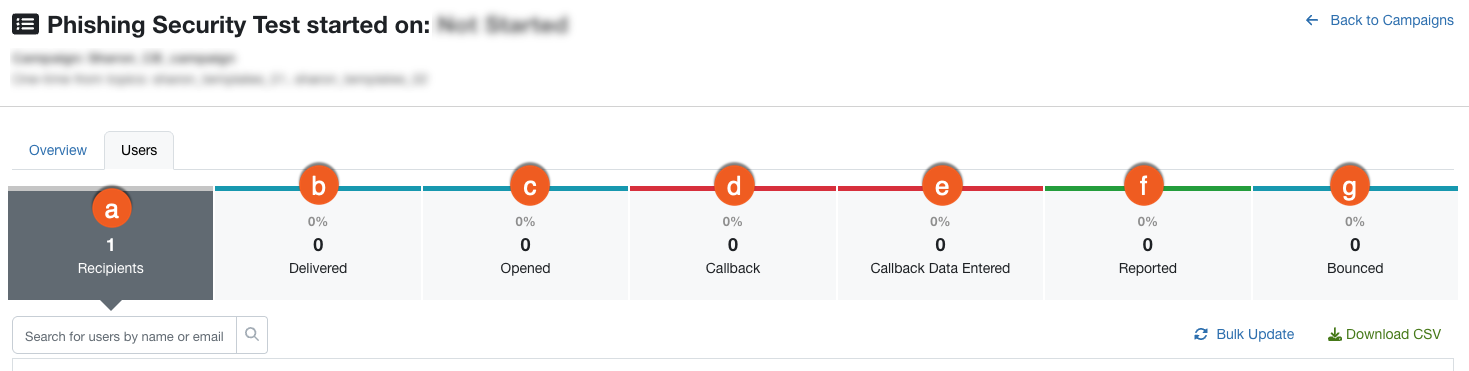
- Recipients: This column shows all users who will receive a simulated phishing email.
- Delivered: This column shows the number of simulated phishing emails successfully delivered to your users.
- Opened: This column shows the number of users who have opened a callback simulated phishing email. When a user opens a simulated phishing email, this open is recorded using a small tracking image automatically placed in each email. When the image loads, we are able to track the open in our system.
- Callback: This column shows the number of users who called the provided number back and entered the code they were given.
- Callback Data Entered: This column shows the number of users who entered their personal information.
- Reported: This column shows the number of users who successfully reported this callback phishing test using the Phish Alert Button. You can click the column filter to view more information about these users.
- Bounced: This column shows the number of emails that bounced. If our simulated callback phishing test cannot be delivered to your mail server, it will bounce. You can click the column filter to view more information about the emails that bounced, including the email addresses affected by the bounce and the reason for the bounce.
Recommended Callback Phishing Training
If you are configuring a remedial training campaign for callback phishing, we recommend using our Callback Phishing: Email and Phone-Based Cyberattacks and Captain Awareness: Callback Phishing modules. This training module can help educate your users about callback phishing attacks and strengthen your organization’s human firewall. If you have additional questions regarding training recommendations for your organization, we recommend contacting your Customer Success Manager.
For more information about setting up remedial training, see our Create a Remedial Training Campaign article.

Available Regions for Callback Phishing
Callback phishing phone numbers are available for more than 15 countries, with additional regions being added periodically. See below for the full list of currently available regions:
- United States
- Argentina
- Australia
- Brazil
- Canada
- Chile
- Colombia
- France
- Germany
- Guatemala
- Honduras
- Ireland
- Mexico
- Netherlands
- Nicaragua
- Panama
- Spain
- Sweden
- Switzerland
- United Kingdom