Note:We’ve added advanced features to phishing templates! All accounts will be opted in to phishing template advanced features by the end of April 2026. For more information, see our Phishing Templates Advanced Features Guide.
Once you've trained your users with your first security awareness training campaign, we recommend that you set up an ongoing phishing campaign. Depending on how often you train your users, you can set the campaign to send a test weekly, bi-weekly, monthly, or quarterly.
As a best practice, we recommend phishing your users at least once per month. For high risk users, we recommend bi-weekly testing. Regular phishing tests will allow your users to practice the skills they’ve learned in their security awareness training.
To set up an ongoing phishing campaign, follow the steps below:
- Log in to your KnowBe4 account and navigate to the Phishing tab.
- Click the + Create Phishing Campaign button.
-
On the New Phishing Campaign page, create your campaign using the recommended settings listed below:
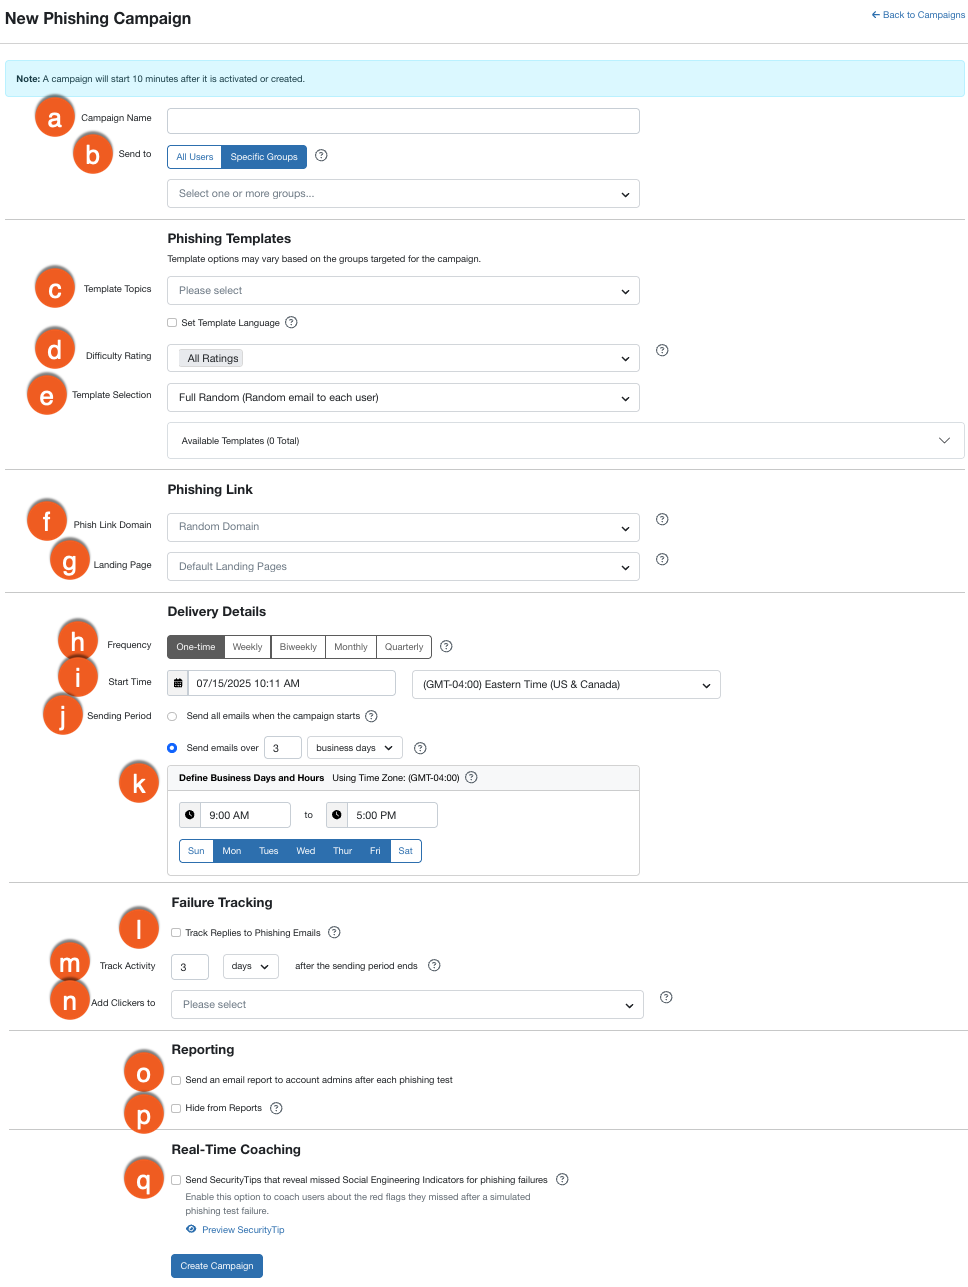
- Campaign Name: Enter a name for your phishing campaign here. This field is required.
- Send to: Click All Users if you would like to test all users. Or, if you only want to test specific users, click Specific Groups and select the groups you would like to test.
- Template Topics: From the first drop-down menu, select the template topics with which you would like to test your users. Use the Set Template Language check box to select the languages you want to use in this phishing campaign. If multiple languages are selected, users will receive templates in any of the selected languages. This setting will override the account’s default phishing language and the language set in the user’s profile. When this check box is selected, the Language Override drop-down menu will appear. You can select a maximum of five languages.
- Difficulty Rating: By default, this setting is set to All Ratings. If you would like to set a difficulty rating for the tests that will be sent to your users, you can select any of the options from the drop-down menu.
- Template Selection: Select Full Random. These settings will ensure that your users receive different phishing tests.
- Phish Link Domain: By default, this setting is set to Random Domain. We recommend that you do not change this setting.
- Landing Page: You can select a specific landing page that you would like to use for all the phishing tests in this campaign, or you can leave this setting set to Default Landing Pages. For more information about our available landing pages, see our Best Practices: Choosing a Landing Page article or our Landing Page Category Glossary.
- Frequency: You can select Weekly, Bi-weekly, Monthly, or Quarterly, depending on how often you train your users.
- Start Time: Set the date, time, and time zone you would like your phishing campaign to start. Your default time zone is the one set in your Account Settings.
- Sending Period: Select Send emails over… and set a timeframe of at least three business days. Setting a time period of at least three business days will ensure that your users don’t receive the tests all at once and can’t warn other users about the test. Depending on the Frequency option you selected, we recommend sending emails over one week for bi-weekly campaigns and over three weeks for monthly campaigns.
- Define Business Days and Hours: By default, your campaign will only send emails during the business hours set in your Account Settings. You can change the hours your emails are sent by entering a start and end time in this field. You can also choose what days you would like emails to be sent by selecting the date check boxes.
- Track Replies to Phishing Emails: You can select this check box if you would like to track your users' replies to phishing test emails. We recommend that you only select this check box for reply-to phishing campaigns. For more information about reply-to phishing, see our Reply-to Phishing Guide.
- Track Activity: We recommend that you track activity for at least three days.
- Add Clickers to: You have the option to add users who fail the phishing test to a selected group. You can then add this group of users to a remedial training campaign at a later date. For more information about remedial training, see our Create a Remedial Training Campaign article.
- Send an email report to account admins after each phishing test: Select this check box if you would like account admins to receive an email when each phishing test is complete.
- Hide from Reports: Select this check box to hide the phishing campaign from user profiles and phishing reports. Hidden campaigns will not impact Risk Scores or Phish-prone Percentages. We recommend using this option when running a test campaign for whitelisting or other phishing functionality tests.
- Send SecurityTips that reveal missed Social Engineering indicators for phishing failures: Customers with a SecurityCoach subscription can send SecurityTips to users that reveal missed Social Engineering Indicators (SEIs) for phishing failures. This feature lets users receive real-time coaching about the red flags they missed after a simulated phishing test failure. For more information, please visit our Real-Time Coaching With Social Engineering Indicators (SEI) article in the Knowledge Base.
- Once you are satisfied with your settings, click Create Campaign.