In this guide, you’ll learn how to integrate Microsoft Teams with Real-Time Coaching. You can use Microsoft Teams to send SecurityTips to your users when risky activity is detected on their devices.
For general information about Real-Time Coaching, see our overview article. If you're looking for information about setting up security vendor integrations that will detect risky activity on your users' devices, see our vendor integration guides.
Setting Up the Integration
To set up this integration, you must upload a Real-Time Coaching bot to Microsoft Teams. Depending on your organization's settings, you may also need to edit permissions to allow the application in Microsoft Teams.
For more information, read the subsections below.
Uploading the Bot
To add the Real-Time Coaching bot application to Microsoft Teams, follow the steps below:
- Log in to your KnowBe4 SAT console.
- Navigate to Coaching > Setup > Delivery Setup.
- Select Microsoft Teams.
-
Enter a name for the bot in the Bot Name (required) field.
Note:The default name is KB4 Security Awareness. You can enter a different name for your bot in the Bot Name field. - Select Upload Bot. A Microsoft 365 login page will display.
-
Log in to your Microsoft 365 admin account. A new Permissions requested page will load after successful login.
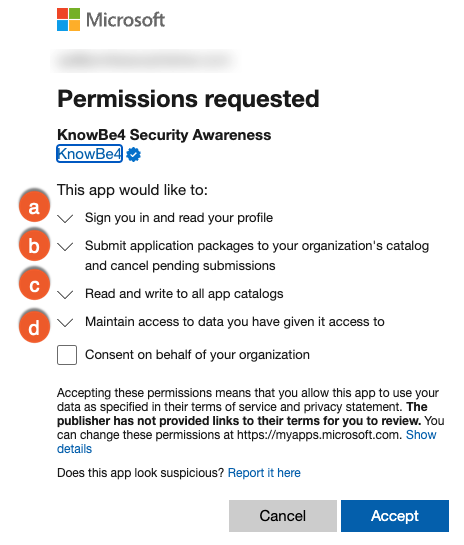
- Sign you in and read your profile: This permission is used to verify you have the correct admin permissions to manage the bot.
- Submit application packages to your organization’s catalog and cancel pending submissions: This permission is used to send data from SecurityCoach to the app catalog so that the bot can be deployed.
- Read and write to all app catalogs: This permission allows you to update and delete the bot from your SecurityCoach console.
- Maintain access to data you have given it access to: This permission allows the bot to maintain the other permissions until you delete the integration.
- Select the Consent on behalf of your organization check box, then click Accept at the bottom of the page.
- Back on the Microsoft Teams workspace setup page in Real-Time Coaching, select Review Permissions. A Microsoft 365 login page will display.
-
Log in to your Microsoft 365 admin account. A second Permissions requested page will load after successful login.
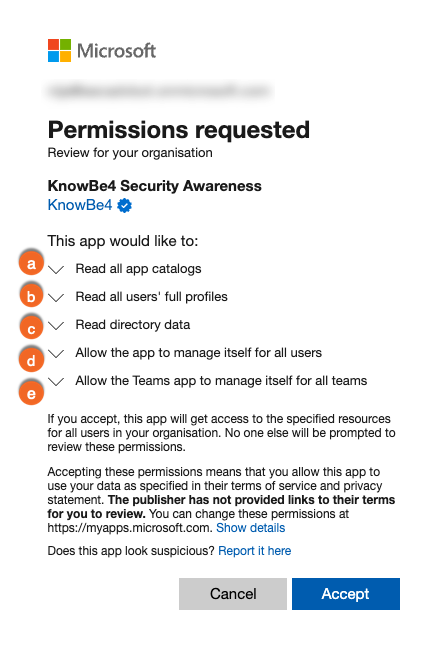
- Read all app catalogs: This permission confirms that the bot was successfully uploaded.
- Read all users’ full profiles: This permission allows the bot to synchronize your selected Microsoft Teams users with SecurityCoach.
- Read directory data: This permission locates your Microsoft Teams users and installs the bot for them.
- Allow the app to manage itself for all users: This permission allows the bot to install, update, and uninstall itself for your users.
- Allow the Teams app to manage itself for all teams: This permission allows the bot to install, update, and uninstall itself for your teams.
- Select Accept at the bottom of the page.
-
Back on the Microsoft Teams workspace setup page in Real-Time Coaching, enable the bot for Specific Teams or All Teams Users in Microsoft Teams. If you are adding specific teams, select Specific Teams, choose your teams from the drop-down menu, then select Add Teams to confirm. If you are adding all Teams users, click All Teams Users, then select Add All Users to confirm.

- If your organization allows only specific applications in Microsoft Teams or if you encounter a policy permissions issue, continue to the steps in the Managing Setup Policies in Microsoft Teams section below. If your organization allows any applications in Microsoft Teams, continue to the Using the Integration section below.
The Bot Has Been Blocked or Removed
If you encounter the error The bot has been blocked or removed, follow the steps below:
- Log in to your Microsoft Teams admin center.
- Use the sidebar to navigate to the Teams app tab > Manage apps subtab.
-
Look for the KB4 Security Awareness bot in the Manage apps subtab.
Important:The default name for the bot is KB4 Security Awareness. If you did not use the default name while following the steps in the Uploading the SecurityCoach Bot section, search for your custom bot name instead.- If the bot is present, permissions are still loading. Wait one minute and then refresh the Microsoft Teams setup page in your SecurityCoach console. If this does not resolve the error, follow the steps in the Deleting the Integration section and then set up the integration again.
- If the bot is not present, the bot was removed in Microsoft Teams. Follow the steps in Deleting the Integration section, then set up the integration again.
The Bot Could Not Be Installed
If any users experience an error during syncing, you can select Generate CSV below the error banner to download a list of users that were not synced and the error message for each user.
Managing Setup Policies in Microsoft Teams
If your organization manages how apps are made available to users with the Teams app, you’ll need to allow the Real-Time Coaching application.
To allow the application, follow the steps below:
- Log in to your Microsoft Teams admin center.
-
In the sidebar on the left side, click Teams apps to expand a drop-down menu.

-
Click Setup policies from the drop-down menu.

-
On the App setup policies page, select the name of the policy your team is under. If your team is under the default global policy, select Global (Org-wide default). If your team is under a custom policy, select that custom policy’s name.

-
In the following Global (Org-wide default) or custom policy page, select Add apps. A new sidebar will open on the right side of the screen.

-
Use the search bar in the sidebar on the right side of the screen to search for the KB4 Security Awareness app.
Important:The default name for the app is KB4 Security Awareness. If you did not use the default name while Uploading the Bot, search for your custom bot name instead.
-
KB4 Security Awareness will appear in a drop-down menu underneath the search bar.

-
Click Select to the right of KB4 Security Awareness.

-
Once the app is selected, click Add below.

-
The KB4 Security Awareness app will now show under Installed apps.

Once the KB4 Security Awareness app is installed, allow up to 12 hours for changes to apply in the Microsoft admin center.
Once changes have been applied, Real-Time Coaching will automatically sync the Microsoft Teams integration every 12 hours. You can also manually resync your users by following the steps below:
- Log in to your KnowBe4 SAT console.
- Navigate to Coaching > Setup > Delivery Setup.
- Select Configure on the Microsoft Teams vendor tile.
- Select the name of the workspace you are configuring.
- On the Microsoft Teams workspace setup page, select the Run User Sync button at the bottom-right side of the User Sync Details section.
Once the new sync is complete, the results will display under the User Sync Details section. If there were any errors, you can select Generate CSV below the error banner to view more details.
Using the Integration
Once you've uploaded the bot and allowed the Real-Time Coaching application in Microsoft Teams, you can use Teams to send SecurityTips to your users in Real-Time Coaching categories. For more information, see our Real-Time Coaching Categories Guide.
To view and manage the Microsoft Teams integration in your KSAT console, navigate to SecurityCoach > Setup > Delivery Setup > Configure for Microsoft Teams. Then, select the name of the workspace you want to manage. From this page, you can view a list of your teams, verify how many users the bot has been enabled for, send yourself a test message, and more.
Deleting the Integration
To delete the integration for a Microsoft Teams workspace, follow the steps below:
- Log in to your KnowBe4 SAT console.
- Navigate to Coaching > Setup > Delivery Setup.
- Select Configure on the Microsoft Teams vendor tile.
- Select the name of the workspace you'd like to delete.
-
Select Delete Integration.
Note:Deleting this integration in Real-Time Coaching will also delete it from your Microsoft Teams admin console. - In the pop-up window that opens, select Delete. A Microsoft 365 login page will open.
- Log in with your Microsoft admin credentials. Once you log in, the integration will be deleted.