The Collaboration Platform Phish Alert Button (PAB) add-in gives your users the ability to report suspicious messages.
In this article, you will learn how to enable and configure our PAB for Collaboration Platforms.
Enable PAB
Before you install the PAB, you will need to enable and configure the PAB in your Account Settings. To enable the PAB, follow the steps below.
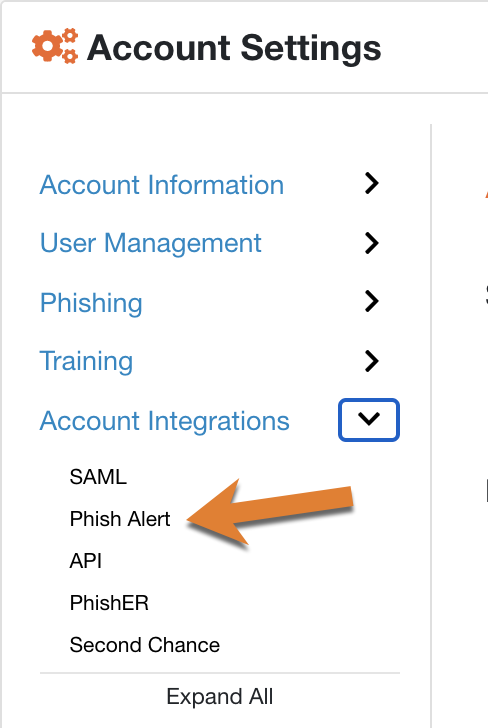
- Log in to your KnowBe4 console and navigate to your Account Settings page.
-
Navigate to Account Integrations > Phish Alert.
-
Turn on the Enable Phish Alert setting.
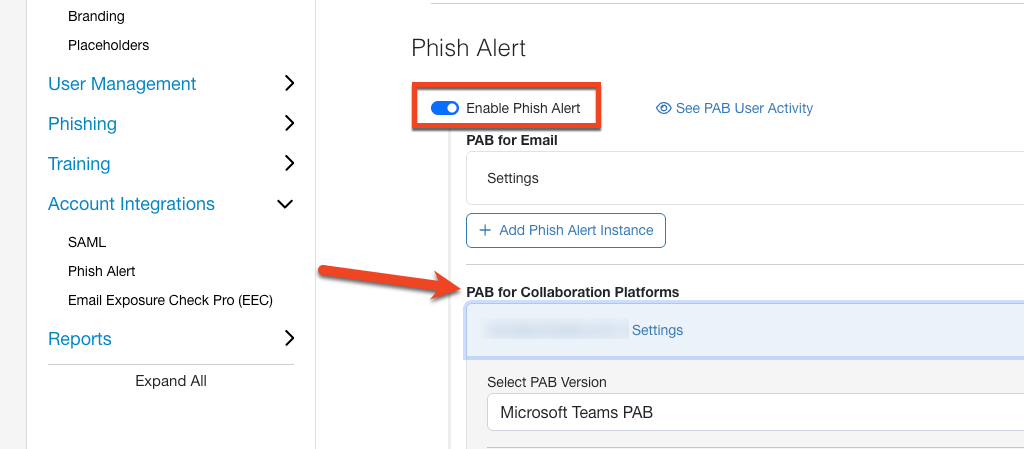
- Click the Add Phish Alert Instance button.
PAB for Collaboration Platform Settings

- Select PAB Version: From the drop-down menu, select the version of the PAB you want to edit for this PAB instance.
- Setting Name: Enter the name for your PAB instance.
- Icon: Upload your own custom icon for the PAB.
- Send Non-Simulated Messages to: If a user reports a non-simulated message, you can send a copy of this message to specific users in your organization. To send these users a copy of these messages, enter the users' email addresses in this field. Email addresses must be separated by commas.
- Add PhishER Email Address: Click this link to add the first reporting email address from your PhishER account to the Send Non-Simulated Messages to: field.
- Send Us a Copy: Enable this setting to send a copy of reported non-simulated phishing messages to KnowBe4 analysis. This email will include the original message header. To learn more about sharing messages with us, see our Share Reported Phishing Emails with KnowBe4 Using the Phish Alert Button (PAB) article.
- Allow users to leave comments and disposition: Enable this setting to allow your users to add comments and decide the disposition of a message when they use the Collaboration Platform PAB. For more information, see our Phish Alert Button (PAB) User Comments and Email Disposition Guide.
- Disable Unknown Disposition: Select this check box if you would like to exclude the Unknown disposition from options your users can choose when they use the PAB.
- Default Disposition: Select a disposition option to set as the default disposition for your PAB instance. The default disposition is the option that will be displayed as selected when users click the PAB.
- Send Dispositioned Messages to: Enter the additional forwarding email addresses based on the reported message's disposition in the disposition fields below. For more information, see our Phish Alert Button (PAB) User Comments and Email Disposition Guide.
Language Settings
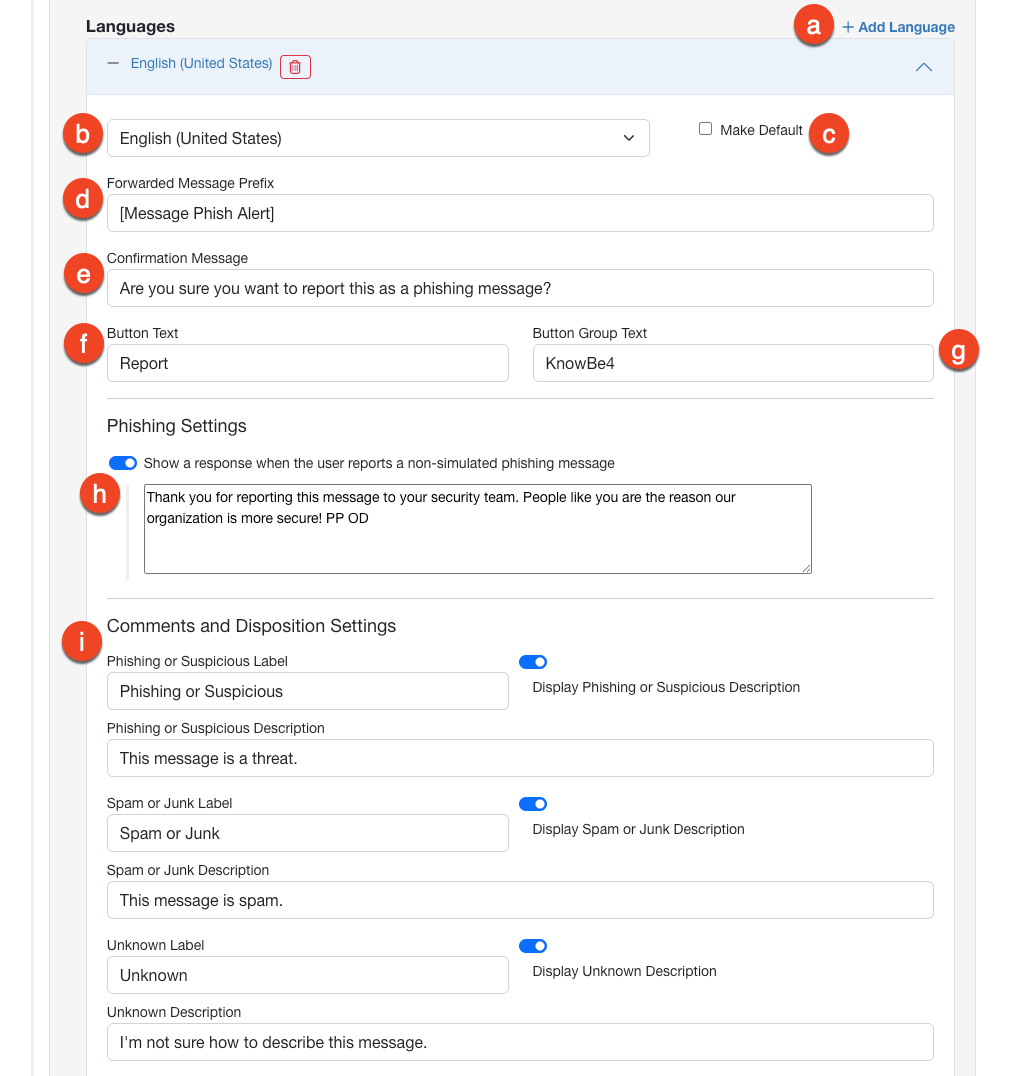
- Add Language: Click this button to add additional languages to your PAB instances. This feature is only compatible with specific versions of the PAB. To see if your version of the PAB is compatible with the additional languages feature, see our Phish Alert Button (PAB) Language Aware Feature Guide.
- Language drop-down menu: From the drop-down menu, select a language you would like to use for the PAB instance.
- Make Default: Select this check box to set this language as the default language for your PAB instance.
- Forwarded Message Prefix: This prefix will be added before the original subject line when a non-simulated phishing message is forwarded to the recipients you set in the Send Non-Simulated messages to: field.
- Confirmation Message: This message will be displayed to users after they click the PAB. By default, this message asks the user to confirm whether or not they want to report the message. This field has a maximum of 255 characters.
- Button Text: This is the text that will appear on the PAB in the user's collaboration platform.
- Button Group Text: This is the text that will appear under the PAB in the user's collaboration platform.
- Show a response when the user reports a non-simulated phishing message: If you enable this setting, the user will see this message when they report a non-simulated phishing message. This field has a maximum of 469 characters for the EXE PAB and 500 characters for the Hybrid PAB.
- Comments and Disposition Settings: Enter your own text to customize the labels and descriptions for the PAB dispositions. If you do not customize the dispositions, the default text will be used. To display the disposition descriptions to your users, turn on the toggles next to the disposition label fields. For more information, see our Phish Alert Button (PAB) User Comments and Email Disposition Guide.
Download and Permissions
The settings below allow you to view documentation, download the PAB manifest file, and authorize permissions.

- Save Phish Alert Settings: Click this button to save any changes made to your PAB for Collaboration Platforms settings.
- View Guide: Click this button to open the product manual for the selected version of the PAB.
- Download: Click this button to download the installation, manifest, or configuration file for the selected version of the PAB.
- Accept Microsoft Permissions to Authorize GRAPH APIs for the PAB: Click this button to open the Microsoft 365 page. Then, review and accept the permissions to authorize the PAB to use Microsoft's Graph APIs.