The Phish Alert Button (PAB) add-in for the Microsoft Outlook mobile app (iOS and Android) and Microsoft 365 gives your end-users the ability to report suspicious emails from not only their computer but also from their mobile inbox. This empowers your employees to take an active role in managing the problem of phishing and other types of malicious emails.
Paid Integration: If you are using our full-featured Phishing and Training console, the PAB will also track if your users report our simulated phishing emails, so you can see which users are successfully identifying potentially malicious emails.
We encourage you to inform all of your users of this tool before making it accessible. Below are helpful resources that you can use to assist with your implementation of the PAB:
- Best Practices for PAB Implementation (For admins)
- Phish Alert Button (PAB) for Microsoft 365 Guide (For end-users)
For instructions on how to enable and configure your PAB in the admin portal, visit our main PAB article.
Installation Prerequisites
This installation requires one of the following servers:
- Microsoft 365
-
Exchange Server 2016 (Hybrid only) - version 15.1.544.27 (CU3) or later
Important:Only email accounts hosted on Microsoft 365 or cloud exchange servers can support mobile devices. If an email account is hosted on-premises, mobile devices will not be supported. For additional information, please see Microsoft’s documentation Microsoft’s documentation (link opens in new window).
This version can be used on the following mail clients:
- Microsoft 365 OWA
- Outlook 2016 for Windows (Click-to-Run install only)
- Outlook 2019 for Windows
- Outlook 2016 for Mac
- Outlook for iOS
- Outlook for Android
You'll need to download the following file to install, enable, and configure your PAB in the KnowBe4 admin portal:
- PhishAlertManifest.xml
If you have a proxy, a connection to the following is needed in order to bypass proxy/proxy authentication:
- outlook.office365.com
- outlook.office.com
-
us.pab.knowbe4.com, eu.pab.knowbe4.com, or ca.pab.knowbe4.com
The domain used will depend on where your KnowBe4 account is located.
How to Install
In order to use the PAB, you must enable the Connected Experiences option in your Outlook. To do so, please follow the instructions below:
- Go to File > Settings > General > Privacy and data > Privacy settings.
- From Privacy settings, go to the Optional connected experiences section.
- Enable Turn on optional connected experiences.
Once you've enabled Connected Experiences, follow the steps below to install the PAB:
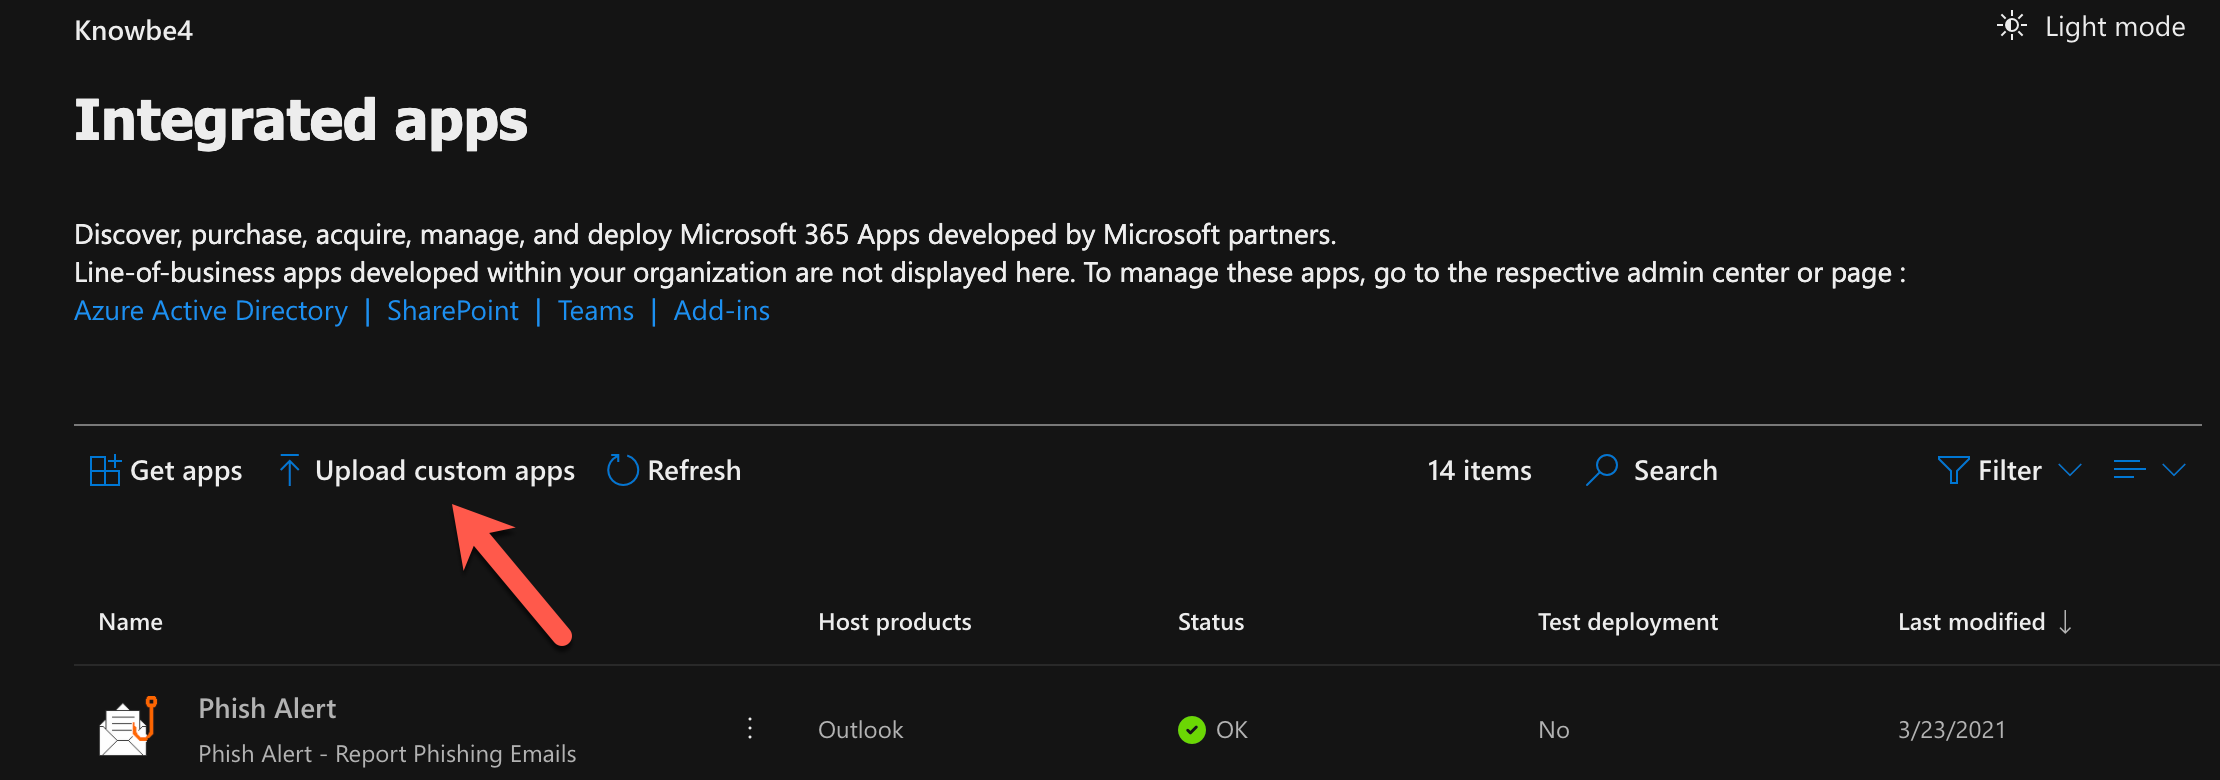
- Log in to your mail server Admin portal. Under the Settings menu, click Integrated apps.
-
From the Integrated apps screen, click Upload custom apps. This will take you to the Centralized Deployment add-in management screen.
-
From the Centralized Deployment area, click the I have the manifest file (.xml) on this device. radio button and then sign select the Browse option.

- A file browser pop-up window opens. Locate and add the PhishAlertManifest.xml file from your Account Settings and click the Next button to install.
-
Select which users will have access to the add-in and which deployment method to use. We recommend that you make the add-in accessible to Everyone and to use the Fixed deployment method. You will need to click (View options) to edit the deployment method.
Note:If you'd only like to enable this version of the PAB to specific distribution groups, see step 6 in our Multiple Phish Alert Button Instances (Multi-PAB): Microsoft 365 or Exchange article for details on this process.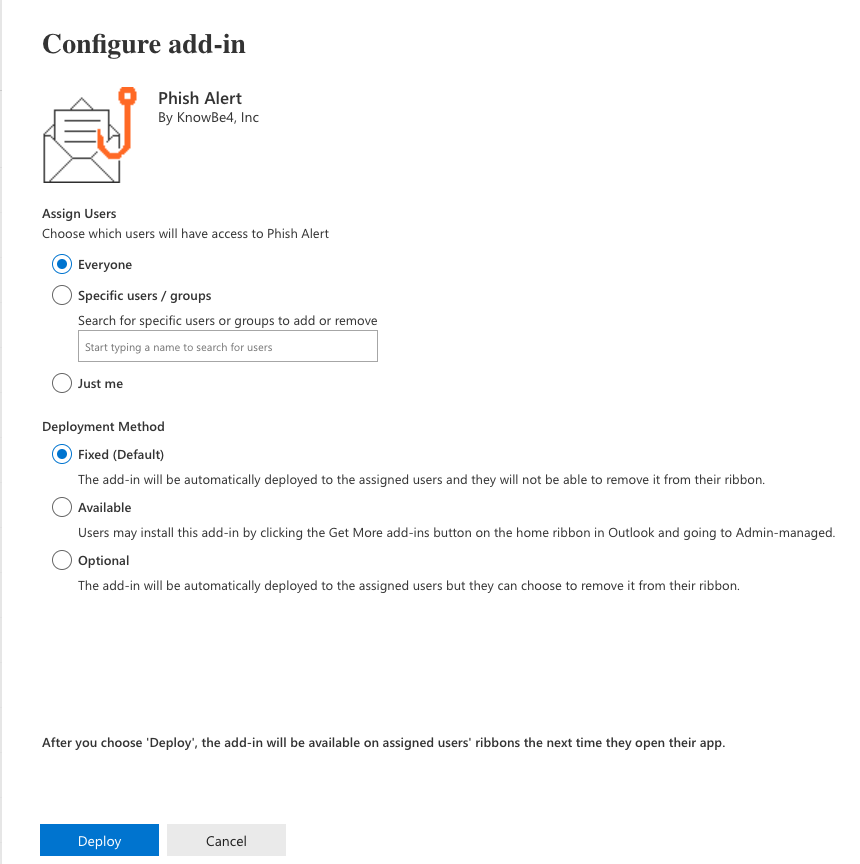
-
This is how the add-in should look once configured in the Services & add-ins area:
Note:It can take up to an hour for the PAB add-in to be visible in your Microsoft 365 inbox.
If the steps above do not match your current view, try the alternative method listed below.
-
Log in to your mail server Admin portal. Under the Settings menu, click Integrated Apps and then Add-ins at the top of the page.

- From the Add-ins screen, click Deploy Add-In. This will open a wizard, click Next to continue.
-
From the Deploy a new add-in window, click the Upload custom apps option.

- Finish the installation process by following steps 4-6.
How to Uninstall
To uninstall the PAB for Microsoft 365, follow these steps:
- Go to Settings > Integrated Apps > Add-ins in your Microsoft 365 admin center Microsoft 365 admin center (link opens in new window).
- Find your PAB add-in in the list.
- Select the add-in and select Remove Add-In.
User Experience
Once installed, the PAB add-in will be available from any open email in the compatible mail clients, including the Outlook app for iOS and Android.
The Phish Alert button will appear in the Apps launcher on an open email. To access the Apps launcher, click the Apps icon in the top-right corner of an open email. If the PAB does not display in the Apps launcher, you can click Add apps. Then, locate and add the PAB add-in.

You can also pin the PAB add-in to the toolbar at the top of an open email. To pin the add-in, click the ellipsis icon and select Customize actions. Or, navigate to Settings > Mail > Customize actions. Then, select the Phish Alert add-in and click Save.
If you are using a smaller sized window or resolution, some of the elements may be hidden. Make sure that your window is expanded, or the resolution is set, to the standard size when using the Phish Alert Button.
A user can report any email as a phishing email. The reported email will be in the user's Sent Items as a forwarded message and will be deleted from the user's inbox. If the user incorrectly reported the email, they can retrieve it from their Deleted items/Trash.
Outlook Mobile App (for Android)
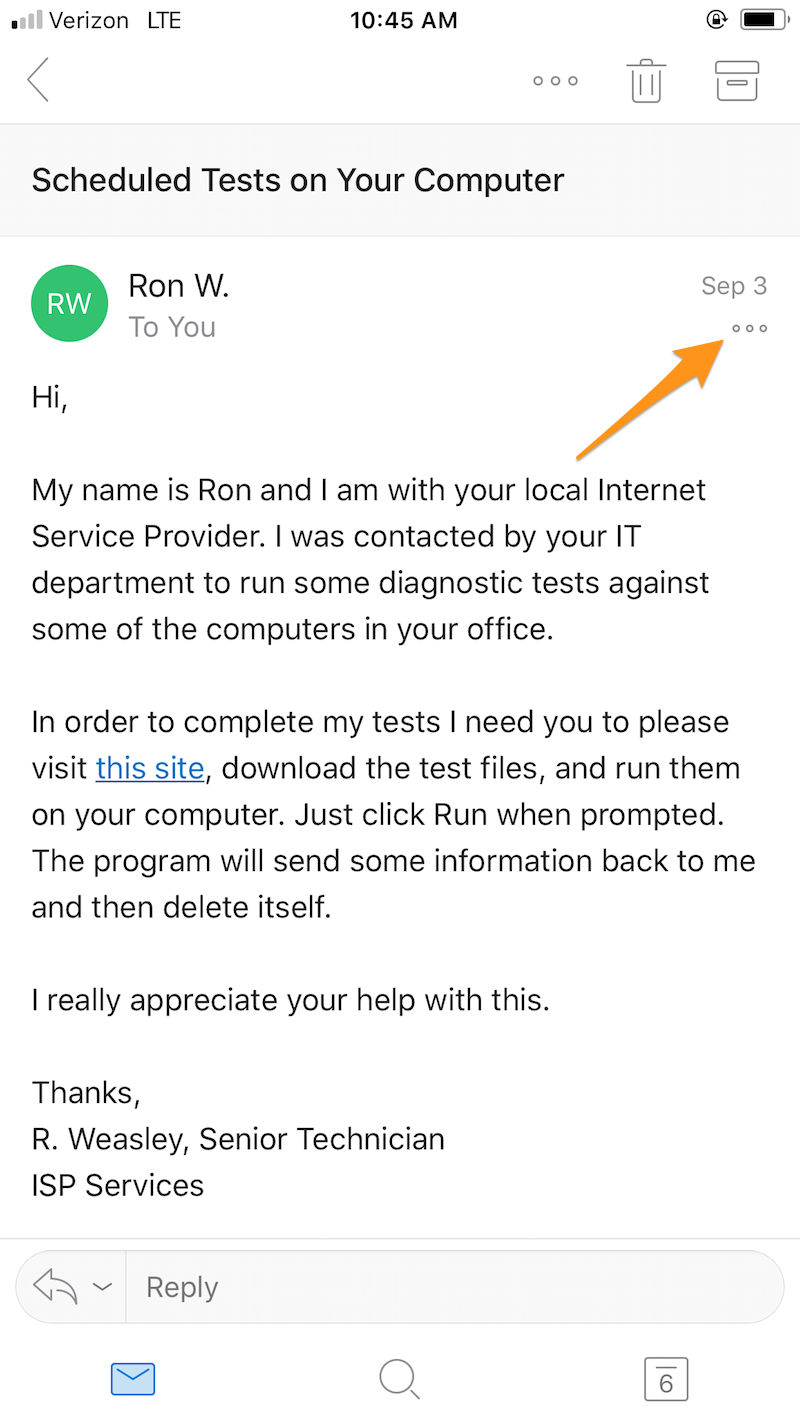
If users want to report an email using the PAB from the Outlook App on an Android device, they'll first tap the three dots at the top right of the screen, as shown below.

Then, they'll see Phish Alert listed in their add-ins.

Once they've selected the Phish Alert add-in, they'll be brought to the screen shown below to confirm that they want to report the email. From this screen, they'll tap the Mobile Phish Alert button to confirm submission.

After the email has been reported, the message you've set in your Account Settings will display, as shown below. Click OK to dismiss the message.

Outlook Mobile App (for iOS)
If users want to report an email using the PAB from the Outlook App on an Apple device, they'll first click the three dots at the top right of the screen, as shown below.
Then, they'll see Phish Alert listed in their add-ins.

Once they've selected the Phish Alert add-in, they'll be brought to the screen shown below to confirm that they want to report the email. From this screen, they'll tap the Mobile Phish Alert button to confirm submission.

After the email has been reported, the message you've set in your Account Settings will display, as shown below. Click the OK button to dismiss it.

New Outlook Experience
The New Outlook experience is exclusive only to Microsoft 365 customers. This means that if you are using the Exchange PAB with a Microsoft 365 environment, the Exchange server PAB is not compatible and the Phish Alert Button will not be supported by the Outlook Web App.
Additional Resources
- Change the Phish Alert Text for Mobile Phish Alert Button (PAB)
- Multiple Phish Alert Button Instances (Multi-PAB): Microsoft 365 or Exchange
- PAB Compatibility Matrix
- FAQ: Phish Alert Button (PAB)
- Microsoft's Using Outlook for iOS and Android in the Government Community Cloud in Exchange Online (link opens in new window) (Please see this article if you are using a Government Community Cloud.)