The Content Creation Agent allows you to build complete, text-based training courses using AI. Describe your topic, audience, tone, and preferred duration, or upload internal documents and policies to tailor the content to the specific needs of your organization. The agent generates a complete course with a quiz, which can be translated into 30 languages and used in a training campaign.
The Content Creation Agent is available for AIDA and SAT Advanced subscriptions. This feature will debut within KnowBe4 Labs, our dedicated space for launching new and experimental features to participating customers. For more information about KnowBe4 Labs, see our Introducing KnowBe4 Labs article.
Getting Started
To get started, log in to your KnowBe4 console, navigate to the ModStore tab, then select Customization from the side menu. This will open the Customization page.

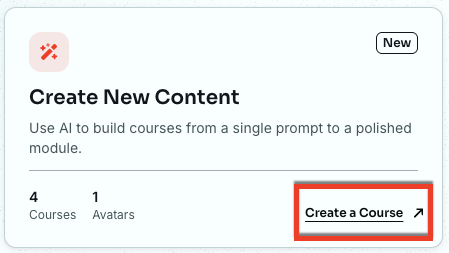
On the Create New Content card, click Create a Course.
This will open the Course Creation page.
To learn more about the options in this section, see the screenshot and the list below:
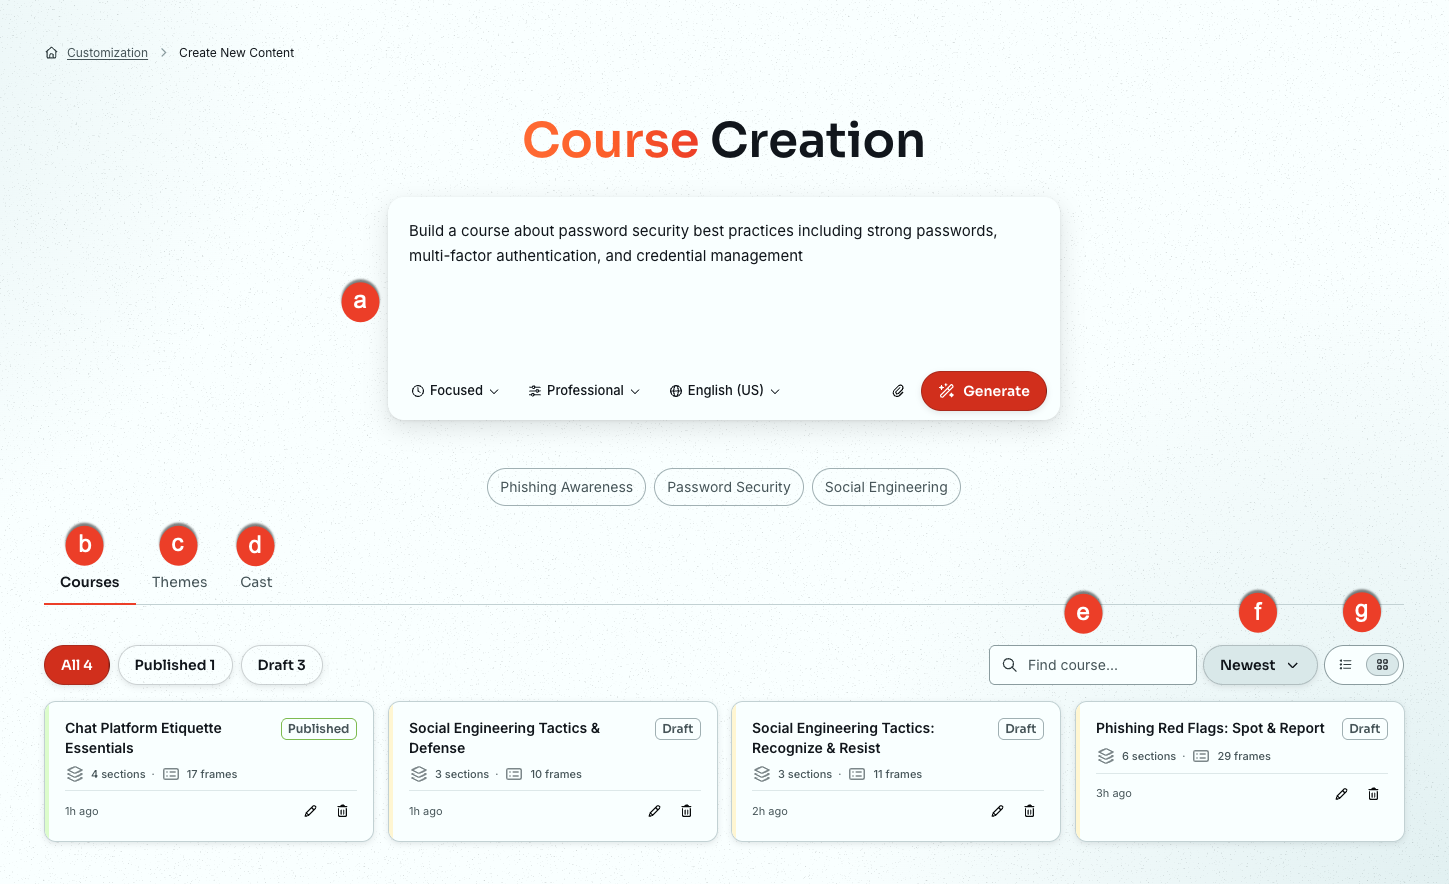
- Prompt: Use this field to describe your training topic, audience, key learning objectives, and any other relevant details that you’d like to use during your course creation. If necessary, the options below can be used to refine the results. For more information, see the Describing Your Course section.
- Courses tab: This tab contains the course creation options and a list of modules you've created.
- Themes tab: A theme allows you to select the visual identity of your custom course. This tab lists available themes for you to choose from and allows you to create more.
- Cast tab: Cast members are the AI-generated characters that appear in course images and scenarios. This tab lists your cast members and allows you to add more.
- Search: Enter a course name or topic to filter the list.
- Sort: Sort your search results by Newest, Oldest, A → Z, or Z → A.
- Page view: Switch between card view and list view.
Describing Your Course
Use the options below to describe the course you want to build. To learn more about the options in this section, see the screenshot and the list below:
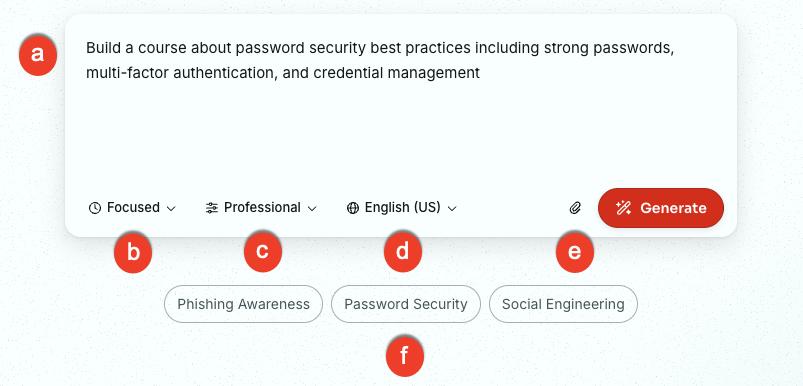
- Prompt field: Type a description of the training topic, audience, key learning objectives, and any other relevant details in the text field.
-
Training type and duration: Select the type of training you would like to create.
- Essentials (up to 5 min): A brief, high-level overview. Best for awareness training, quick refreshers, or introducing a single concept.
- Focused (up to 15 min): A targeted course covering one topic in moderate depth, with context, examples, and a knowledge check. Best when learners need more than a refresher but don't require full coverage.
- In-depth (up to 30 min): A comprehensive course with multiple sections, scenarios, and reinforcement activities. Best for complex topics, role-specific training, or when learners need full context.
-
Tone: Select the tone you would like to use for your course.
- Professional: Polished, business-appropriate language with a balanced, neutral feel. Suits most workplace training topics.
- Technical: Precise language with industry-specific terminology. Best for IT, security, or engineering audiences who expect detail.
- Conversational: Casual, approachable language that speaks directly to the learner. Best for engaging audiences in a less formal setting.
- Formal: Structured, traditional language with a measured tone. Best for compliance, legal, or other highly structured content.
- Encouraging: Supportive, motivating language that frames learning positively. Best for behavior-change topics, new-skill development, or sensitive subjects.
- Direct: Clear, straightforward language that gets to the point quickly. Best for time-sensitive training or audiences who prefer brevity.
- Language: Select the language you want the module to use. The languages on this list are the same as those available for the console.
- Reference materials: Attach any reference materials you would like r to use when building your course. For example, if your organization has specific password security tips, attach them here.
- Pre-built prompts: Select one of three pre-built prompts. The text is added to the prompt field above, where you can edit it before generating.
When you're ready, click Generate. A pop-up appears with a legal disclaimer.

To continue generating your course, select the check box to agree to the terms, then click Accept & Continue.
Reviewing the Course Outline
After you click Generate, the agent produces a structured outline and displays it in the Review panel. This is a preview of your layout, not the finished course. No content has been generated yet. You can use this opportunity to review the sections, frames, and interaction types, and make any structural changes before clicking Generate Content to build the full course.
First, you are presented with options for a Landing Slide, the first slide shown after the course launches. To learn more about the options in this section, see the screenshot and the list below:
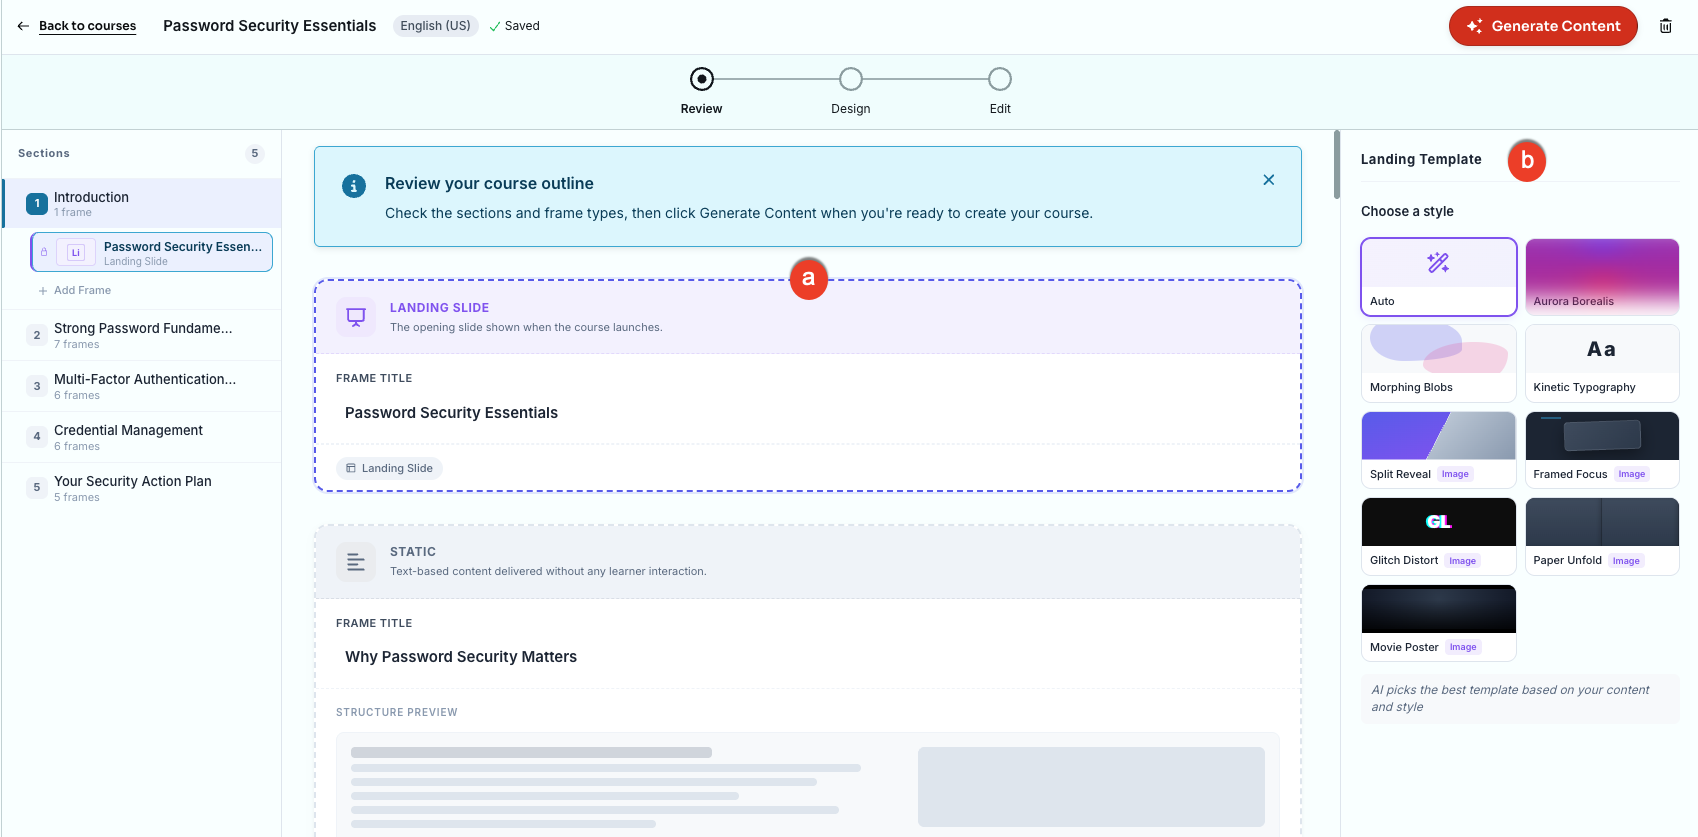
- Landing Slide: Select this frame to show the Landing Templates in a panel to the right. This frame also shows you the title of your course.
- Landing Template: Select a style you would like to use for the landing slide.
After you select the Landing Slide frame, scroll down and select the next frame. The remaining frames in the course will have the same options. To learn more about those options, see the screenshot and the list below:

- Sections: Click on each of the sections to see a list of frames for that section, then click on the frames to see the basic layout.
- + Add Frame: Click this button to add another frame to the section.
- + New Section: Click this button to add another section to your course.
- Frames: Use this section to review the individual screens within a section. Click any frame to see its layout and properties.
- Frame Properties: This section lists the interaction types and any additional instructions for the specific frame.
-
Interaction Type:
- Static: Text-based content delivered without any learner interaction.
- Reveal: Hidden content revealed through flip cards, accordion panels, or tabbed sections.
- Knowledge Check: A brief quiz question that reinforces learning.
- Scenario: A real-world situation that presents learners with branching decision choices.
- Hotspot: A clickable visual where learners explore key areas of an image or interface.
- Summary: Key takeaways from the course with an optional review question.
- Infographic: A visual layout that pairs an image with labeled callout cards.
- AI Instruction (optional): Guide the Content Creation Agent on how to build and structure this interaction.
When you're satisfied with the course outline, click Generate Content to open the design wizard.
Designing Your Course
The course design wizard walks you through the five steps for building your course. The steps appear in the Your Choices panel on the left so you can follow along.
Step 1: Choosing a Style
This is where you select the visual style for the AI-generated images that will be used throughout your course. To learn more about the options in this section, see the screenshot and the list below:
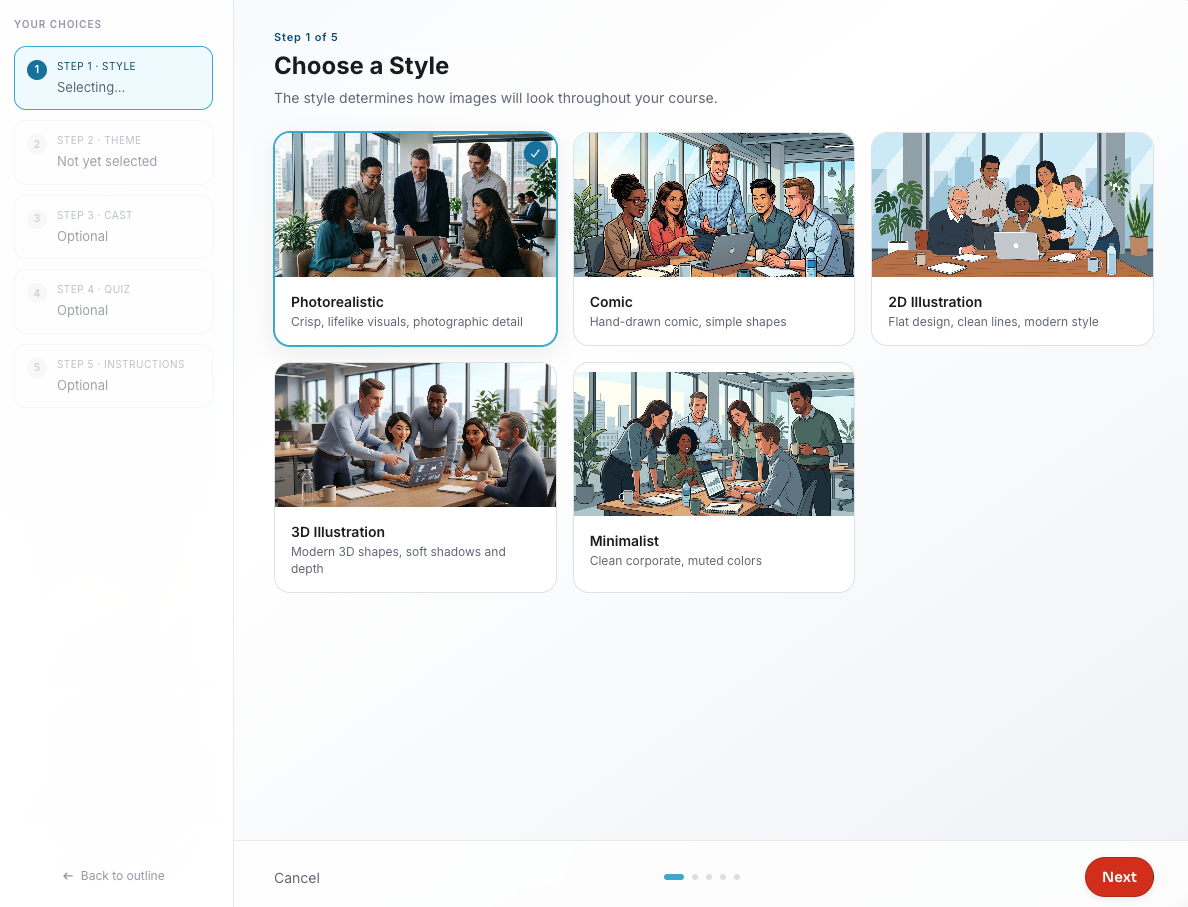
- Photorealistic: Real-world photography style with natural lighting, true-to-life environments, and lifelike people.
- Comic: Bold outlines, expressive characters, and a playful illustrated style that keeps content approachable.
- 2D Illustration: Clean, flat artwork with a modern color palette for a wide range of topics.
- 3D Illustration: Dimensional scenes with soft shadows and depth, giving images a tactile, high-production feel.
- Minimalist: Understated and professional, with simple shapes, open space, and a refined corporate style.
Click Next to continue to the next step.
Step 2: Choosing a Theme
Select a theme that will represent the visual identity of your course. To learn more about the options in this section, see the screenshot and the list below:
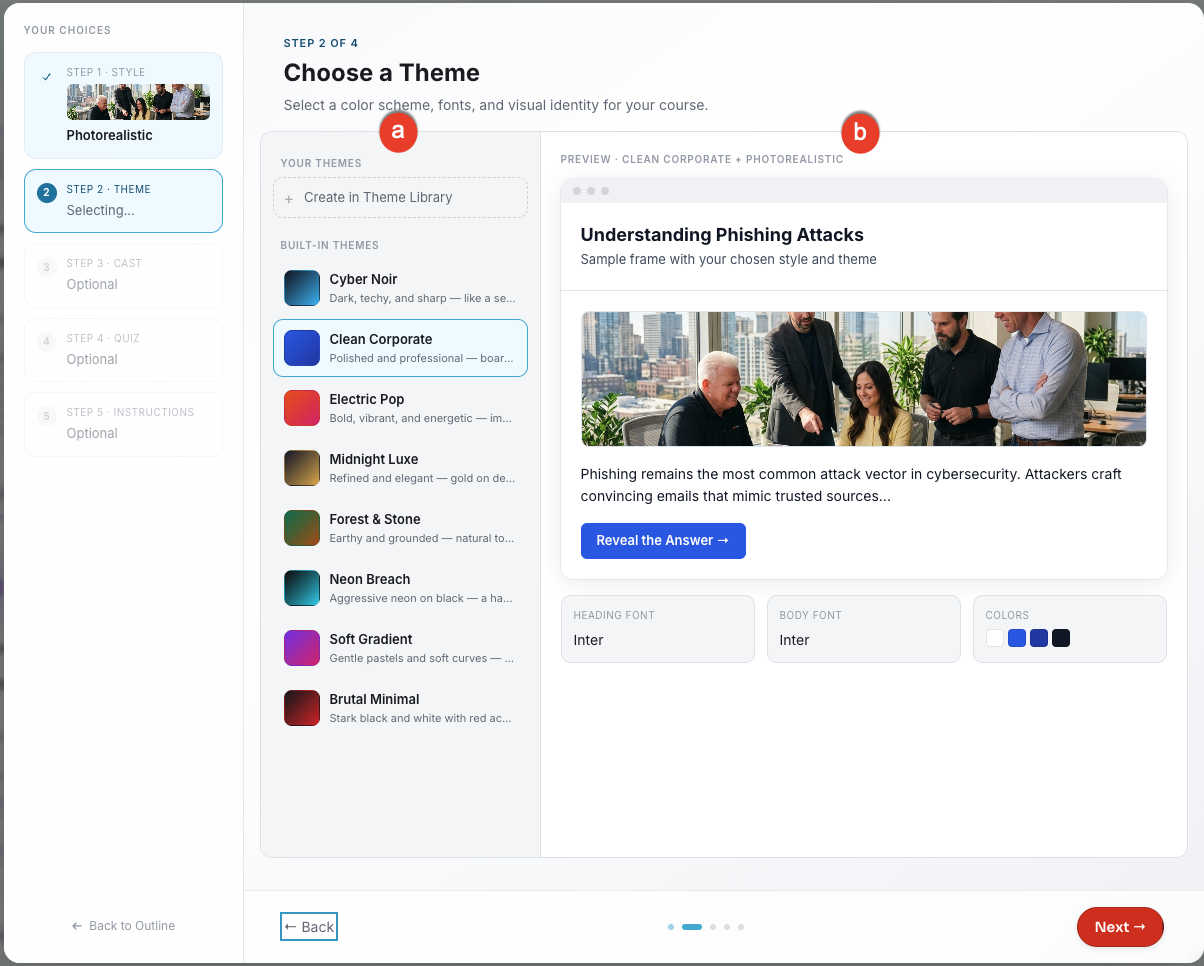
- Your Themes: Select a theme from the available list.
- Preview: See a preview of the theme you select.
If you'd like to use a custom theme, click + Create Theme in Library. For more information, see the Creating a Custom Theme section below.
Click Next to continue.
Step 3: Choosing Cast Members
Choose which AI-generated characters appear in course images and scenarios. To learn more about the options in this section, see the screenshot and the list below:
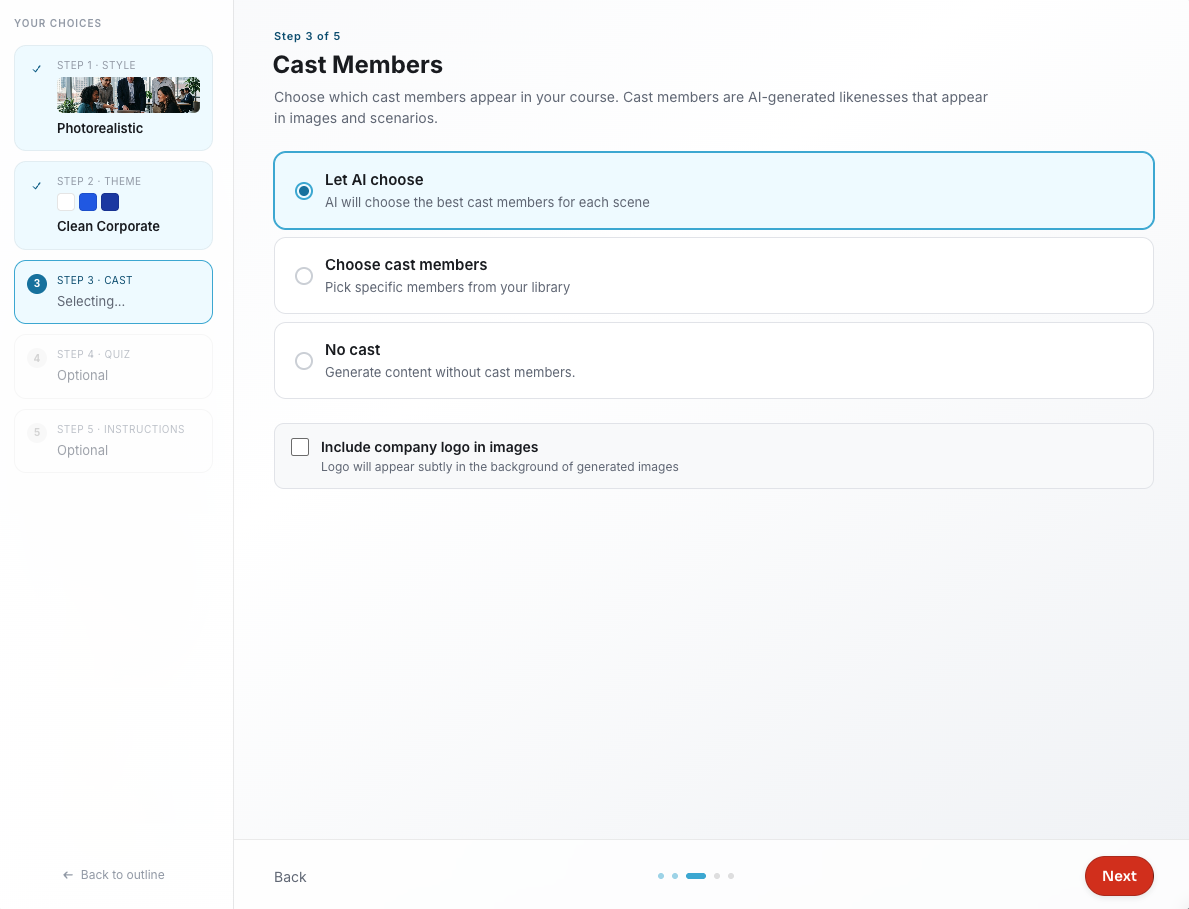
- Let AI choose: The Content Creation Agent will choose the best cast members for each scene.
- Choose cast members: Select specific members from your library. They will be listed in this step. For information on how to add additional cast members, see the Adding a Cast Member section.
- No cast: Generate content without cast characters.
- Include company logo in images: Select this option to include your organization’s logo in the background of generated images.
Click Next to continue.
Step 4: Setting Up a Final Quiz (Optional)
You have the option to add a scored quiz at the end of your course. Learners must pass the quiz to complete the course. To learn more about the options in this section, see the screenshot and the list below:
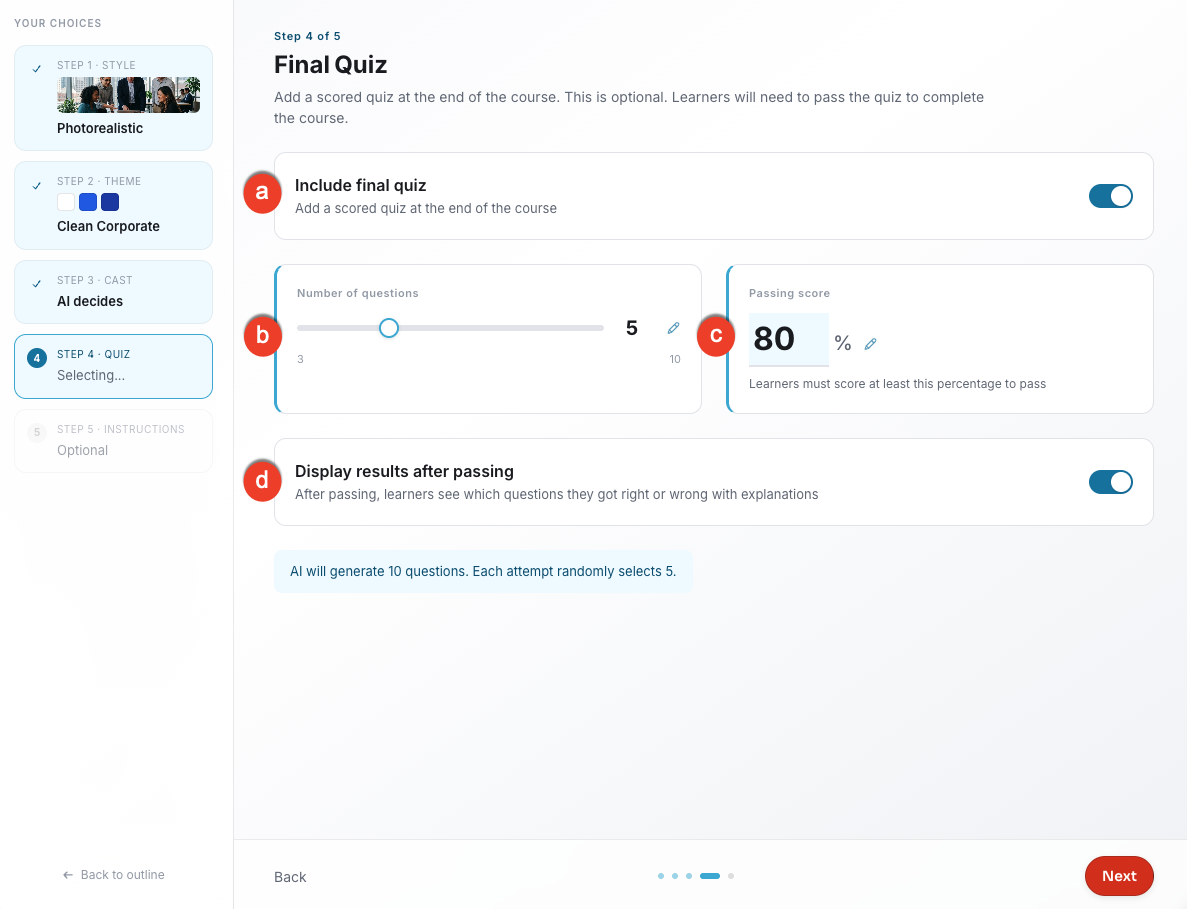
- Include final quiz: Enable this toggle to add a scored quiz. Enabling this toggle activates the options below.
- Number of questions: Use the slider to set how many questions learners see per quiz attempt. The default is five questions.
- Passing score: Enter the minimum percentage learners must score on the quiz to pass. The default score is 80 percent.
- Display results after passing: Enable this toggle to allow learners to see which questions they got right or wrong, with explanations, after passing.
Click Next to continue.
Step 5: Additional Guidance (Optional)
Provide additional instructions to refine your course content and images. You can select from the suggested prompt options or write your own.
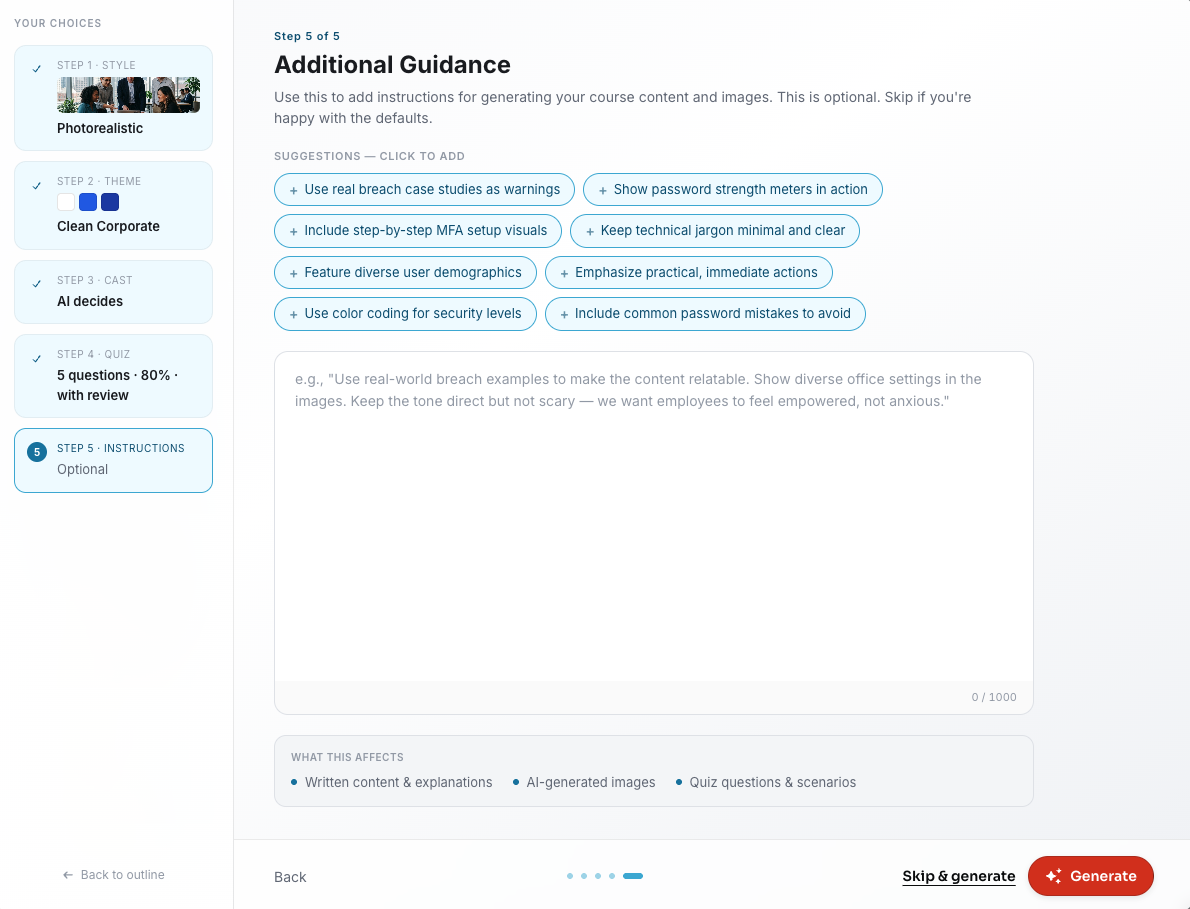
When you're ready, click Generate. To skip this step without providing additional guidance, click Skip & Generate.
Editing Your Course
Once your course is generated, it opens in the Edit view. To learn more about the options in this section, see the screenshot and the list below:
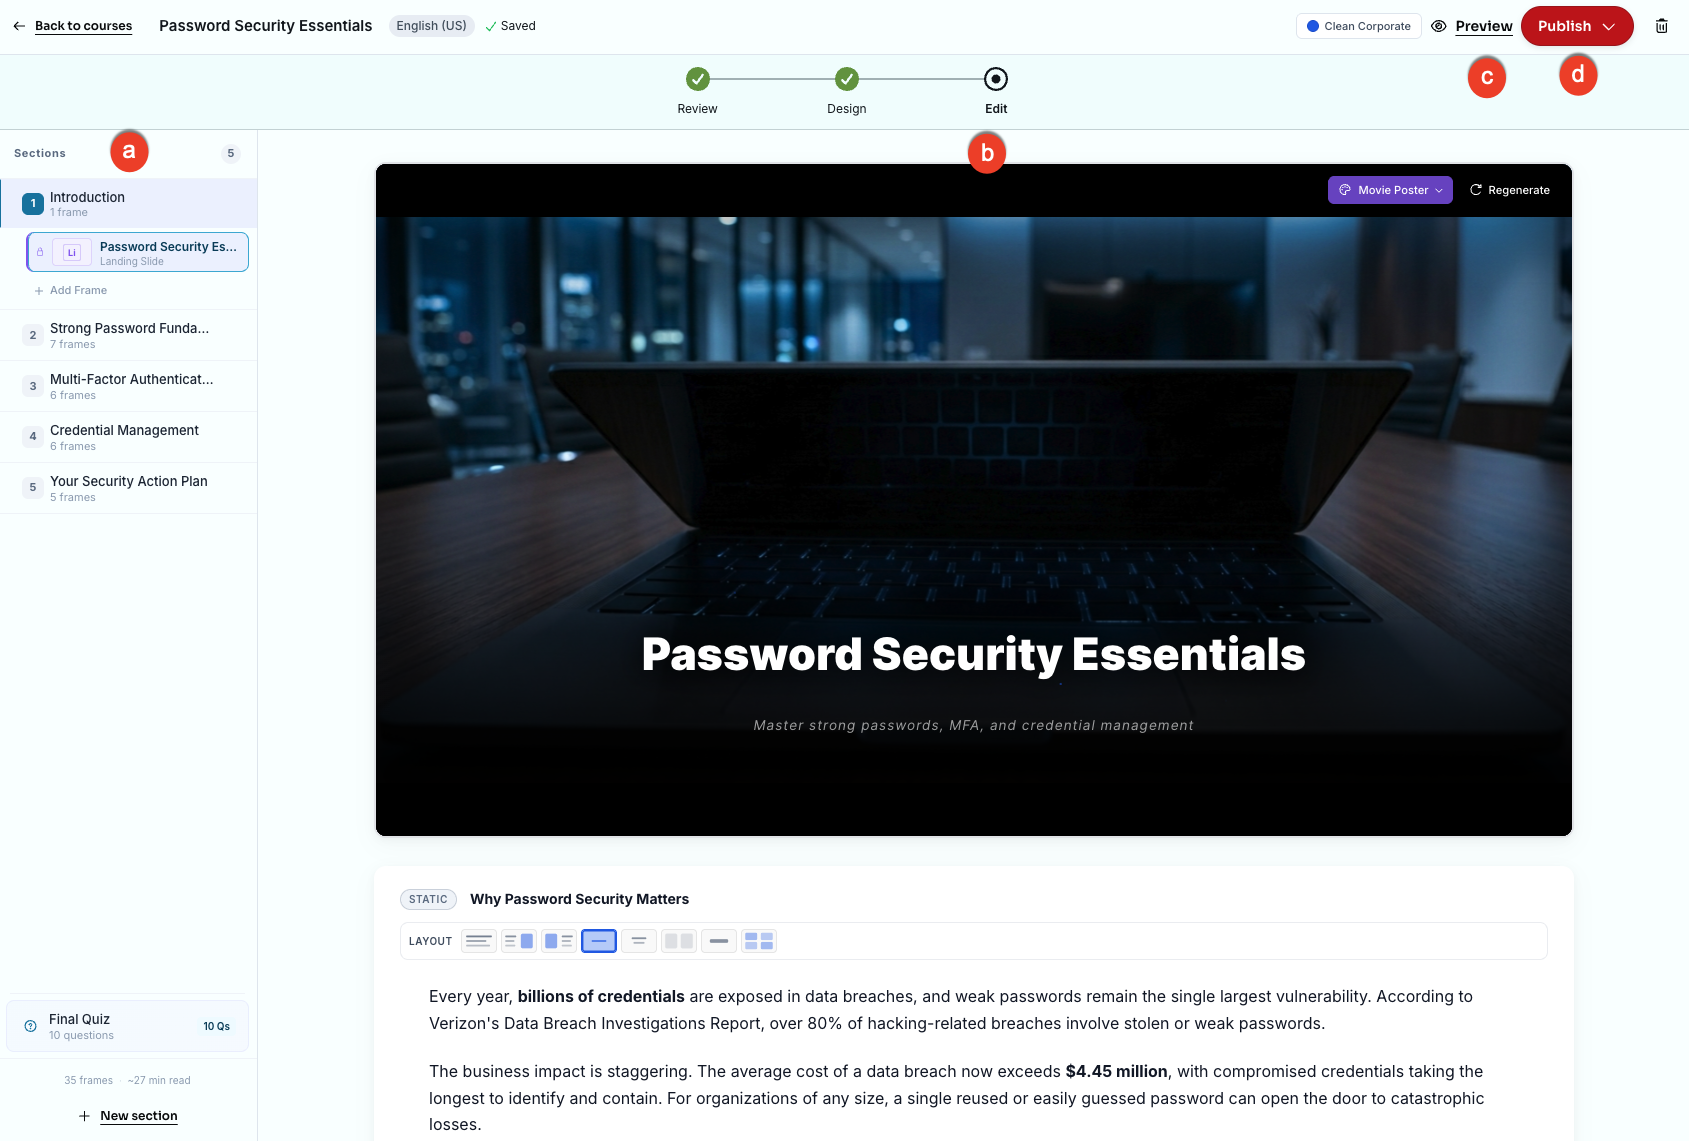
- Sections: Click on each of the sections to see a list of frames for that section, then click on the frames to review the course content.
- Frames editor: Use the main view to edit content or add a new frame. Click any text box in any frame to make adjustments.
- Preview: Click the button to see how your course will look to learners.
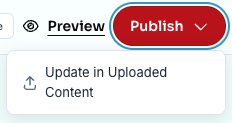
- Publish: Click this button to add the course to Uploaded Content.
Publishing Your Course
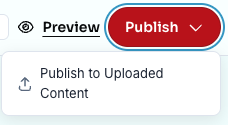
When your course is ready, click the Publish drop-down menu to see your options.
Click Publish to Uploaded Content to add the course to your Uploaded Content library. For more information, see the Upload Custom Training Content article.
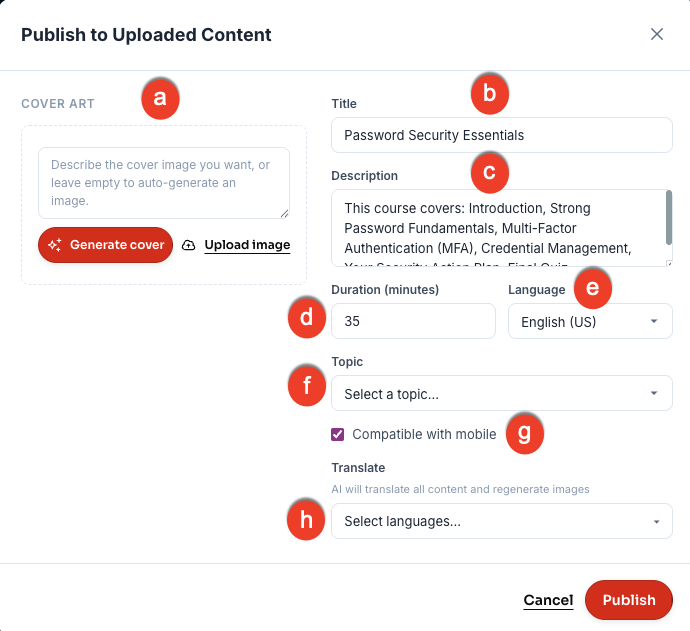
Publishing to Uploaded Content
After you click Publish to Uploaded Content, a pop-up opens. To learn more about the options in this section, see the screenshot and the list below:
-
Cover Art: This is the image that will be displayed next to your course under Uploaded Content. You have three options for adding an image:
- Use the prompt field to describe the type of cover art you want to use in the course, then click Generate Cover to generate the image.
- Click Generate Cover without adding a prompt to create an AI-generated image based on the course content.
- Click Upload Image to add an image from your computer.
- Title: Add a descriptive title (up to 65 characters). Learners will see this title in their training library.
- Description: Provide a description of this content for future reference. This description will only be seen by admins and cannot exceed 250 characters.
- Duration: Enter the estimated completion time in minutes.
- Language: Select the language of the course.
- Topic: Use this drop-down to select a topic such as Email Security or Physical Security.
- Compatible with mobile: Select this checkbox if you would like your course to be compatible with mobile devices.
- Translate: Select one or more languages to translate the course. This will provide AI-generated translations in the selected languages and will also regenerate any images used in your course.
When you're satisfied with your selections, click Publish.
Updating a Published Course
If you update a previously published course and want to push the changes to Uploaded Content, use the following steps.
- From the ModStore, go to Customization Create New Content
- Select the course from the Course Creation page.
- After the course opens, click the Publishdrop-down menu.
-
Select the Update in Uploaded Content option.
The Update Published Course pop-up opens. Make a selection:
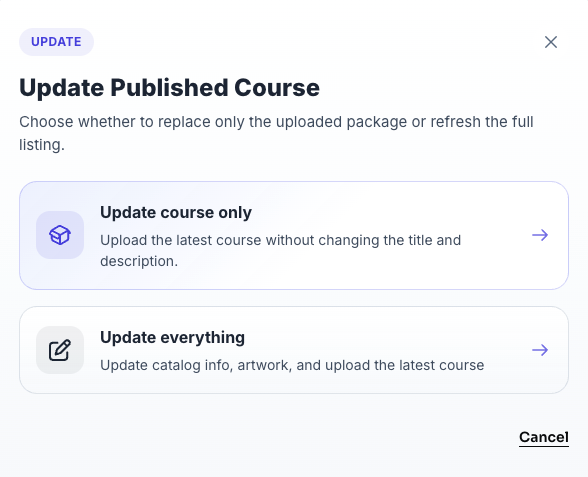
- Update course only: Select this option to upload the latest version of the course without changing the title and description.
- Update everything: Select this option to update the course to the latest version, along with the catalog information and artwork.
When the update is complete, a confirmation message appears. Click View in Uploaded Content to go to the course in your content library, or click Close.
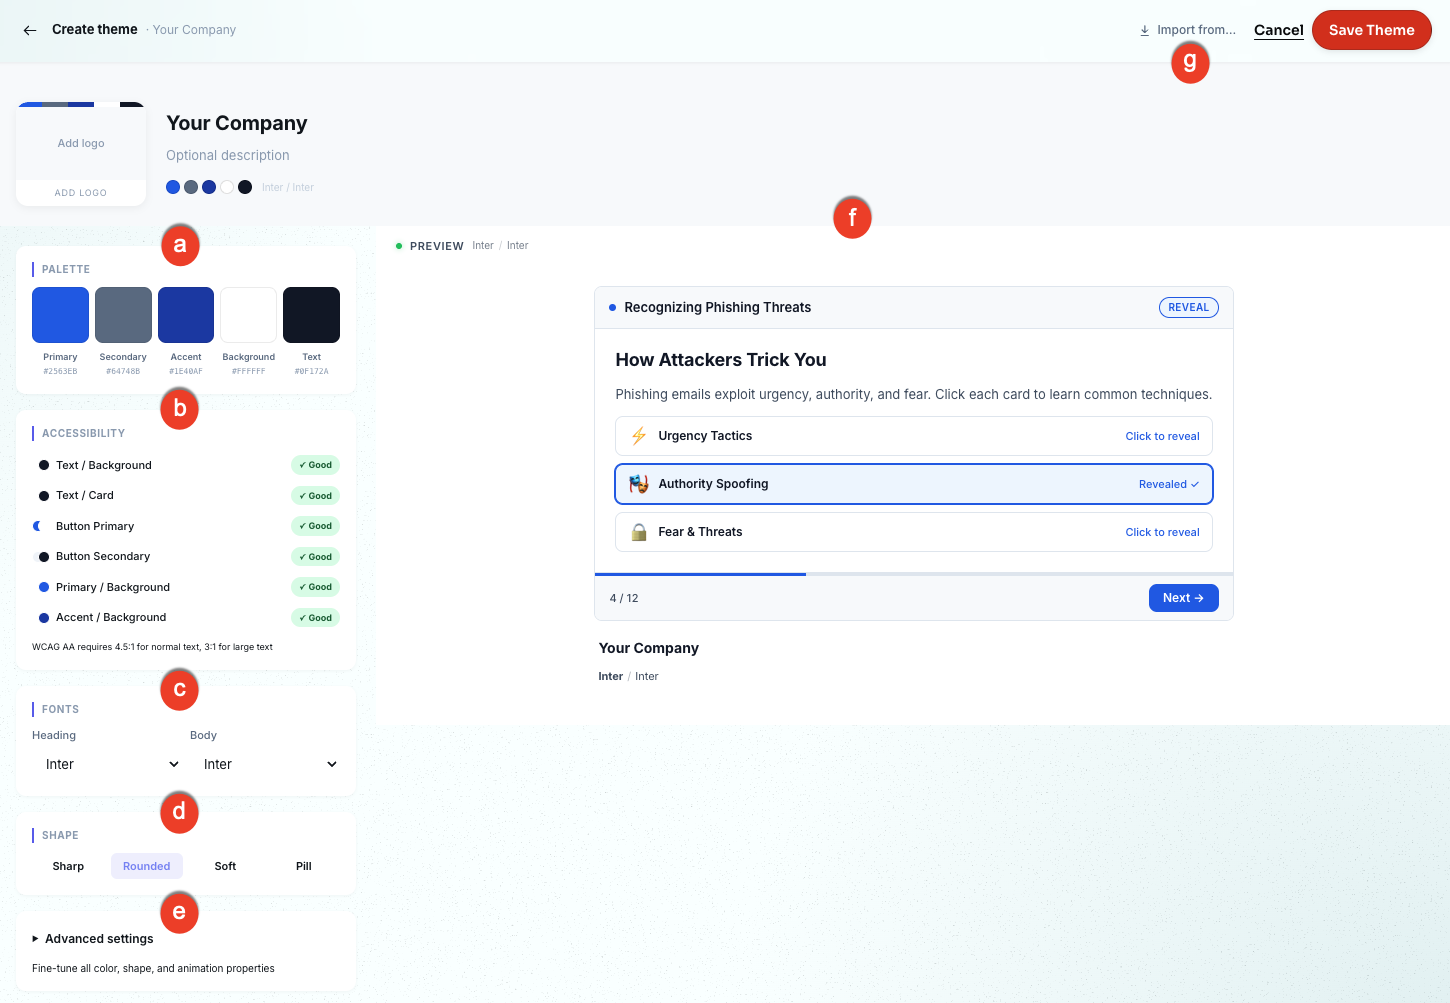
Creating a Custom Theme
You can create and manage custom themes for your courses from the Themes tab on the Create a Course page.
To create a theme, click + Create Theme. To learn more about the options in this section, see the screenshot and the list below:
-
Palette: Select the colors that define your theme.
- Set a Primary color for the main course elements.
- Set a Secondary color for supporting elements.
- Set an Accent color for highlights and buttons.
- Set a Background color for the course canvas.
- Set a Text color for all written content.
- Accessibility: View real-time contrast checks for your selected color combinations. All pairings are evaluated against the Web Content Accessibility Guidelines (WCAG) AA standards, which require a 4.5:1 ratio for normal text and 3:1 for large text. Pairings that meet the standard display a green Good indicator.
- Fonts: Select the typefaces for your course. Choose a font for headings and a separate font for body text.
- Shape: Select the corner style applied to cards, buttons, and elements throughout your course. Options range from Sharp (square corners) to Pill (fully rounded).
- Advanced Settings: Expand this section to fine-tune color, shape, and animation properties beyond the standard palette options.
- Live Preview: See how your theme selections look applied to a sample course frame. The preview updates in real time as you make changes.
- Import From: Use this drop-down menu to import color and font settings from an existing theme or external source to use as a starting point.
When you're satisfied, click Save Theme. Your new theme is now available to select in the course design wizard.
Adding a Cast Member
You can add and manage AI-generated cast members from the Cast tab on the Create a Course page.
To add a cast member, click + Add Cast Member. To learn more about the options in this section, see the screenshot and the list below:
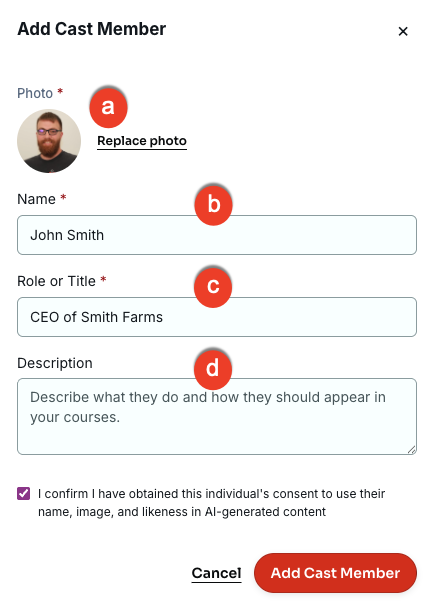
- Photo: Upload a photo of the cast member.
- Name: Enter the cast member's name.
- Role / Title: Enter the cast member's role or title.
- Description: Enter a description of how the cast member should appear in courses. This field is optional.
Click Add Cast Member. The cast member is now available when you generate a course.