Available to Diamond-level and SAT Advanced subscriptions, KnowBe4's PasswordIQ allows you to monitor your users' password vulnerabilities. The PasswordIQ client scans for vulnerabilities in your Active Directory (AD)'s password-related settings and compares your users' passwords to breached and weak passwords from various lists and databases. Then, the client communicates with KSAT to display your scan results on your dashboard.
To enable PasswordIQ, navigate to Account Integrations > PasswordIQ in your Account Settings. Then, select the Enable PasswordIQ check box.
See the sections below to learn how to install the client, run scans, and view your results.
Important:PasswordIQ will never display or report your users' passwords. In AD, all passwords are encrypted and stored in a hashed format, so the unhashed versions of passwords are inaccessible to PasswordIQ and KnowBe4.
Requirements
To install the PasswordIQ client, you'll need to meet the requirements listed below:
- You have access to a computer that meets the requirements:
- The computer's operating system is Windows 10 or later with 32-bit or 64-bit, or Windows Server 2016 or later.
-
The computer uses a version of .NET Framework with 4.7.2 or later.
Note: If your computer doesn’t have this framework, the Setup Wizard will install version 4.7.2 for you - The computer has at least four GB of RAM.
- The computer's system drive has at least one GB of available hard disk drive (HDD) space.
- User Account Control (UAC) is enabled in the computer's UAC settings.
-
You have access to an on-premises AD that runs on Windows Server 2008 R2 or a later version.
Note: If you have multiple AD domains, you'll need to install a different instance of the client for each domain. - You have access to an AD domain administrator or an AD account that can be elevated as an administrator. This account must have Replicating Directory Changes and Replicating Directory Changes All permissions. For more information, see Microsoft's Replicating Directory Changes permission article.
- You're a KSAT admin or have a security role with Read/Write access to PasswordIQ.
Vulnerabilities
The PasswordIQ client scans each user for 11 vulnerabilities and reports the vulnerabilities that it finds to KSAT. Additionally, our Risk Score Report uses these vulnerabilities as risk factors when calculating your Risk Score. For more information, see our SmartRisk™ Engine and Risk Score Guide
For more information about these vulnerabilities, see the table below:
| Vulnerability | Description | Risk Score Severity Level |
|---|---|---|
| Weak Password | The password matches a password from one of our weak password lists, so it's common or easy to guess. A cybercriminal may be more likely to guess the password and access the user's account. | Medium |
| Shared Password | The password matches at least one other user's password in your AD. The password is likely common or simple, so a cybercriminal may be more likely to access the user's account. | Medium |
| Clear Text Password | The password is stored with reversible encryption in your AD. The password can be decrypted, so a cybercriminal may be more likely to access the user's account. | High |
| Empty Password | The password doesn't contain any characters, so the user logs in to the account by leaving the password field blank. Anyone can access the user's account, including cybercriminals. | High |
| DES-Only Encryption | The account uses the Data Encryption Standard (DES) to encrypt the user's password. DES is an outdated encryption method because it encrypts the password with only a 56-bit key, while newer encryption methods use longer keys that are more secure. A cybercriminal may be more likely to guess the password and access the user's account. | Medium |
| Breached Password | The password was exposed in a data breach that is connected to your AD account. The user is actively using a password that is accessible to cybercriminals. | High |
| Password Not Required | The account doesn't require a user to enter a password when they log in. Anyone can log in to the account, including cybercriminals. | High |
| Password Never Expires | The account has its password timeout set to zero. Because of this setting, even if the Password never expires check box in the user’s properties is unchecked, their password will never expire. PasswordIQ will check password expiration settings in your organization’s domain policies, fine-grained password policies, and user properties. Passwords that aren’t changed often have a higher chance of being guessed by cybercriminals. | Medium |
| LM-Hash Password | The account uses a LAN Manager (LM) hash. An LM hash converts the password to all uppercase letters, limits the password to 14 characters, and splits the 14 characters into two groups of seven characters. This process weakens the password, so cybercriminals are more likely to crack it. | Medium |
| AES Encryption | The account doesn't use Advanced Encryption Standard (AES) to encrypt the user's password. AES encrypts passwords with a 128-bit or 256-bit key. So, passwords that use AES encryption are less vulnerable to attacks. | Medium |
| Missing Pre-Authentication | The account doesn't require pre-authentication, so the account may be unprotected from password-guessing attacks. Pre-authentication encrypts a timestamp of the log-in request by using a key that is based on the user's password. This process protects against password-guessing attacks because it records each attempt to log in to the account. | Medium |
To learn how you can resolve these vulnerabilities, see the Resolving Your Vulnerabilities section below.
Copying Your API Token
To connect the PasswordIQ client to your KSAT console, you'll need your Product API Token.
To create and copy your API token, follow the steps below:
- Log in to your KSAT account.
- Navigate to the PasswordIQ tab.
- Click PasswordIQ Client Setup.
- In theToken Name field, enter a name for your token.
- Select an Expiration Date for the token.
- Select a User.
- Click Create Token.
-
In the Product API Token pop-up window that opens, click the PasswordIQ API token to copy the token. You’ll need this token to complete this setup in the Installing the Client section below.
Important: After you close this window, you will not be able to view this token again.
- Click OK.
Installing the Client
Before you install the PasswordIQ client, verify that your computer meets the requirements in the Requirements section above. Then, copy your API token by following the instructions in the Copying Your API Token section above.
To install the client, follow the steps below:
- Log in to your KSAT account.
- Navigate to the PasswordIQ tab.
-
In step 2 of the Welcome to PasswordIQ instructions, click the PasswordIQ client link.

-
Click the Yes button in the pop-up window.

- Click the Next button.
- After you read the Software License Agreement, click the Accept button to accept the terms and conditions.
-
If your computer uses a proxy server to access the internet, select the Use a Proxy Server check box and fill out the fields. For more information, see the screenshot and list below. If your computer doesn't use a proxy server to access the internet, skip this step.

- IP Address or Name: Enter the proxy server's IP address or name. You can find this information in your computer's proxy server settings, which are under Network & Internet > Proxy.
- Port Number: Enter the proxy server's port number. You can find this information in your computer's proxy server settings, which are under Network & Internet > Proxy.
- Click the Next button.
-
In the Application Programming Interface (API) Token field, paste the API token that you copied in the Copying Your API Token section above.

- Click the Next button.
-
In the Username and Password fields, enter the login credentials of an AD service account that meets the required permissions. The client will use this service account to run all scheduled scans.
Note: If this account isn't assigned the Log on as a service permission, the client will assign this permission to the account automatically.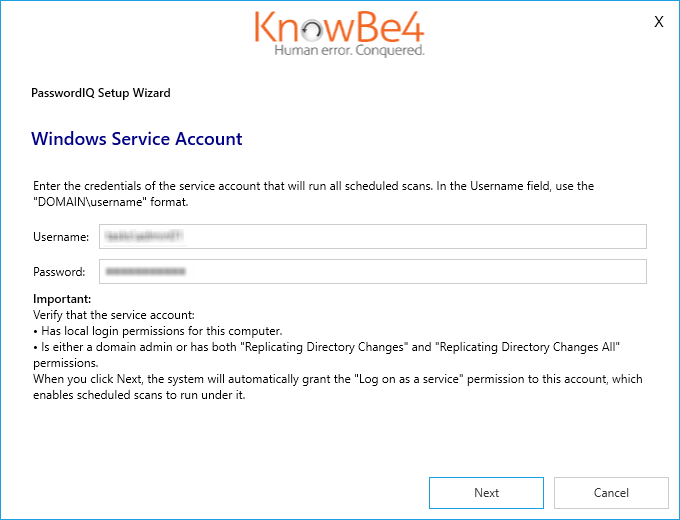
- Click the Next button to complete the installation.
Running Scans
After you install the PasswordIQ client, you can start scanning your AD for vulnerabilities. You'll need to run your first scan from your client. After your first scan, you can run scans and create a scan schedule from your dashboard. For more information, see the Running Scans section of our How to Use your PasswordIQ Dashboard article.
To run your first scan, follow the steps below:
- Open the PasswordIQ client.
-
In the Quick Scan section, click the Scan Now button.
Note: PIQ has additional settings you can access by clicking the gear icon in the top-right corner of the window. In Advanced settings, you can choose to include two optional vulnerabilities in your scan: AES Encryption No Set or Password Never Expires.
-
After the scan completes successfully, click the View Dashboard button to view your scan results in KSAT.

Settings
In your PasswordIQ client, you can customize your settings by clicking on the settings icon at the top-right corner of the client. In the modal that opens, you can see two tabs: General and Advanced. For more information about these tabs, see the subsections below.
/AdvancedSettings.png)
General
On the General tab, you can edit two sections: API Token and Proxy Server. These sections include settings that you set up when you started the PIQ client for the first time.
In the API Token field, you can change the API token you entered from your KSAT console. To save your changes, click Validate API Token.
In the Proxy Server field, you can change the proxy server that your computer uses to connect to the internet. Select the Use a Proxy Server check box if it’s disabled, and enter the name or IP address you want to use. In the Port Number field, enter the port number for your proxy server. To save your changes, click Validate Proxy Settings.
Advanced
On the Advanced tab, you can edit two sections: Custom Domain Controller and Custom Organizational Units.In the Custom Domain Controller section, you can choose any domain controller you want PasswordIQ to scan by entering the computer name or IP address in the Custom Domain Controller field.
In the Custom Organizational Units section, you can select one or more Organizational Units for PasswordIQ to scan from the drop-down menu.
Viewing Your Results
Because you can only view limited results from the PasswordIQ client, we recommend that you use your KSAT account to view and analyze your results. To navigate to your dashboard, navigate to the PasswordIQ tab of your KSAT console.
To view your scan results, you can either use the default dashboard or create custom dashboards. For more information, see our How to Use Your PasswordIQ Dashboard article.
Using Smart Groups for Detected Users
You can use Smart Groups to enroll the users who were detected for vulnerabilities in phishing or training campaigns. For example, you could use the PasswordIQ Event criteria to enroll users with weak passwords in the Creating Strong Passwords- Security Awareness Training training module.
For more information about Smart Groups, see our Smart Groups Overview.
Resolving Your Vulnerabilities
After you view your results, you can work with your users to resolve their password vulnerabilities. For more information, see our How to Resolve Your Password Vulnerabilities article.