In your PhishER console, you can use PhishRIP to remove email threats from your users’ inboxes. PhishRIP allows you to prevent active phishing attacks by searching for users’ reported emails and removing all similar emails across your Microsoft 365 mail server or your Google Workspace mail server.
Enabling PhishRIP
See the subsections below to learn how to enable PhishRIP in your Microsoft 365 mail server or your Google Workspace mail server. You can connect PhishRIP to multiple mail servers.
Enabling for Microsoft 365
To enable PhishRIP for Microsoft 365, follow the steps below:
- Log in to your PhishER console.
- Click the gear icon on the left side of the page to navigate to your settings.
- Navigate to the PhishRIP section.
- Click the Connect to Microsoft 365 button. You will be redirected to the Microsoft 365 login page.
- Log in to your Microsoft 365 account using your admin credentials.
-
Once logged in, the Permissions requested pop-up window will display the first set of permissions. Read the permissions, then click Accept. You will be redirected back to PhishER.
Note:Quarantine folders will be created after each query is run for any users added after the last query. This action will only occur if the last query was run more than 10 minutes before the next query.
- Under the Mail Servers section of your PhishER settings, the new instance of your Microsoft 365 mail server will display. The mail server's connection to PhishRIP is incomplete until you accept a second set of permissions to add the application to the mail server.
- To accept the permissions, click Continue. You will be redirected to Microsoft.
- Log in to your Microsoft 365 account using your admin credentials again.
-
Once logged in, the Permissions requested will display the second set of permissions. Read the permissions, then click Accept. You will be redirected back to PhishER. Your Microsoft 365 mail server instance will be connected to PhishRIP.

-
Under the PhishRIP section of your PhishER settings, click the Disabled toggle. Then, click Save. This action will enable PhishRIP in your PhishER console.

- (Optional) Select the Enable Defend Integration check box to allow PhishRIP to use KnowBe4 Defend to enhance search speed and threat management. This setting is only available for Microsoft 365.
-
(Optional) Select the Allow Permanent Message Deletion check box to enable the delete option in PhishRIP. Once the delete option is enabled, admins can request PhishRIP to quarantine, restore, and permanently delete emails in your Microsoft 365 mail server.
Important:KnowBe4 cannot restore permanently deleted emails.
-
(Optional) Select the Enable Hidden Quarantine Folder check box to automatically move future quarantined messages to a hidden folder. This feature will help users avoid accessing potentially malicious content. Any existing quarantine folders and messages created before enabling this feature will remain visible and accessible to users. This setting is automatically toggled on for new PhishER accounts when PhishRIP is enabled and is only available for Microsoft 365.
Note:The Restore and Permanently Delete PhishRIP actions will remain fully operational in this hidden folder.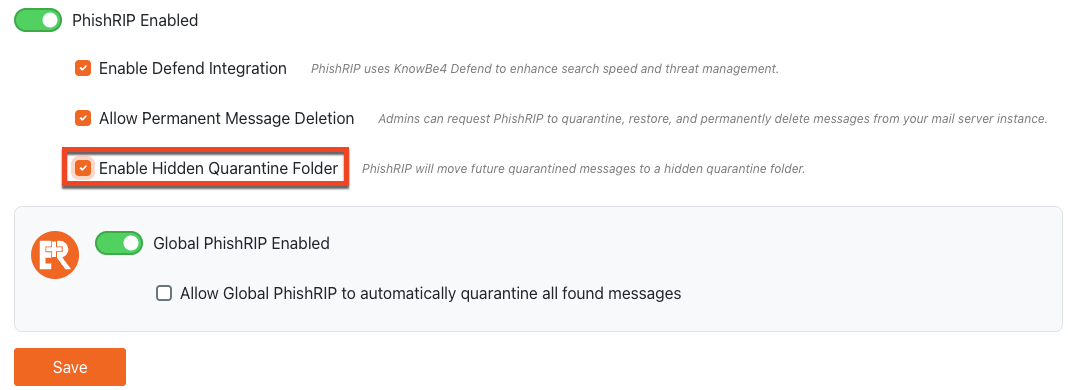
Once PhishRIP is enabled in your PhishER console, a fishbone icon will display in the navigation panel. Click this icon to access PhishRIP.
![]()
To connect another mail server, click Connect to Microsoft 365 in the Mail Servers section of your PhishER Settings again.
Enabling for Google Workspace
To enable PhishRIP for Google Workspace, follow the steps below.
- Log in to your PhishER console.
- Click the gear icon on the left side of the page to navigate to your settings.
- Navigate to the PhishRIP section.
-
Click Connect to Google Workspace. A Google Workspace Credentials pop-up window will display with instructions.

- Copy your Client ID.
-
In a separate tab of your browser, log in to your Google Workspace Google Workspace (link opens in new window) admin console. You must have a Super User Administrator role.
Note:To learn how to view your admin role, visit Google's View role assignments & privileges View role assignments & privileges (link opens in new window) article. -
Once you’ve logged in, navigate to Security > Access and data control > API Controls > Manage Domain wide delegation.

-
Click Add new.

- Paste the Client ID that you copied in step five.
-
In the OAuth scopes field, enter "https://www.googleapis.com/auth/admin.directory.user.readonly,https://mail.google.com/"

- Click Authorize.
- Locate and copy your Google Workspace Customer ID from your Google Workspace Account Settings. To learn how to find your Customer ID, see Google’s Find your customer ID Find your customer ID (link opens in new window) article.
- Return to your PhishER console.
-
In the Google Workspace Credentials pop-up window, enter your Account Admin email address in the Access User field.
- Enter the Customer ID that you copied in step 12 into the Mailserver ID field.
-
Click Connect.
Note:Quarantine folders will be created after each query is run for any users added after the last query. This action will only occur if the last query was run more than 10 minutes before the next query. -
Under the PhishRIP section of your PhishER settings, click the Disabled toggle. Then, click Save. This action will enable PhishRIP in your PhishER console.
.gif)
-
(Optional) Select the Allow Permanent Message Deletion check box to enable the delete option in PhishRIP. Once the delete option is enabled, admins can request PhishRIP to quarantine, restore, and permanently delete messages in your Google Workspace mail server.
Important:KnowBe4 cannot restore permanently deleted emails.
Once PhishRIP is enabled in your PhishER console, a fishbone icon will display in the navigation panel. Click this icon to access PhishRIP.
![]()
To connect another mail server, click Connect to Google Workspace in the Mail Servers section of your PhishER Settings again.
Initiating a PhishRIP Query
In your PhishER console, there are four places where you can initiate a PhishRIP query: the PhishER Inbox column, the Run drop-down menu, the Message Details page, and the PhishRIP Queries page. See the subsections below for the steps for each method.
Method 1: PhishER Inbox Column
To initiate a query from the Inbox column, follow the steps below:
-
Navigate to the Inbox tab.

-
In the PhishRIP column, click the plus icon to open the Find Similar Messages pop-up window.
Note:If PhishRIP was already initiated on the message, a fishbone icon will display instead of the plus icon. If the PhishRIP column is not available, select the gear icon at the top-right corner of the Inbox page. Then, the Inbox Table Settings pop-up window will open. You can select the PhishRIP check box to show the column.
Method 2: Run Drop-down Menu
To initiate a query from the Run drop-down menu, follow the steps below:
- Navigate to the Inbox tab.
-
Click the checkbox to the left of the message that you want to initiate a query for.

- Click the Run drop-down menu in the top-left corner of the page.
-
Under the PhishRIP section, click Find Similar Messages to open the Find Similar Messages pop-up window.

Method 3: Message Details Page
To initiate a query from the Message Details page, follow the steps below:
- Navigate to the Inbox tab.
-
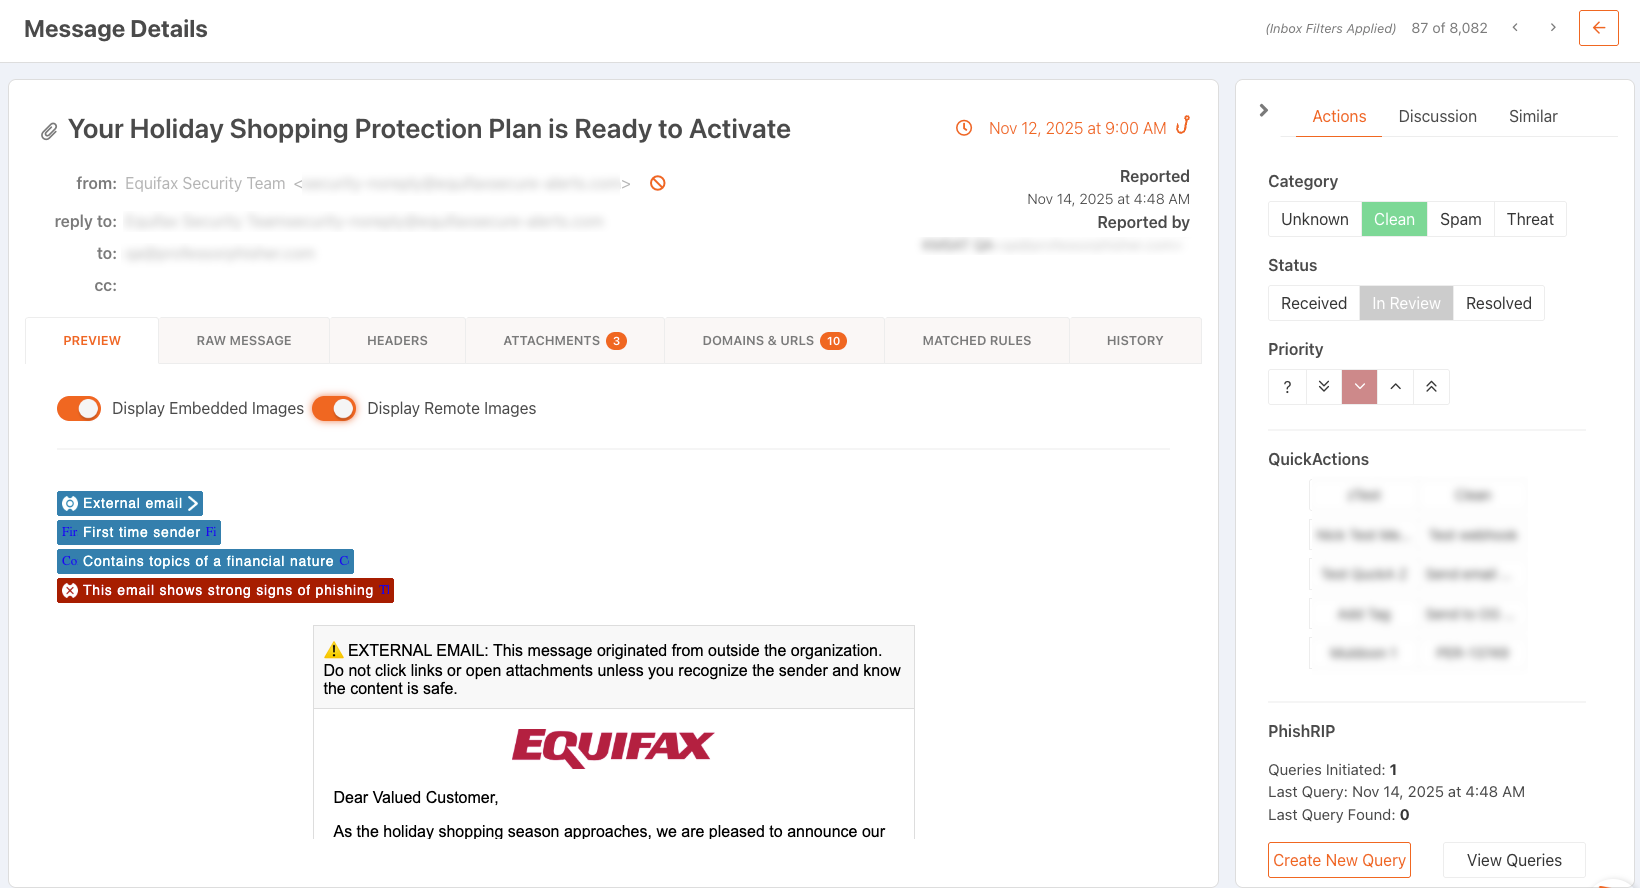
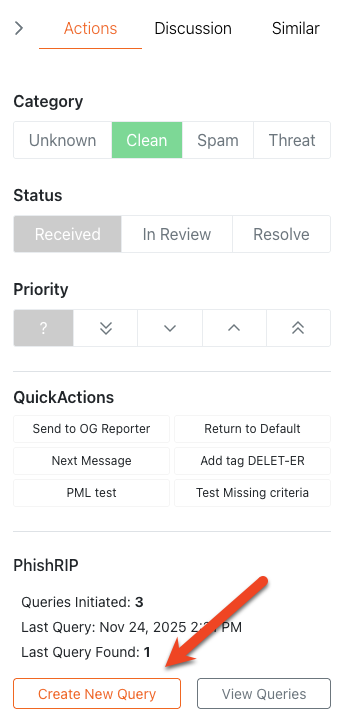
Click a message to open the Message Details page.
-
In the Actions and Discussion sidebar on the right of the page, click the Create New Query button under the Actions tab. When you click this button, the Find Similar Messages pop-up window will open.
If a PhishRIP query fails, you can retry the query by clicking Retry in the Status column of the PhishRIP Queries page. This option is only visible for failed queries, regardless of the resolution status. Retrying a query will not create a new query.

Method 4: PhishRIP Queries Page
When the Allow PhishRIP queries to be initiated without a source message setting is enabled in the Preferences subtab of your PhishER Settings, you can initiate a query from the PhishRIP Queries page without an associated reported message.
To initiate a query from the PhishRIP Queries page, follow the steps below:
- Log in to your PhishER console.
- Navigate to the PhishRIP section.
-
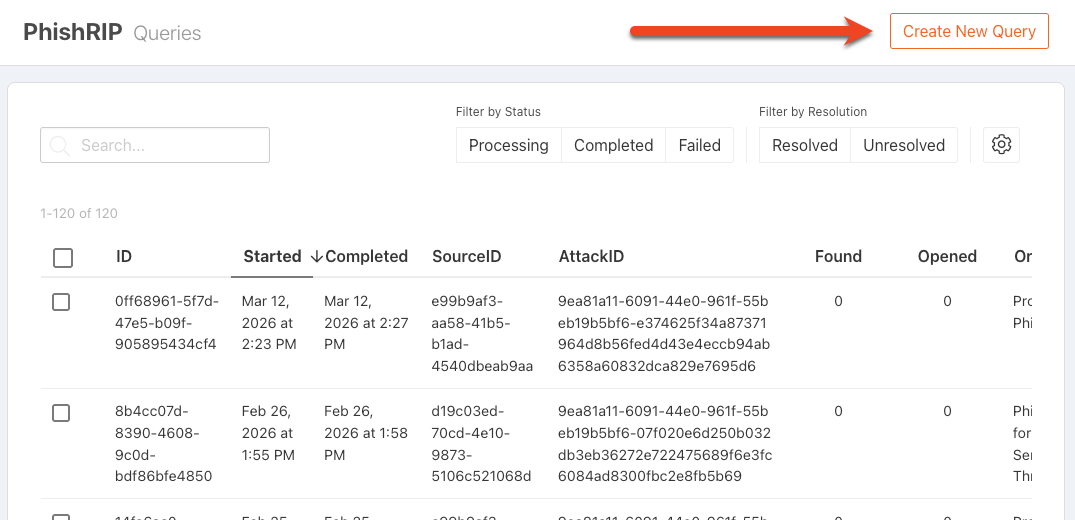
In the top-right corner of the page, click Create New Query to open the Find Similar Messages pop-up window.
When you use this method to initiate a query, the options for customizing criteria are different from the other methods. For more information, see the Criteria Without a Source Message subsection below.
Find Similar Messages
Each method used to initiate a PhishRIP query will open the Find Similar Messages pop-up window. For more information about this pop-up window, see the screenshot and list below:
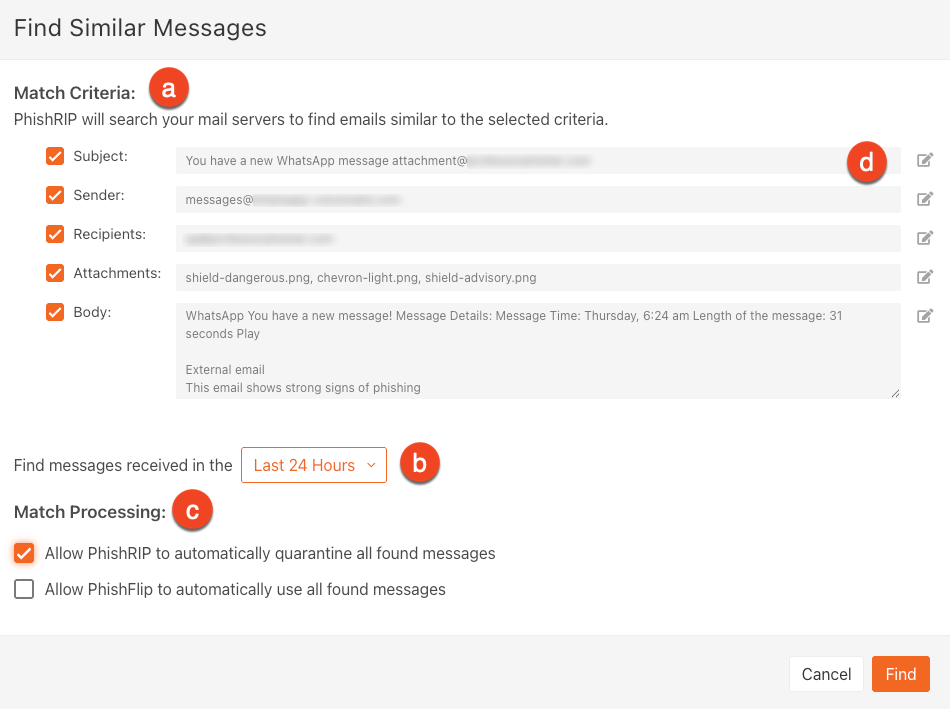
-
Match Criteria: Select at least two criteria options for your PhishRIP query. PhishRIP will use this information to find all of the matching messages across your mail server.
Note:If the Allow PhishRIP queries to be initiated with one match criterion setting is enabled in Settings, you can select at least one criterion. -
Find messages received in the: By default, PhishRIP will find similar messages that were received over the last 24 hours. Click on the drop-down menu to select one of the following options: Last 72 hours, Last Week, or Last Month.
Note:If you enabled the Defend integration in your PhishRIP settings, PhishRIP will find messages that were received over the last 40 days. The Defend integration is only available for Microsoft 365. - Match Processing: You can select the following quarantine and PhishFlip options for your PhishRIP query:
-
Allow PhishRIP to automatically quarantine all found messages: Select this check box if you want PhishRIP to quarantine all found messages. Messages stay in the Quarantine folder until you restore them or permanently delete them.
Note:PhishRIP does not scan the Quarantine folder when searching for messages. - Allow PhishFlip to automatically use all found messages: Select this check box if you want PhishER to use the emails found by PhishRIP queries to automatically create phishing templates and start phishing campaigns in KSAT. The automatic phishing campaigns send the simulated phishing emails to the users who received the original, malicious emails.
-
-
Customized Criteria: Create a new PhishRIP query by selecting one of the following criteria and modifying the text field. To modify the text field, click the pencil icon. If you create a new query without a reported message, see the Criteria Without a Source Message subsection below.
- Subject: In this field, you can narrow your search criteria by entering text from the original subject line. You’ll need to enter at least four consecutive characters from the original subject line. If the subject contains any special characters, you’ll need to keep those characters in the query for it to search successfully.
- Sender and Recipient: In these fields, you can enter the original email addresses or narrow the search criteria by entering only the domain or subdomain.
- Attachment: In this field, you enter the original attachment names or narrow the search criteria by entering a file type. All listed attachments are required for matching emails. You can remove unwanted attachments from the list. To match any file of a specific type, enter an asterisk before the file extension, such as “*.pdf”.
-
Body: In this field, you can narrow the search criteria by entering part of a string in the original message. You’ll need to either enter at least 30 characters or 50 percent of the content found in the original message.
Remember:Defend does not support the Body criterion. This option is only available for accounts without any mail servers connected to Defend and with Defend disabled in PhishRIP settings.
Criteria Without a Source Message
When you create a new PhishRIP query from the PhishRIP Queries page, the Find Similar Messages pop-up window allows you to enter your own criteria to find matching messages. For more information about customizing this criteria, see the list below:
- Subject: In this field, you can narrow your search criteria by entering text for a subject line. You’ll need to enter at least 10 characters.
- Sender and Recipient: In these fields, you can narrow the search criteria by entering complete email addresses, domains, or subdomains.
- Attachment: In this field, you can narrow the search criteria by entering attachment names. You’ll need to enter at least three characters. To match any file of a specific type, enter an asterisk before the file extension (for example: *.pdf). All listed attachments are required for matching emails.
- Body: In this field, you can narrow the search criteria by entering text for message content. You’ll need to enter at least 20 characters.
PhishRIP Queries
Your PhishRIP Queries page contains all of the PhishRIP queries initiated inside your PhishER console. When a query is selected, you can mark it as Resolved or Unresolved. You can click an individual query ID to open the PhishRIP Messages page.
For more information about the PhishRIP Queries page, see the screenshot and list below:
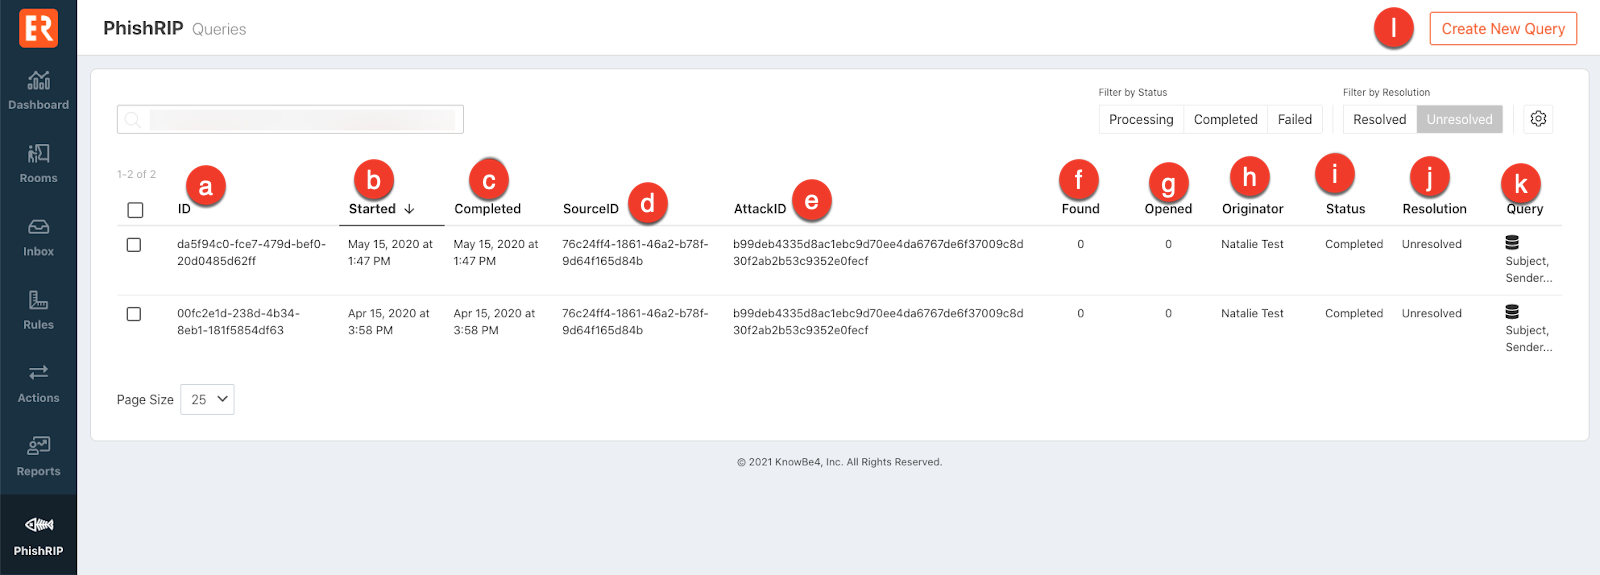
- ID: This column displays a unique string of characters that identifies a PhishRIP query.
- Started: This column displays the date and time a PhishRIP query was initiated.
- Completed: This column displays the date and time a PhishRIP query completed its mailbox search.
- SourceID: This column displays a unique string of characters assigned to the PhishER message used to create a PhishRIP query. Click the Source ID link to view the Message Details page for the message.
-
AttackID: This column displays a unique string of characters assigned to the PhishRIP message that shares a similar subject or sender to messages that have been recently affected by PhishRIP.
Note:If the PhishRIP query was initiated from the PhishRIP Queries page instead of a message in your Inbox, the SourceID and AttackID columns will display “No source message (Advanced Features)” and “No AttackID (Advanced Features)”. - Found: This column displays the number of messages that matched the PhishRIP query criteria.
- Opened: This column displays the number of found messages that were opened.
- Originator: This column displays the first and last name of the user who initiated the PhishRIP query.
- Status: This column displays the status of a PhishRIP query. A query can have a status of Processing, Completed, or Failed.
- Resolution: This column displays whether a query was marked as Resolved or Unresolved.
- Query: This column displays the match criteria that were selected for the PhishRIP query. If you click the database icon, the View PhishRIP Details pop-up window will open and display the originally selected criteria. This feature allows you to review the exact items that were searched for by the query.
- Create New Query: When the Allow PhishRIP queries to be initiated without a source message setting is enabled in your PhishER Settings, you can click this button to open the Find Similar Messages pop-up window. Then, you can enter your own information for the match criteria.
You can filter PhishRIP queries by the Processing, Completed, or Failed statuses. You can also filter by the Resolved or Unresolved resolutions. Use the search bar to filter your PhishRIP queries by using Lucene Query syntax. When a message is selected, you can apply the Resolved or Unresolved resolutions to the message.
PhishRIP Messages
The PhishRIP Messages page will display the matching messages found across all of the inboxes in your mail server. For more information about this page, see the screenshot and list below:

-
Mailbox Email: This column displays the email address of the mailbox containing a message that matched the PhishRIP query.
Note:You can limit the mailboxes that PhishRIP scans by creating a list of domains or regexes in your Mail Servers settings. For more information, visit our PhishER Settings: Integrations article. - Mailbox Name: This column displays the name of the inbox containing a message that matched the PhishRIP query.
- Read: This column displays whether the message was Read or Unread by the recipient.
- Discovery Folder: This column displays the inbox folder where the message was found.
- Subject: This column displays the text found in the subject line of the message.
- Date Found: This column displays the date the PhishRIP query discovered the message.
- PhishRIP Status: This column displays the last known status of a PhishRIP message. If the message is available, the message will be in the Discovered, Quarantined, Deleted, or Quarantine Pending status. If the message is unavailable due to actions performed outside of PhishRIP or if the message has been deleted in another query, the message will be in the Unavailable status.
- PhishFlip Status: This column displays the last known status of a PhishFlip message. If the message is available, the message will be in the PhishFlip Pending, PhishFlip Failed, or PhishFlip Created status. If the message has not been through PhishFlip, that field will be empty.
- Status Updated: This column displays the date when the message last had changes applied to it.
- Download CSV: Clicking this button will export the list of emails and information identified by a PhishRIP query into a CSV file. The download can be viewed in your PhishER settings under Settings > Downloads.
You can filter PhishRIP messages by Discovered, Quarantined, Deleted, Pending, or Failed statuses.
PhishRIP Actions
When you select a PhishRIP message from the PhishRIP Messages page, the Run drop-down menu will display. Depending on the delete option you selected under your PhishRIP settings, the Run drop-down menu will display different options.
For more information, see the subsections below.
Permanent Message Deletion Disabled
If you disabled Allow Permanent Message Deletion in your PhishRIP settings, options will display in the Run drop-down menu. For more information about these options, see the screenshot and list below:

- Quarantine: This action will move the selected message into the Quarantine folder of the inbox where the message was discovered.
- Restore: This action will move the selected message from the Quarantine folder of the inbox to the original discovery folder of the message.
- PhishFlip: This action will create an automatic PhishFlip campaign based on users' reported emails. For more information, see the Creating Automatic PhishFlip Campaigns section of our PhishFlip Guide.
- Create KSAT Template: This action will automatically create a KSAT phishing template that you can use in your phishing campaigns. For more information, see the Creating KSAT Templates with PhishFlip section of our PhishFlip Guide.
- Send Custom Email: This option allows you to send a custom email using the Email Template Editor. Click Send Custom Email to open the template editor in a pop-up window. When your email is ready to be sent, click the Send button.
Permanent Message Deletion Enabled
If you enabled the delete option under your PhishRIP settings, options will display in the Run drop-down menu. For more information about these options, see the screenshot and list below:

- Quarantine: This action will move the selected message into the Quarantine folder of the inbox in which the message was discovered.
- Restore: This action will move the selected message from the Quarantine folder of the Microsoft 365 inbox or the Google Workspace inbox to the original discovery folder of the message.
-
Permanently Delete: This action will permanently delete the selected message from the Microsoft 365 inbox or the Google Workspace inbox in which the message was discovered. A message must be quarantined before it can be permanently deleted. If a message has not been quarantined, this option will be grayed out.
Important:KnowBe4 cannot restore permanently deleted emails. - PhishFlip: This action will create an automatic PhishFlip campaign based on users' reported emails. For more information, see the Creating Automatic PhishFlip Campaigns section of our PhishFlip article.
- Create KSAT Template: This action will automatically create a KSAT phishing template that you can use in your phishing campaigns. For more information, see the Creating KSAT Templates with PhishFlip section of our PhishFlip article.
- Send Custom Email: This option allows you to send a custom email using the Email Template Editor. Click Send Custom Email to open the template editor in a pop-up window. When your email is ready to be sent, click the Send button.