In the Account section of your PhishER Settings, you can generate reporting email addresses, set up your email server, manage custom email templates and notifications, and more.
Reporting Emails
From the Reporting Emails subtab, you can view your reporting email addresses and generate new reporting email addresses. Reporting email addresses are used to forward your users’ reported emails to your PhishER Inbox. You can set up a reporting email address to work with the Phish Alert Button (PAB) to forward emails automatically. Or, if your organization doesn't use the PAB, you can use the reporting email address to forward emails manually. See the subsections of this article below to learn more about each method.
For more information about the settings in the Reporting Emails subtab, see the screenshot and list below:

-
Generate New Email: You can click this button to generate a new reporting email address. You can generate as many reporting email addresses as you would like. For example, you could generate multiple reporting email addresses if your organization would like to use different reporting email addresses for specific user groups, PAB instances, or office locations.
Note:All emails forwarded to your reporting email addresses are sent to your PhishER Inbox. - Reporting Email: This column displays your reporting email addresses.
- Tag: This column displays the custom tags associated with your reporting email addresses. To add a tag, click the edit icon and enter your tag in the field. Then, press Return or Enter to save your change. You can create one custom tag for each reporting email address. PhishER will automatically assign your tag to messages that the reporting email address forwards to your PhishER Inbox.
- Active: In this column, you can use the toggle button to enable or disable a reporting email address.
- Forwarded Only: In this column, you can select the check box to only allow reporting email addresses to receive emails that have been forwarded manually.
- Actions: In this column, you can click the paper icon to copy the reporting email address. You can click the trashcan icon to delete the reporting email address.
Forwarding Reporting Emails Using the PAB
If your organization has installed the Phish Alert Button (PAB), you can set up a reporting email address to forward your users’ reported emails to your PhishER Inbox automatically. To forward emails with the PAB, you must add a reporting email address to the Phish Alert section of your KSAT Account Settings.
To set up automatic email forwarding with the PAB, follow the steps below:
- Log in to your PhishER console.
- Navigate to Settings > Reporting Emails.
-
In the Actions column, click the paper icon to copy your reporting email address.

- Log in to your KSAT console.
- Click your email address at the top-right corner of the page. From the drop-down menu that opens, select Account Settings.
- Navigate to Account Integrations > Phish Alert.
- Click the + icon next to the PAB instance to view your settings.
-
In the Send Non-Simulated Emails to: field, enter your reporting email addresses. For more information about this field, see the Enable and Configure PAB section of our Phish Alert Button (PAB) Product Manual.
Note: If your organization enables and configures the PAB after enabling PhishER, the reporting email address will automatically populate in the Send Non-Simulated Emails to: field. If you would like to remove this email address from the list, click the Remove PhishER Email Addresses button.
- Click the Save Phish Alert Settings button.
- At the bottom of the page, click the Save Changes button.
Manually Forwarding Report Emails
If your organization does not use the Phish Alert Button (PAB), your users will need to forward emails to your reporting email addresses manually. We recommend that you set up an alias email address in your mail server to route forwarded emails to your PhishER reporting email address. Then, instruct your users to forward all suspicious emails to the alias email address.
For more information about creating an alias email address in common email clients, see the list below:
- Apple iCloud: Add and manage email aliases for iCloud Mail on iCloud.com Add and manage email aliases for iCloud Mail on iCloud.com
- Gmail (Google Workspace): Add or delete an alternate email address (email alias) Add or delete an alternate email address (email alias)
- Microsoft Outlook: Add or remove an email alias in Outlook.com Add or remove an email alias in Outlook.com
Email Server
From the Email Server subtab, you can view and edit information about your default email template and email server settings for custom emails in your PhishER console. If you create a PhishER action on the Actions tab and select the Send Email option for the Choose how you would like to report this action step, these email server settings will automatically populate in your email template.
To adjust your default email template and related email server information, edit the settings on the Email Server subtab. For more information, see the screenshot and list below:

- Default From Address: Enter the email address that you would like to populate in the From field in your email template.
- Default From Name: Enter the name that you would like to populate in the From Name field in your email template.
- Default Reply to Address: Enter the email address that you would like to populate in the Reply To field in your email template.
- Default Reply to Name: Enter the name that you would like to populate in the Reply To Name field in your email template.
- X-Phisher header: If you would like to attach an email header to your custom email for flagging or tracking purposes, enter a custom email header in this field. Your header will be attached to the outgoing email from your PhishER console.
- Email Headers: Select this check box if you would like to overwrite the fixed return-path email address when you enter an email address in the From field for a custom email template.
- DKIM Signature: Select this check box to enable DKIM signatures in your PhishER console. A DKIM signature is a line of text that proves if a PhishER notification is authentic. DKIM signatures can be used for notifications from KnowBe4 or custom notifications that you've created. To learn more about DKIM signatures, see our How to Enable and Customize PhishER DKIM Signatures article.
- Configure DKIM: Select the type of signing domain you would like to use for DKIM signatures. To use KnowBe4's signing domain, select Use KnowBe4's Signing Domain. To use a signing domain from your organization, select Use Your Signing Domain.
-
Add Custom Signing Domain: If you selected Use Your Signing Domain, click this button to open the Add Custom Signing Domain pop-up window. From the drop-down menu, select a signing domain. Then, click Add to add the signing domain to your console.

- Save: Click this button to save your email server settings.
- Allowed Domains: This section displays a list of all the domains that have been added and verified in your KSAT Account Settings. For more information about allowed domains, see our How to Add and Verify Domains article.
Email Templates
From the Email Templates subtab, you can view all of your custom email templates and create new custom templates. You can set up custom emails to use in your PhishER actions. If an action is triggered and an email template is attached to the action, PhishER will automatically send the email template to your specified recipients. To create a custom email template, click the New Email Template button at the top-right corner of the page. For more information about email templates, see our How to Create a Custom Email Template in PhishER article.

Notifications
From the Notifications subtab, you can view all of your notifications and create new notifications. Notifications are emails that you can send to your admins to inform them of changes to your saved queries in the PhishER Rooms tab. For example, you can notify admins once a room has less than 10 emails or more than 50 emails after a set period of time.
For more information about the Notifications subtab, see the screenshot and list below:

- New Notification: You can click this button to create a new notification.
- Search: You can use this search bar to find specific notifications.
- Name: This column displays the notification’s name.
- Target Room: This column displays the PhishER room that is mentioned in the notification.
- Created At: This column displays the date and time of when the notification was created.
- Updated At: This column displays the date and time of when the notification was last updated.
- Actions: This column displays the actions available to perform for the notification. You can click the trashcan icon to delete the notification.
Creating Notifications
To create a notification, follow the steps below:
- Log in to your PhishER console.
- Navigate to Settings > Notifications.
-
Click the New Notification button in the top-right corner of the page. The New Notification pop-up window will open. For more information about the fields in this pop-up window, see the screenshot and list below:
- Notification Name: In this field, enter a name for your notification.
- Select an existing saved query: From this drop-down menu, select the PhishER room you would like to mention in the notification.
- Thresholds: Select the Less Than and More Than check boxes to use one or both of the limit options. Then, enter numbers in the Emails fields to set the limits that will trigger PhishER to send the notification.
-
Timeframe: Enter a number in the field and select a frequency from the drop-down menu to determine how often PhishER will send the notification.
Note:You must enter a timeframe of 10 or more minutes, 1 to 90 hours, or 1 to 90 days. - Deliver to: In this field, enter the email addresses of the users who should receive the notification. Separate each email address with a line break.

- Click Save to create your notification.
Downloads
From the Downloads subtab, you can download any reports or large files generated in your console. For example, you can select a report from the Reports tab, reported messages in your PhishER Inbox, or emails identified in a PhishRIP query, and click the Download CSV button. The CSV file will display in the list of files when it is fully generated and available to download. Files that include more than 5000 messages from your PhishER Inbox will be displayed in the list of downloadable files. You can change the maximum item limit in the Preferences tab. Smaller files from your PhishER Inbox will automatically download through your browser and will be available from your browser’s download history.
For more information about the Downloads subtab, see the screenshot and list below:

- Name: This column displays the file’s name.
- Created At: This column displays the date and time of when the file was generated to download.
- Expires At: This column displays the date and time of when the file will be removed from the list automatically.
- Actions: This column displays the actions available to perform for the file. You can click the download icon to download the file. You can click the trashcan icon to delete the file.
Viewing Alerts for Downloads and Comments
When generated files are ready to access, an alert displays as a bell icon on the user icon at the bottom of the navigation bar. Click the bell icon to open the Alerts pop-up window and view alerts for all large files that are ready to download. New alerts are displayed in bold text. You can click the download icon to download a file. Alerts will also generate an event whenever a user responds to a message sent from the PhishER Discussionpanel. You can click the email icon to navigate directly to a user's response. When you don’t have any new alerts, you can click the user icon and click Alerts to open the Alerts pop-up window. Previously viewed alerts are displayed in normal text.

Data Retention
From the Data Retention subtab, you can set how long you would like for your data to be stored in PhishER. Data retention is calculated as the amount of time that has passed since a user reported a message. To configure your data retention settings, select a Retention Type and Retention Period.
For more information about the Data Retention subtab, see the screenshot and list below:

- No Message Retention (Past and Future): You can select this option to permanently delete all records of both past and future messages. If you select this option, PhishER will delete the entire raw message as well as any actions, labels, rules, tags, and other data. None of the data removed from the message will display in any past or future PhishER reports or message details.
- No Message Retention (Future Only): You can select this option to permanently delete all records of future messages. If you select this option, PhishER will delete the entire raw message as well as any actions, labels, rules, tags, and other data. None of the data removed from the message will display in any historical reports.
- Message Timestamps and Dispositioning Retention: You can select this option to permanently delete all records of the message, including the entire body, raw message details, and email addresses. If you select this option, PhishER will only keep information about message properties to dispositioning such as category, status, or priority and timestamps. This option is used to delete any information that isn't needed for reports on your PhishER Dashboard tab.
- Message Body and Details Retention: You can select this option to delete the entire raw message, including the body, headers, email addresses, and attachments. If you select this option, PhishER will remove private information that can be found in the email body from KnowBe4's servers. PhishER will only keep information about message properties, actions, labels, and rules.
- Retention Period: Use the drop-down menu and text field to set the period of time that you would like PhishER to retain data. You can set a period of days, months, or years. The minimum retention period is one day, and the maximum retention period is ten years.
-
Save: Click this button to save your data retention settings.
Note:Data retention features are currently optional. However, KnowBe4 reserves the right to modify the default data retention settings. This modification would only affect PhishER accounts that have not configured their data retention settings.
Preferences
From the Preferences subtab, you can configure settings for files downloaded from your console, messages grouped by similarity in the Message Details page, and additional configuration options for PhishER features. See the subsections below to learn more about each setting.
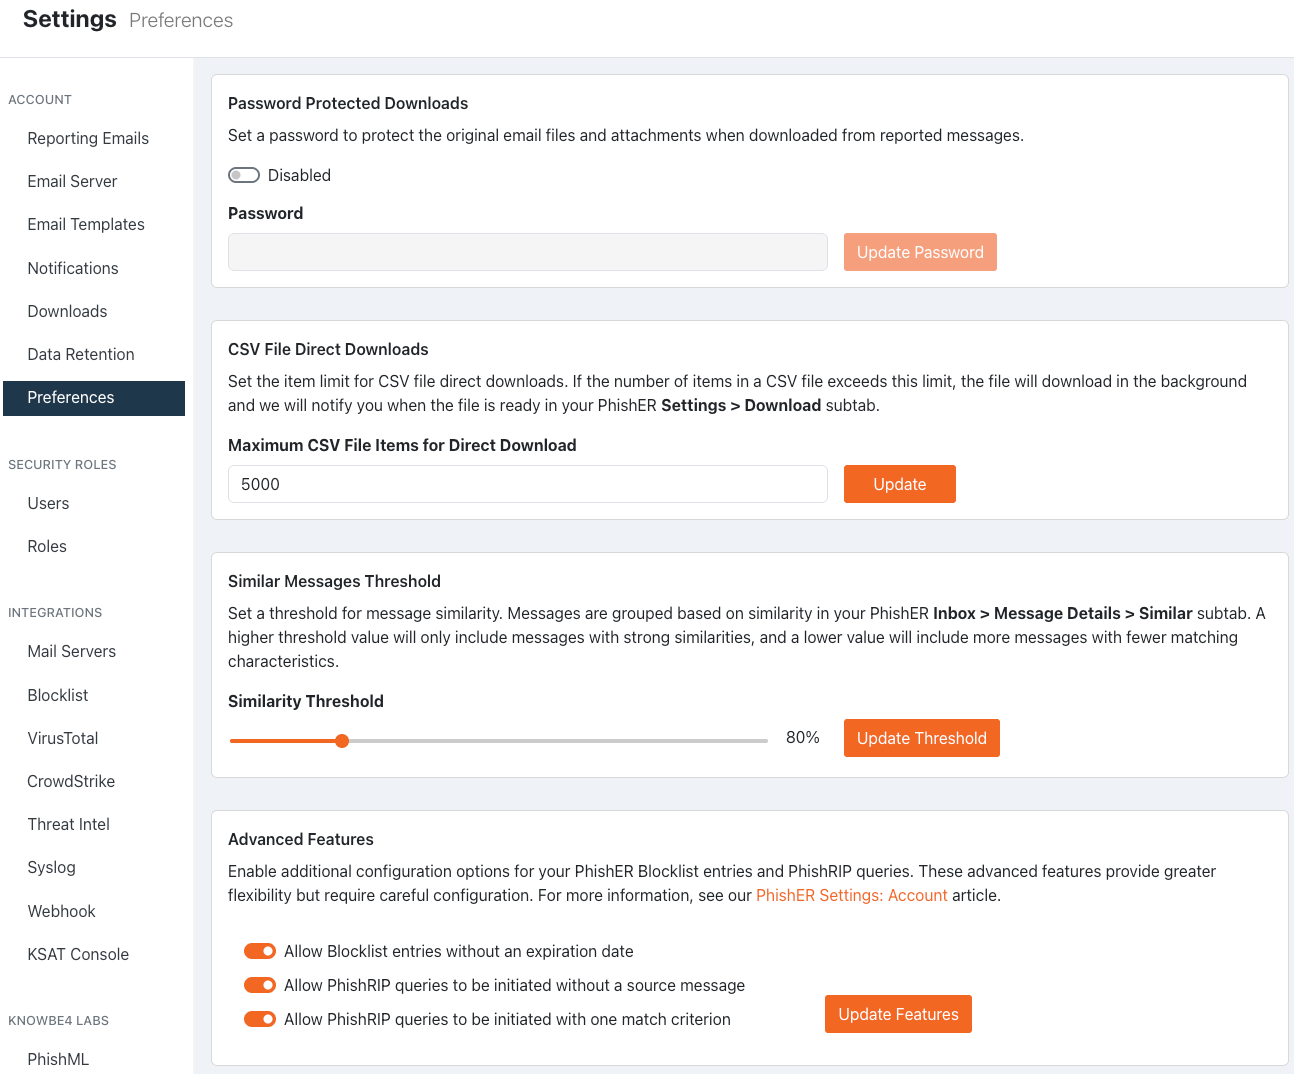
Password Protected Downloads
This section allows you to set a password to protect the files you download from reported messages. To set a password for downloaded files, follow the steps below:
- Turn on the toggle to enable the Password Protected Downloads setting.
- In the Password field, enter a password that is at least six characters long.
- Click Update Password.
Once this setting is enabled, all original files downloaded from the Message Details page will be converted to password-protected ZIP files.
CSV File Direct Downloads
This section allows you to set a maximum item limit for CSV file direct downloads. To set a limit for direct downloads, follow the steps below:
- In the Maximum CSV File Items for Direct Downloads field, enter the number of items you want to be the limit for direct downloads.
- Click Update.
Once this setting is updated, all CSV files that exceed this item limit will download in the background, and we will notify you when the file is ready in your Downloads subtab.
Similar Messages Threshold
This section allows you to set the similarity of messages that are grouped together in the Similar subtab in the Message Details page. To set the similarity threshold, follow the steps below:
- Use the Similarity Threshold slider control to set the desired percentage of similarity.
- Click Update Threshold.
Once this setting is updated, new reported messages that meet the threshold will be grouped together with similar messages.
Advanced Features
This section allows you to enable additional configuration options for your PhishER Blocklist entries and PhishRIP queries. These advanced features provide greater flexibility but require careful configuration. To learn about the options available for each feature, see the screenshot and list below:
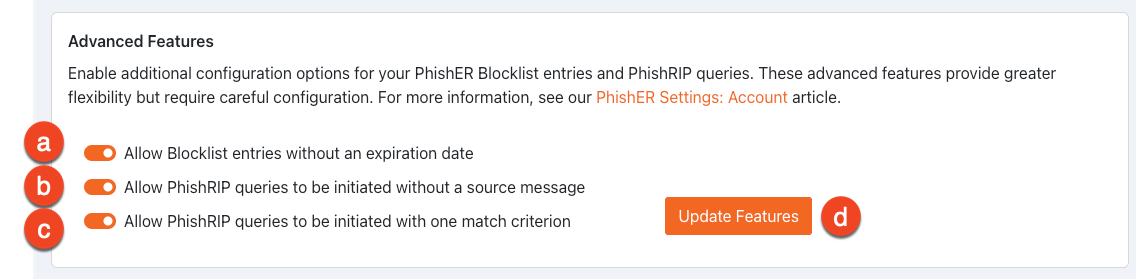
- Allow Blocklist entries without an expiration date: Select this check box to allow your admins to create PhishER Blocklist entries without expiration dates. When this option is enabled, the Never Expire option is available in the Duration drop-down menu in the Create New Entry window for the blocklist. For more information about blocklist entries, read our PhishER Blocklist Guide.
- Allow PhishRIP queries to be initiated without a source message: Select this check box to allow your admins to initiate a PhishRIP query without an associated reported message. When this option is enabled, the Create New Query button is available on the PhishRIP Queries page. When you click this button, the Find Similar Messages pop-up window will display, and the Match Criteria section’s text fields will be empty. Then, you can select criteria and enter your own information in the fields. For more information about PhishRIP queries, read our PhishRIP Guide.
- Allow PhishRIP queries to be initiated with one match criterion: Select this check box to allow your admins to select only one match criterion instead of at least two criteria options in the Find Similar Messages window when they initiate a PhishRIP query.
- Update Features: Click this button to update your advanced features settings.