If another organization is considering working with your organization to purchase a product or service, they may need to perform a risk management assessment on your organization. If the organization uses KCM GRC to manage their risk management assessments for vendors or third parties, they can create a KCM GRC user account for your organization. Then, they can send questionnaire assessments to your user account.
For information about activating and accessing your KCM GRC account, see the Activating and Accessing Your Account section of our How to Activate Your Account, Access Your Account, and Reset Your Password article.
See the sections below to learn how to activate your account, complete questionnaires, and respond to issues that your client has created for your questionnaire answers.
Completing Questionnaires
When your client assigns a questionnaire to you, you will receive an email notification from KCM GRC. To log in to your KCM GRC account and access the questionnaire, click the here link in the email.
After you log in to your account, you will be taken to your Vendor Portal Dashboard. From your Vendor Portal Dashboard, you can view the questionnaires that have been assigned to you, issues that have been created for your assessment responses, and any documents that you have attached to your assessment responses.
To complete the questionnaire you were assigned, follow the steps below:
- Click the link in your notification email to log in to your account. When you log in to your account, you'll be taken to the Vendor Portal Dashboard.
- From the Name column of the Questionnaires section of the page, click the name of the questionnaire that you would like to complete.

- Complete your questionnaire by answering questions individually or by importing your answers. If you do not know which method you should use to complete your questionnaire, see the information below:
- If your organization does not use answer templates from an industry-standard assessment tool, you will need to answer questions individually. To learn how to answer questions individually, see the Answering Questions Individually subsection below.
- If your organization uses answer templates from an industry-standard assessment tool, such as the Consensus Assessments Initiative Questionnaire (CAIQ) or the Standardized Information Gathering Questionnaire (SIG), you can import your answer file into the questionnaire. To learn how to import your answer file, see the Importing Answers with Assessment Tools subsection below.
Answering Questions Individually
If your organization does not use answer templates from an industry-standard assessment tool, you will need to answer the questions in the questionnaire individually. For most questionnaires, the questions will be grouped into sections, which can help you keep track of your progress.
To answer questions individually, follow the steps below:
- Open the questionnaire you would like to complete. For more information about accessing the questionnaire, see the introduction of the Completing Questionnaires section above.
- For each question in the questionnaire, select the answer that applies to your organization.
Note:When you answer questions with answers that are displayed as check boxes, you can select more than one answer. When you answer questions that are displayed as free-form text fields, you can enter up to 1,000 characters. If you need more space for your answer, click the Add Comment button to add a comment that includes more information.
- After you select a response, click the Save Answer button. You will need to save each response before you can finalize and submit your questionnaire. If you need to exit the assessment and complete it later, you will lose the progress for questions that you have not saved.

- (Optional) Click the Add Comment and Attach File buttons to add notes or supporting files to your responses. For information about the file requirements, see Do the files that vendors can upload to questionnaires need to meet any specific requirements? question in our KCM GRC: Vendor Risk Management Module Frequently Asked Questions (FAQ) article.

- When you complete the questions in a question set, select a new question set from the Sections menu. When you select a new question set, a new set of questions will display.
Tip:The fraction next to each section represents the number of questions you have answered out of the total number of questions in the section.

- When you finish the questionnaire, click the Finalize Questionnaire button at the bottom of the page to submit your questionnaire. When you click this button, your client will receive an email notifying them that the questionnaire is ready for review.

Importing Answers with Assessment Tools
If your organization uses an official assessment tool to respond to industry-standard questionnaires such as the CAIQ or SIG, you can upload the file to populate answers to questions in the questionnaire.
The assessment tool file must be in one of the file formats listed below:
- XLSX
- XLSM
- JSON
To import an official answer file into a questionnaire, follow the steps below:
- Open the questionnaire you would like to complete. For more information about accessing the questionnaire, see the introduction of the Completing Questionnaires section above.
- From the Questionnaire Submission page, click the Import Answers button in the top-right corner.

- In the Import Answers window that opens, select the appropriate questionnaire answer file from the Questionnaire Type drop-down menu.
- Click the Click to Upload button, then select your answer file.

- All of the questions you have answered or commented on in your answer file will populate in the Import Answers window. If you would like to upload a file to support your response to a question, click the Click to Upload button. To delete answers from the import list, click the trash icon.

- When you are ready to import your answers, click the Save button at the bottom of the window.
Tip: If you need to edit or add comments to an answer after clicking the Save button, you can import the answer file again. However, you will need to make any changes in your answer file before you import the file again.
- After you finish importing answers into the questionnaire, click the Finalize Questionnaire button at the bottom of the page to submit your assessment. Your client will receive an email notifying them that the questionnaire is ready for review.
Responding to Issues
If your client is unsatisfied with an answer you provided or if they would like to request additional information from you regarding a specific question, they can create an issue for that question. The purpose of an issue is to initiate additional communication between you and your client.
If your client creates one or more issues for your questionnaire responses, you will receive an email notification. You can click the link in the email notification to navigate to your vendor portal, where you can respond to issues.
To respond to an issue, follow the steps below:
- Log in to your KCM GRC account.
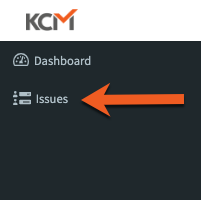
- Select the Issues tab from your navigation panel.
- In the Description column, click an issue's description to open the issue.
Note: You can view the issue's priority from the Priority column. The issue's priority can help you determine how quickly you need to respond to the issue.

- From the Issue Details page, read the Issue Description. Under this description, you can view the question the issue was created for.

- In the Response field, enter your response to the issue. You can enter up to 1,000 characters in this field.
- Click the Save Response button to submit your response.
- (Optional) If you need to provide a file to the issue, click the Click to Upload button on the left side of the Issue Details page.
Note: Uploading a file will replace any files you previously uploaded for this question.

When you submit your issue response, your client will receive an email notifying them that you responded. When your client responds back to you, you will also receive an email. You can continue to communicate with your client from the Issue Details page until your client closes the issue.