The KCM GRC platform offers a Risk Management module designed to simplify the processes of identifying, assessing, monitoring, and mitigating the various risks faced by your organization. The Risk Wizard is a quick and easy way to implement risk management using your KCM GRC platform.
This guide will assist you with navigating through the Risk Wizard. See the sections below to learn more.
What Is the Risk Wizard?
The Risk Wizard offers a simple flow of identifying and adding your organization’s risks to your KCM GRC platform, so you can evaluate, mitigate, and monitor these threats.
Master Risk Repository
You will navigate through the Risk Wizard and select applicable risks from KCM GRC's offering of industry-standard risks. This collection of risks is called the Master Risk Repository. All of the risks in the Master Risk Repository were gathered from the National Institute of Standards and Technology (NIST) Special Publication 800-30, Guide for Conducting Risk Assessments.
In addition to the NIST risks that you can choose from, you can import or create custom risks while using the Risk Wizard. All of the risks you select and/or create while using the Risk Wizard will be added to your KCM GRC Risk Register upon completion.
Risk Wizard Steps
After logging in to your account, navigate to the Risk Wizard by clicking on Risk Management, then Risk Wizard from your navigation panel. Then, follow the steps below to complete the Risk Wizard.
Step 1: Choose a Risk Wizard level based on your organization’s familiarity and maturity with risk management. The level you choose determines the number of risks and the complexity of the risks that are offered in the Risk Wizard. Regardless of which wizard level you choose, you can add additional risks from KCM GRC's Master Risk Repository to your Risk Register manually, or from the Risk Wizard, at any time.
| Risk Wizard Level | Description |
| Core | The Core level includes the most common risks from the Master Risk Repository. This level is a good option if your organization is in the fundamental stages of establishing risk assessment and management processes. |
| Moderate | This level expands on the core-level collection of risks from the Master Risk Repository, offering additional risks and vulnerabilities. This level is a good option if your organization is familiar with its risks, has completed risk assessments, and/or has risk management processes in place. |
| Advanced | This level offers the entire set of pre-populated risks from the Master Risk Repository. This level is a good option if your organization has completed risk assessments and has fully established risk management processes. |
Use the Select button under the appropriate level to start the Risk Wizard.
Step 2: The Risk Wizard will begin in the Business & Strategic Risks category, with a set of pre-populated risks. Use the expand arrows to the left of the slider buttons to expand each risk and view its description. Using the slider buttons, select all of the applicable risks that need to be added to your organization's Risk Register. You can use the Select All From This Category checkbox to select all Risks offered from the category, at that Risk Wizard level.
Step 3: Repeat step two until you've reviewed and selected the applicable risks from each category in the wizard.
Step 4: The Manual section of the Risk Wizard offers three options for adding additional risks to your Risk Register. See the Adding New Risks from the Risk Wizard section below for instructions on each method.
Step 5: The Confirm page is the final page of the Risk Wizard. It will display all of the risks you've selected, imported, or created in the wizard. Click the Confirm button to add these risks to your Risk Register.
After completing the Risk Wizard, the next step is to specify the Likelihood and Impact of each of the risks you've added. You'll make these specifications from your account's Risk Register. See our How to Use Your Risk Register article for more information.
Adding New Risks from the Risk Wizard
When navigating through the Risk Wizard, the Risk Wizard - Manual Selection page offers three different methods for adding risks to your account's Risk Register: (1) Add risks from the Master Risk Repository, (2) Import risks with a CSV file, or (3) Create risks manually.
See the sections below for details on each method of adding new risks from the Risk Wizard.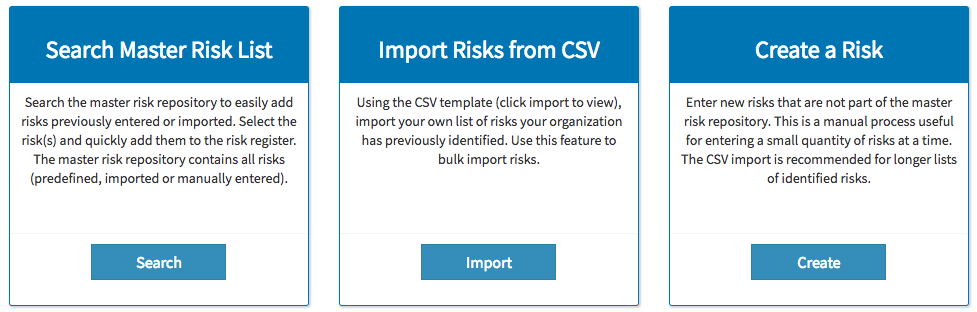
Search Master Risk List
From the Search Master Risk List pane, click the Search button and use keywords to display and select risks from the Master Risk Repository.For example, if you need to add risks to your Risk Register that are related to access control, type the word "access" in the search bar to see available risks, as shown below.
From the drop-down selection, click on a risk's title to see its description.
Click the Save button to add the risk to your Risk Wizard.
Import Risks from CSV
If you already have a CSV file of your organization's identified risks, add the risks to your account by clicking the Import button under the Import Risks from CSV section of the page. Alternatively, you can import these risks from the Risk Register page at a later time. See the Importing Risks section of our How to Use Your Risk Register article for more information.
The CSV file specifications are included on the Import CSV Risks modal window (shown below). Once you select your CSV file and click the Click to Upload button, you will be able to review and delete risks before importing them to your Risk Register.
Click the Save Imported Risks button to add the risks to your Risk Wizard.
Create a Risk
From the Create a Risk section of the Risk Wizard - Manual Selection page, click the Create button to build a new risk for your Risk Register.
The Create a New Risk modal window will display. Enter the details below to create your risk.

- Name: Give your risk a descriptive title that represents the scope of what the risk poses to your organization.
- Description: Describe the threat that the risk poses to your organization. Include the physical location, systems, employees, third parties, processes, etc. that would be involved if the event were to occur.
- Likelihood: Determine the likelihood that the risk will occur. This variable will influence your Inherent Risk Score. See the Risk Likelihood and Impact section of our Risk Management Module Guide article for more information about measuring risk likelihood in the KCM GRC platform.
- Impact: Determine the measure of impact that the risk would cause to your organization. This variable will influence your Inherent Risk Score. See the Risk Likelihood and Impact section of our Risk Management Module Guide article for more information about measuring risk impact in the KCM GRC platform.
- Category: Select the category that you'd like the risk to fall under in your Risk Register. There are six default categories in the Risk Register: Business & Strategic, Environmental & Natural, Financial, Operational & Infrastructure, Compliance, and Custom. You can also create custom categories from your Account Settings area. See the Risk Settings section of our How to Manage Your KCM GRC Account Settings article for more information about adding custom categories to your Risk Register.
- Subcategory: Select a subcategory for the risk. The subcategory options will vary depending on the category that you select.
- Affected Asset: Describe a physical asset in your environment that the risk would affect if it were to occur.
- Create Risk: Click this button to add the risk to your Risk Wizard.