KnowBe4's PhishER is a Security Orchestration, Automation, and Response (SOAR) platform that manages messages that your users report. Using PhishER, your organization can identify potential threats to strengthen your security measures and defense-in-depth plan.
PhishER is available as a standalone platform, but it works best when combined with the KnowBe4 console. PhishER can also integrate with third-party analysis tools like VirusTotal and Syslog, which provide your organization with security scans and evaluations.
PhishER Workflow
Below is a diagram of the PhishER workflow. We recommend reviewing this workflow before getting started so you can better understand PhishER.

For more information about this workflow, see the list below:
- When your users report suspicious emails or Microsoft Teams messages, they are sent to the PhishER Inbox.
- Using your customized rules, PhishER analyzes the components of emails or Teams messages for malicious content or red flags. Then, PhishER assigns tags to the emails or messages that meet your rule criteria.
- Tags trigger PhishER to perform your specific actions. Based on your organization's customized rules and actions, PhishER will automatically disposition each email or Teams message. Dispositioning helps you prioritize reported emails and messages and respond quickly to real phishing attacks.
- If you have enabled the PhishER Blocklist, you can use information about malicious or spam emails to block similar emails from reaching your users' inboxes. If you have a PhishER Plus subscription and have enabled the Global Blocklist, you can use crowd-sourced information to block similar emails.
- If you have enabled PhishRIP, you can remove similar malicious or spam emails that have reached your users' inboxes already. If you have a PhishER Plus subscription and have enabled Global PhishRIP, you can use crowd-sourced information to remove similar emails.
- If you have enabled PhishFlip, you can reuse reported emails to create KSAT phishing templates and campaigns. PhishFlip removes malicious elements from the reported emails before sending phishing tests to your users.
Prerequisites
When using PhishER and KSAT together, you will need to purchase the same number of seats for both products. If you purchase additional seats for either product during your subscription term, you will need to purchase seats for the other products as well.
All PhishER customers will need to have an email forwarding system so that all users' reported emails can be forwarded to your PhishER Inbox for analysis. We recommend that you install the Phish Alert Button (PAB) for your organization, but you also have the option to allow your users to manually forward emails to a reporting email address. For more information about these methods, see our Phish Alert Button (PAB) Product Manual and PhishER Settings article.
Creating Your Account
First, you'll need to create a PhishER account.
To create your account, follow the steps below:
- Log in to your KnowBe4 account.
- Click your name at the top-right corner of the page. From the drop-down menu that opens, select Account Settings.
- Navigate to Account Integrations > PhishER.
- Click the Create PhishER Account button.
Accessing PhishER
Once you've created a PhishER account for your organization and PhishER is enabled in your account, the Go to PhishER button will display on your KnowBe4 Account Settings page. Selecting this button will take you directly to your PhishER console. Or, you can access your PhishER console by navigating to the corresponding URL for your KnowBe4 instance. For more information, see the screenshot and list below:

- United States: https://phisher.knowbe4.com
- Canada: https://ca.phisher.knowbe4.com
- European Union: https://eu.phisher.knowbe4.com
- Germany: https://de.phisher.knowbe4.com
- United Kingdom: https://uk.phisher.knowbe4.com
You can also access PhishER from the navigation menu in the top-left corner of your KSAT or KnowBe4 Security Center (KSC) console. See the sections below for more information.
A GIF showing how to navigate from KSAT to PhishER is displayed below:
A GIF showing how to navigate from KnowBe4 Security Center (KSC) to PhishER is displayed below:
Setting Reporting Email Addresses
You will need to set up at least one reporting email address to forward emails to your Inbox. If your organization uses the PAB, you'll need to set up a reporting email address for each PAB instance.
To set reporting email addresses, follow the steps below:
- Log in to your KnowBe4 account.
- Click your name at the top-right corner of the page. From the drop-down menu that opens, select Account Settings.
- Navigate to Account Integrations > Phish Alert and open the settings for a PAB instance.
-
In the Send Non-Simulated Phishing Emails to field, enter your reporting email addresses. For more information about this field, see the Enable and Configure PAB section of our Phish Alert Button (PAB) Product Manual.

- Click the Save Phish Alert Settings button.
- At the bottom of the page, click the Save Changes button.
Dashboard
When you open your PhishER platform, the Dashboard page will display. On this page, you can view a quick overview of your PhishER platform. For more information about this page, see the screenshot and list below:

- Search: You can use this search bar to filter your dashboard using Lucene queries. The dashboard will display an overview of information about all the messages that match the criteria.
-
Edit Dashboard Layout: You can click this icon to add and remove widgets from your dashboard. You can drag, drop, and resize each widget to create a custom layout. When you click this icon, the Reset Dashboard Layout and Add Widget buttons will display.

-
Last 30 days: By default, the dashboard displays data and activity over the last 30 days. However, you can adjust the dashboard view to display a different date range by clicking the Last 30 days button. If you click this button, the date range pop-up window will open.

- Reported Messages: This section displays the number of reported messages that have been forwarded to your PhishER Inbox.
- Automatically Resolved: This section displays the number of messages that were dispositioned based on your enabled rules and actions.
- Manually Resolved: This section displays the number of messages that were dispositioned without your active rules and actions.
- Unresolved: This section displays the number of messages that have not been dispositioned.
- Received Messages: This bar graph displays the number of reported messages forwarded to your PhishER Inbox. The data shows the number of messages reported each day or hour.
- Messages Summary: This pie chart shows a comparison of messages in the Automatically Resolved, Manually Resolved, and Pending Review statuses.
- Reported Messages by Category: This line chart shows how messages have been dispositioned. Messages can be dispositioned as Clean, Spam, or Threat. Each message is dispositioned as Unknown by default until PhishER or an admin dispositions it into one of the other categories.
- Categories: This pie chart shows a comparison of messages that are being dispositioned.
- Reported Messages by Priority: This line chart displays the priority of the reported messages. A message can be assigned one of the following priorities: Unknown, Low, Medium, High, or Critical. The data shows the number of messages reported each day or hour for each priority type.
- Priorities: This pie chart shows a comparison of how messages are prioritized.
Rooms
The Rooms tab contains multiple filtered views of the messages in your PhishER Inbox. Each filtered view will be based on your saved queries and system-generated filters. You can view a filtered Inbox, Dashboard, and Report when clicking on the icons next to each system-generated filter.

If you click on a specific group of messages in a room, you will be taken to a filtered view of your Inbox that displays all the messages from the group. A group of messages is created in a room if a minimum of two messages meets the room criteria.
For more information about rooms, see our How to Create and Manage PhishER Rooms article.
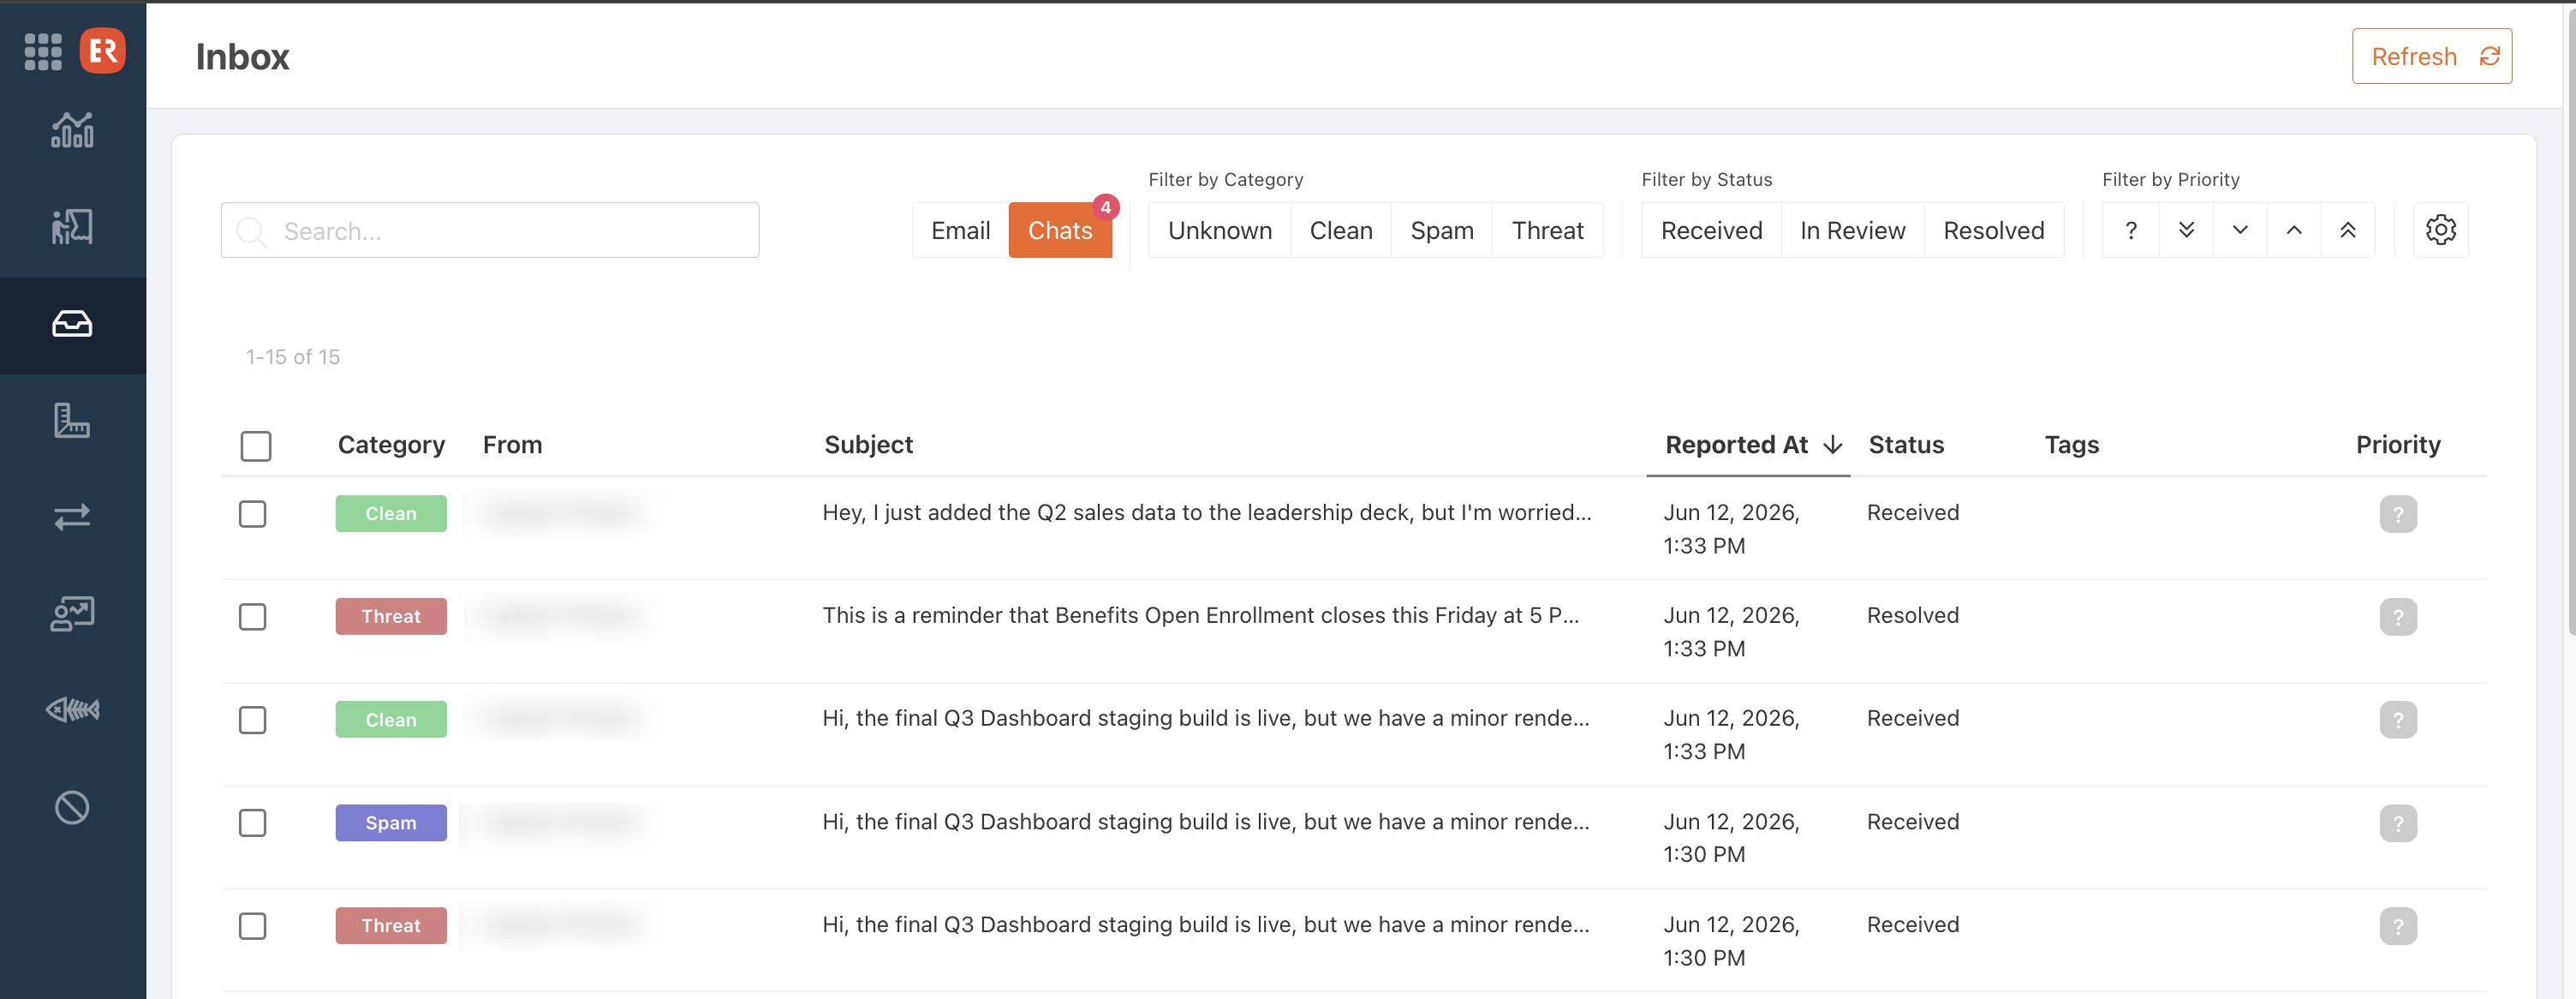
Inbox
You can view all of your users' reported messages from the Inbox tab. The Inbox is divided into two tabs: Email and Chats. You can filter messages in either tab by category, status, and priority. You can also save customized filter settings as a room and perform actions and change message disposition.
The Email tab displays all the emails that your users have reported using the PAB or by manually forwarding them to a reporting email address.
PhishER uses third-party analysis tools to organize these messages into different components, including the message's raw data, headers, attachments, and body. When you click an individual email, the Message Details page displays detailed information about the message, such as its components. From this page, you can also perform actions on the message and use the Discussion feature to communicate with your admins.
For more information about the Inbox, see our PhishER Inbox Guide.
Chats
The Chats tab displays all messages that your users have reported using the Microsoft Teams PAB. When you click an individual Teams message, the Chat Message Details page displays information about the message, including the sender, recipient, source, and chat type.
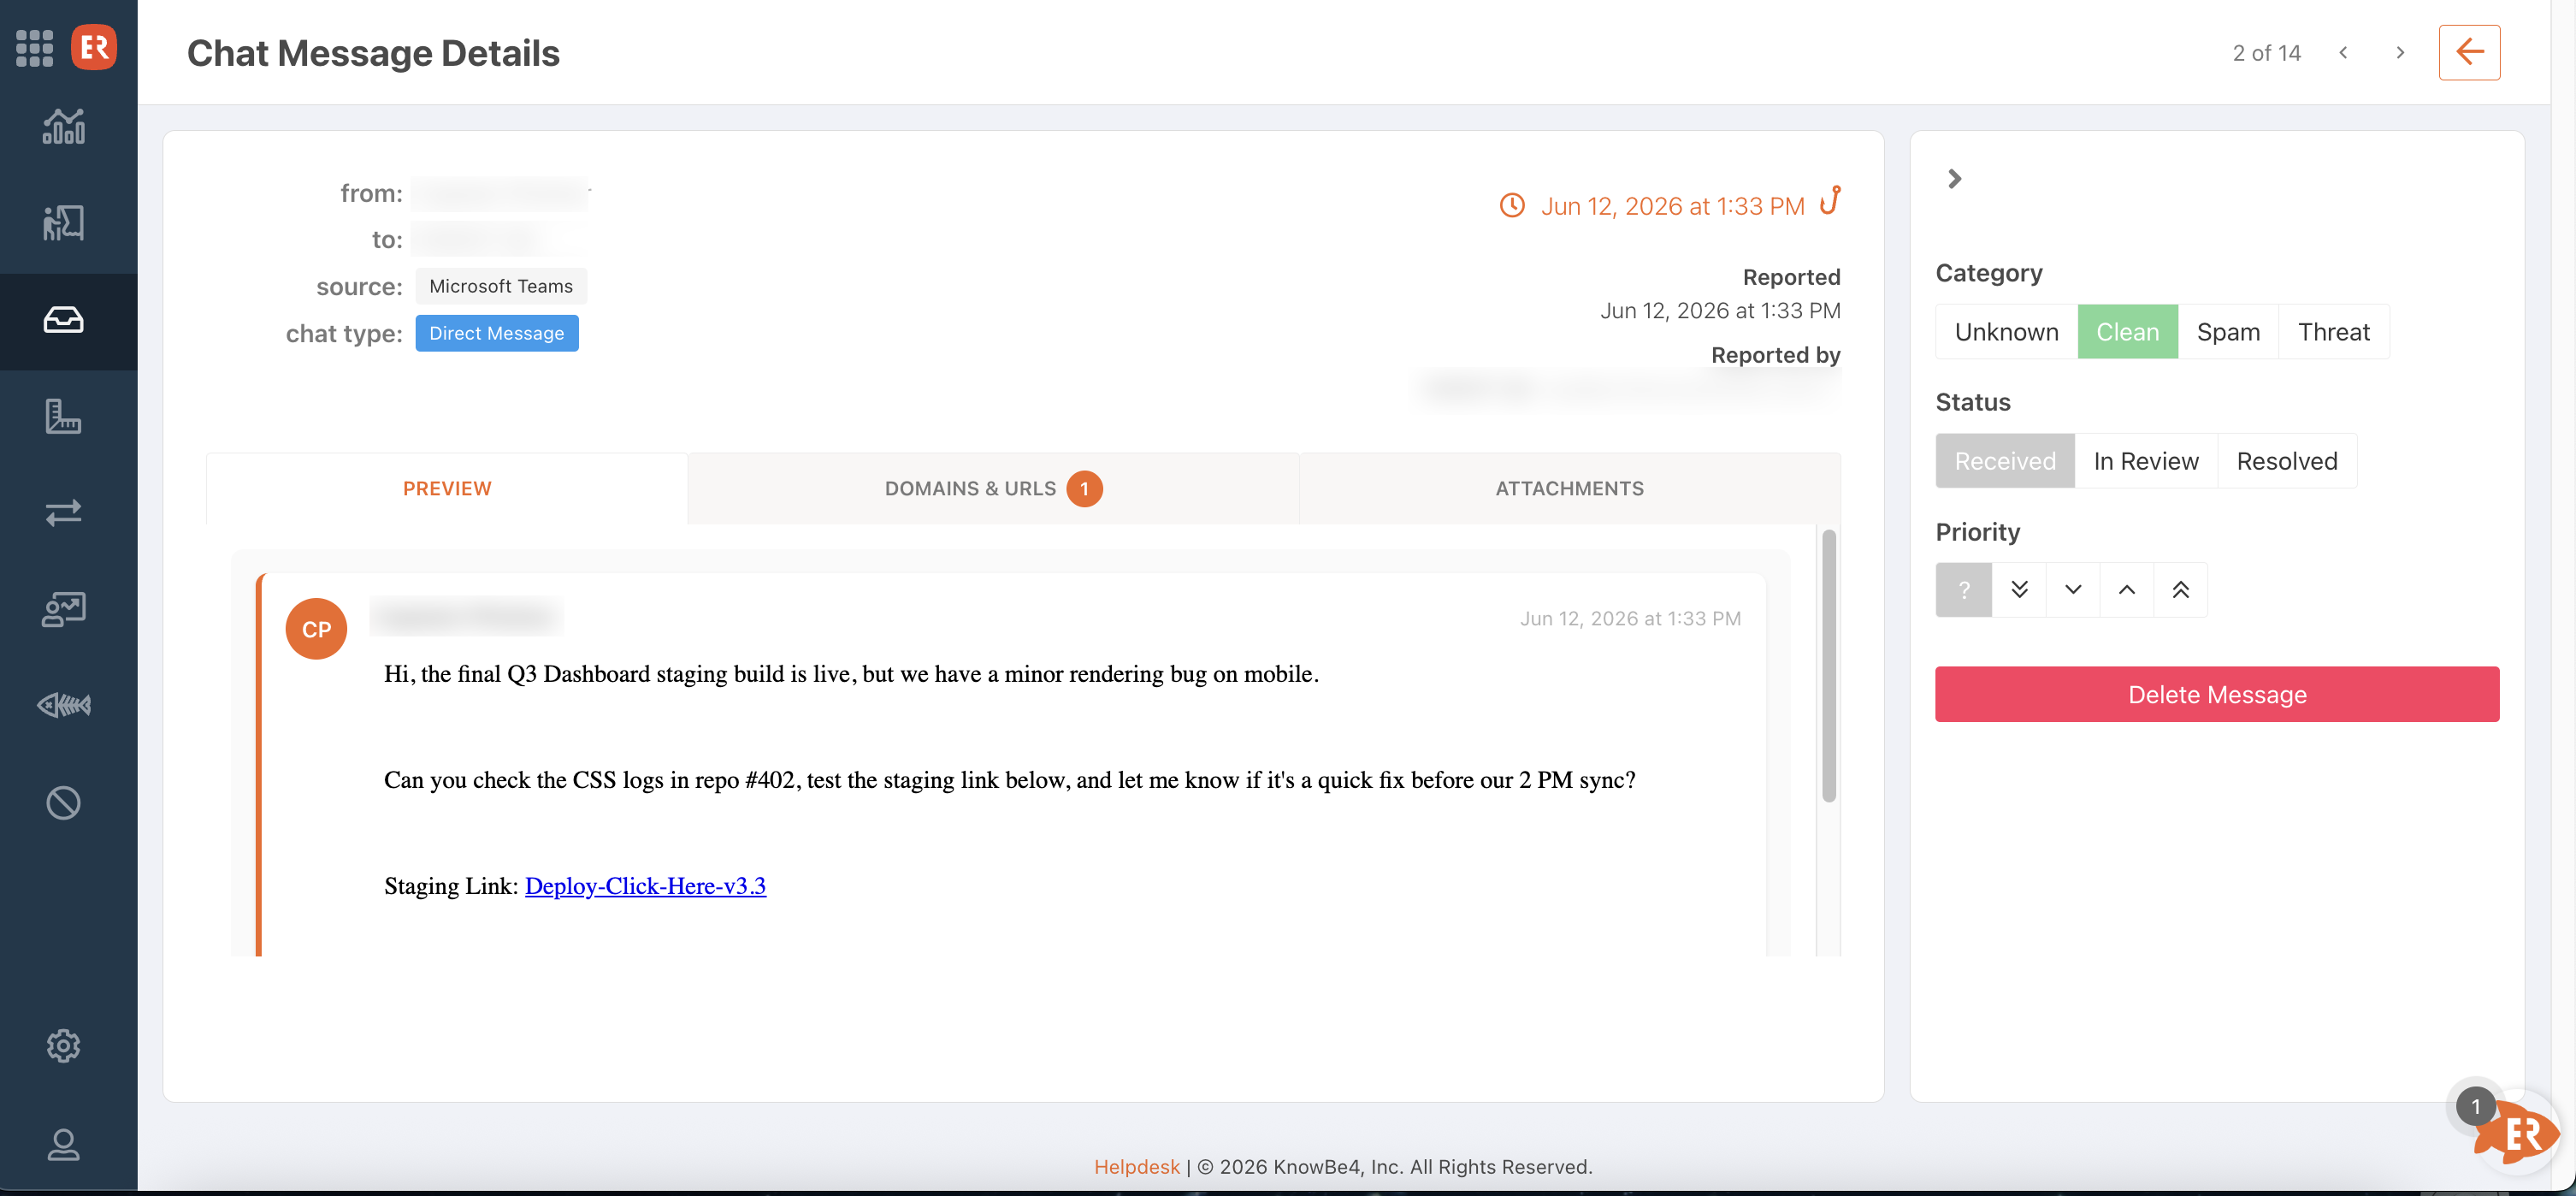
From this page, you can view the message content in the Preview tab, review extracted URLs in the Domains & URLs tab, and view any attached files in the Attachments tab. You can also set the message's category, status, and priority from the right panel.
Rules
You can view all of your PhishER rules from the Rules tab. A rule is a logical expression used to disposition emails forwarded to the PhishER Inbox. To disposition emails, all rules must follow YARA rule logic.

Based on the rule, a tag will be added to the emails as they are forwarded to the PhishER Inbox. The Rules tab includes the Rules List page, which has the following subtabs:
- Custom Rules: This subtab lists the rules your organization creates from scratch using the PhishER rule editor.
- System Rules: This subtab lists the default set of rules provided by KnowBe4.
- Global Variables: This subtab lists the global variables your organization creates for custom rules. If you use multiple rules with the same strings, you can use global variables to update all of these rules at once.
For more information about rules, see our How to Create and Manage PhishER Rules article.
Actions
You can view all of your PhishER actions from the Actions tab. When a message is assigned a tag, the tag will indicate how the message should be processed in PhishER. Then, the action will start the steps in that process. For example, you can create an action to assign a category of Spam to all matching messages. The Actions tab includes the Actions List page, where you can create and manage all the actions in your PhishER platform.

For more information about actions, see our How to Create and Manage PhishER Actions article.
Reports
You can view all of your PhishER reports from the Reports tab. Each subtab displays a report with the most common information found in your users' reported emails. By default, each report displays data and activity from the last 30 days, but you can adjust this date range by clicking the Last 30 Days button in the top-right corner of the page.

The Reports tab includes the following subtabs:
- Attachments: This subtab displays the most common attachment types in users' reported emails.
- Reporters: This subtab displays the most common users who report emails.
- Senders: This subtab displays the most common sender domains associated with users' reported emails.
- Domains and URLs: This subtab displays the most common domains and URLs in users' reported emails.
- Tags: This subtab displays the most common tags applied to users' reported emails.
For more information about reports, see our How to Use PhishER Reports article.
Blocklist
The PhishER Blocklist feature helps your Microsoft 365 mail server prevent malicious or spam emails from reaching your users’ inboxes. You can view all of your blocklist entries from the Blocklist tab's Your Syncing Entries subtab. When you review users' reported emails, you can update your blocklist to send information about threats or spam to your mail server.

For more information about blocklists, see our How to Use the PhishER Blocklist article.
PhishRIP
PhishRIP is a PhishER email quarantine feature that allows your organization to search for users' reported emails across all of the inboxes connected to your Microsoft 365 or Google Workspace instance. You can view all of your PhishRIP search results, or queries, from the PhishRIP tab. Using PhishRIP, you can prevent active phishing attacks by removing potential email threats from your users' inboxes.

When you select an individual message in your Inbox and click the Run drop-down menu, you can trigger actions that will run on the messages that are found by PhishRIP queries.
For more information about PhishRIP, see our How to Use PhishRIP article.
PhishFlip
PhishFlip is a PhishER feature that allows your organization to reuse users' reported emails in phishing campaigns in your KSAT console. PhishFlip will remove all of the malicious elements from the reported emails so that they are safe to send to your users as phishing templates.
Once PhishFlip is enabled on your PhishER platform, you can create KSAT phishing templates from users' reported emails. Then, you can use the phishing templates to create phishing campaigns in your KSAT console. You can also create automatic PhishFlip campaigns containing specific reported emails from your PhishER platform.


For more information about PhishFlip, see our How to Use PhishFlip article.