This article will instruct you on how to set up and enable SAML on your account so that your users can quickly and easily log in to take their KnowBe4 training using AD FS. For more information on AD FS, see Microsoft's Create a Relying Party Trust article and read each of the below three sections.
Note: Make sure the email address that your users use to authenticate with SAML is either entered into the Email field or Email Aliases field of their user profile. However, only the email address listed in the Email field will receive training notification emails. For more information about adding information to user profiles, visit our User Profile Guide.
How to Set Up SAML
To set up SAML, follow the steps below:
- Access your AD FS management console.
- Expand the Trust Relationships folder.
- Right-click Relying Party Trust and click Add Relying Party Trust…. When you click, the Add Relying Party Trust window will open.

- Click Start on the wizard’s Welcome screen.

- Choose Enter data about the relying party manually. Click Next.

- Enter a display name, such as KnowBe4. Select Next.

- Leave AD FS profile selected and select Next.

- On the Configure Certificate screen, select Next.

- On the Configure URL screen, select the Enable support for the SAML 2.0 WebSSO protocol option. Stay on the Configure URL screen and move on to the next step.
- For this step, you'll need to obtain your unique Callback URL from your KSAT Account Settings:
- Log in to your KSAT account.
- After logging in, select your email address at the top-right corner of the page.
- Select Account Settings.
- Navigate to Account Integrations > SAML.
- Copy your account-specific callback URL. For example, https://training.knowbe4.com/auth/saml/xxxxxxxxxxx/callback.
- Navigate back to the Configure URL screen of the setup wizard.
- Paste the link you obtained into the Relying party SAML 2.0 SSO service URL field on the Configure URL page and select Next.

- On the Configure Identifiers screen, enter "KnowBe4" into the Relying party trust identifier field. Select Add, then select Next.

- Leave the I do not want to configure multi-factor authentication settings for this relying party trust at this time option selected, then select Next.

- Leave the Permit all users to access this relying party option selected, then select Next.

- On the Ready to Add Trust screen, select Next.

- Leave the Open the Edit Claim Rules dialog for this relying party trust when the wizard closes check box selected and select Close.

- In the Edit claim rules window, select Add Rule….

- On the Choose Rule Type screen, leave Send LDAP Attributes as Claims selected as the template and select Next.

- Enter a name, then under Attribute Store choose Active Directory. Under the Mapping of LDAP attributes to outgoing claim types area, select Email Addresses for the LDAP Attribute and then choose E-mail Address for Outgoing Claim Type. Click Finish.

- Click Add Rule... back on the Edit Claims window again.

- Under Claim rule template, select Transform an Incoming Claim and select Next.

- Enter a name and then change the following settings:
- Incoming claim type: Select E-Mail Address.
- Outgoing claim type: Select Name ID.
- Outgoing name ID format: Select Email.
-
Pass through all claim values: Select this option.

- Select Finish on the Configure Claim Rule page, and then select OK on the Edit Claims window to exit.
- Right-click the relying party trust and select Properties.

- Click the Advanced tab and select SHA-256 from the Secure hash algorithm drop-down menu.

- Select OK to exit.
How to Find the SHA1 Thumbprint
To find the SHA1 thumbprint, follow the steps below:
- Open AD FS Management.
- Select the Certificates folder under Service.
- Select the Token-signing certificate.
- Select the Details tab.
- Select the Thumbprint option.
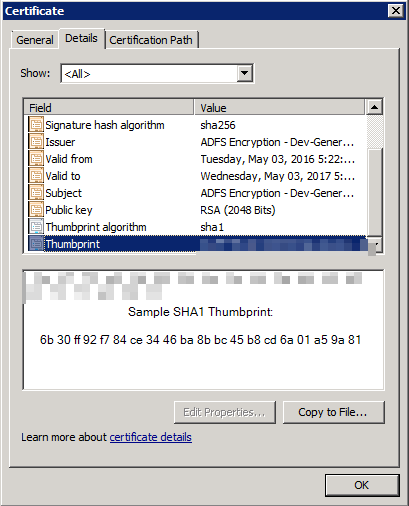
- Copy your unique thumbprint.
How to Enable SAML
The final step is to enable SAML on your account. To learn how to enable SAML on your account, please visit our Set Up SAML Single Sign-on (SSO) for the Security Awareness Training Console article. For more information on the AD FS LoginToRp parameter that is part of your target or SSO URL, please see Microsoft's AD FS 2.0 RelayState article.
Note: When adding your identify provider (IdP) SSO target URL to the SAML settings in your KSAT console, it should follow this format: https://samportal.example_domain.com/adfs/ls/idpinitiatedsignon.aspx?logintoRP=KnowBe4. Your ADFS server should follow this format: samportal.example_domain.com = FQDN.