In Real-Time Coaching, user mapping links detected behaviors to specific users. In the KnowBe4 Security Awareness Training (SAT) console, users are automatically mapped to their email addresses. Depending on your integrated security vendors, you may also need to map users to other identifiers, such as their hostname or username. We recommend mapping users by configuring automated user mapping rules. You can also upload a CSV file to map users manually, or use both methods together. Real-Time Coaching also provides mapping recommendations for you to review
To learn how to map users by configuring user mapping rules or uploading a CSV file, see the subsections below. For general information about Real-Time Coaching, see our Real-Time Coaching Overview article.
System User Mapping Rules
Real-Time Coaching includes preconfigured user mapping rules that cover common vendor identifiers. To view built-in system rules, follow these steps:
- Log in to your KnowBe4 SAT console.
- Navigate to Coaching > Setup > User Mapping Setup.
- In the Settings section, select Configure User Mapping Rules.
To enable or disable a rule, use the toggle on the left side of the rule. System rules cannot be deleted or modified.
The following system rules are available for user mapping:
| Vendor | Vendor Identifier | Operator | KnowBe4 User Data Field |
|---|---|---|---|
| All Vendors | Hostname | is | Hostname |
| All Vendors | Username | is | Email Alias |
| All Vendors | User Email | is | Email Alias |
| KnowBe4 SAT | Detection User ID | is | User ID |
| All Vendors | Username | is | First Name ␣ Last Name |
| All Vendors | Username | is | First Name ․ Last Name |
| All Vendors | Username | is | First Name + Last Name |
| All Vendors | Email Username | is | Username from User Profile Email Address |
| All Vendors | Username | is | Username from User Profile Email Address |
| All Vendors | Hostname | is | Hostname from User Mapping CSV |
| All Vendors | Username | is | Username from User Mapping CSV |
| All Vendors | Username | is | |
| All Vendors | User Email | is |
Custom User Mapping Rules
Real-Time Coaching also allows you to configure custom rules to match your security vendor identifiers. To view and manage Custom Rules, follow these steps:
- Log in to your KnowBe4 SAT console.
- Navigate to Coaching > Setup > User Mapping Setup.
- In the Settings section, select Configure User Mapping Rules.
To enable or disable a rule, use the toggle on the left side of the rule. To delete a custom rule, select the trashcan icon.
Create a Custom Rule
To create a custom user mapping rule, follow these steps:
- Log in to your KnowBe4 SAT console.
- Navigate to Coaching > Setup > User Mapping Setup.
- In the Settings section, select Configure User Mapping Rules.
- From the Configure User Mapping Rules page, select + Create Custom Rule. A Create New Rule pop-up window will display.
-
Select your desired criteria for the custom rule. For more information, see the screenshot and list below:
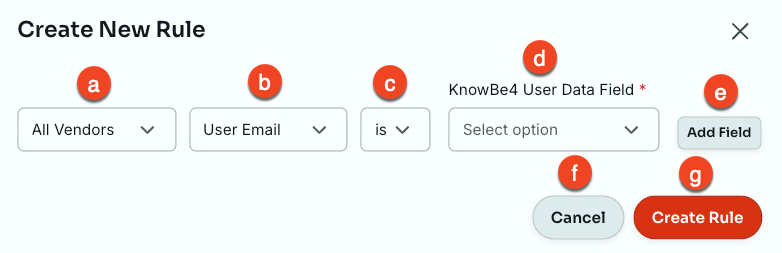
- Vendor Criteria: Select the specific security vendor this rule should apply to, or All Vendors.
- Identifier criteria: Select which security vendor identifier to map.
- Operator criteria: Select if the identifier is the same as or contains the matching KnowBe4 User Data Field.
- KnowBe4 User Data Field: Select the user data field from KnowBe4 to map.
- Add Field: Add your selected criteria to the rule.
- Cancel: Cancel the creation of a new custom rule.
- Create Rule: Confirm your configuration and create the new custom rule.
- Once you have added one or more criteria using the Add Field button, select Create Rule to save your changes.
Uploading a User Mapping CSV File
To map your users using a CSV file, you can use our provided CSV file template or your own custom CSV file:
- To use our downloadable CSV file template, log in to your KnowBe4 SAT console and navigate to Coaching > Setup > User Mapping Setup > User Mapping CSV. Then, select Example CSV to download the template.
- To use a custom CSV file for import, see the CSV File Fields section of this article.
Once you have prepared a CSV file for import, follow the steps below to import the CSV file and map your users:
- Log in to your KnowBe4 SAT console.
- Navigate to Coaching > Setup > User Mapping Setup.
- In the Settings section, select User Mapping CSV. An Upload a CSV File pop-up window will display.
- Select Browse and choose your CSV file.
- Select Upload CSV.
CSV File Fields
To map your users using a custom CSV file, you'll need to add your users' information first. For more information about available CSV field types, see the table below:
| CSV File Field | Description |
|---|---|
| In this field, enter the user's work email address. | |
| Hostname | In this field, enter the user's hostname. |
| Username | In this field, enter the user's username. |
Using the Unmapped Vendor Data Report
The Unmapped Vendor Data Report displays unmapped event and identifier data from your vendors. These are events and identifiers from your integrated vendors that are not currently mapped to a user in your KnowBe4 SAT console. You can use this information to map new users or update mappings for existing users, then rerun user mapping to connect events to users.
There are two report types for the Unmapped Vendor Data Report:
For more information, see the subsections below.
Unmapped Events Report Type
To view Unmapped Events in your Unmapped Vendor Data Report, follow these steps:
- Log in to your KnowBe4 SAT console.
- Navigate to Coaching > Setup > User Mapping Setup.
- In the Reports section, select Unmapped Vendor Data Report.
-
From the Report Type filter, select Unmapped Events. For more information about the Unmapped Events report type options, see the screenshot and list below:
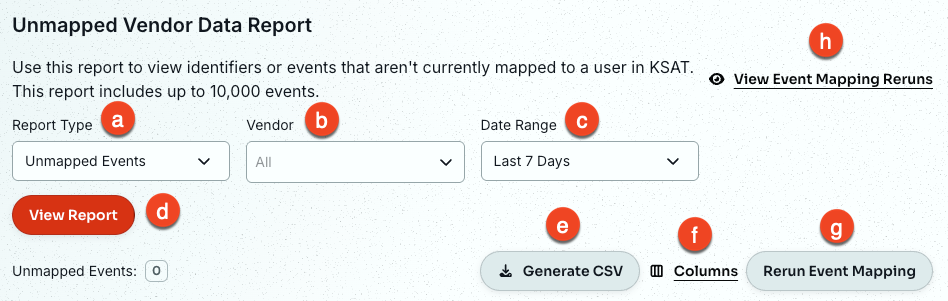
- Report Type: Select between displaying Unmapped Events data or Unmapped Identifiers data.
- Vendor: Select one or more vendors to display event data for.
- Date Range: Select the date range to display data for.
- View Report: Generate report data from your selected criteria.
- Generate CSV: Generate a CSV file of the report.
- Add or Remove Columns: Customize which columns are displayed in the table.
-
Rerun Event Mapping: Rerun user mapping and map the events to users.
Tip:We recommend mapping additional users before selecting this button. - View Event Mapping Reruns: Select this text to view your history of user mapping reruns.
Unmapped Identifiers Report Type
To view the Unmapped Identifiers report type in your Unmapped Vendor Data Report, follow these steps:
- Log in to your KnowBe4 SAT console.
- Navigate to Coaching > Setup > User Mapping Setup.
- In the Reports section, select Unmapped Vendor Data Report.
-
From the Report Type filter, select Unmapped Identifiers. For more information about the Unmapped Identifiers report type options, see the screenshot and list below:
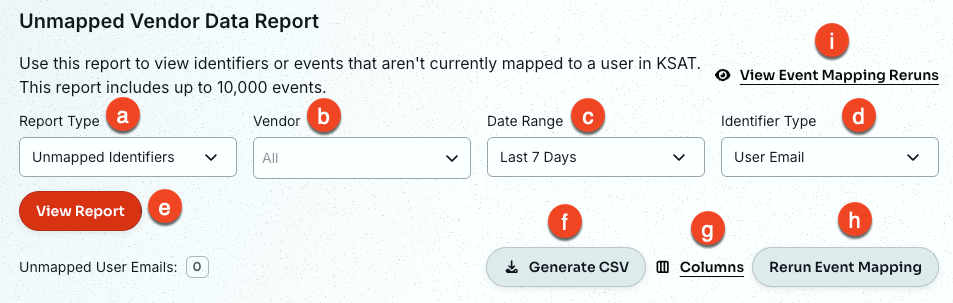
- Report Type: Select between displaying Unmapped Events data or Unmapped Identifiers data.
- Vendor: Select one or more vendors to display event data for.
- Date Range: Select the date range to display data for.
-
Identifier Type: Select the type of vendor identifier to display data for.
Note:An Identifier Type must be selected to generate report data. - View Report: Generate report data from your selected criteria.
- Generate CSV: Generate a CSV file of the report.
- Add or Remove Columns: Customize which columns are displayed in the table.
-
Rerun Event Mapping: Rerun user mapping and map the events to users.
Tip:We recommend mapping additional users before selecting this button. - View Event Mapping Reruns: View your history of user mapping reruns.
Once you have generated the Unmapped Identifiers data, you can connect these identifiers to your users. To connect unmapped vendor identifiers to your KnowBe4 SAT users from the Unmapped Identifiers report type, see the steps below:
- In the Identifier table column, navigate to the identifier and select + Connect KSAT User Email. A Connect KSAT User Email pop-up window will display.
- From this pop-up window, use the KSAT Email Address field to search for the KnowBe4 SAT user you wish to connect to the vendor identifier.
- Select OK to confirm.
Mapping Recommendations
Real-Time Coaching makes recommendations for mapping your KnowBe4 SAT users to various identifiers. To view your recommendations, use the Automatic Device Discovery feature, our user mapping recommendations, and the Discovered Users Report.
For more information about these recommendation options, see the subsections below.
Automatic Device Discovery
The Automatic Device Discovery feature automatically maps users to devices using the data from your integrated vendors. You can then review these mappings on the Review Mapped Users page.
To enable Automatic Device Discovery, follow the steps below:
- Log in to your KnowBe4 SAT console.
- Navigate to Coaching > Setup > User Mapping Setup.
- In the Settings section, enable Automatic Device Discovery by selecting the toggle on the right side of the page.
User Mapping Recommendations
Our user mapping recommendations help map your users to various identifiers. You can accept or reject these recommendations.
To review your user mapping recommendations, follow the steps below:
- Log in to your KnowBe4 SAT console.
- Navigate to Coaching > Setup > User Mapping Setup.
-
In the Recommendations section, select User Mapping Recommendations. For more information about your user recommendation options, see the screenshot and list below:
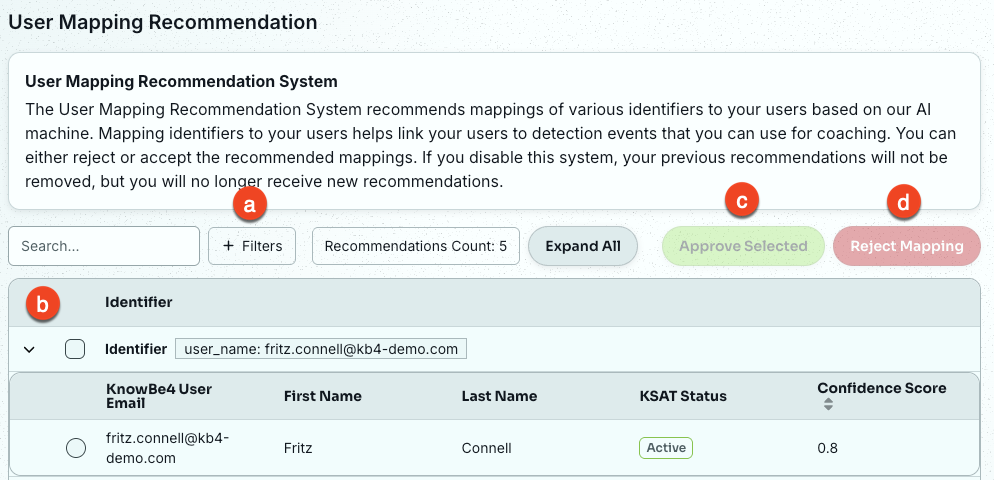
- + Filters: Filter the list of recommended mappings by Active Users, Archived Users, or Confidence Score.
- User Mapping Recommendations Table: Lists mapping recommendations by Confidence Score. The confidence score is a number between 0 and 100, with higher scores indicating greater confidence that the match is correct. For each recommendation, you can see the email, first name, last name, status, and confidence score of the email being recommended for mapping to the alias.
- Approve Selected: Approve the selected mappings in the table.
- Reject Mapping: Reject the selected mappings in the table.
Discovered Users Report
The Discovered Users Report displays users who might not yet be in your KnowBe4 SAT console, based on data from your integrated vendors. This report is enabled by default.
To view the Discovered Users Report, follow the steps below:
- Log in to your KnowBe4 SAT console.
- Navigate to Coaching > Setup > User Mapping Setup.
- Select Discovered Users.
View Your Mapped Users
Once you have mapped your users, you can view those mappings at any time by following the steps below:
- Log in to your KnowBe4 SAT console.
- Navigate to Coaching > Setup > User Mapping Setup.
- In the Reports section, select the Review Mapped Users button.
To edit a mapped user's identifiers, select the three dots icon in the Actions column, then select Edit.