In this article, you'll learn how to integrate Netskope's Next Gen Secure Web Gateway (SWG) with Real-Time Coaching. Once the integration is complete, data from Netskope will be available for use in the Coaching tab of your KnowBe4 Security Awareness Training (SAT) console. This data can be viewed in Real-Time Coaching reports and used to create detection rules for Real-Time Coaching categories. For general information about Real-Time Coaching, see our overview article.
Set Up the Integration in Netskope
Before you set up this integration in your KnowBe4 SAT console, you'll need to create a Netskope API token in your Netskope console and obtain your tenant name. For more information, see the sections below.
Create Your API Token
To create an API token for Netskope, follow the steps below:
- Log in to your Netskope portal.
- Navigate to Settings > Administration > Administrators & Roles.
- Select the Roles subtab.
- Select the New button. A New Role window will pop up.
-
To configure the New Role window, see the screenshots and list below:
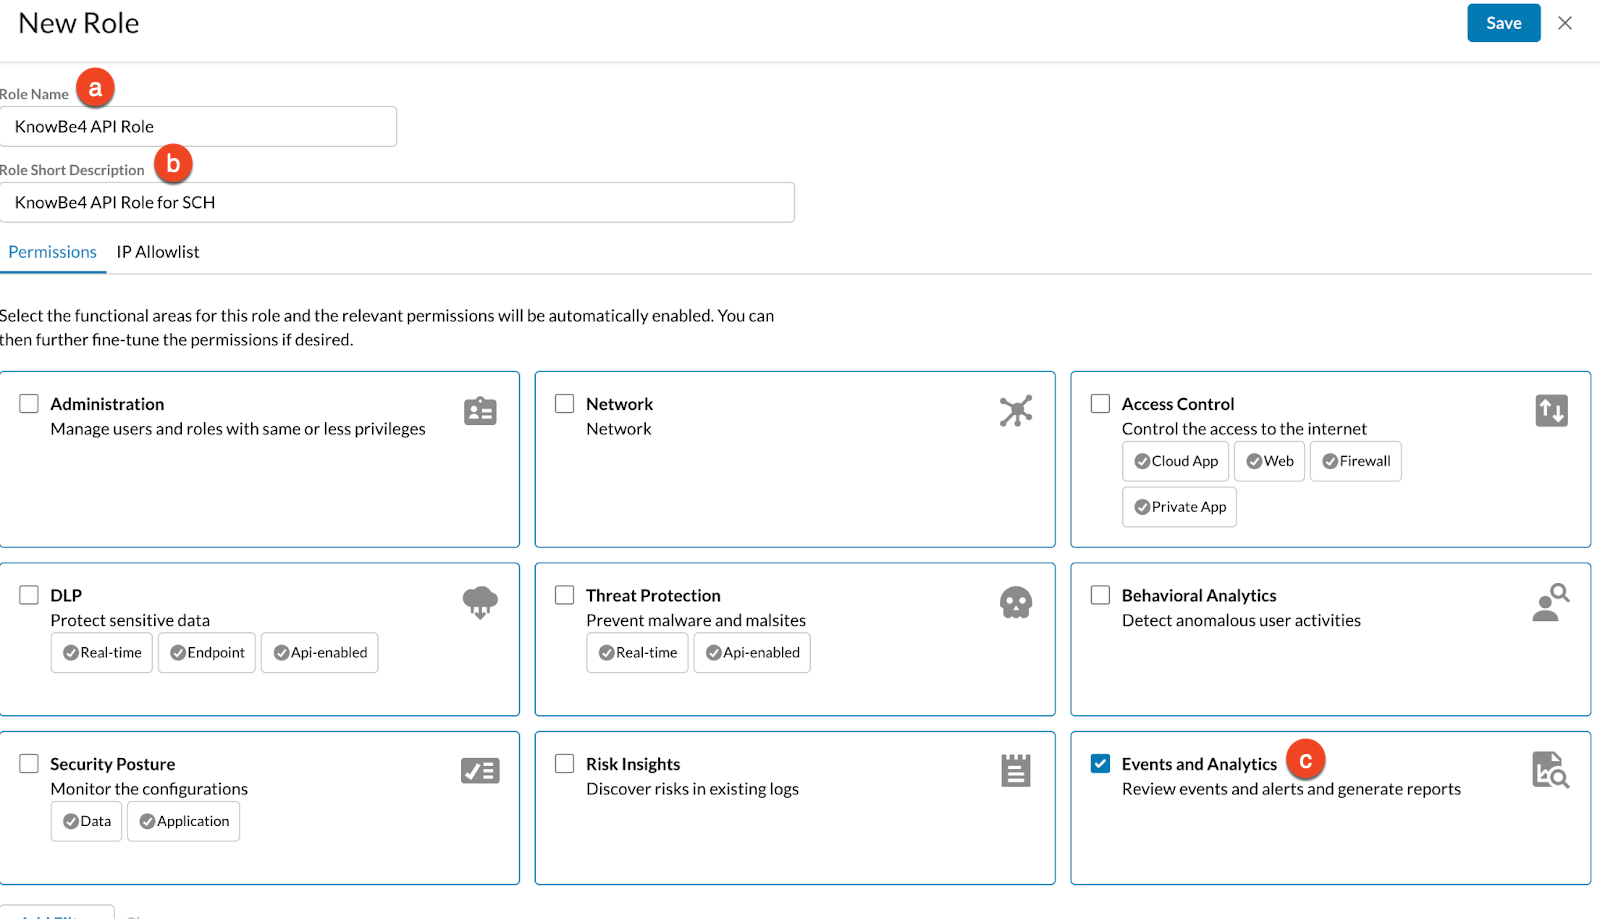
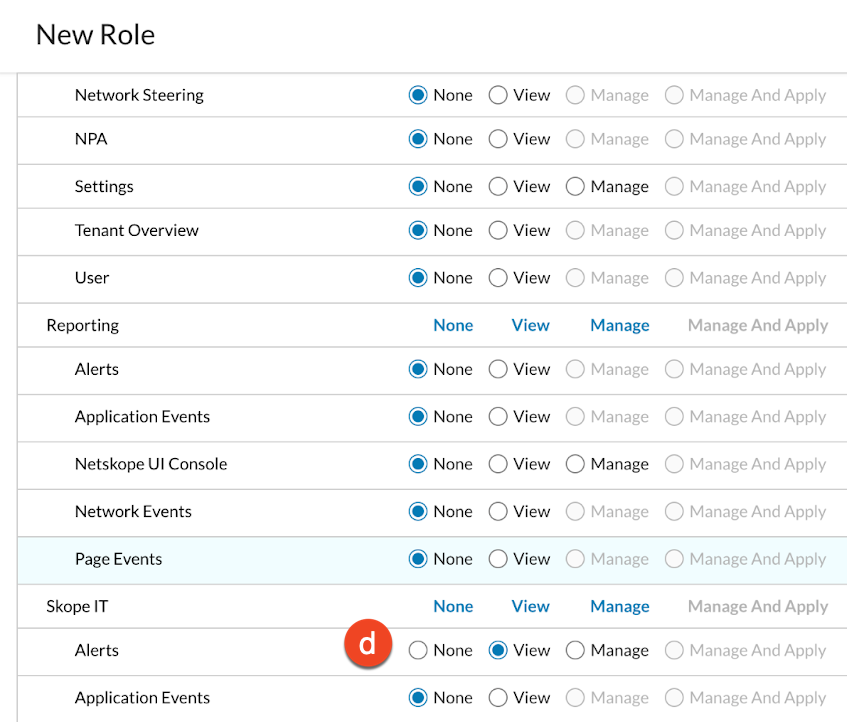
- Role Name: Enter your preferred name for this role. We recommend the name "KnowBe4 API Role".
- Role Short Description: Enter your preferred description for this role.
- Events and Analytics: Select this checkbox and ensure it is enabled.
- Scope IT: Further down in the window, under Scope IT > Alerts, enable the View permission.
- Select Save to save your changes and create the new role.
- Navigate to Settings > Administration > Administrators & Roles.
- Select the Administrators subtab.
- Select Service Account. A New Service Account window will pop up.
-
To configure the New Service Account window, see the screenshot and list below:
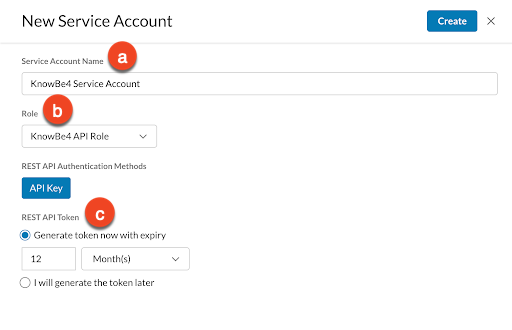
- Service Account Name: Enter your preferred name for the service account. We recommend "KnowBe4 Service Account".
- Role: Select the name of the role you created earlier in the New Role window.
- REST API Token: Select Generate token now with expiry and set your preferred API token expiration date. We recommend selecting 12 Months.
- In the top-right corner of the window, select Create to save your changes and generate the API token. A Success window will pop up.
-
Select Copy Token to copy your API Token. Make sure to save your copied API token somewhere that you can easily access later. You'll need this token to set up the integration in Real-Time Coaching.
Warning:The API token will not be shown again after you close the Success window.
Obtain Your Tenant Name
To find your Netskope tenant name, check your Netskope portal URL. Your tenant name is the subdomain that appears before .goskope. in the address. For example, in the URL yourtenant.goskope.com, your tenant name would be yourtenant.
Make sure to save your tenant name to a place that you can easily access later. You'll need your tenant name to set up the integration in Real-Time Coaching.
Set Up the Integration in Real-Time Coaching
To set up the integration in your KnowBe4 SAT console, follow the steps below:
- Log in to your KnowBe4 SAT console.
- Navigate to Coaching > Setup > Security Vendor Integrations.
- Locate the Netskope vendor tile and select Configure Integration.
-
Enter your Tenant Name and API Token in the corresponding fields.
Note:Enter only your tenant name. Don't include.goskope.or anything after it. - Select Authorize.
Map Your Users
After you've finished integrating Netskope, we recommend mapping your users through mapping rules or through a CSV file upload. For more information about user mapping, see our user mapping article.
Manage Detection Rules
Once you've successfully authorized this integration, you can also manage Netskope detection rules from Coaching > Detection Rules. For a full list of available system detection rules for this vendor, see our System Detection Rules by Vendor article.
Delete the Integration in Real-Time Coaching
If you want to delete the Netskope integration from Real-Time Coaching, follow these steps:
- Log in to your KnowBe4 SAT console.
- Navigate to Coaching > Setup > Security Vendor Integrations.
- Locate the Netskope vendor tile and select Edit.
- Select Delete Integration near the bottom of the page.