After your initial Active Directory (AD) configuration, you can customize your sync with additional options to meet your organization's needs. For more information, see the sections below. For information about the basic Active Directory Integration (ADI) installation and configuration process, see our Active Directory Integration (ADI) Configuration Guide.
Creating an ADI Service Account in Active Directory
To set up ADI, you must use or create an account in AD that has the following permissions:
- read all user information
- read all inetOrgPerson information
To create an AD User with necessary read permissions, follow the steps below:
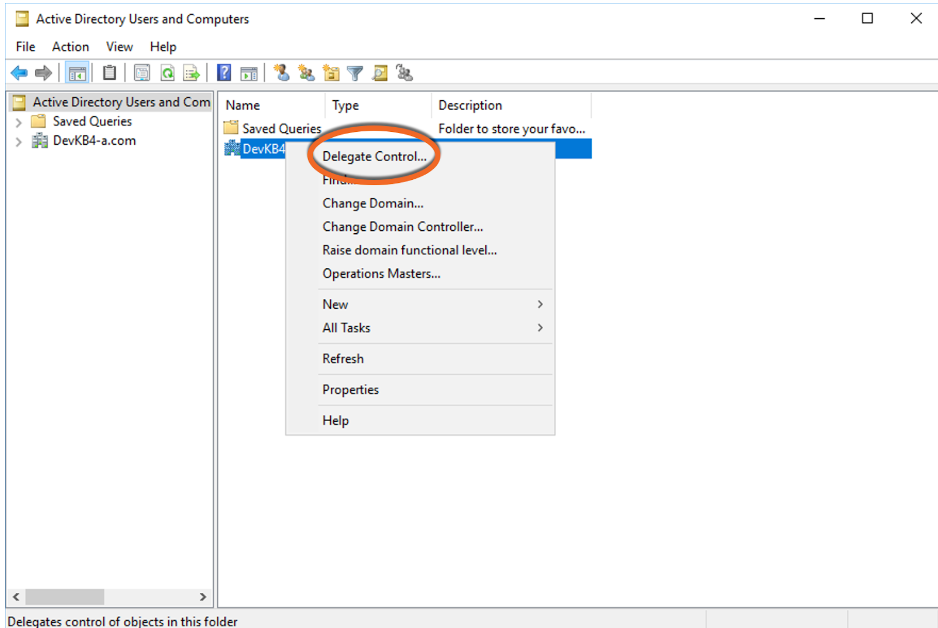
- Open Active Directory Users and Computers.
-
Right-click on your domain and select Delegate Control. When you select Delegate Control, the Delegation of Control modal will open.
-
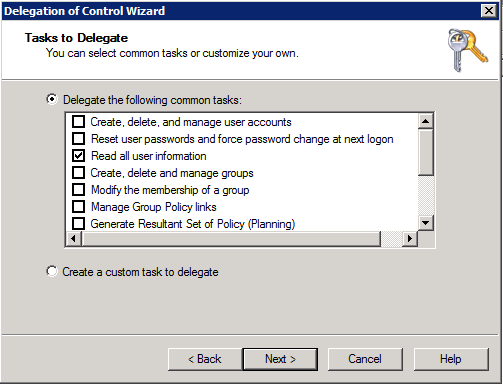
In the Delegation of Control modal, add your previously created ADI Service account.

-
Delegate the Read all user information task and the Read all inetOrgPerson information task.
- Lastly, you will need to reconfigure your KnowBe4 ADI Sync Service to use your new AD service account with ADI.
To change the specified user, follow the steps below:
- Navigate to your C:\ProgramData\KnowBe4\ADI Sync\Config\ folder and delete the <domain>.dat file.
- Open the command prompt as an administrator and navigate to your C:\Program Files\KnowBe4\ADI Sync\ folder, then type “adisync.exe config”.
Changing Where to Pull Email Addresses from in Active Directory
By default, the ADI sync will sync all proxy email addresses for your users. However, you can change where you would like to pull email addresses from in Active Directory. Additionally, you can choose to only sync users’ primary proxy email addresses. Open your adisync.conf file from within your C:\ProgramData\KnowBe4\ADI Sync\Config folder. By default, you will see the following fields:
- emailAttribute = "proxyAddresses"
- primaryProxyOnly = false
For more information about changing which email addresses sync for your users, see the list below:
- Primary Proxy Only: If you would like to only use the primary proxy address for each user, change the primaryProxyOnly field from "false" to "true". Save the adisync.conf file, then start the ADI service again. This process will ensure that no alias email addresses are synced.
-
Mail Attribute: If you would like the sync to use the Mail attribute instead of proxyAddresses, change the emailAttribute field to "mail" from "proxyAddresses". Save the adisync.conf file and start the KnowBe4 ADI Sync Service again.
Important:Regardless of which field you are syncing by, the mail attribute for a user cannot be empty. For the purposes of ADI, this value does not need to be a valid domain. For more information, contact our support team. - User Principal Name: If you would like the sync to use the userPrincipalName (UPN) instead of proxyAddresses, change the emailAttribute field from "proxyAddresses" to "userPrincipalName". Save the adisync.conf file and start the KnowBe4 ADI Sync Service again.
Viewing Mail and Proxy Addresses in Active Directory
Follow the steps below to view a user’s mail and proxy address in Active Directory. You can also use these steps to view a user’s PrincipalName.
- In the Active Directory Users and Computers window, click View from the toolbar.
-
From the View drop-down menu, select Advanced Features.

- Double-click on a user to open the User Properties pop-up window.
- In the User Properties pop-up window, select the Attribute Editor tab.
-
To view the user's mail address, search the Attribute column for mail. Select mail, then click the Edit button.

-
When you click Edit, the String Attribute Editor pop-up window will open. From this pop-up window, you can adjust the Value of the mail attribute.

-
To view the user's proxy address, search the Attribute column for proxyAddresses. Select proxyAddresses, then click the Edit button.

-
When you click the Edit button, the Multi-valued String Editor pop-up window will open. Here, you can add or remove a Value to the proxyAddresses attribute.

Support for Multiple Domain Sources
If your users are split between multiple domain sources, you will need to set up a configuration for each domain with user objects that need to be synchronized.
For each additional domain, you will need to run the adisync.exe config in your ADI sync installation directory. Running the ADI sync configuration a second time will create the additional <domain>.conf files that should be edited in order to specify the filter criteria for your sync.
To run ADI sync configuration for multiple source domain support, follow the steps below:
- Open the command prompt in administrator mode.
- Navigate to the ADI Sync system directory. The system directory's default location is C:\Program Files\KnowBe4\ADI Sync.
-
Type the line below, and then press the Enter key:
adisync.exe config
- Enter the details for your additional domain controller and domain. For more details, see step 7 in the Installation and Configuration section of our Active Directory Integration (ADI) Configuration Guide.
- Once the additional <domain>.conf file has been created in C:\ProgramData\KnowBe4\ADI Sync\Config, edit the file to specify the information that you would like to sync. For more details, see our Active Directory Integration (ADI) Configuration Guide.
- Save the <domain>.conf file.
- After repeating this process for all of your additional domains, you can start your synchronization.
Installing the Newest Version of ADI
Follow the steps below to install the newest version of ADI without uninstalling your previous version:
- Download the new installer from your KSAT Account Settings.
- Run the installation.
-
If asked, click Yes to use the data from the previous installation.
The KnowBe4 ADI Sync Service will start automatically once the installation is completed. You can verify that the service is running as expected in the Windows services menu.
Your users should continue to sync as expected.
Syncing Custom Fields
The user profiles in your KnowBe4 console include custom fields that you can use to sync additional information from your Active Directory. To specify the information that you want to sync to the custom fields, edit the <domain>.conf file and then start the serviceagain for your changes to sync. To learn more, see Syncing Other User Information to KnowBe4.

Enabling SecurityCoach Fields
If you've already configured ADI and your subscription includes SecurityCoach, you can enable the SecurityCoach fields by installing the newest version of ADI. If you're already using the latest version and you don't have the SecurityCoach fields enabled, you'll need to reconfigure ADI to enable these fields.
To reconfigure ADI and enable the SecurityCoach fields, follow the steps below:
- Stop the KnowBe4 ADI Sync Service in the Windows services menu.
- Navigate to the \ADIsync system directory. The system directory's default location is C:\ProgramData\KnowBe4\ADI Sync\Config\.
- Rename your <domain>.conf file to "<domain>-OLD.conf".
- Move the <domain>-OLD.conf file to a different directory.
- Navigate to the installation directory C:\Program Files\KnowBe4\ADI Sync\ and open an elevated command prompt.
- In the command prompt, run adisync.exe config.
- Reconfigure ADI by entering the same information you entered previously, but set Enable SecurityCoach fields to true. Once you reconfigure ADI, a new <domain>.conf file will populate in the \Config directory.
- Open the <domain>-OLD.conf file and the new <domain>.conf file.
- Copy the data in the [sync.users] section of the <domain>-OLD.conf file. Paste this data into the new <domain>.conf file.
- Copy the data in the [sync.groups] section of the <domain>-OLD.conf file. Paste this data into the new <domain>.conf file.
- (Optional) If you customized the [sync.fields] section of the <domain>-OLD.conf file, you can make the same customizations to the new <domain>.conf file.
- Start the KnowBe4 ADI Sync Service.