The Settings menu allows access to the Defend console's main configuration options. When making changes, always select Save Changes at the top-right corner of the screen.
To update, review, and make changes to your settings, follow the steps below:
- Log in to the Defend console.
- Navigate to Settings.
- Configure your settings accordingly.
- When you have finished making changes, select Save Changes in the top-right corner of the page.
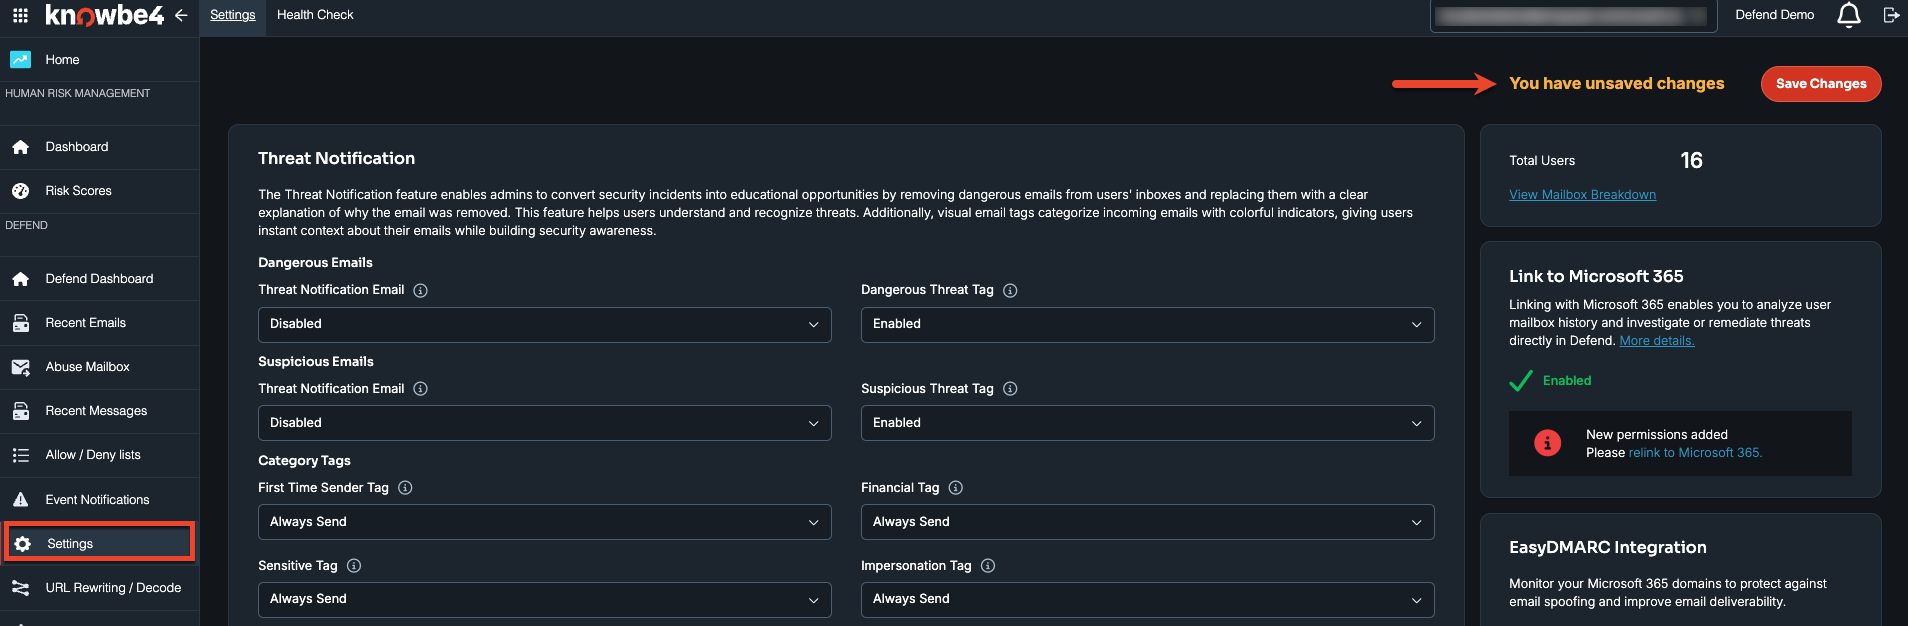
Configurable Settings
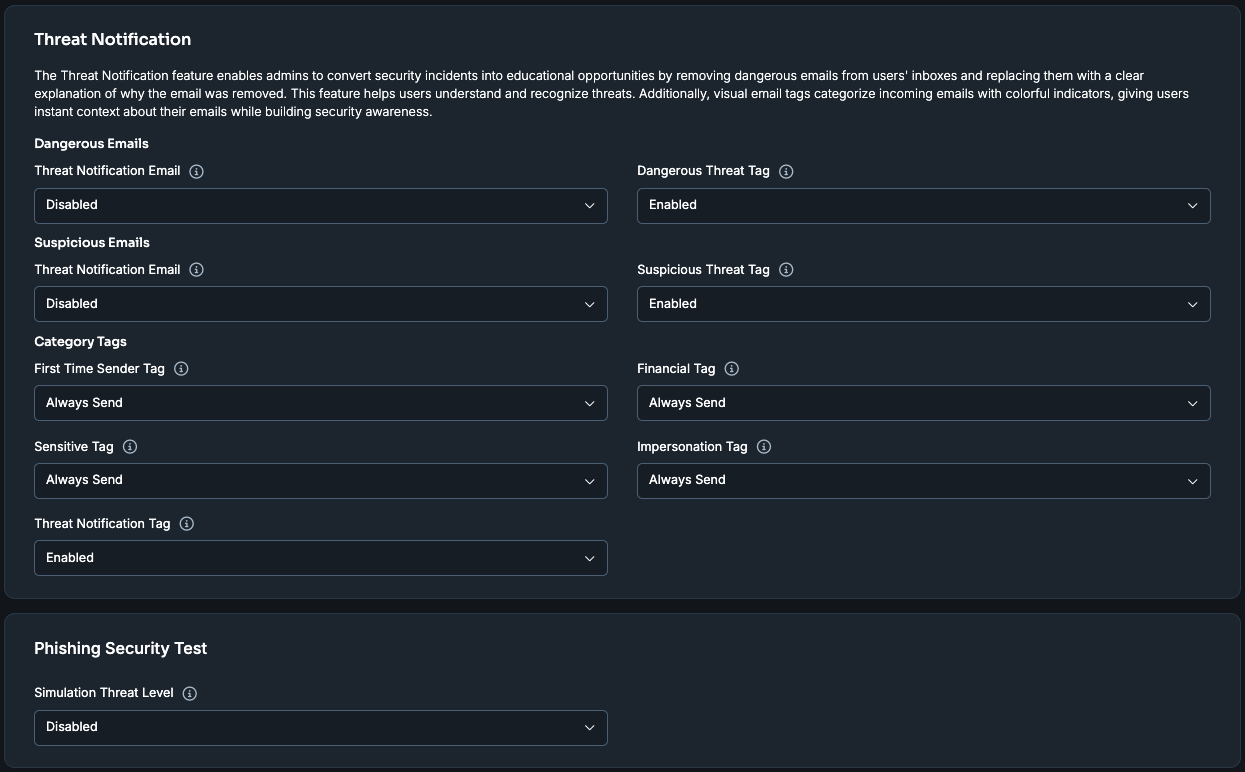
The configurable settings for Defend post-delivery are as follows:
- Threat Notification:
The Threat Notification feature enables admins to convert security incidents into educational opportunities by removing dangerous emails from users' inboxes and replacing them with a clear explanation of why the email was removed. Visual email tags also categorize incoming emails with colorful indicators.
-
Dangerous Emails, Threat Notification Email:
- Enable or disable sending the user an email notification when a dangerous email is removed.
-
Suspicious Emails, Threat Notification Email:
- Enable or disable sending the user an email notification when a suspicious email is removed.
-
Dangerous Threat Tag:
- Enable or disable applying a visual tag to dangerous emails.
-
Suspicious Threat Tag:
- Enable or disable applying a visual tag to suspicious emails.
-
Threat Notification Tag:
- Enable or disable the threat notification tag.
-
Category Tags:
Each category tag gives users instant visual identification of a specific type of email by displaying a colored tag in their inbox:
- First Time Sender Tag: Flags emails from a sender the user hasn't received mail from before, helping surface potentially harmful messages.
- Financial Tag: Flags emails identified as containing financial topics, such as bank details.
- Sensitive Tag: Flags emails identified as containing sensitive-action topics, such as resetting a password.
- Impersonation Tag: Flags emails identified as impersonating another user or organization.
- Threat Notification Tag: Flags threat notification emails from Defend that contain details about a phishing attack the user was protected from.
For each tag, choose when it's applied to a matching email:
- Always Send: Applies the tag to every matching email.
- Disabled: No tag is applied.
- Send Only if Suspicious: Applies the tag only when the email is also flagged as suspicious.
-
Phishing Security Tests:
Choose how Defend classifies phishing security test emails:
- Disabled (default): Defend classifies the email as it normally would.
- Benign: Applies External-level banners and actions to the email.
- Suspicious: Applies Suspicious-level banners and actions to the email.
- Dangerous: Applies Dangerous-level banners and actions to the email.
This setting defaults to Disabled, and any changes you make are recorded in the admin audit log.
For more information, see the Defend | Post-Delivery Best Practices for Phishing Security Tests article.
-
Auto-Remediation:
Auto-remediation enables Defend to automatically move or report dangerous and suspicious emails from users' inboxes.
- Dangerous Email Auto-Remediation: Select the action Defend should take when a dangerous email is detected (for example, moving it to a Recoverable Purges folder).
- Suspicious Email Auto-Remediation: Select the action Defend should take when a suspicious email is detected (for example, moving it to a Suspicious folder).
-
Email Productivity:
Helps reduce inbox clutter by identifying graymail and spam. When enabled, these emails are labeled and moved from the inbox into the matching category.
- Graymail Management: Enable or disable moving graymail to a separate folder.
- Spam Management: Enable or disable moving spam to a separate folder.
- Graymail Tag: Choose when the graymail tag is applied (for example, Always Send).
- Spam Tag: Choose when to apply the spam tag (for example, Always Send).
-
Abuse Mailbox:
The Abuse Mailbox feature allows admins to configure a dedicated address where users can report suspected phishing emails for investigation. Defend monitors this mailbox and automatically analyzes reported emails.
- Phishing Mailbox: The address Defend should monitor.
- Automatic Remediation: Enable or disable the automatic remediation of a reported email once a threat is confirmed.
- Send User Notification for User Submission, Benign Reanalysis, Dangerous Reanalysis, Phishing Test Reanalysis: Enable or disable sending the user a notification for each outcome.
- User Notification Email Signature: A custom signature added to notification emails.
-
Operation Mode Settings:
These settings control how Defend scans mailboxes across your organization.
Scanning Scope: This setting controls which user mailboxes Defend scans post-delivery using the Microsoft Graph API.
- Disabled: Post-delivery scanning via Graph API is turned off. No mailboxes are scanned.
- Microsoft Group: Enables Graph API scanning for members of a specific Microsoft 365 group. Only mailboxes belonging to users in that group are scanned.
- Entire Tenancy: Enables Graph API scanning for all licensed users. Every mailbox across your Microsoft 365 tenancy is scanned.
-
Message Security:
Configure how Defend protects Microsoft Teams messages for this tenant.
- Microsoft Teams Message Scanning Scope: Entire Tenancy or a subset.
- Configuration Posture Monitoring: Enable or disable monitoring of the tenant's Teams security configuration posture.For more information, see the Folder-Move Preferences section below.
-
Link to Microsoft 365:
- Grant permissions on Microsoft 365 to allow the analysis of historical emails and mailbox details to protect your users, as well as the ability for admins to view, remediate, restore, and locate emails.
- Select Relink to Microsoft 365 if you need to re-establish the connection.
-
EasyDMARC Integration:
- Monitor your Microsoft 365 domains to protect against email spoofing and improve email deliverability.
- Select View DMARC Configuration (or Set up DMARC monitoring) to get started.
-
Allow Filtering in Recent Emails:
- This setting determines which admins can view all emails processed on the Recent Emails page.
- The All threat filter can be enabled or disabled for all admins, or enabled only for Global Admins and admin policies.
-
Allow View, Download, and Delete of an External Email:
- Enable or disable actions (Email operations) that admins can take on external emails.
-
Allow KnowBe4 Intelligence to View Emails:
- Controls whether the KnowBe4 Intelligence team can view email content.
- When enabled, KnowBe4 Intelligence can access phish and suspected missed phish in the Recent Emails Operations tab to investigate and identify phishing emails and ensure service delivery.
- When disabled, this access is blocked.
-
Secure Email Gateway (SEG):
- Tell Defend about your current email gateway setup (for example, Microsoft 365) so it can integrate with your email system.
-
Company Impersonation Attacks:
- Add your organization's secondary domains and protected names so Defend can help safeguard your organization's identity against impersonation.
-
Linguistic Analysis:
- Defend uses natural language processing (NLP) to analyze the emotion and intent behind emails and detect suspicious behavior. Add any custom subject phrases here to help avoid false positives.
-
Default Language:
- Defend uses Exchange mail rules to detect a user's language for banners.
- If a language can't be detected, Defend uses this default.
- The languages available are Chinese (Mandarin) Simplified, Dutch, English, French, French Canadian, German, Hungarian, Italian, Japanese, Norwegian, Portuguese, Portuguese (Brazil), Spanish, and Spanish (Latin America).
Folder-Move Preferences
When Productivity is enabled, users can register their graymail and spam preferences by moving emails between folders in Microsoft Outlook without visiting the Email Summary page.
Folder-move preferences are registered below:
| Folder-Move | Registered Preference |
|---|---|
| _Graymail to Inbox | Not graymail |
| Inbox to _Graymail | Graymail |
| Junk to Inbox | Not spam |
| Inbox to Junk | Spam |
Preferences are applied at the sender level and are treated the same as preferences set via the Email Summary page or the Phish Alert Button (PAB). Registering a graymail preference for a sender clears any existing spam preference for that sender, and registering a spam preference clears any existing graymail preference.
Recommended Default Settings
The recommended default settings are displayed below:
Threat Notification
| Option | Default Setting |
|---|---|
| Dangerous Threat Notification (Email) | Enabled |
| Dangerous Threat Tag | Enabled |
| Suspicious Threat Notification (Email) | Enabled |
| Suspicious Threat Tag | Enabled |
| First Time Sender Tag | Always Send |
| Financial Tag | Always Send |
| Sensitive Tag | Always Send |
| Impersonation Tag | Always Send |
| Threat Notification Tag | Enabled |
Auto-Remediation
| Option | Default Setting |
|---|---|
| Dangerous Email Auto-Remediation | Recoverable Purges Folder |
| Suspicious Email Auto-Remediation | Disabled |
Productivity Management
| Option | Default Setting |
|---|---|
| Graymail Management | Disabled |
| Graymail Tag | Disabled |
| Spam Management | Disabled |
| Spam Tag | Disabled |
Operation Mode
| Option | Default Setting |
|---|---|
| Scanning Scope | Entire Tenancy |