This article provides the necessary steps for adding users to your organization's Workspace, ensuring that users can securely access and collaborate. There are two ways to add new users to Workspace, depending on whether the users are internal or external to your business account.
Internal Users
Internal users are automatically enrolled in Workspace via the KnowBe4 Server Infrastructure (KSI) or Active Directory if using ADFS. They can be added and managed through your organization's KSI. To add internal users to Workspace, follow the steps below:
- Navigate to switch.egress.com and log in. This opens the Administration Panel.
- Select Invite Users. You can invite a single user or multiple users.
- If you select Invite Single User, complete the form with the user's details and assign them to a system role. You have the option to pre-assign them a password.
- Select Invite to send the user an invitation.
-
If you select Invite Multiple Users, you can either type the user details into the text box or import the user details from a CSV file. When importing, ensure that the data is arranged according to your chosen format.
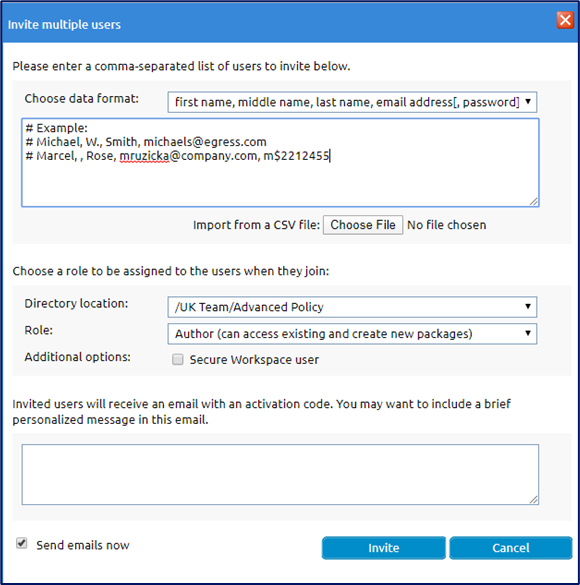
- Choose a directory location and role for the imported users.
- Include a personalized message for the email invitation.
- Select Invite.
External Users
The Workspace auto-enrolment policy means that external users you share zones with are automatically granted access and do not require you to create an account for them. If you want to add multiple third-party users in bulk without first sharing zones with them, you can do so in Workspace by CSV import. To add users in bulk to Workspace, follow the steps below:
- Navigate to Admin Tools > Users / Groups > Bulk User Import (from CSV).
- Select the cloud upload icon in the top-right corner.
- In the Import Users window, add a description and select the CSV file to import.
- Select the Import Mode to either add or archive the imported users.
- Select Import Users.