Overview
This guide details the steps to set up unified quarantine between KnowBe4's Inbound Mail Security and Microsoft Defender for Office 365. The configuration enables email remediation from user inboxes to Microsoft's quarantine system using the Set Verdict API. Once configured, you can automatically apply specific Microsoft Defender for Office 365 phishing actions and quarantine policies to emails based on KnowBe4 Defend's Inbound Mail Security analysis.
This configuration is achieved through our Unified Quarantine feature, which maps KnowBe4 Defend's phishing verdicts to the corresponding Microsoft Defender for Office 365's phishing verdicts:
| KnowBe4 Defend Phishing Verdicts | Microsoft Defender for Office 365 Phishing Verdicts |
|---|---|
| High Confidence Phish | High Confidence Phish |
| Dangerous Phish | Phish |
Prerequisites
Make sure that your environment meets our basic requirements listed below:
- Microsoft 365 admin account with appropriate permissions
- Microsoft P2 license
- KnowBe4 Inbound Mail Security linked with a Microsoft 365 Admin app registration and configured to send phishing verdicts to Microsoft

Configuration Instructions
Follow the configuration instructions below to set up KnowBe4 Defend and Microsoft Defender for Office 365 to create a unified quarantine experience.
Setting up KnowBe4 Defend for Unified Quarantine
The steps below show how to set up KnowBe4 Defend's Inbound Mail Security for unified quarantine with Microsoft Defender for Office 365.
- Sign in to the KnowBe4 Security Center.
- Expand the Defend menu on the left side of the console.
- Click Settings.

- Scroll down to the Quarantine section.
- In the Pre Delivery Quarantine section, select Do not send to Microsoft quarantine in the drop-down menu.
- In the Post Delivery Quarantine section, select Enabled in the drop-down menu.

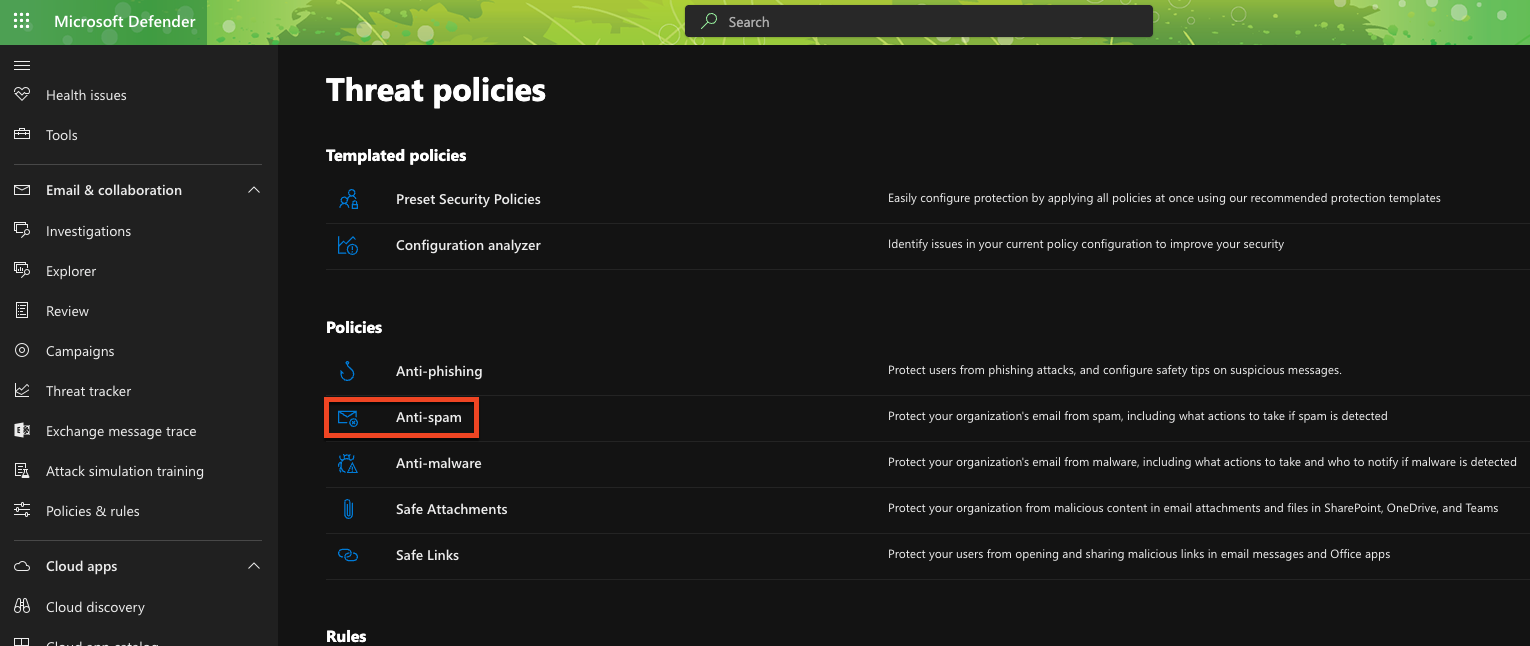
Accessing the Anti-Spam Policies in Microsoft 365
The steps below show how to access the Anti-spam policies in Microsoft Defender for Office 365.
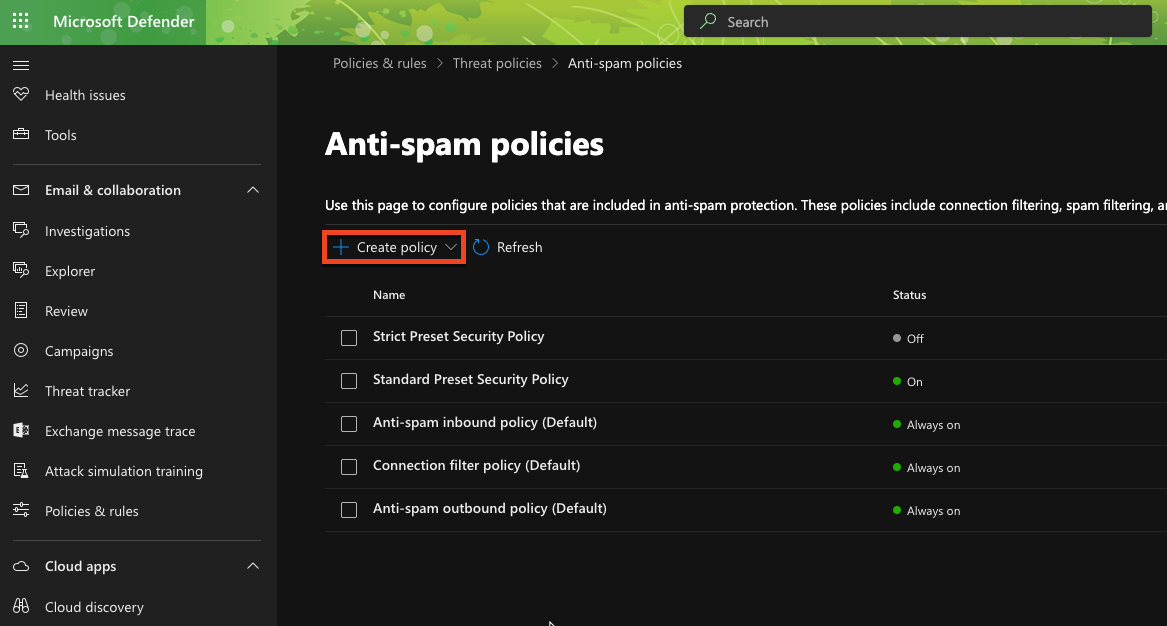
- Sign in to the Microsoft Defender for Office 365 portal.
- Navigate to Email & collaboration > Policies & rules > Threat policies.
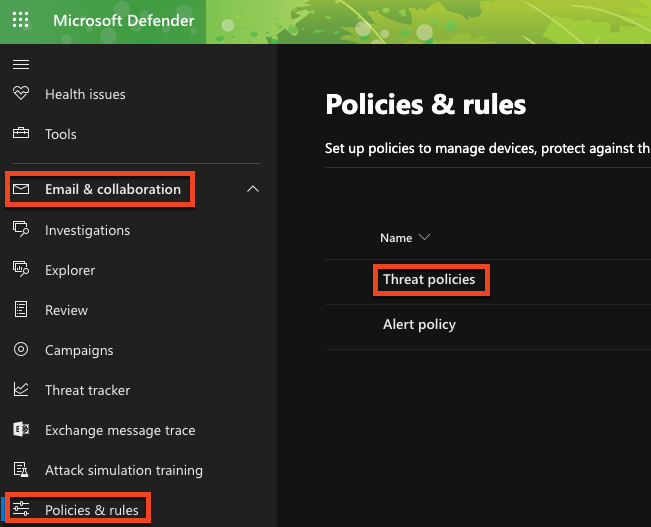
- Under the Policies section, click on the Anti-spam policy.
Modifying an Existing or Creating a New Anti-Spam Inbound Policy
Follow the steps in Option 1 or Option 2 below to configure your inbound anti-spam policy and determine what actions Microsoft Defender for Office 365 will take on phishing and high confidence phishing emails.
Option 1: Edit an Existing Policy
Follow the steps below to edit an existing inbound anti-spam policy.
- From the list of policies, select the inbound policy you want to modify.
- Double-click on the policy name to edit the policy.
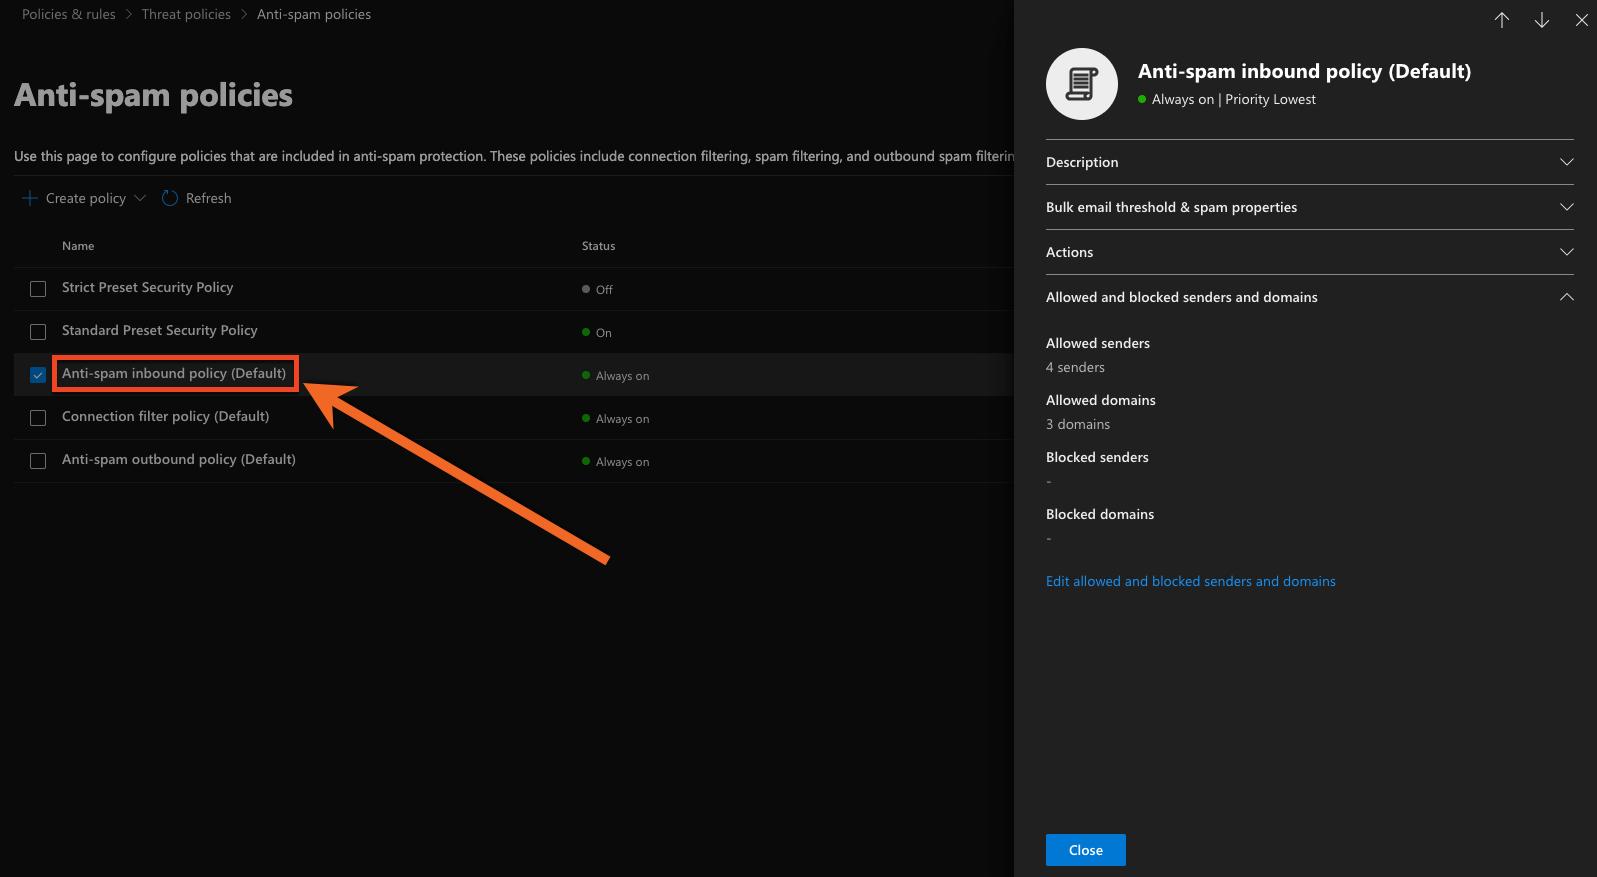
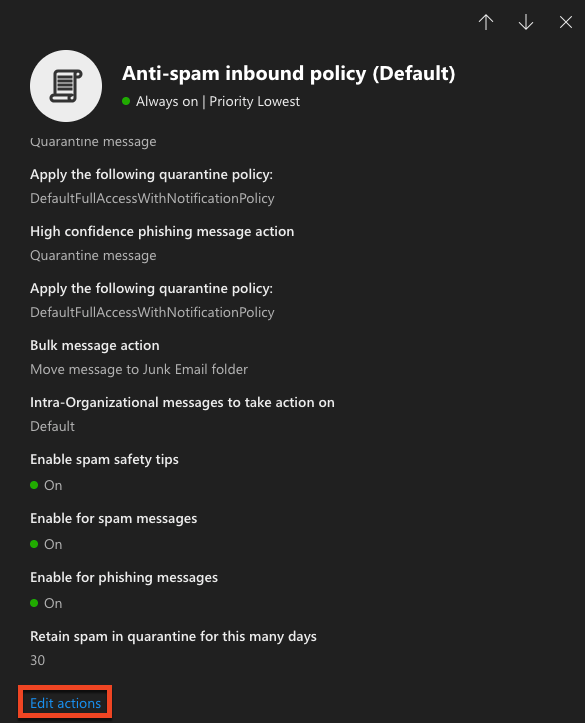
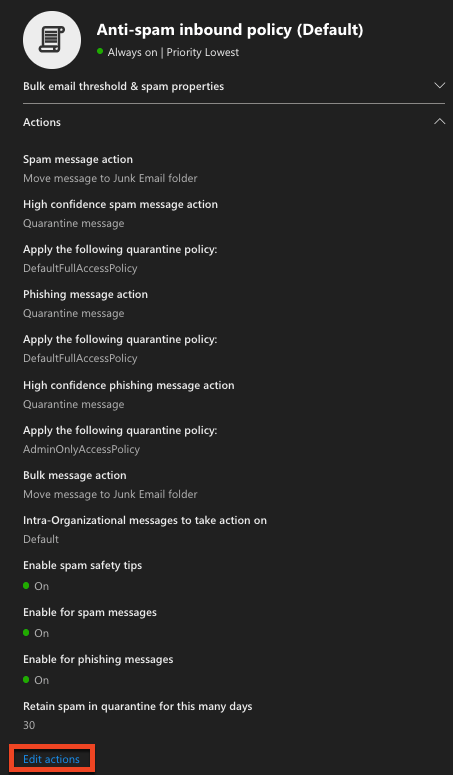
- In the Actions menu on the right side of the page, scroll down and click Edit actions.
Option 2: Create a New Policy
Follow the steps below to create a new inbound anti-spam policy.
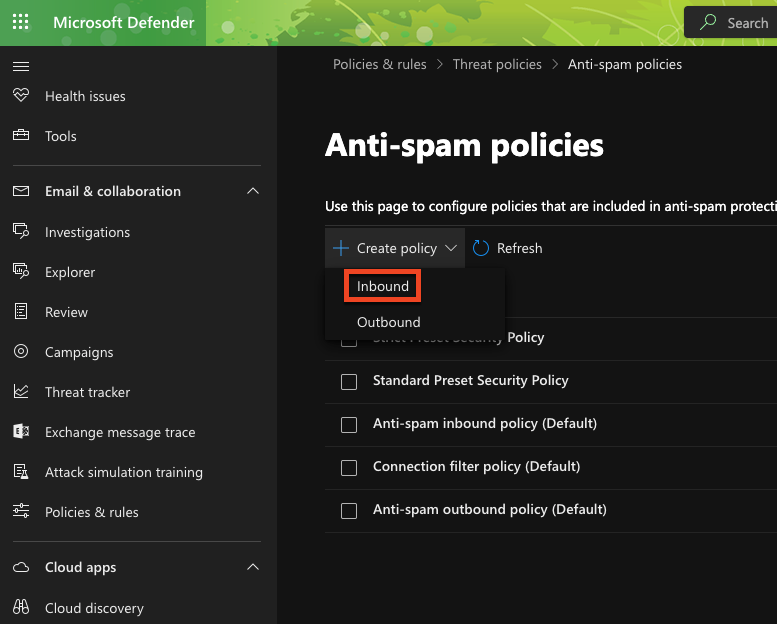
- Click on + Create policy.
- Select Inbound.
- Enter a Name for your policy, such as "KnowBe4 Inbound Mail Security Integration".
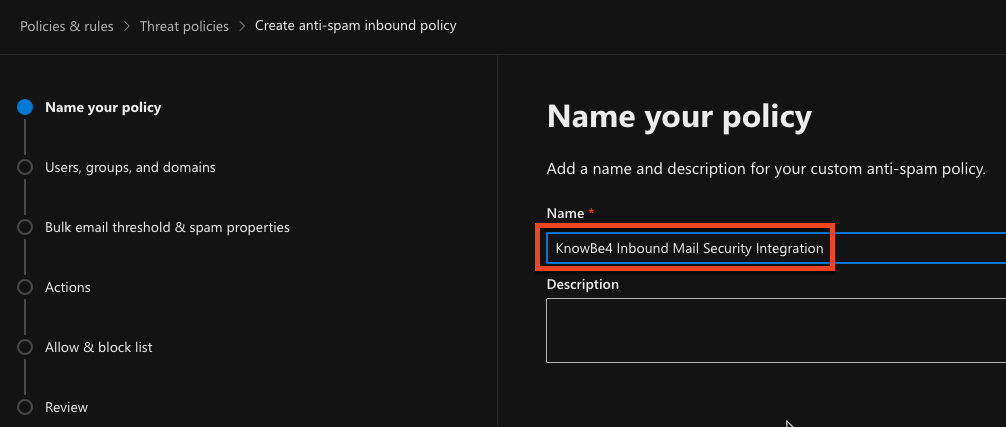
- Click Next.
Configure Actions for Phishing Verdicts
Follow the steps below to configure actions for phishing verdicts.
- In the Actions section, click Edit actions.
- For the Phishing section, choose from these available message actions:
- Move message to Junk Email folder
- Add X-header
- Prepend subject line with text
- Redirect message to email address
- Delete message
- Quarantine message
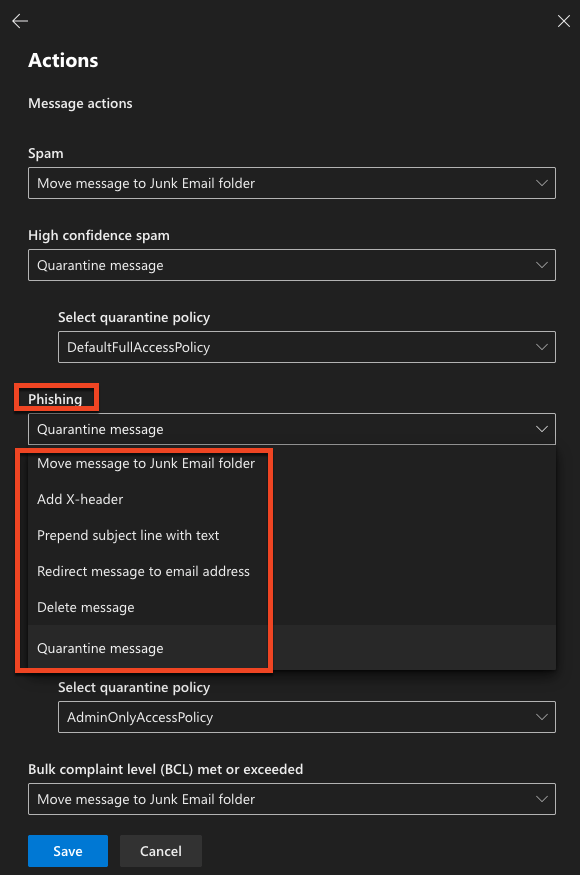
- If you selected Quarantine message for the Phishing message action, select your preferred quarantine policy from the Select quarantine policy drop-down menu. Custom quarantine policies appear in the available options.
Configure Actions for High Confidence Phishing Verdicts
Follow the steps below to configure actions for high-confidence phishing verdicts.
- In the Actions section, click Edit actions.
- For the High confidence phishing section, choose from these available actions:
- Quarantine message
- Move message to Junk Email folder
- Redirect message to email address
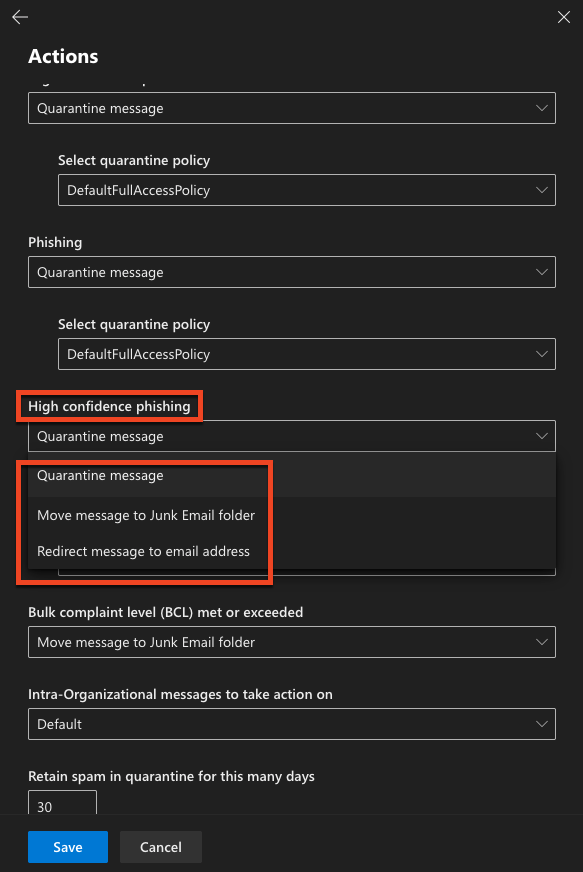
- If you selected Quarantine message for the High Confidence Phishing message action, select your preferred quarantine policy from the Select quarantine policy drop-down menu. Custom quarantine policies appear in the available options.
Save Your Changes
To save changes to your policy, follow the steps below:
- Review all your settings.
- Click Save or Next, depending on whether you're editing an existing policy or creating a new one.
- If creating a new policy, you may need to define additional settings like priority and user or domain scope before saving.
Setting Up Quarantine Notifications for Users
If Quarantine message is selected for Phishing or High confidence phishing in your inbound anti-spam policy for Microsoft Defender for Office 365, you can select a quarantine policy to notify your users. There are several default quarantine policies that Microsoft Defender for Office 365 provides, or you can set up a custom quarantine policy. The sections below will show you how you can customize the existing quarantine policies or create your own custom policy.
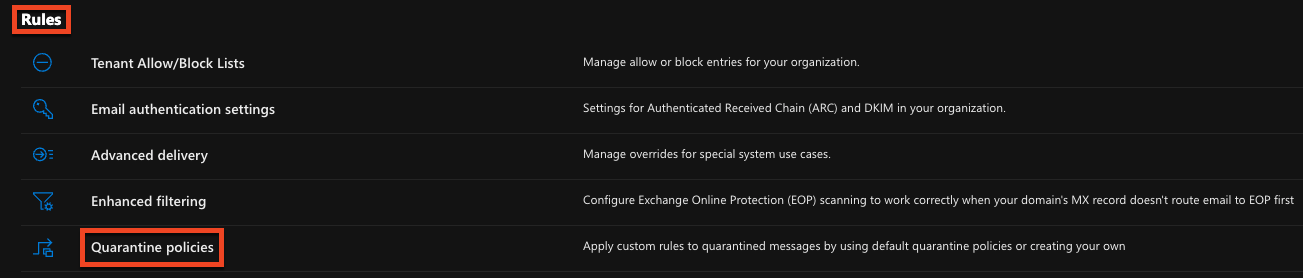
Access Quarantine Notification Settings
The steps below will show you where you can access the quarantine policies in Microsoft Defender for Office 365:
- Sign in to the Microsoft Defender for Office 365 portal.
- Navigate to Email & collaboration > Policies & rules > Threat policies.
- Select Quarantine policies under the Rules section.
Configure Existing Quarantine Policies
The steps below show how you can configure existing quarantine policies.
- Click Global settings.
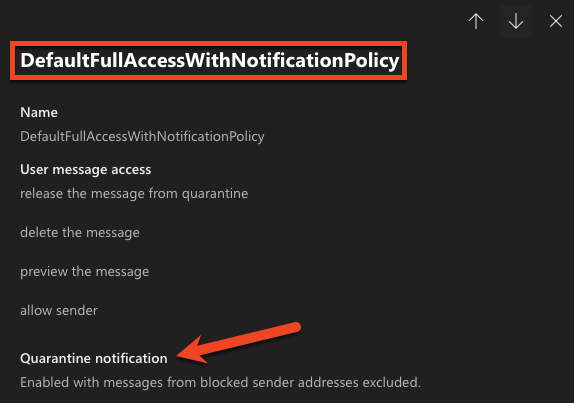
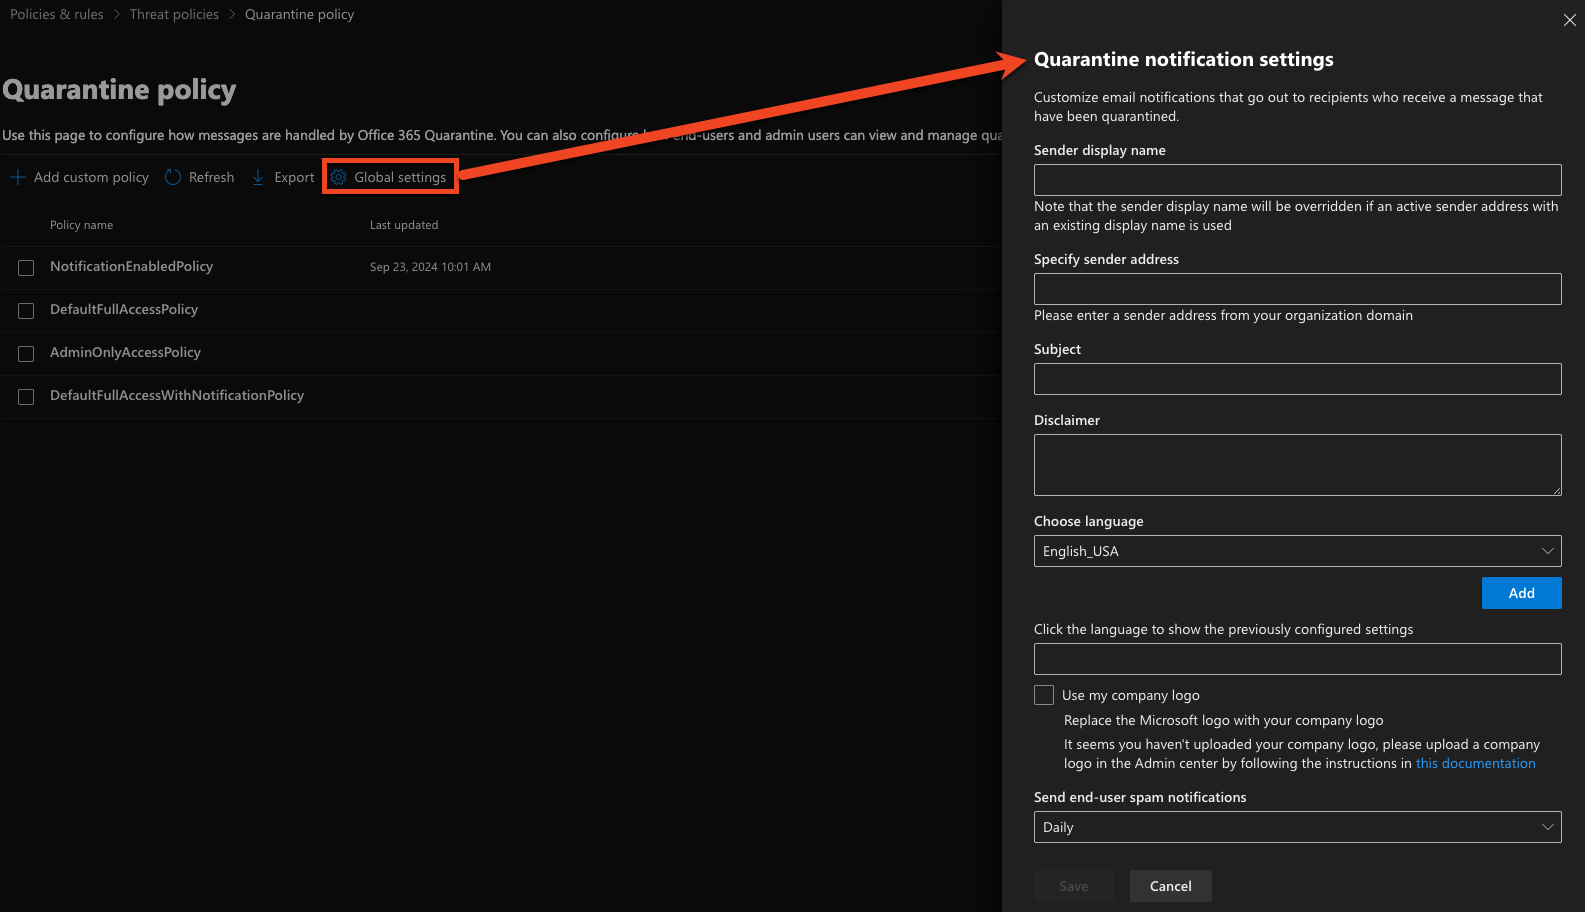 Note:The Global Settings are the only way to edit the four default policies: NotificationEnabledPolicy, DefaultFullAccessPolicy, AdminOnlyAccessPolicy, and DefaultFullAccessWithNotificationPolicy.
 - The menu that appears on the right side of the page allows you to customize the email notifications for your users:
- Sender display name
- Sender address
- Subject
- Disclaimer
- Language
- Company logo
- Notification frequency
Note:The only default quarantine policies that allow quarantine notifications for your users are the NotificationEnabledPolicy and the DefaultFullAccessWithNotificationPolicy. For additional information, see Microsoft's Use quarantine notifications to release and report quarantined messages article.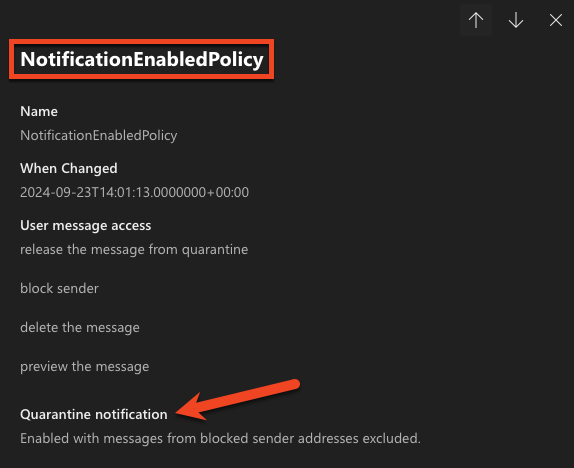
Create New Quarantine Policies
Follow the steps below to create and configure a new quarantine policy.
- Select +Add custom policy.
- Name your new quarantine policy.
- Select the preferred Recipient message access:
- Limited access will allow users to view quarantine messages
-
Set specific access (Advanced) allows you to control the level of access your users have for quarantined messages
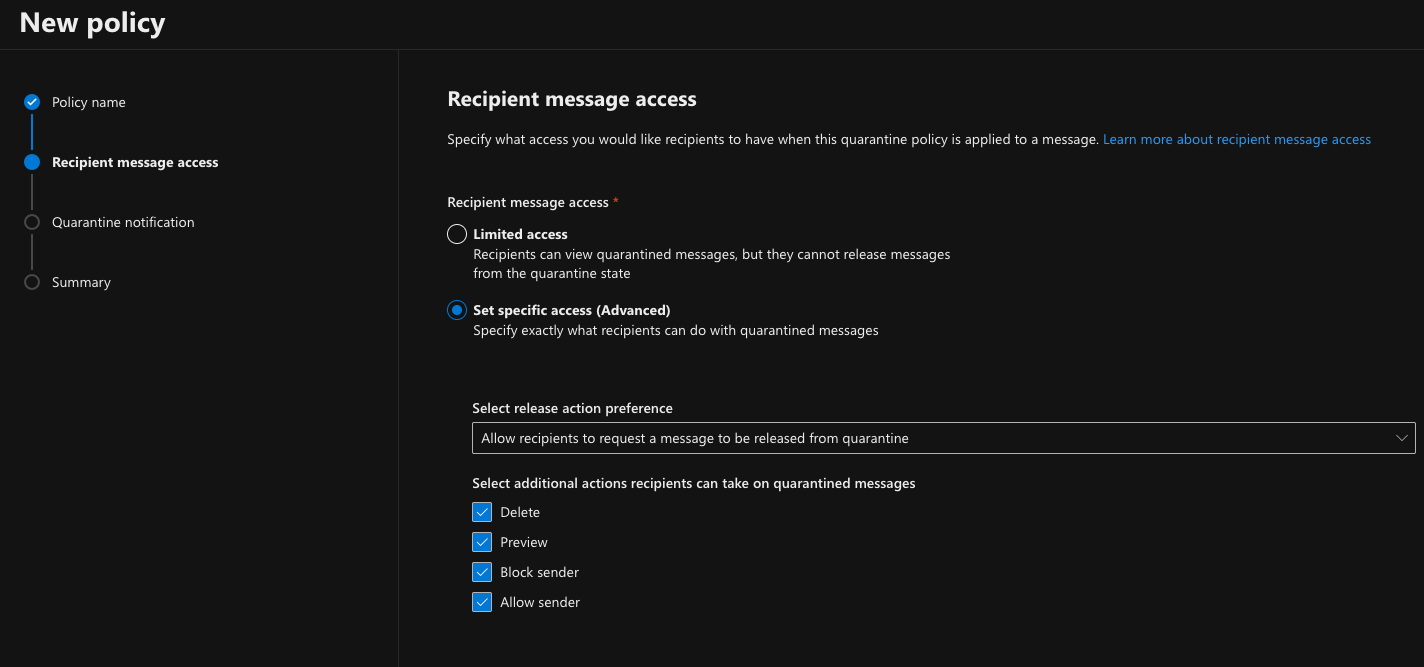
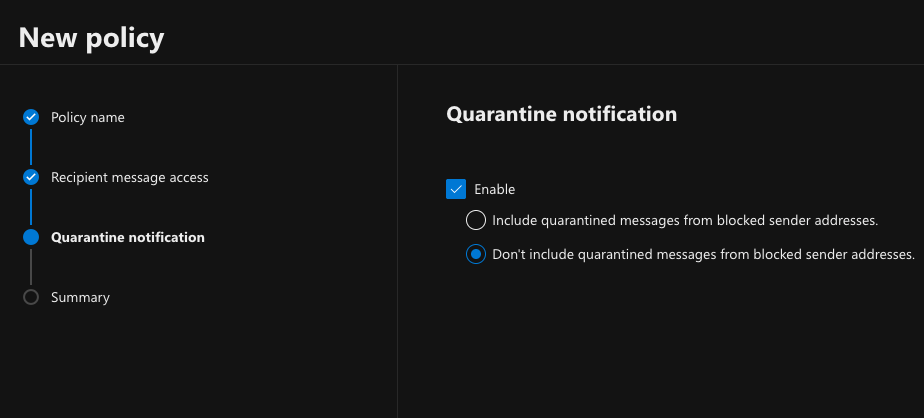
- Select the Enable check box to turn on quarantine notifications, and then select whether or not to include quarantined messages from blocked sender addresses.
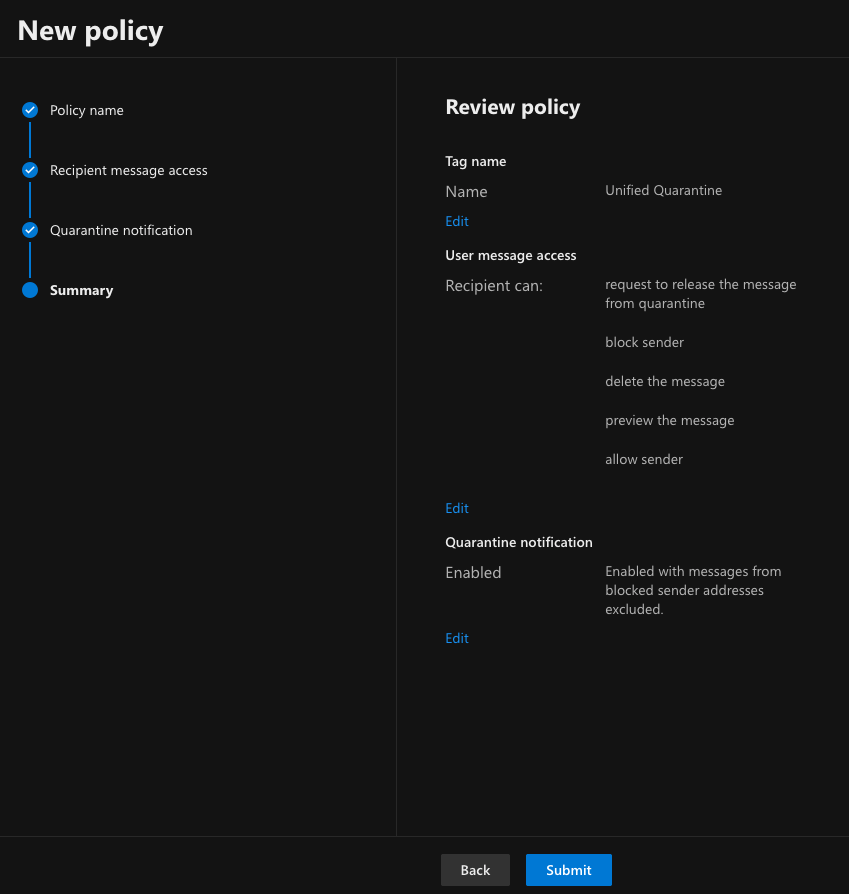
- Review the following settings:
- Tag name: This is the name of your new quarantine policy.
- User message access: These are the actions that your users can take on quarantined messages.
-
Quarantine notification: Choose whether users will receive a notification when a message is sent to quarantine.
Save Your Configuration
Once you've configured your desired notification settings, click Save to apply the changes.
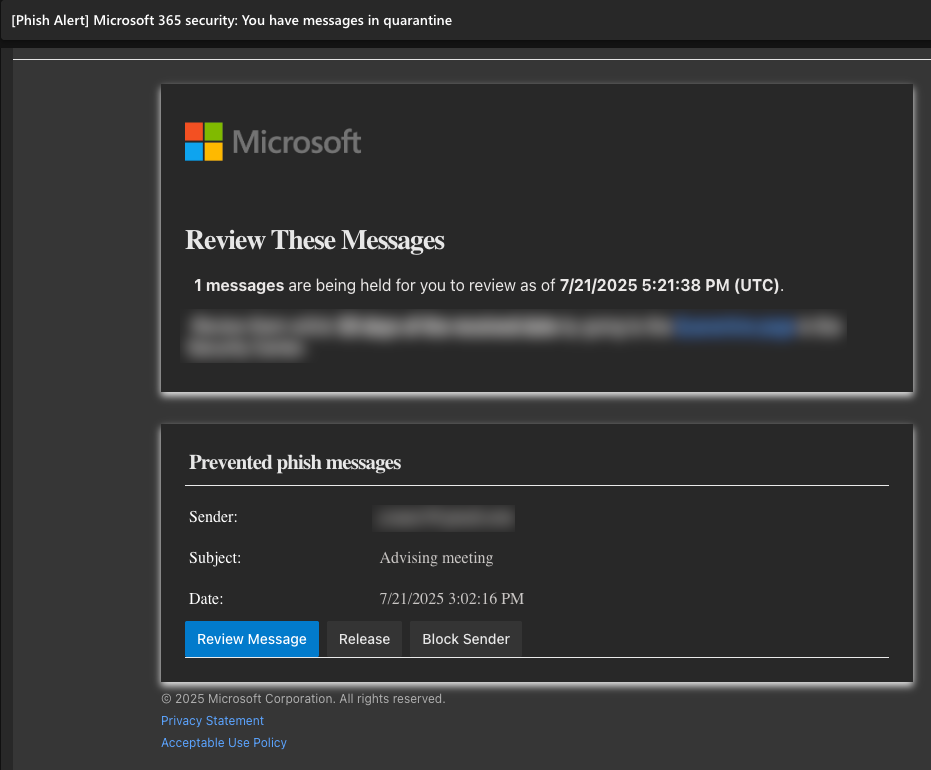
User Experience
When users receive a quarantine notification:
- The email will list messages that have been quarantined for them.
- Users can preview details about each quarantined message.
- Depending on your configuration, users may be able to:
- Release or request release for messages they believe are legitimate
- View the reason for quarantine
- Delete message
- Block sender
- Allow sender