In this guide, you'll learn how to get started with Prevent, an AI-driven email security product designed to help you tackle outbound email risks. Prevent is a powerful cybersecurity tool that proactively identifies and mitigates outbound data risks by analyzing your outgoing communications. Prevent uses advanced AI to analyze emails in real time, focusing on sender behavior, content, and recipient to protect sensitive information from being inappropriately shared or exfiltrated. Prevent stops data breaches and incidents before they happen, supporting your organization’s users in real time.
To access the Prevent console, you must first use the deployment center to deploy Prevent for your organization. You can then use the Prevent console to customize data protection policies, alter Prevent configurations, and tailor the system to your organization and users. The Prevent dashboard provides you with an overview of the volume and nature of email events being analyzed and nudging your users, allowing you to conduct thorough investigations of potential data exposure incidents.
Deployment Center
The Prevent deployment center is a comprehensive wizard that allows admins to configure and deploy Prevent to their organization easily. Admins are guided through each section of the deployment process, and progress is saved at every step. Once the deployment center is complete, admins gain access to the Prevent console, where further customization and product configuration can be completed.
Prerequisites
To successfully complete the deployment center process, make sure you have the following prerequisites:
- Microsoft 365 tenant
- Global admin role on Microsoft 365 tenant
Deployment Center Steps
The following steps are completed in the deployment center:
-
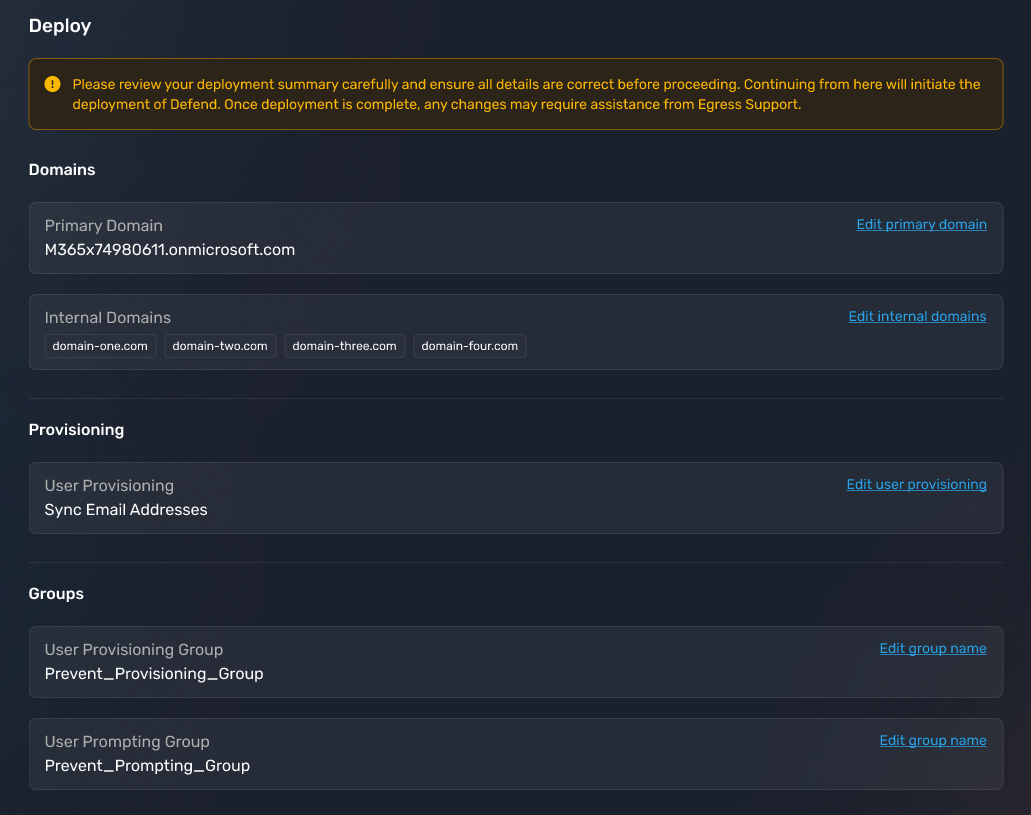
Domains: Confirm all of your organization’s internal domains that Prevent detects when syncing with Microsoft 365. This step is key to configuring Prevent optimally for your organization. For more information about the fields on the Domains page, see the list below.
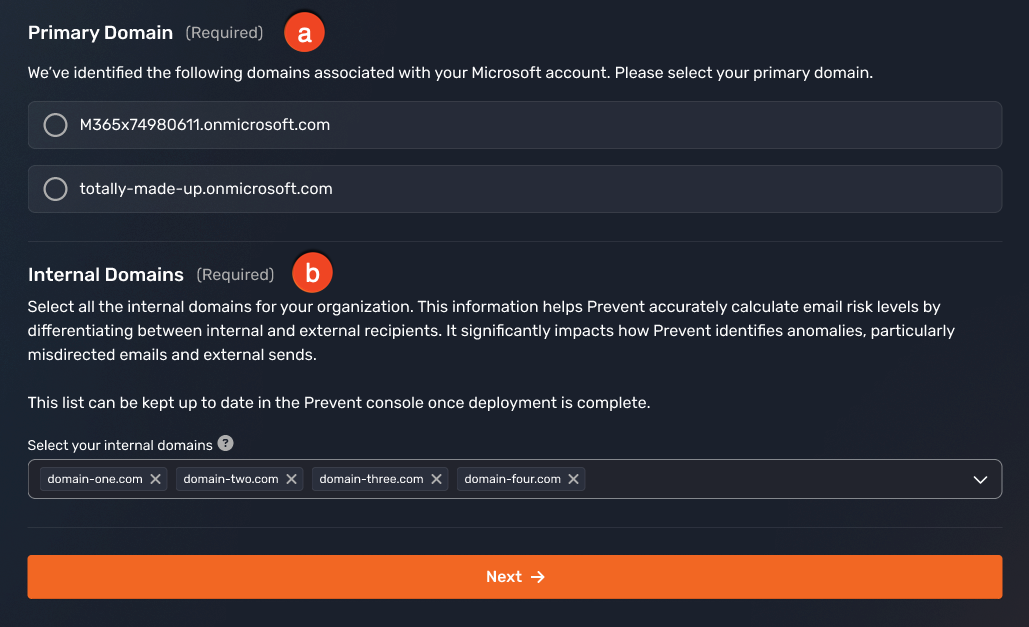
- Primary Domain: Select the primary domain from your organization’s Microsoft 365 tenant.
- Internal Domains: Select all the internal domains that your organization owns and uses.
-
Groups: Confirm the two Microsoft 365 groups that will be used for ingesting historical email data and to identify which users to nudge with Prevent advice. For more information about the fields on the Groups page, see the list below.
Note:The groups used for ingestion and nudging can be the same. For initial testing purposes, it may be beneficial to have a different nudge group before the organization-wide rollout.
- User Provisioning Group: Specify the name of the group that will contain all users in your organization. All users in this group will be provisioned, and their historical and email data will be ingested to Prevent.
- User Nudge Group: Specify the name of the group of users who will receive nudges from Prevent when an email they send has a risk associated with it.
-
KnowBe4 Email Security Add-In: A critical part of the Prevent service is the KnowBe4 Email Security Outlook add-in. Download the installation file and upload it to your Microsoft 365 environment. This ensures that all users in your designated nudge group can access the add-in and receive real-time Prevent advice. For more information about the fields on the Add-In page, see the list below.
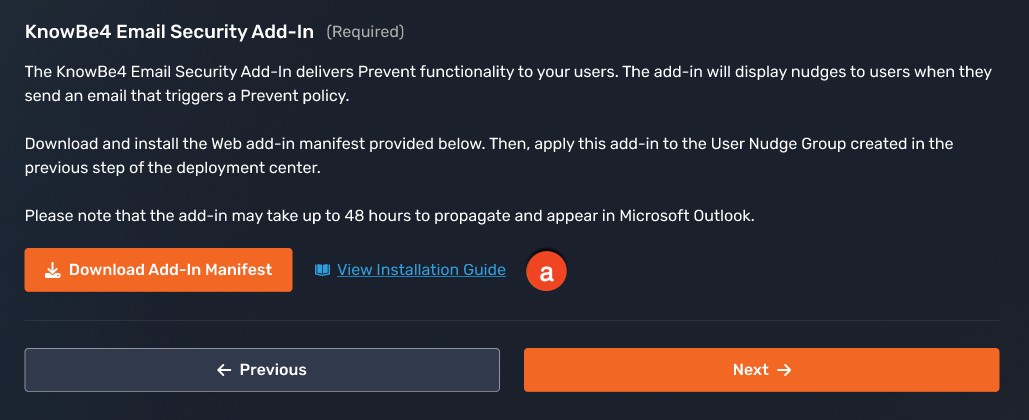
- Download Add-In Manifest: Select the Download Add-In Manifest button to download the manifest for the add-in. The add-in provides Prevent functionality to your users.
Note:Depending on your setup, it can take 24 to 72 hours for changes to appear in your environment. New installations typically propagate within 48 hours, while upgrades or replacements to an existing manifest may take up to 72 hours to fully propagate. -
Email Nudges: In circumstances where real-time advice can be provided to users, Prevent will provide retrospective nudges. When an email is sent that triggers Prevent, the sender will receive an email from Prevent allowing them to continue or cancel the sending of their email. Specify the internal email address that Prevent should use to send retrospective nudges from, and the default action that should happen if a user doesn’t reply to the nudge. For more information about the fields on the Email Nudges page, see the list below.
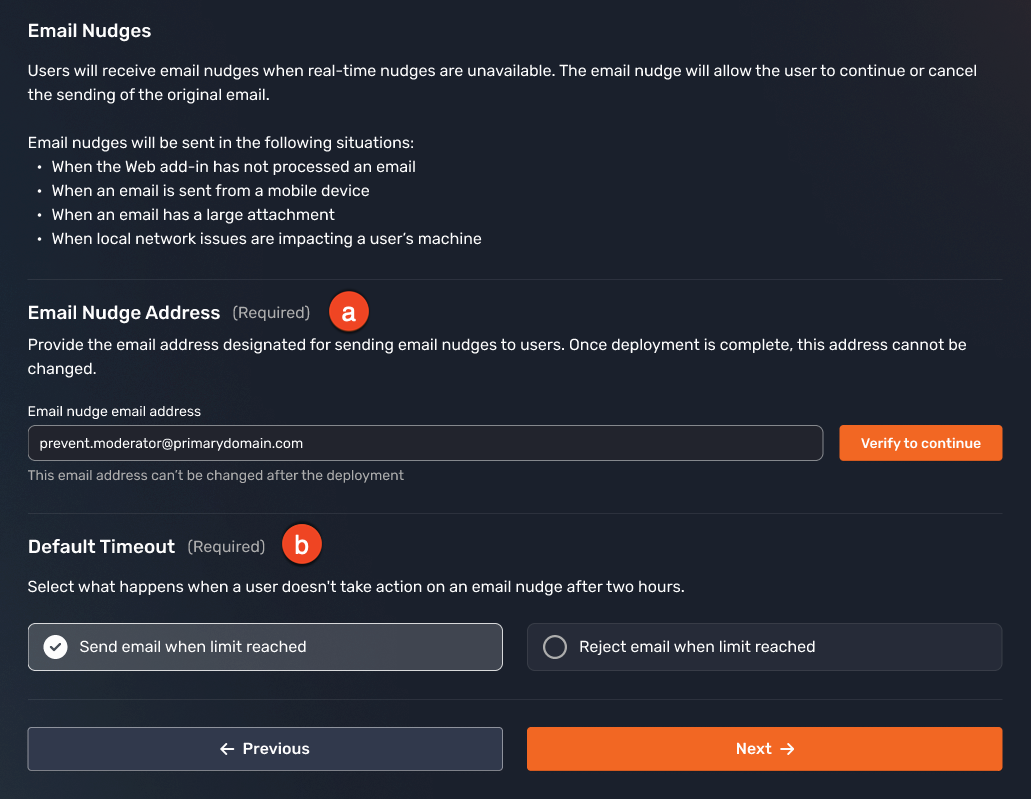
- Email Nudge Address: Enter the email address that Prevent should use to send email nudges to users.
- Default Timeout: Select what happens when a user doesn’t reply to an email nudge. The original email can be sent or rejected after two hours if the user doesn’t reply to the email nudge.
-
Summary: View an overview of all deployment steps and inputs captured so far for your confirmation and review.
-
Gateway Deployment Steps: Grant the required permissions to create the gateway. For more information about the fields on the Deploying Gateway page, see the list below.
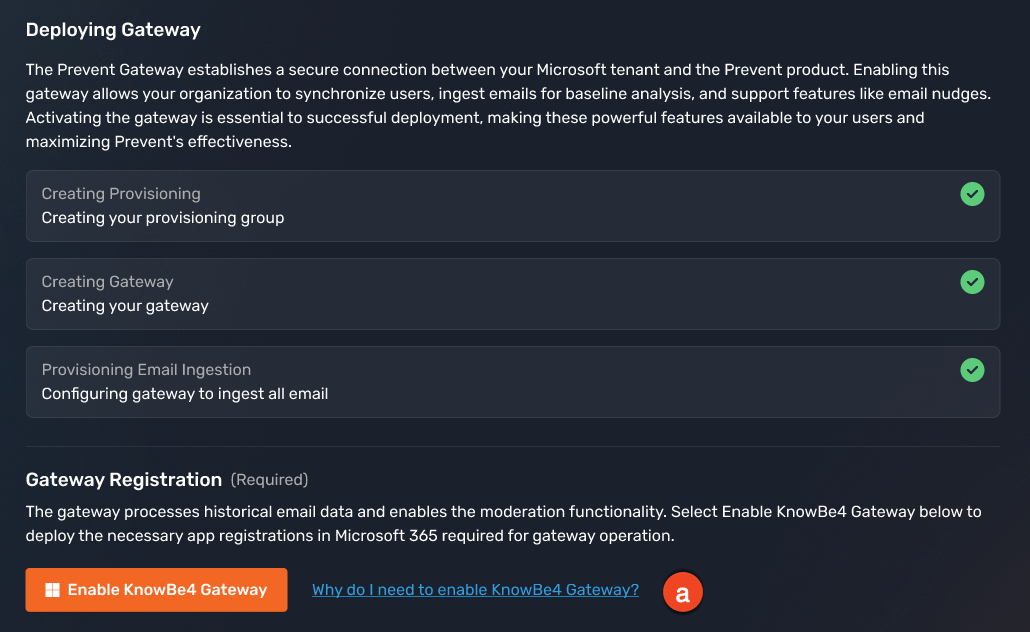
- Enable KnowBe4 Gateway: Select the Enable KnowBe4 Gateway button to grant the required Microsoft 365 permissions for the KnowBe4 gateway.
- Deploy: The deployment center will compile all the data you have provided and run the Prevent installation.
Summarized Changes
Once successfully deployed, the following changes will be made to your Microsoft tenant, allowing Prevent to function correctly.
During deployment, each organization will be configured with a unique domain. Configuring an accepted domain allows us to route emails to the Prevent gateway for processing. We do not configure an MX record, but we do use the MX record value.
| App Registration | Permissions Required | Justification |
|---|---|---|
| Ingestion |
Microsoft Graph > Application Permissions > User > User.Read.All Microsoft Graph > Application Permissions > Group > Group.Read.All Microsoft Graph > Application Permissions > Mail > Mail.Read |
Establishes an understanding of users’ email communication to allow Prevent to accurately nudge users when an issue is detected. |
| Connector | Action |
|---|---|
| Microsoft 365 to Prevent | Route mail to Prevent for Analysis |
| Prevent to Microsoft 365 | Route mail back to Microsoft 365 |
The default name for the Prevent user provisioning group is "Prevent_Provisioning_Group." Prevent will ingest the profile information and 12 months of historical email data of users in this group.
The default name for the Prevent nudge group is “Prevent_Prompting_Group”. Prevent will nudge users in this group with advice when an email they send triggers a Prevent policy.
Dynamic expressions can be used to add users to these groups. For example, if you wanted to add all your users to the "Prevent_Provisioning_Group”, you could use a dynamic expression such as (user.mail -ne null) and (user.userType -eq "Member").
When a risk is detected, the Prevent Gateway will send a verification email to the sender to approve or reject whether or not the mail will be sent. This verification email is sent on behalf of the shared mailbox.
| Transport Rule | Action |
|---|---|
| Email Nudges | Redirect relevant emails to the gateway for retrospective analysis. |
| Forward Replies to Email Nudges | When a user responds to their retrospective email notification by choosing to either continue or cancel their email send, their reply is automatically directed to the email nudge mailbox for appropriate handling and review. |
A spoofed sender entry is created to tell Microsoft to allow messages coming from the Prevent email nudge address and gateway infrastructure. Without this, Microsoft 365 might flag these critical security alerts as spoof and send them to junk or quarantine, preventing your users from seeing their security nudges.
Prevent Console
Once deployment is complete and you have rolled out Prevent to your organization by adding the required users to the Prevent user group in Microsoft 365, you will have access to the Prevent console.
The console is comprised of the following pages:
- Dashboard
- The dashboard provides an overview and top-level statistics about your organization’s use of Prevent.
- For further information, see the Prevent - Dashboard article.
- Search Emails
- The search emails page allows you to find and investigate email events.
- For further information, see the Prevent - Search Emails article.
- Settings
- The settings page allows you to configure general settings and policy settings to suit your organization’s needs.
- For further information, see the Prevent - Settings article.
Prevent Enterprise
Prevent is available in two distinct offerings to meet diverse organizational needs. The default Prevent experience provides essential outbound email security with AI-driven analysis and real-time protection against data breaches. For organizations requiring enhanced capabilities, Prevent Enterprise delivers additional advanced features and customization options. As an administrator, understanding which version your organization utilizes will help you leverage the appropriate tools and configurations to maximize your email security posture.
For further information, see the Prevent and Prevent Enterprise Overview article.