Prevent helps users avoid errors and accidental mistakes when sharing data and Personally Identifiable Information (PII) by email. By combining historical email behavior trends, domain hygiene analysis, and Data Loss Prevention (DLP) rules, Prevent advises end users on the risk level of an email.
This guide provides a comprehensive overview of the Prevent system and deployment.
Components
Prevent is formed of the following components:
- API
- Learns user behavior to provide accurate opinions and prompts
- Responsible for metadata ingestion and storage
- Policy Engine
- Determines what to do with Prevent’s opinion of an email, such as when to prompt users in accordance with your policy
- Client Add-In
- Enforces the policy and prompts users when required
- Prevent Gateway
- For emails that are not processed by the COM or web add-in
Architecture
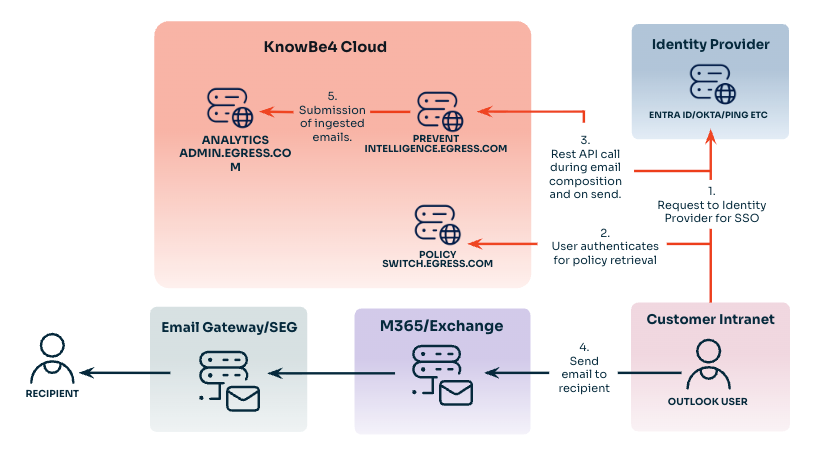
- Prevent Microsoft Outlook add-in triggers single sign-on (SSO) authentication when Microsoft Outlook starts up.
- Prevent Microsoft Outlook add-in makes a call to the Prevent policy server to retrieve security policies. These security policies control the behavior of the add-in, such as what scenario to show a prompt to the user.
- Analysis of email content and recipients occurs during composition and on sending the email. Prompts in line with Prevent security policies are delivered where necessary.
- Email sent to the recipient via the normal route, such as Microsoft Exchange and then SEG (optional).
- User actions are ingested to allow Prevent to learn and constantly provide accurate advice to users. This data is also ingested into the Prevent Analytics platform for reporting purposes.
Ingestion
For Prevent to provide the most value, it requires a baseline dataset and an understanding of email relationships. This data is acquired through ingestion. There are two ingestion methods that can be used:
- Graph API Ingestion
- Ingests 12 months of metadata if available.
- Only available for organizations using Microsoft Exchange Online.
- Graph API ingestion is a mandatory requirement if using the web add-in.
- Graph API ingestion is a mandatory requirement for shared mailbox support. This feature ensures users receive real-time Prevent advice when sending from a shared mailbox or on behalf of another user.
- Windows Outlook COM Add-In Ingestion
- Ingests 12 months of metadata, if available, via the Microsoft Outlook add-in.
Data Storage
The data stored by Prevent includes:
- Sender
- From
- Sender Display Name
- From Display Name
- Recipients – display name and email
- SentBy Address
- Mailbox Address
- Sent Date
- Parent Thread Index
- Message References
- Thread Index
- Exchange Message Class
- Message ID
- InReplyTo Message ID
- Hashed identifiers *
- Subject line*
- Attachment names*
*This data is optional and ingested to display additional information in the Prevent Security Center.
All data is stored for 18 months. All activity between the application and its underlying data sources occurs over a secure connection using TLS 1.2.
Data Segregation
Customer data is isolated by assigning each organization an ID. Authentication and database queries to Prevent are made at an organizational level, ensuring that data cannot be accessed between organizations.
Data Retention
The retention period for Prevent Analytics is 18 months rolling and for up to 30 calendar days thereafter. This data is required to improve the accuracy of the Prevent services and provide trend and risk analysis for reporting. For more information, see our Data Retention Policy Schedule.
Network Configuration
Communication to the Prevent cloud is via HTTPS. If SSL inspection or decryption is being used, a customer may be required to add proxy exceptions to bypass this for URLs given below to avoid interference.
United Kingdom
- switch.egress.com
- uk.intelligence.egress.com
- uk.office.egress.com
- uk.kes.knowbe4.com
Europe
- eu1.esi.egress.com
- eu.intelligence.egress.com
- eu.office.egress.com
- eu.kes.knowbe4.com
North America
- us1.esi.egress.com
- us.intelligence.egress.com
- us.office.egress.com
- us.kes.knowbe4.com
Asia-Pacific
- au.esi.egress.com
- au.intelligence.egress.com
- au.office.egress.com
- au.kes.knowbe4.com
Graph API Ingestion Configuration
Graph API ingestion requires an app registration within your Entra ID tenant. This configuration can be done manually within the Entra ID admin platform or using Powershell. Global Administrator credentials are required.
To set this up, follow the steps below:
- Log in to your Entra ID portal.
- Navigate to App registrations New registration.
- Populate the settings as shown below:
Name Prevent Who can use this application or access this API? Accounts in this organizational directory only (Single Tenant) - Click Register.
- Navigate to Authentication Add a platform Mobile and desktop applications.
-
Select the URL ending with "/nativeclient" and click Configure.
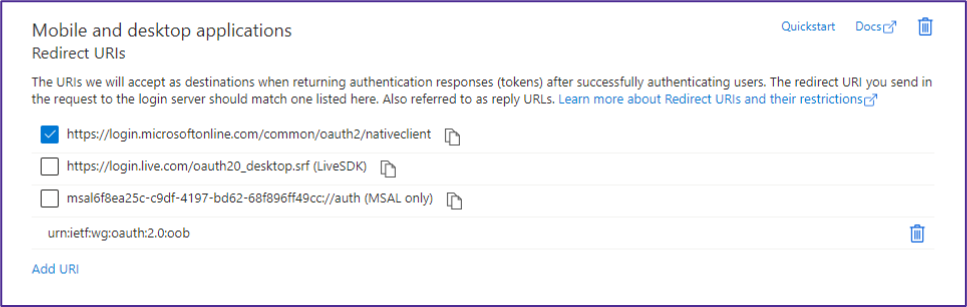
- Add a new redirect URL with the value of urn:ietf:wg:oauth:2.0:oob
-
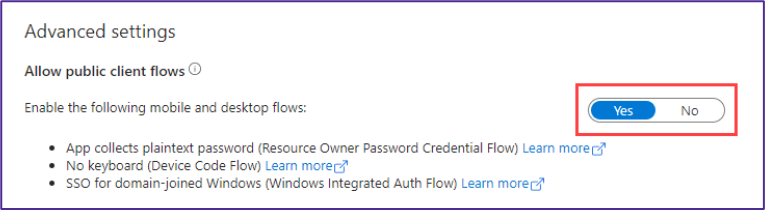
Under Advanced Settings, enable Allow public client flows by selecting Yes.
- Click Save.
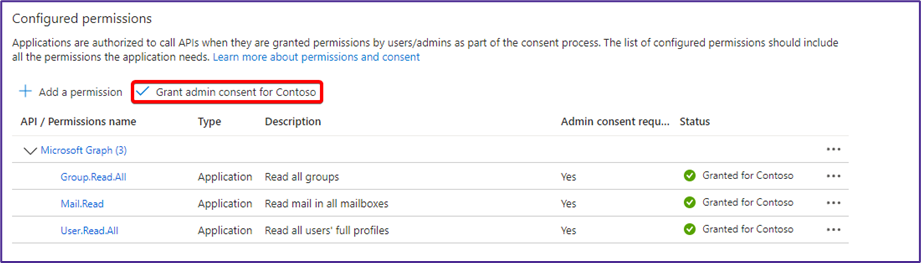
- Navigate to API Permissions Add a permission.
- Add the permissions below:
- Microsoft Graph Application Permissions User User.Read.All
- Microsoft Graph Application Permissions Group Group.Read.All
- Microsoft Graph Application Permissions Mail Mail.Read
- Click Add Permissions.
-
Click Grant admin consent for your organization. Click Yes to any prompts asking you to override any existing permissions.
-
Navigate to Certificates and Secrets. Add a new client secret with an expiry of 24 months. Copy the value of the secret immediately after creation. Your Prevent engineer will need this value.

- Navigate to the Overview page and note the Application (client) ID and Directory (tenant) ID. Your Prevent engineer will need these values.
- Pass the following information to your Prevent engineer:
- Application (client) ID.
- Directory (tenant) ID.
- Client secret value and date of expiry.
Gateway
Prevent has developed the Prevent Gateway to ensure that Prevent caters to non-outlook mail flow from sources, such as mobile devices or back-end systems.
Prevent Deployment Manager
The implementation of Prevent for mobile is achieved via a Deployment Manager, which will be run from the Prevent engineer’s machine. Full details on this Deployment Manager can be found within the following subsections, but it will require a Global Administrator from your tenant to authorize the implementation via Device Code authentication.
Authentication Requirements
Deployment Manager is a Windows application that is run by a KnowBe4 Engineer to enable remote and easy installation of Prevent for mobile. Using Microsoft OAuth Device authentication, the Deployment Manager authenticates with a client’s Microsoft 365 environment remotely. The Deployment Manager must be run on a KnowBe4 employee’s computer, connected to a KnowBe4 VPN, without the client needing to physically enter their username and password onto the KnowBe4 engineer’s device. It will require authorization from a Global Administrator within your tenant. A “token” is received from Microsoft Graph after login, which lasts between 60 and 90 minutes, and is discarded as soon as the page containing the auth flow is closed.
Conditional Access
The Prevent Deployment Manager will be run from the KnowBe4 engineer’s machine connected to a VPN from the UK or America. If you have Conditional Access policies applied to the Global Administrator who authorizes the scripts, you may need to make an exception to the Conditional Access Policy during the installation. The exception can be removed afterward.
General Flow
Emails sent from outside of the Prevent Microsoft Outlook Add-in are sent to a moderation mailbox in the Prevent Gateway and are scanned for any risks and processed accordingly. If a risk is detected, such as a misdirected email, the sender will receive a bounce-back verification email with the option to either approve and send or reject and discard the email. The flow of this feature is shown in the screenshot and list below:
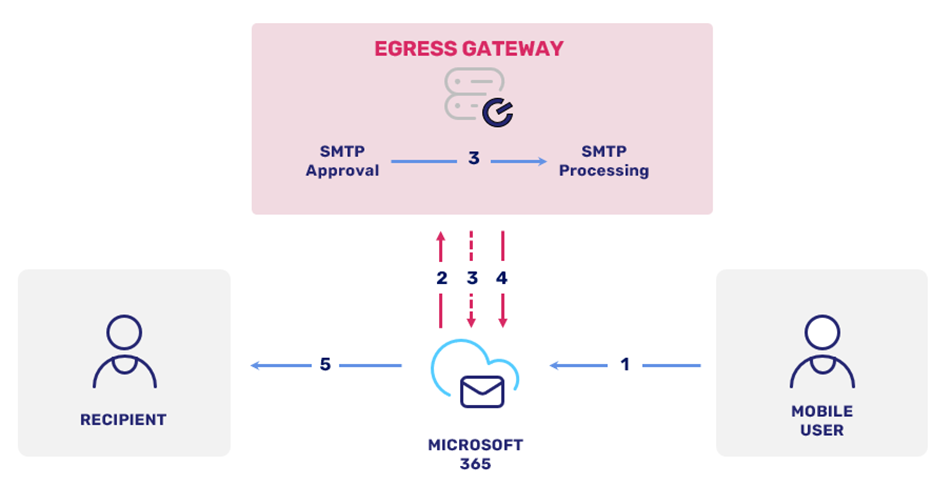
- A mobile user sends an email.
- The email is redirected to the Prevent Gateway via SMTP for analysis.
- Prevent Gateway analyses the email for any risks. If no risks are detected, the email is automatically approved and released.
- If a risk is detected, the Prevent Gateway will send a verification email to the sender on behalf of the shared mailbox. The sender can review the verification email and either approve or reject the send of the email. Approved messages are returned to the Prevent Gateway queue for additional SMTP processing, with encryption or decryption if required, and then returned to Microsoft 365 for final delivery. Rejected messages are deleted with a notification message to the sender or released with a MIME header that Microsoft 365 rules can act upon if needed).
- Approved messages are returned to Microsoft 365 for delivery to the recipient.
- If a user takes no action, by default, emails are auto-approved after two hours.
Gateway Configuration
The Prevent Deployment Manager is used to configure the components required for the Prevent Gateway, reducing the risk of human error and the time required for the implementation. Below are the components implemented by the Deployment Manager:
- Accepted Domain
- Configuring an accepted domain allows us to route emails to the Prevent Gateway for processing. We do not configure an MX record, but we do use the MX record value.
- Connectors
- Allows emails to be transmitted between Microsoft 365 and Prevent over TLS 1.2, using the MS recommendation of CA-issued certificate-based authentication.
- Microsoft 365 Group
- The transport rules created, as shown below, are scoped to apply to a Microsoft 365 group. Prevent users will need to be manually added to the group.
- Shared Mailbox
- When a risk is detected, the Prevent Gateway will send a verification email to the sender to approve or reject whether or not the mail will be sent. This verification email is sent on behalf of the shared mailbox.
- Transport Rules
- There are two rules required. The first rule will determine what emails will be redirected to the Prevent Gateway. The second rule will determine if any emails are being sent to the shared mailbox, typically approve or reject responses, and redirect them to the Prevent Gateway.
If deployment using the deployment manager is not possible, the manual steps detailed in this section should be followed.
Prerequisites
The prerequisites needed for configuring the gateway are listed below:
- Graph API ingestion configured
- Microsoft 365
- Microsoft 365 Global Administrator access
Accepted Domain
To configure an accepted domain, follow the steps below:
- In the Microsoft 365 admin portal, navigate to Setup.
- Under Get your custom domain set up, select View Manage Add domain.
- Configure the new domain using your Prevent Gateway domain address, which will be provided by your KnowBe4 Engineer.
Connectors
Send Connector
To configure a send connector, follow the steps below:
- In the M365 admin portal, navigate to Mail Flow Connectors.
- Click + Add a Connector.
- Set the mail flow scenario to be from Microsoft 365 to Partner Organization.
- Click Next.
- Enter a name for the connector.
- Click Next.
- Select the option to only use the connector where there is a transport rule associated with it.
- Click Next.
- Select Route email through these smart hosts.
- Add the Prevent hostname, which will be provided by your KnowBe4 Engineer.
- Click Next.
- Select Always use Transport Layer Security (TLS) to secure the connection.
- Tick Add the subject name and enter your Prevent hostname.
- Click Next.
Receive Connector
To configure a receive connector, follow the steps below:
- In the Microsoft 365 admin portal, navigate to Mail Flow Connectors.
- Click + Add a connector.
- Set the mail flow scenario to be from Your Organization to Microsoft 365.
- Click Next.
- Enter a name for the connector.
- Click Next.
- Enter the Prevent Gateway hostname to allow Microsoft 365 to identify the source of incoming mail.
Microsoft 365 Group
To configure a Microsoft 365 group, follow the steps below:
- In the Microsoft 365 admin portal, navigate to Active Teams and Groups.
- Select Add a Microsoft 365 group.
- Enter a name for the group, such as "Prevent Moderation".
- Click Next.
- Assign an owner of the group.
- Click Next.
- Add relevant members to the group.
- Click Next.
- Enter a group email address, such as "Prevent_Users@customer.com".
- Use the Privacy drop-down menu to select Private.
- Untick Create a team for this group.
- Click Next.
- Review and create the group.
Once created, add the desired Prevent users to the group.
Shared Mailbox
Create the shared mailbox in the Microsoft 365 admin portal by following the steps below:
- Navigate to Teams & Groups Shared mailboxes.
- Click + Add a shared mailbox.
- The address of the mailbox should be Egress_Moderator@customer.com
- Click Save Changes.
Prevent will send verification emails on behalf of this shared mailbox. These emails will originate from an internal address but from an external Prevent IP address and will therefore, be rejected due to SPF misalignment. To prevent these rejections, the Gateway hostname should be allowed to spoof the mailbox address within your Microsoft Security Portal:
- Navigate to Policies and Rules Threat Policies Tenant Allow/Block Lists Spoofed senders.
- Add a new domain pair including the moderator mailbox address and your Prevent Gateway regional address, which can be provided by your KnowBe4 Engineer.
Transport Rules
Prevent Moderation
To configure Prevent moderation, follow the steps below:
- In the Microsoft 365 admin portal, navigate to Mail Flow Rules + Create a new rule.
-
Configure the rule with the following settings:
Apply this rule if the Header
X-MS-Exchange-Organization-AuthMechanism
Matches
^0?4
And is received from
Member of group Egress_Prevent_Users@customer.com.
Do the following
Route the message using the following Connector:
Exchange Online to Egress
And Set the message header
X-Egress-Moderation with the value Required
Except if
Message type is Calendaring
Or
Message Header X-Switch-Processed contains:
[GATEWAY ID] this will be provided by you Prevent Engineer
Or
Message Header X-$Switch matches the following patterns:
^((?!TPSECONDARY).){1,1000}$
Forward Replies to Prevent SMTP Moderation
To forward replies to Prevent SMTP moderation, follow the steps below:
- In the Microsoft 365 admin portal, navigate to Mail Flow Rules + Create a new rule.
-
Configure the rule with the following settings:
Apply this rule if Received from
Inside the Organization
And is sent to recipient Egress_Prevent_Users@customer.com.
Do the following
Route the message using the connector
Exchange Online to Egress
And set the Message Header
X-Egress-Moderation with the value required
Except if the header
[GATEWAY ID] this will be provided by your Prevent Engineer