AIDA Orchestration is an always-on, AI-driven system that automatically manages and personalizes your Phishing Security Tests (PSTs) and security awareness training (SAT) to reduce user risk. AIDA uses AI to intelligently generate phishing templates and automatically sends those phishing tests to your users.
AIDA automatically scales the difficulty of each test based on user performance. The system uses personalized content and realistic logo changes to keep simulations relevant and appropriately challenging.
Even with this system enabled, you will retain full control to fine-tune the system's behavior and monitor all activity.
AIDA is available on the KnowBe4 console as an add-on to your Diamond-level subscription.
Enabling AIDA Orchestration
To enable AIDA Orchestration, log in to your KnowBe4 console and click the Orchestration tab.
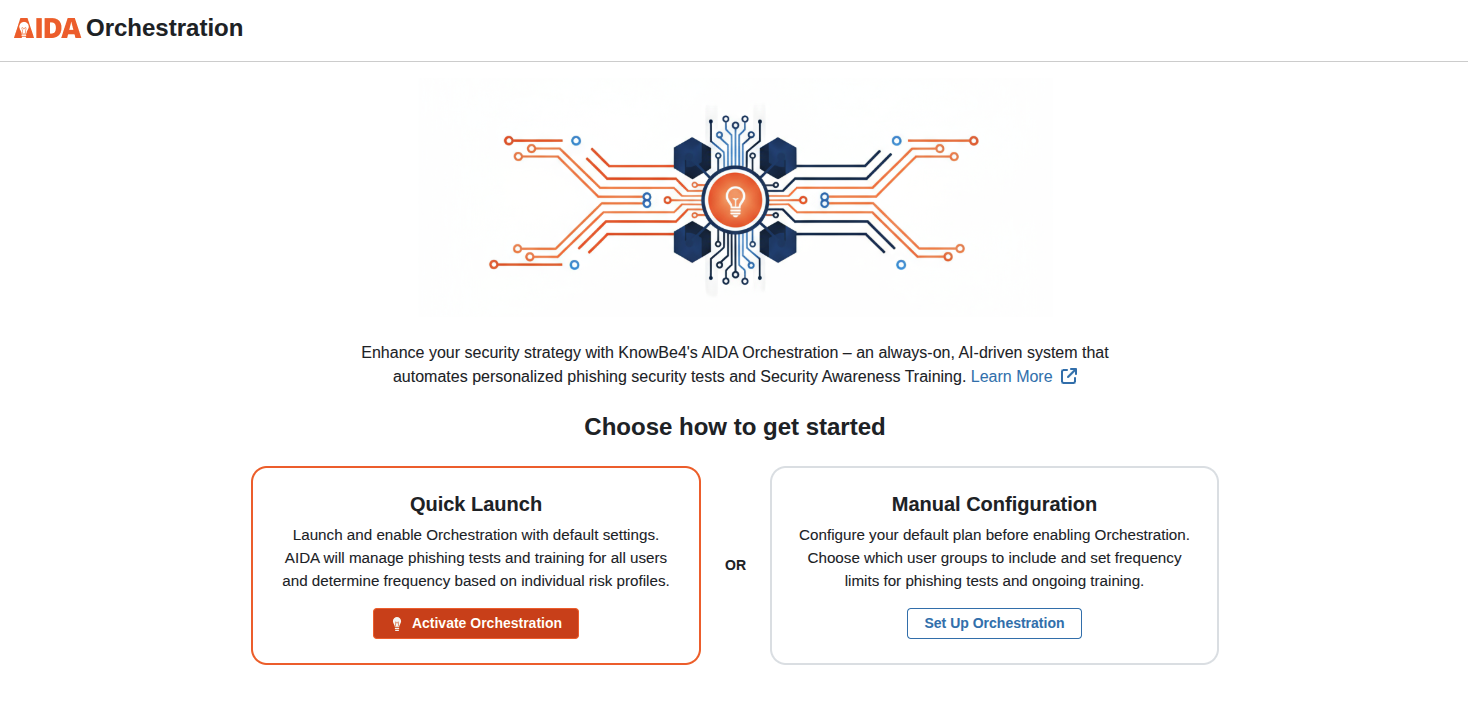
You have two ways to get started:
-
Quick Launch: Click the Activate Orchestration button to launch and enable Orchestration with default settings. AIDA will manage phishing tests and training for all users and determine frequency based on individual risk profiles. For more information, see Managing AIDA Orchestration.
Note: Selecting the Quick Launch option creates a plan called "Default" that includes all users. Both the phishing agent and training agent are enabled, with AIDA selecting the optimal frequency for tests and training based on each user's risk profile. You can adjust these settings at any time after enabling Orchestration. - Manual Configuration: Click the Set up Orchestration button to configure your default plan before enabling Orchestration. Choose which user groups to include and set frequency limits for phishing tests and ongoing training.
Manual Configuration
After clicking the Tune Orchestration button when enabling AIDA Orchestration, the General section of the AIDA Orchestration plan configuration page opens.
General Settings
Let’s get AIDA Orchestration working for you by creating a default plan that tells AIDA how to manage and personalize your team's phishing security tests and training.
What is a Plan?
A plan tells AIDA how to manage security awareness training for specific groups of users. Think of it as your blueprint for automation: you define who gets included, how often they receive phishing tests and training, then AIDA Orchestration handles the day-to-day execution.
Each Plan includes:
- User groups you want to include and any you want to exclude
- Phishing or Training frequency limits for phishing tests and security awareness training
Why use multiple Plans?
Different teams often need different approaches to security training. Plans let you customize AIDA Orchestration’s automation for each group's needs.
How Plans work together
When you have multiple plans, they follow a priority order you set. If a user appears in multiple groups across different plans, AIDA Orchestration applies the plan with the highest precedence to that user. This feature prevents conflicts and ensures consistent training delivery.
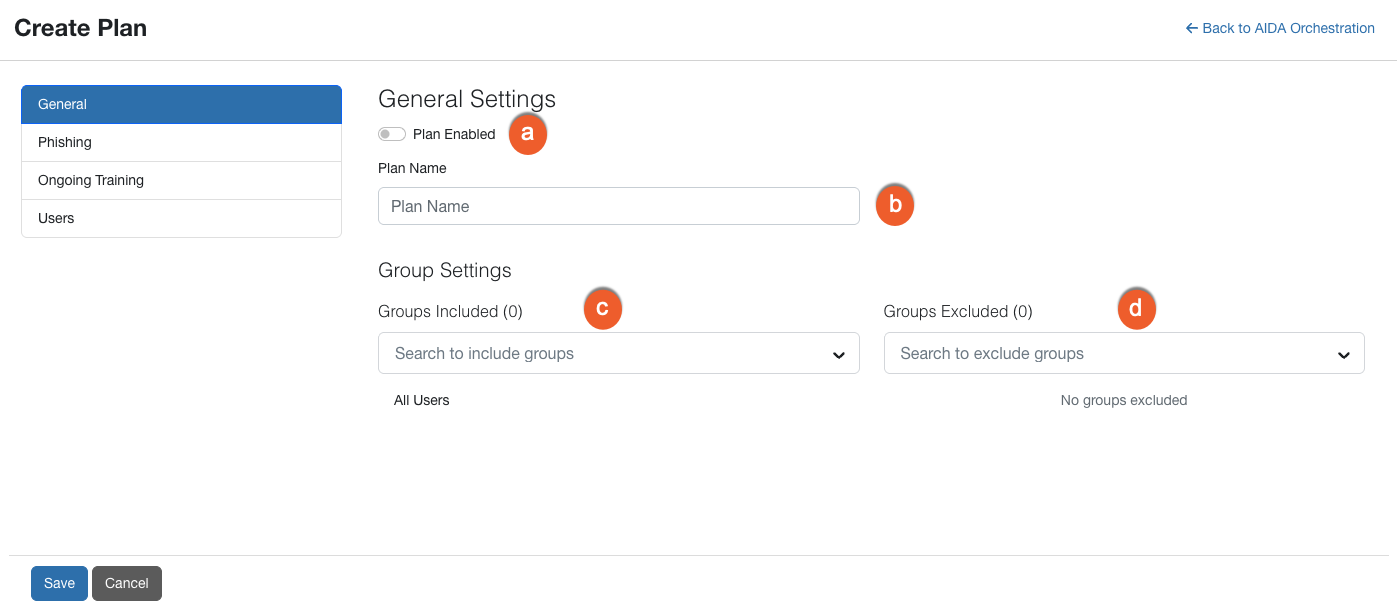
To learn more about the options in this section, see the screenshot and the list below:
-
Plan Enabled: This toggle is already enabled.
Note: This toggle does not immediately enable AIDA Orchestration. It will be enabled only after you click the Save Changes button. - Plan Name: This is the name for the default plan, and the admin cannot change it.
- Groups Included: Select the groups you want to include in the plan. For more information on managing users and groups, see the Users and Groups Management Guide.
- Groups Excluded: Select the groups you would like excluded from the plan.
Phishing Settings
To learn more about the options in this section, see the screenshot and the description below:
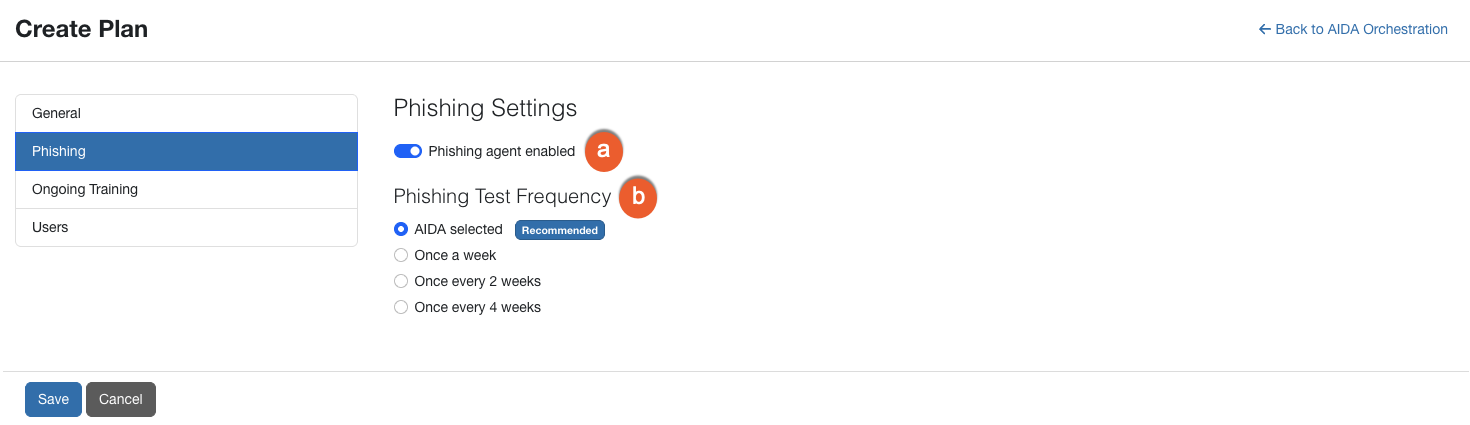
- Phishing agent enabled: Use this toggle to enable or disable the phishing agent.
-
Phishing Test Frequency: Select how often you would like phishing tests sent to users. We recommend the AIDA selected option, in which AIDA will decide the frequency of phishing tests on a user-by-user basis.
Note: AIDA schedules each user's phishing test using that user's individual time zone, based on the time zone set on their profile, instead of the account's configured time zone. This ensures tests are delivered during each user's local business hours.
Ongoing Training Settings
To learn more about the options in this section, see the screenshot and the description below:
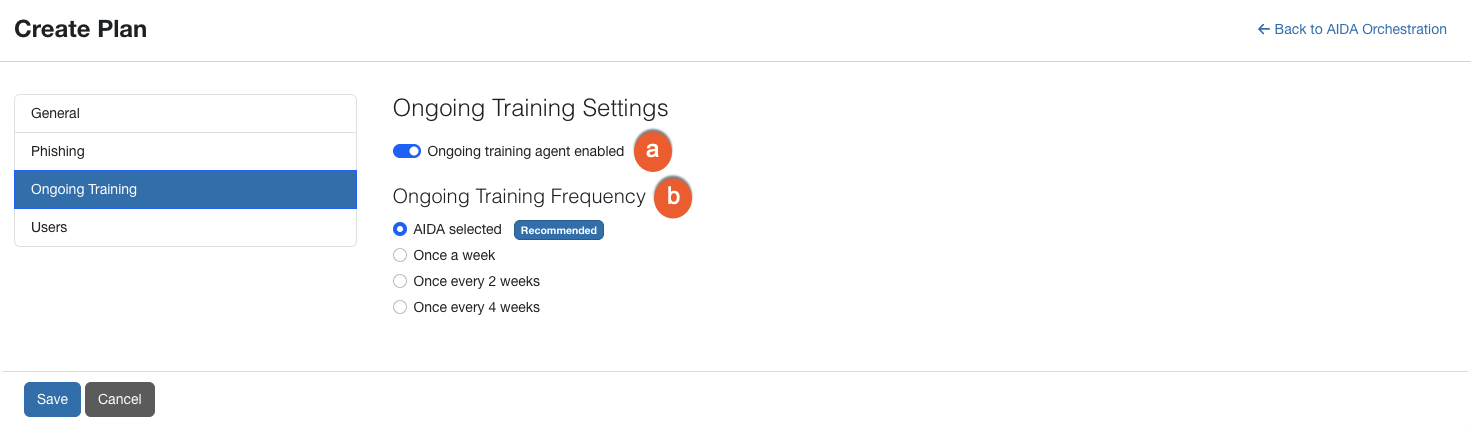
- Ongoing training agent enabled: Use this toggle to enable or disable the ongoing training agent.
- Ongoing Training Frequency: Select how often you would like security awareness training sent to users. We recommend the AIDA selected option, in which AIDA will decide the frequency of training on a user-by-user basis.
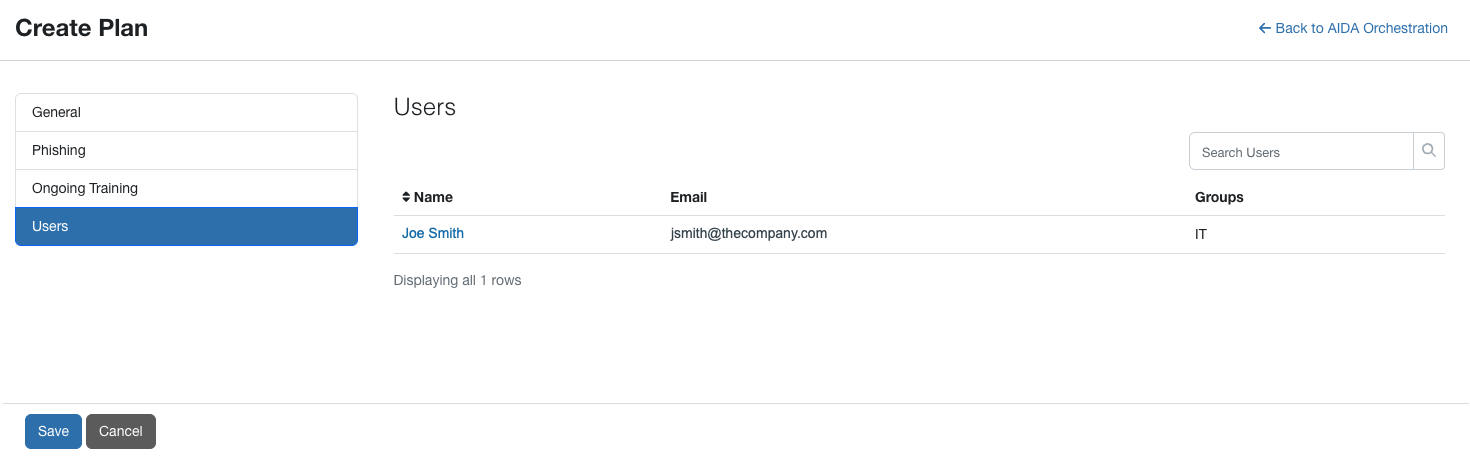
Users
This section lists all user names, email addresses, and the assigned groups that will be included in your plan.
Managing Agents
Log in to your KnowBe4 console and click the Orchestration tab to see the Agents subtab. This subtab contains agent cards that let you quickly view and access information about your active agents.
You can see the status of your ongoing training, phishing, and remedial training agents and navigate directly to their specific settings and activity pages.
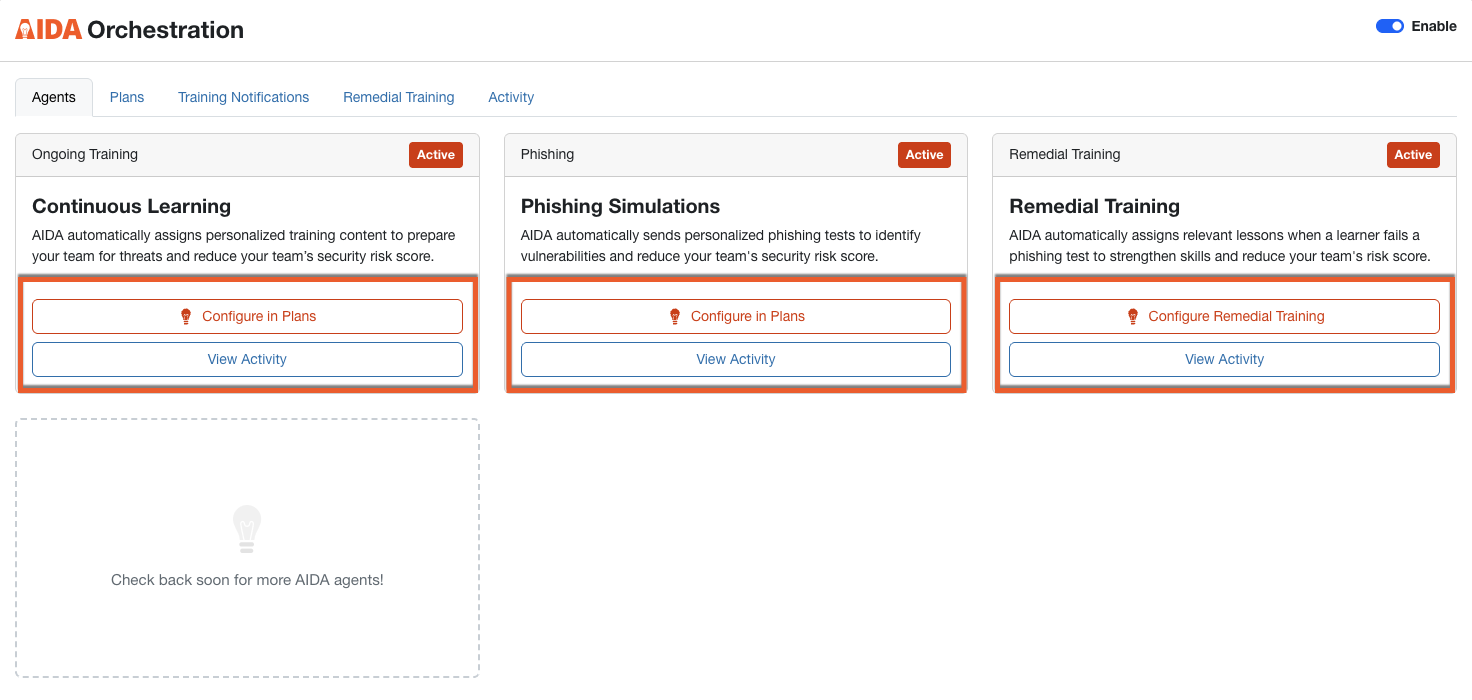
Each card provides a brief overview of how each agent works to protect your team and includes the following navigation buttons:
- Configure in Plans: Click this button to open the Plans subtab, where you can customize how this agent delivers content to your learners.
- View Activity: Click this button to open the specific Activity report for that agent. These reports show real-time data on how your learners are interacting with AIDA’s phishing tests and training.
Managing Plans
Select the Plans subtab to see a list of your plans for AIDA Orchestration.
To learn more about the options on this subtab, see the screenshot and the list below:
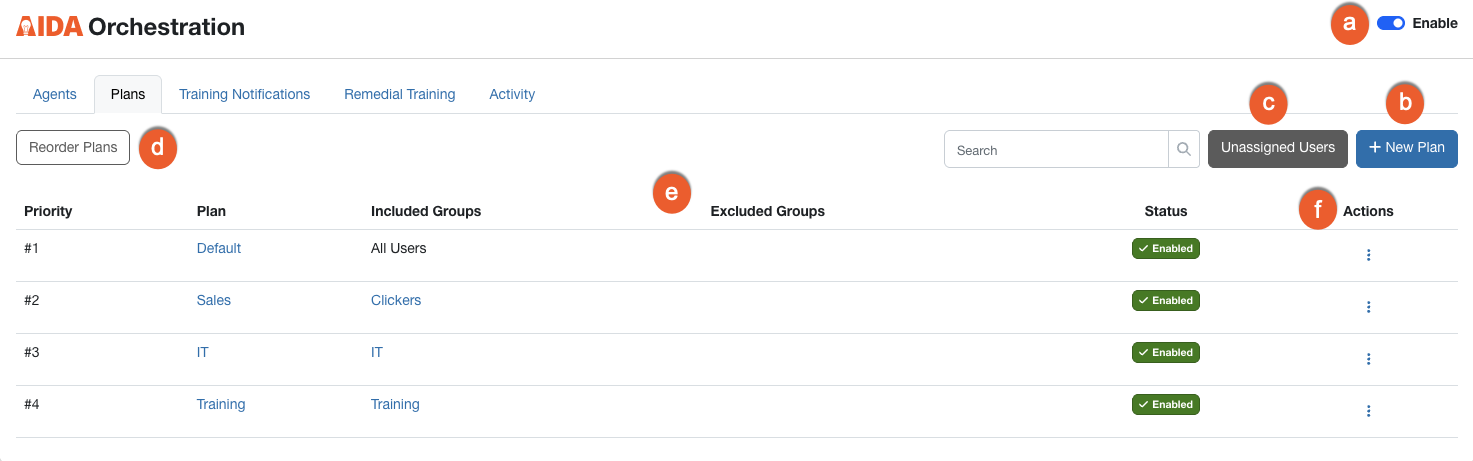
- Enable: Select this toggle to disable or enable AIDA Orchestration.
- + New Plan: Click this button to create a new plan. See the Adding a New Plan section below for more information.
- Unassigned Users: Click this button to view a list of users that have not been assigned to a group.
- Reorder Plans: Click this button to reorder the priority of where the plans are listed.
- Plan list: This section displays a list of the plans, the groups in each plan, and whether the plan is enabled or disabled.
-
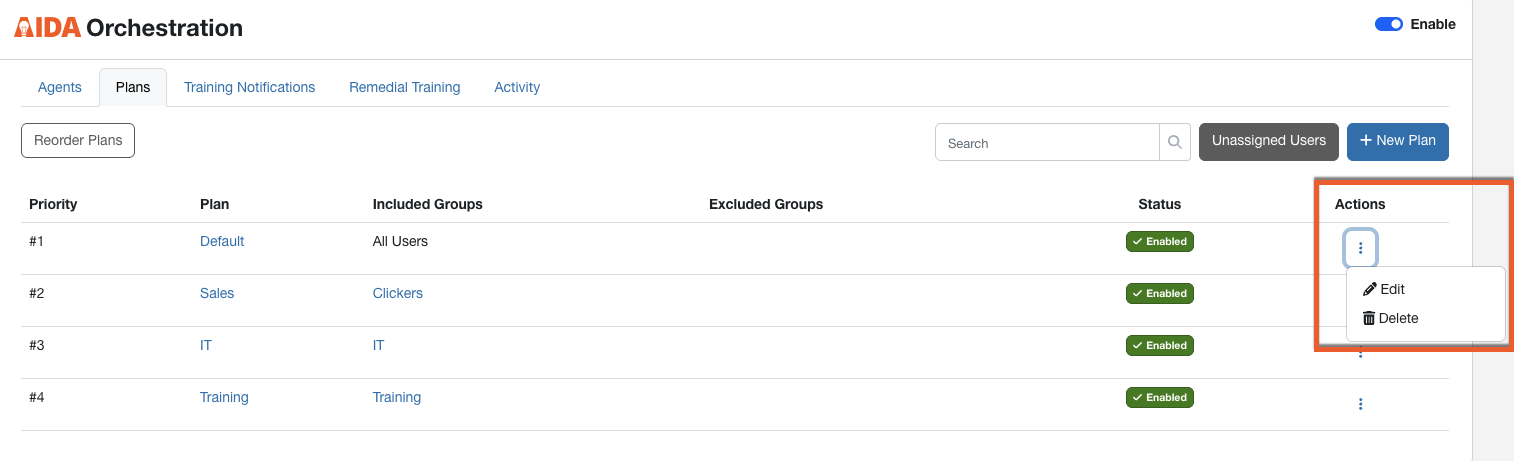
Actions: To enable the Actions column, click the icon on the far right side of the plan. Then, select one of the following actions:
- Edit: Select this option to update the details of the plan.
- Delete: Select this option to delete the plan.
Adding a New Plan
To add a new plan, click the +New Plan button. The Create Plan page opens. It has four sections: General, Phishing, Training, and Users.
General Settings
To learn more about the options in this section, see the screenshot and the list below:
-
Plan Enabled: Select the toggle to enable or disable the plan.
Note: This toggle does not immediately enable the plan. It marks it to be enabled. It will be enabled only after you click the Save button. -
Plan Name: Enter the name of your plan.
Note: Default plans are named "Default" and cannot be changed by the admin. - Groups Included: Select the groups you want to include in the plan. For more information on managing users and groups, see the Users and Groups Management Guide.
- Groups Excluded: Select the groups you would like excluded from the plan.
Phishing Settings
To learn more about the options in this section, see the screenshot and the description below:
- Phishing agent enabled: Use this toggle to enable or disable the phishing agent.
-
Phishing Test Frequency: Select how often you would like phishing tests sent to users. We recommend the AIDA selected option, in which AIDA will decide the frequency of phishing tests on a user-by-user basis.
Note: AIDA schedules each user's phishing test using that user's individual time zone, based on the time zone set on their profile, instead of the account's configured time zone. This ensures tests are delivered during each user's local business hours.
Ongoing Training Settings
To learn more about the options in this section, see the screenshot and the description below:
- Ongoing training agent enabled: Use this toggle to enable or disable the ongoing training agent.
- Ongoing Training Frequency: Select how often you would like security awareness training sent to users. We recommend the AIDA selected option, in which AIDA will decide the frequency of training on a user-by-user basis.
Users
This section lists all user names, email addresses, and the assigned groups that will be included in your plan.
When you are satisfied with your selections in each section, click the Save button at the bottom-left corner of the page.
Editing and Deleting a Plan
To edit a plan, click the icon under Actions, select Edit from the drop-down list, and make any necessary updates. To delete the plan, select Delete.
Adding and Managing Ongoing Training Notifications
To add a training notification, log in to your KnowBe4 console, click the Orchestration tab, and then the + Add Notification button on the Training Notifications subtab. Below is an overview of the notification options. For more details on this section, see our Training Campaign Notifications Overview article.
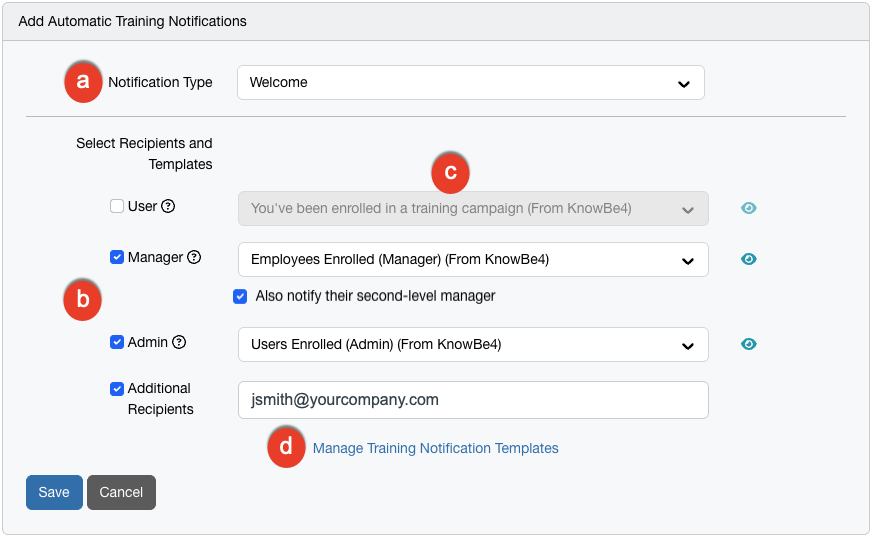
- Notification Type: From this drop-down menu, select when the notification will be sent. You can select from the following options: Welcome, Remind After Enrollment, Remind Before Due Date, Campaign Completion, or Past Due.
-
Select Recipients and Templates: Select the appropriate check box to send notifications to your desired recipients. You can select from the following options: User, Manager, Admin, Additional Recipients, or a combination of these four options.
If you select Manager, you will also have the option to Also notify a second-level manager. The system dynamically identifies the direct manager's supervisor based on the organizational hierarchy in your console. For Additional Recipients, you can enter up to 10 email addresses and use commas to separate each address. For security, every entered email must match an authorized domain already configured in your console.
-
Select Template: From the drop-down menu, select which notification template to send to the recipient type. To preview the selected template, click the icon on the right side of the field.
Note: If you have enabled password-less logins in your account settings, be sure to select the training notifications labeled "(Password-less).' - Manage Training Notification Templates: Click this link to view available notification templates in a new window. We provide several system email templates for you to choose from. You can click this option to customize our notifications or create your own notifications.
When you are satisfied with your notification selections, click the Save button.
Managing Ongoing Training Notifications
To learn more about the options in this section, see the screenshot and the list below:
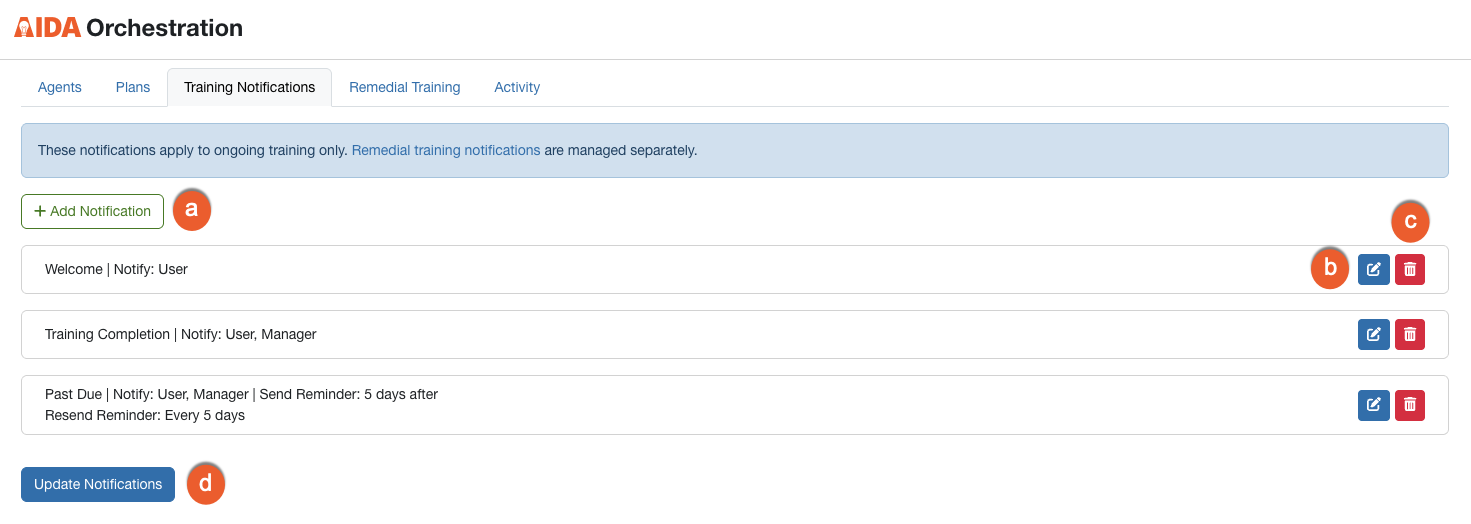
- + Add Notification: Click this button to add another notification.
- Edit: Click this button to edit a notification.
- Delete: Click this button to delete a notification.
- Update Notifications: if you have added, edited, or deleted a notification, click this button to confirm the update to your training notifications.
Managing and Editing Remedial Training
To manage AIDA Remedial Training, log in to your KnowBe4 console and click the Orchestration tab. Click the Remedial Training subtab to see the Remedial Training page.
To learn more about the options in this section, see below:
-
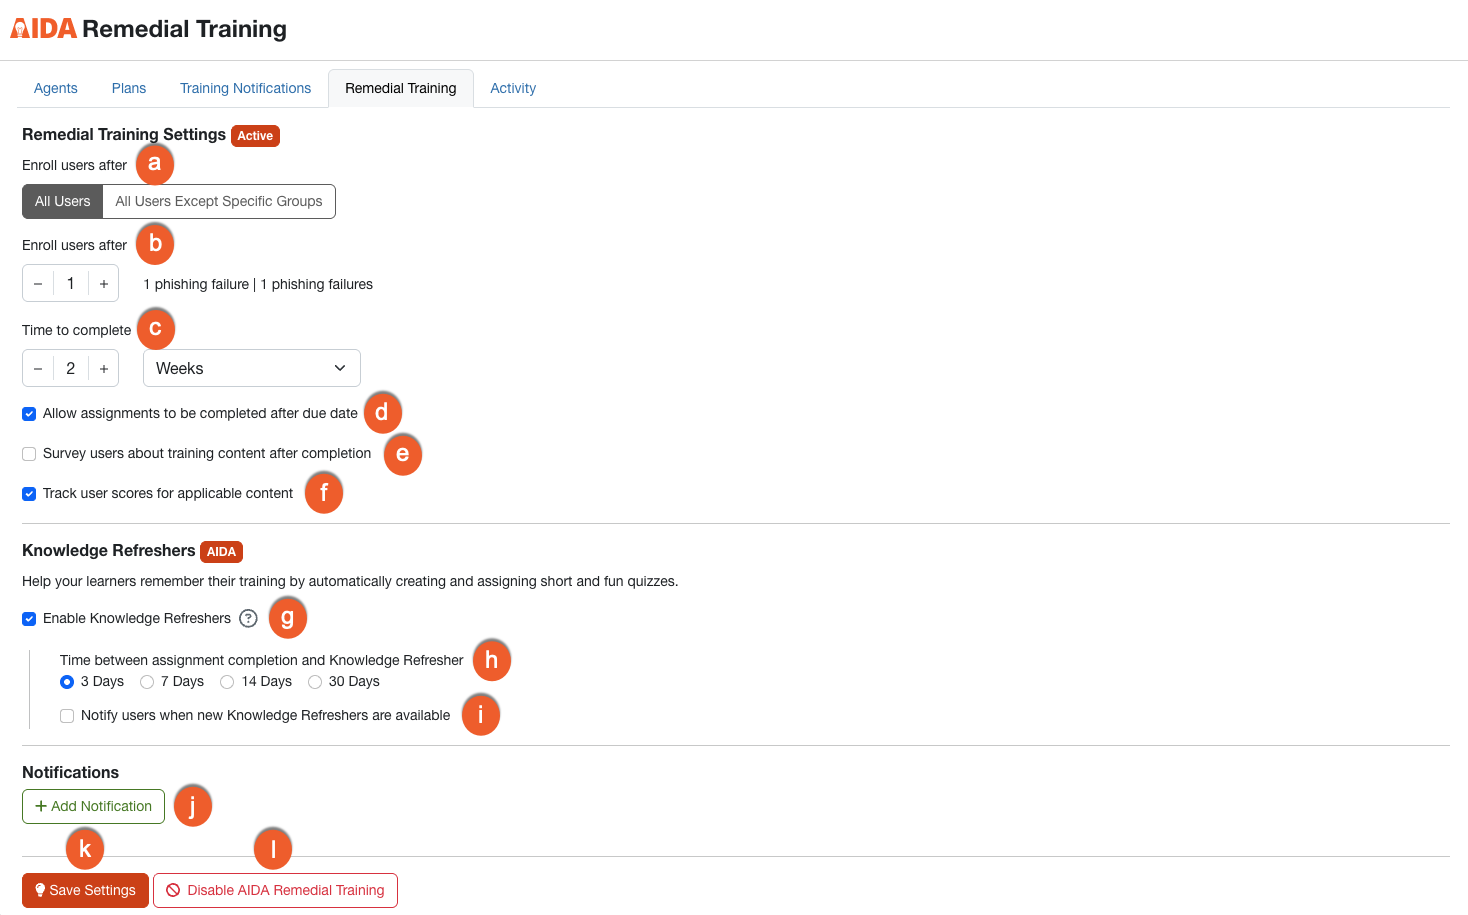
Enroll Users: Select the user groups you would like to enroll:
- All Users: If you select this button, all users in your organization will be assigned remedial training if they fail phishing simulations.
-
All Users Except Specific Groups: If you select this button, all users except selected groups will be assigned remedial training for failing phishing simulations. If you make this selection, the Groups to Exclude drop-down menu will appear. Select the user groups to exclude from the automated remedial training.
Note: You can click View Groups to go to the Manage Groups page to view, edit, or add a group.
- Enroll users after: Set how many phishing simulations users must fail before being enrolled in remedial training.
- Time to complete: Select the number of days, weeks, or months users have to complete their assigned training.
- Allow assignments to be completed after due date: Enable this toggle to allow users to complete their assigned training after the selected due date.
- Survey users about training content after completion: Enable this toggle to provide users with a survey after they have completed their training.
- Track user scores for applicable content: Enable this toggle to track scores.
- Enable Knowledge Refreshers: Select this check box to enable Knowledge Refreshers in the Learner Experience. See our Accessing Knowledge Refreshers in the Learner Experience article for more information.
- Time between assignment completion and Knowledge Refresher: Select the number of days between when a user completes a training module and when the knowledge refresher for that module is available.
- Notify Users when new Knowledge Refreshers are available: Select this check box to notify users when knowledge refreshers are available in their console.
- + Add Notifications: Click this button to add a notification to your training. See the Adding a Remedial Training Notification section below for more information.
- Save Changes: Click this button to save any changes you have made to the remedial training campaign.
- Disable AIDA Remedial Training: Click this button to deactivate the remedial training campaign.
Adding a Remedial Training Notification
You can set up automated notifications while creating or editing a new remedial training. To add a notification for your remedial training, follow the steps below:
- Log in to your KnowBe4 console and click the Orchestration tab.
- Click the Remedial Training subtab to see the Remedial Training page.
- Click + Add Notification.
See below for an overview of the notification options. For more details on this section, see our Training Campaign Notifications Overview article. To learn more about the options in this section, see below:
- Notification Type: From this drop-down menu, select when the notification will be sent. You can select from the following options: Welcome, Remind After Enrollment, Remind Before Due Date, Campaign Completion, or Past Due.
-
Select Recipients and Templates: Select the appropriate check box to send notifications to your desired recipients. You can select from the following options: User, Manager, Admin, Additional Recipients, or a combination of these four options.
If you select Manager, you will also have the option to Also notify a second-level manager. The system dynamically identifies the direct manager's supervisor based on the organizational hierarchy in your console. For Additional Recipients, you can enter up to 10 email addresses and use commas to separate each address. For security, every entered email must match an authorized domain already configured in your console. -
Select Template: From the drop-down menu, select which notification template to send to the recipient type. To preview the selected template, click the icon on the right side of the field.
Note: If you have enabled password-less logins in your account settings, be sure to select the training notifications labeled "(Password-less). - Manage Training Notification Templates: Click this link to view available notification templates in a new window. We provide several system email templates for you to choose from. You can click this option to customize our notifications or create your own notifications.
When you are satisfied with your notification selections, click the Save button. To add another notification, click the + Add Notification button again.
Viewing Orchestration Activity
To learn more about the options in this section, see the screenshot and the list below:
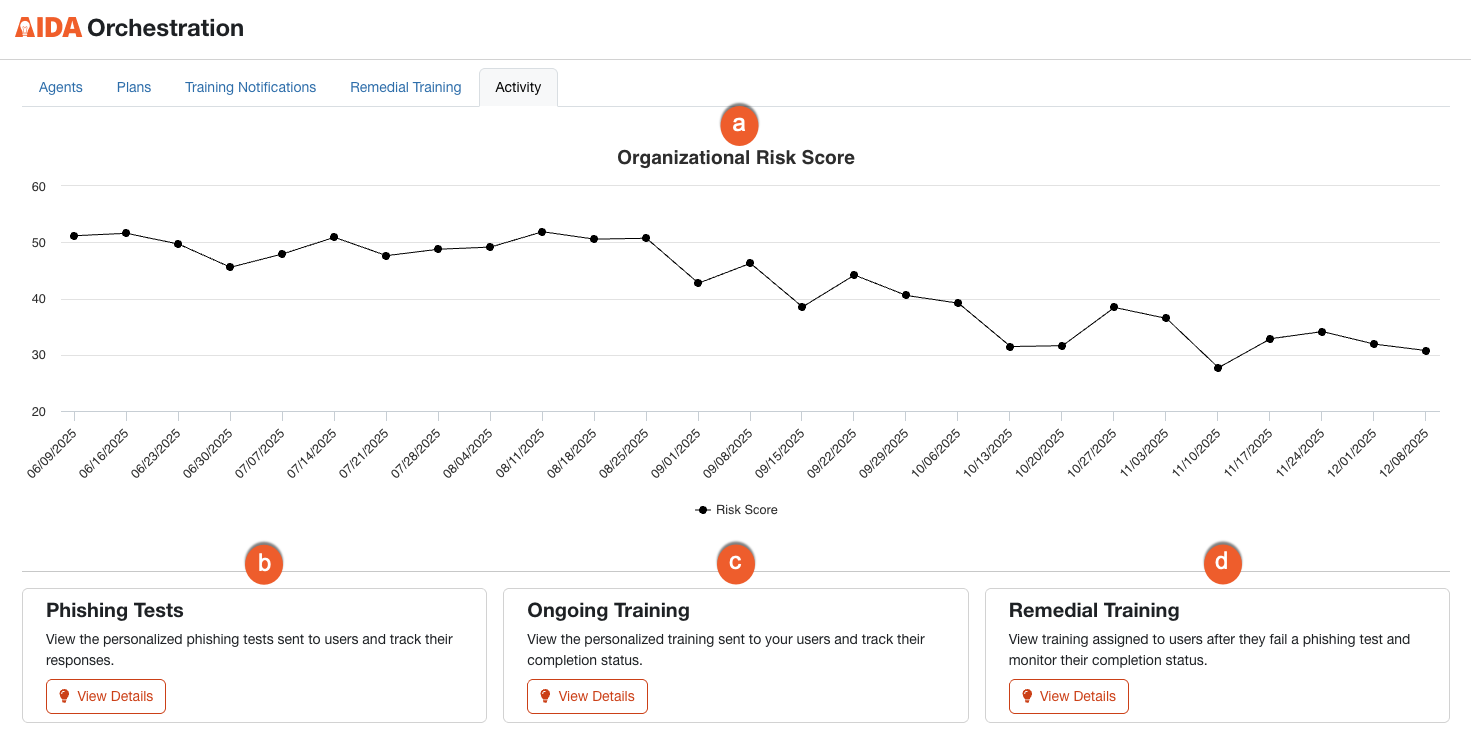
- Organizational Risk Score: Displays your organizations risk score for the past six months.
- Phishing Tests: View personalized phishing tests sent to users and track their responses. For more information, see the Viewing Phishing Activity section.
- Ongoing Training: View and manage personalized training sent to users and track completion status. For more information, see the Viewing Training Activity section.
- Remedial Training: View and manage training assigned after failed phishing tests and track completion status. For more information, see the Remedial Training Activity section.
Viewing Phishing Activity
To learn more about the options in this section, see the screenshot and the list below:
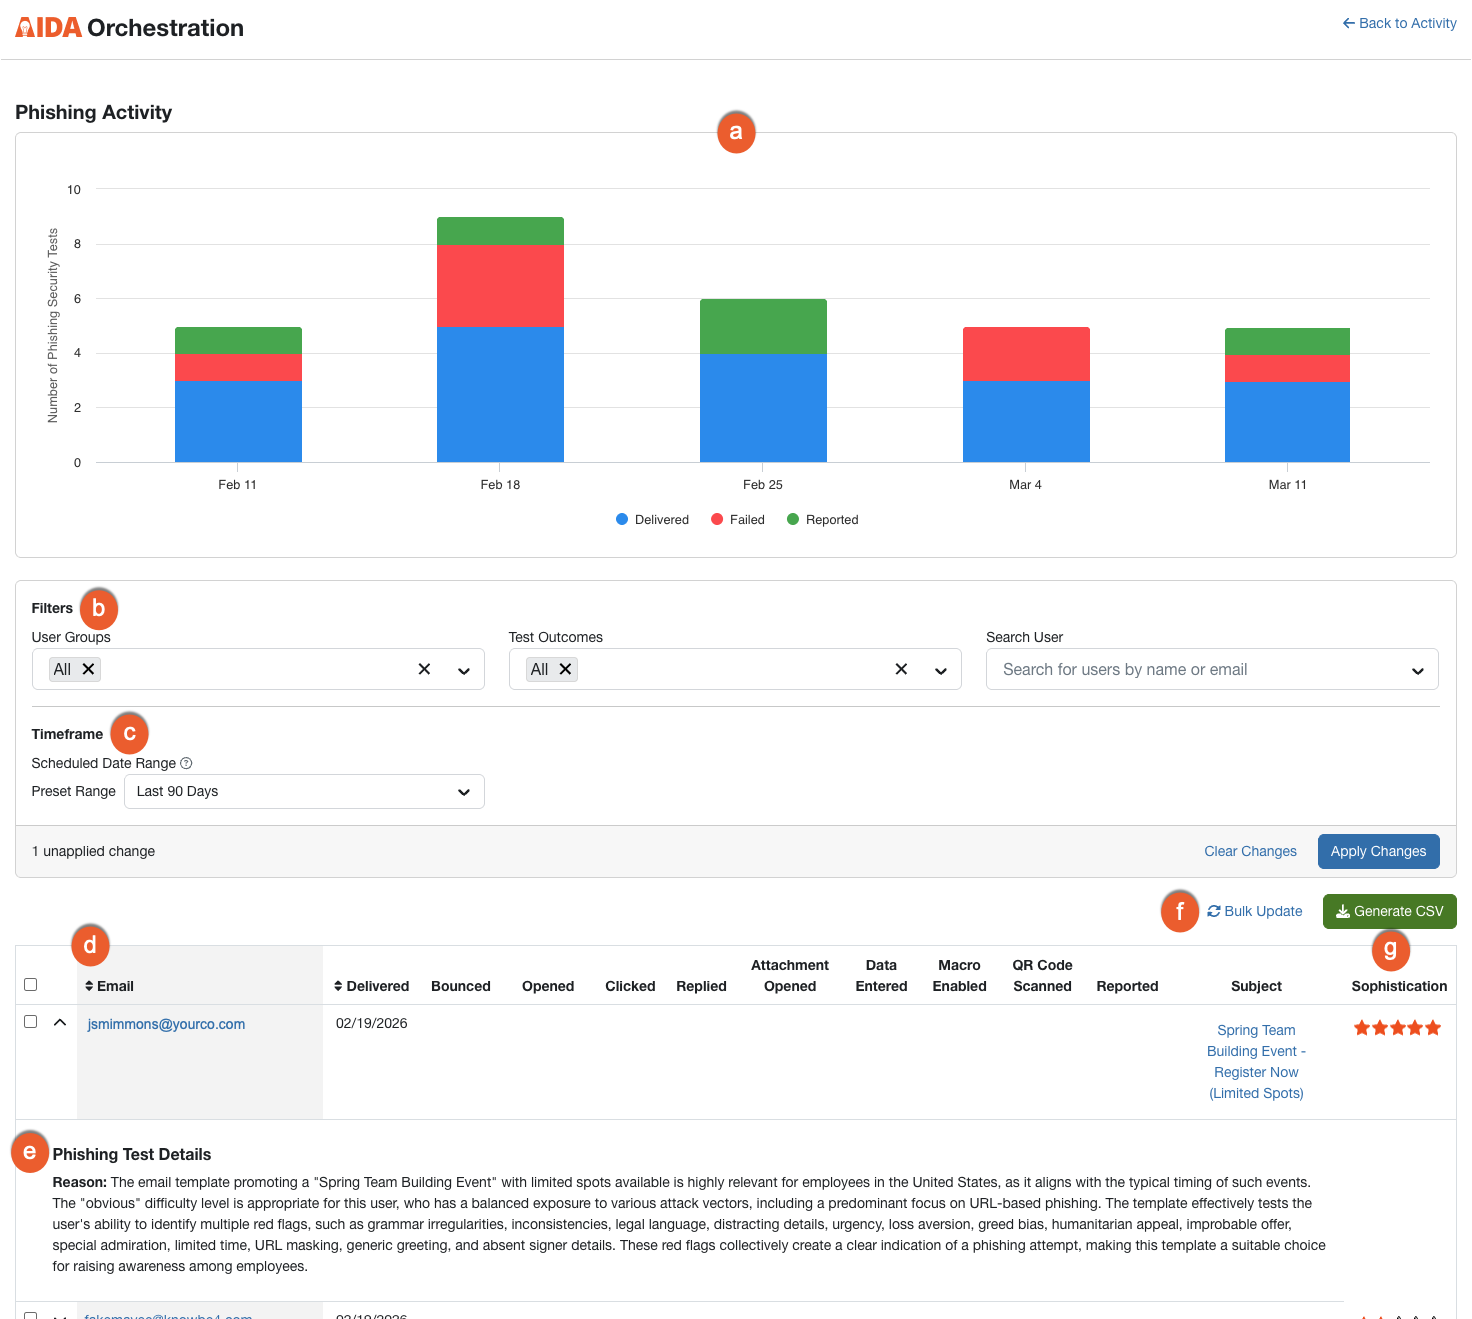
-
Phishing Activity Chart: This bar chart gives you a quick visual summary of your phishing results. It displays the number of tests that were delivered, failed, or reported during your selected timeframe. The chart updates automatically when you change your filters, helping you identify trends and see the impact AIDA is having on your organization's Risk Score.
- Delivered (Blue): The total number of phishing tests sent to your learners.
- Failed (Red): The number of learners who failed a test by performing a negative action, such as clicking a link.
- Reported (Green): The number of learners who correctly identified and reported the test using the Phish Alert Button (PAB).
-
Filters: The User Groups and Test Outcomes filters are enabled by default. Select one of the following filter options.
- User Groups: From this drop-down menu, select which results to display: all user groups or specific user groups. The default selection is All.
- Test Outcomes: select User Failed to view users who failed phishing tests, User Reported to view users who reported phishing emails, or Bounced for emails that fail to be delivered. The default selection is All.
- Search User: From this drop-down menu, select or search which user’s results to display.
- Timeframe: Use this drop-down menu to filter activity within the selected range based on when phishing tests were scheduled.
- Arrow icon: Click this icon in the column headers to sort the results in the table.
- Phishing Test Details: Click the expand icon next to a user's email to see the reasoning behind the phishing test that was sent to the user.
- Bulk Update: Click this button to open the Bulk Update Users window. You can upload a CSV file to remove phishing failures or add reported email events for multiple users at once. This feature allows you to quickly correct data and ensure your organization’s Risk Score remains accurate.
- Generate CSV: Click this button to generate a CSV file version of the report table.
Viewing Training Activity
To learn more about the options in this section, see the screenshot and the list below:
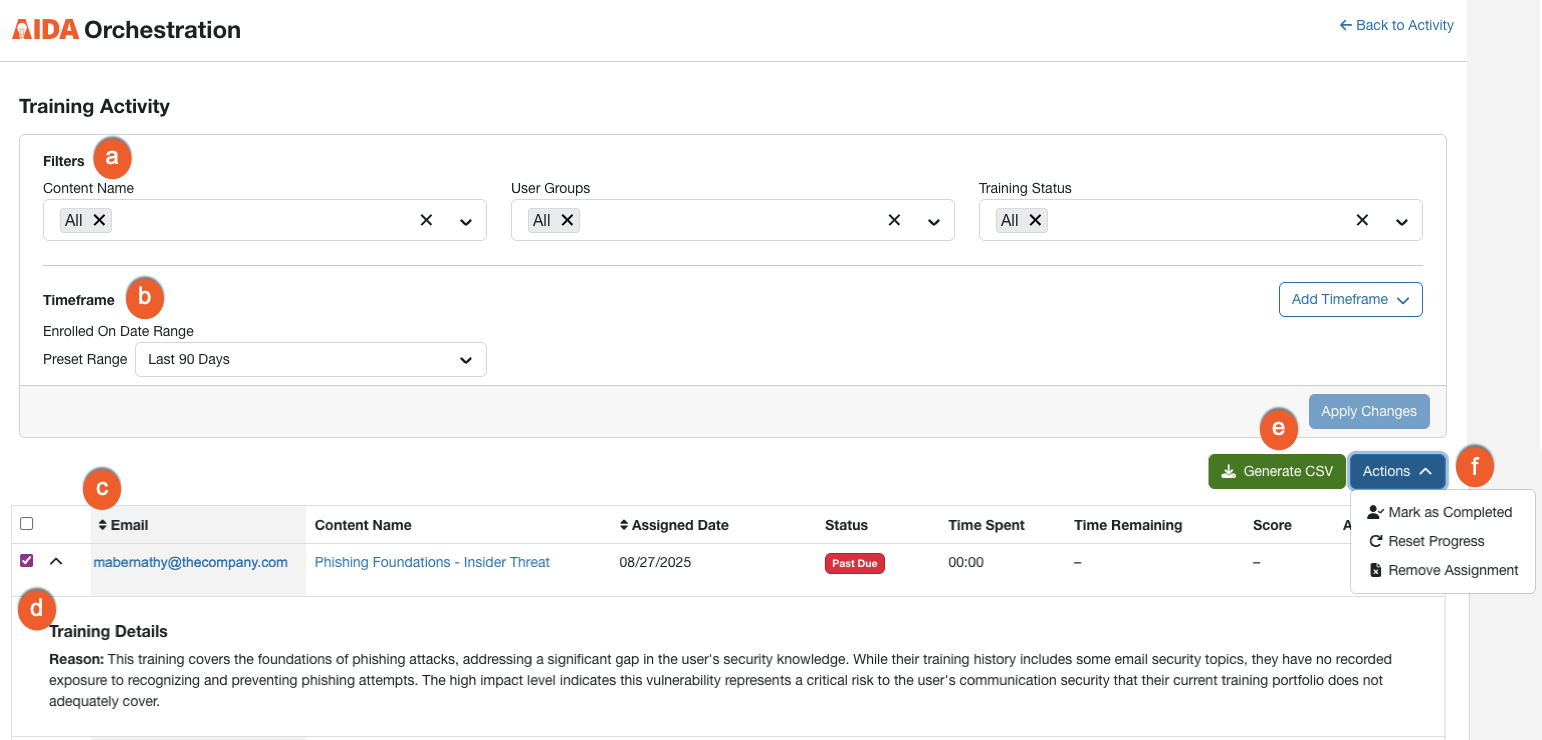
-
Filters: The Content Name, User groups, and Training Status filters are enabled by default. Select one of the following filter options.
- Content Name: From this drop-down menu, select the specific piece of content for which to filter your results. The default selection is All.
- User Groups: From this drop-down menu, select which results to display: all user groups or specific user groups. The default selection is All.
- Training Status: Select Not Started to view users who have not started their training, Completed to view users who completed their training, In Progress for users who are still taking their training, or Past Due for users who have passed the deadline for completing their training. The default selection is All.
- Search User: From this drop-down menu, select or search which user’s results to display.
- Timeframe: Use this drop-down menu to filter activity within the selected range based on when users were enrolled in training.
- Arrow icon: Click this icon in the column headers to sort the table results.
- Training Details: Click the expand icon next to a user’s email to see the details on the training that was assigned.
- Generate CSV: Click this button to generate a CSV file version of the report table.
-
Actions: To enable the Actions button, select one or more check boxes next to the user name. Then, select one of the following actions:
- Send Notification: Manually send the user a notification regarding the assigned content. For more information, see the Adding a Manual Training Notification section below.
- Mark as Completed: Mark the user's assigned content as completed.
- Reset Progress: Reset any progress the user made on the assigned content.
- Remove Assignment: Remove the assigned remedial training module for the user.
Adding a Manual Training Notification
To send a manual training notification, click the Actions menu, then select Send Notification. The manual notification page opens. To learn more about the options in this section, see below:
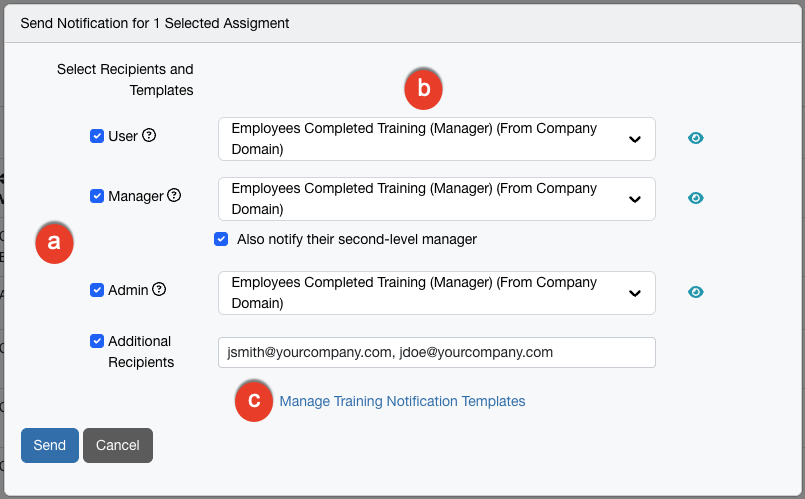
-
Select Recipients and Templates: Select the appropriate check box to send notifications to your desired recipients. You can select from the following options: User, Manager, Admin, Additional Recipients, or a combination of these four options.
If you select Manager, you will also have the option to Also notify a second-level manager. The system dynamically identifies the direct manager's supervisor based on the organizational hierarchy in your console. For Additional Recipients, you can enter up to 10 email addresses and use commas to separate each address. For security, every entered email must match an authorized domain already configured in your console. - Select Template: From the drop-down menu, select which notification template to send to the recipient type. To preview the selected template, click the icon on the right side of the field. in your console.
- Manage Training Notification Templates: Click this link to view available notification templates in a new window. We provide several system email templates for you to choose from. You can click this option to customize our notifications or create your own notifications.
Viewing Remedial Training Activity
To learn more about the options in this section, see below:
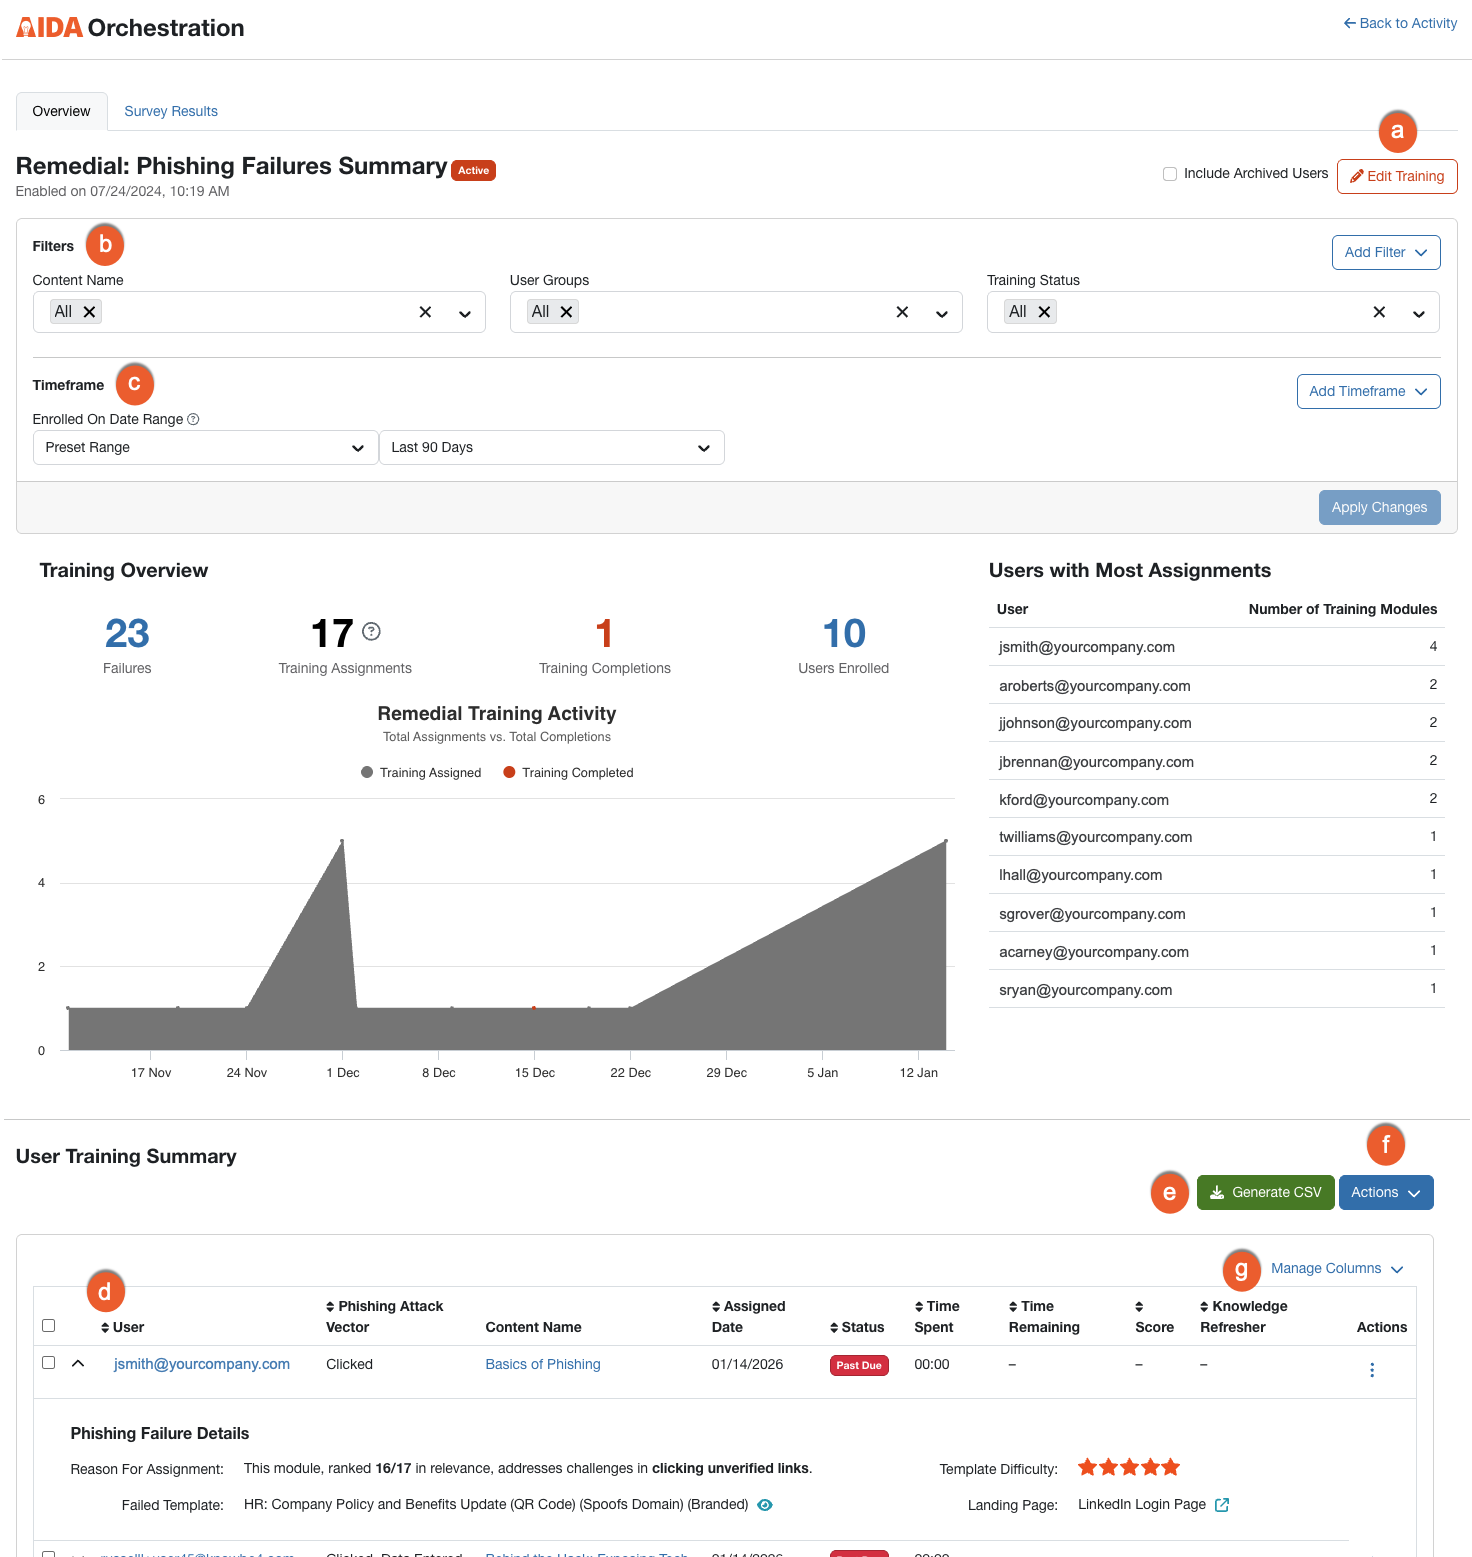
- Edit Training: Click this button to go to the Remedial: Phishing Failures settings page.
-
Filters: The Content Name, User Groups, and Training Status filters are enabled by default. Select one of the following options.
- Content Name: From this drop-down menu, select the specific piece of content for which to filter your results. The default selection is All.
- User Groups: From this drop-down menu, select which results to display: all user groups or specific user groups. The default selection is All.
- Training Status: Select Not Started to view users who have not started their training, Completed to view users who completed their training, In Progress for users who are still taking their training, or Past Due for users who have passed the deadline for completing their training. The default selection is All.
- Timeframe: Use this drop-down menu to change the time period for data displayed in the chart.
- Arrow icon: Click this icon in the column headers to sort the results in the table.
- Generate CSV: Click this button to generate a CSV file version of the report table.
-
Actions: To enable the Actions button, select one or more check boxes next to the user name. Then, select one of the following actions:
- Send Notification: Manually send the user a notification regarding the assigned content. For more information, see the Adding a Manual Remedial Training Notification section below.
- Mark as Completed: Mark the user's assigned content as completed.
- Reset Progress: Reset any progress the user made on the assigned content.
- Remove Assignment: Remove the assigned remedial training module for the user.
- Manage Columns: Click this text to display a drop-down menu that contains a list of available columns. From the drop-down menu, you can deselect the default columns that are displayed in the table.
Adding a Manual Remedial Training Notification
To send a manual training notification, click the Actions menu, then select Send Notification. The manual notification page opens. To learn more about the options in this section, see below:
-
Select Recipients and Templates: Select the appropriate check box to send notifications to your desired recipients. You can select from the following options: User, Manager, Admin, Additional Recipients, or a combination of these four options.
If you select Manager, you will also have the option to Also notify a second-level manager. The system dynamically identifies the direct manager's supervisor based on the organizational hierarchy in your console. For Additional Recipients, you can enter up to 10 email addresses and use commas to separate each address. For security, every entered email must match an authorized domain already configured in your console. - Select Template: From the drop-down menu, select which notification template to send to the recipient type. To preview the selected template, click the icon on the right side of the field. in your console.
- Manage Training Notification Templates: Click this link to view available notification templates in a new window. We provide several system email templates for you to choose from. You can click this option to customize our notifications or create your own notifications.