The Gmail PAB add-on allows your users to report suspicious emails from their Gmail accounts. When your users click the PAB to report an email, they can help provide your IT team with an early warning about potential threats.
In this article, you’ll learn how to install and activate the Gmail PAB add-on. For general information about the PAB, see our Phish Alert Button (PAB) Product Manual.
How to Install the Gmail PAB Add-On
When you install the Gmail PAB add-on, you have the option to install the PAB for your entire domain or for specific organizational units (OUs) in your organization.
To install the Gmail PAB add-on using one of these methods, see the subsections below:
- Installing the PAB for Your Entire Domain
- Installing the PAB for Specific Organizational Units (OUs)
Installing the PAB for Your Entire Domain
- Log in to your Google Workspace Admin account.
-
Click Apps > Google Workspace Marketplace apps > Apps list.
Important:Please keep the Apps page open during the installation process. You will need to return to this page for step 9 below.
- Click here to open the Phish-Alert Add-On page.
-
Click the Install button.

- In the permissions pop-up window that opens, click Continue.
-
Select the check box to agree to the terms of service.
Note:Since this installation is for your entire domain, these permissions will apply to all users in your domain. - In the pop-up window that opens, click Done.
- Refresh the Apps page in your Google Workspace admin account.
-
Click Phish Alert Add-on.

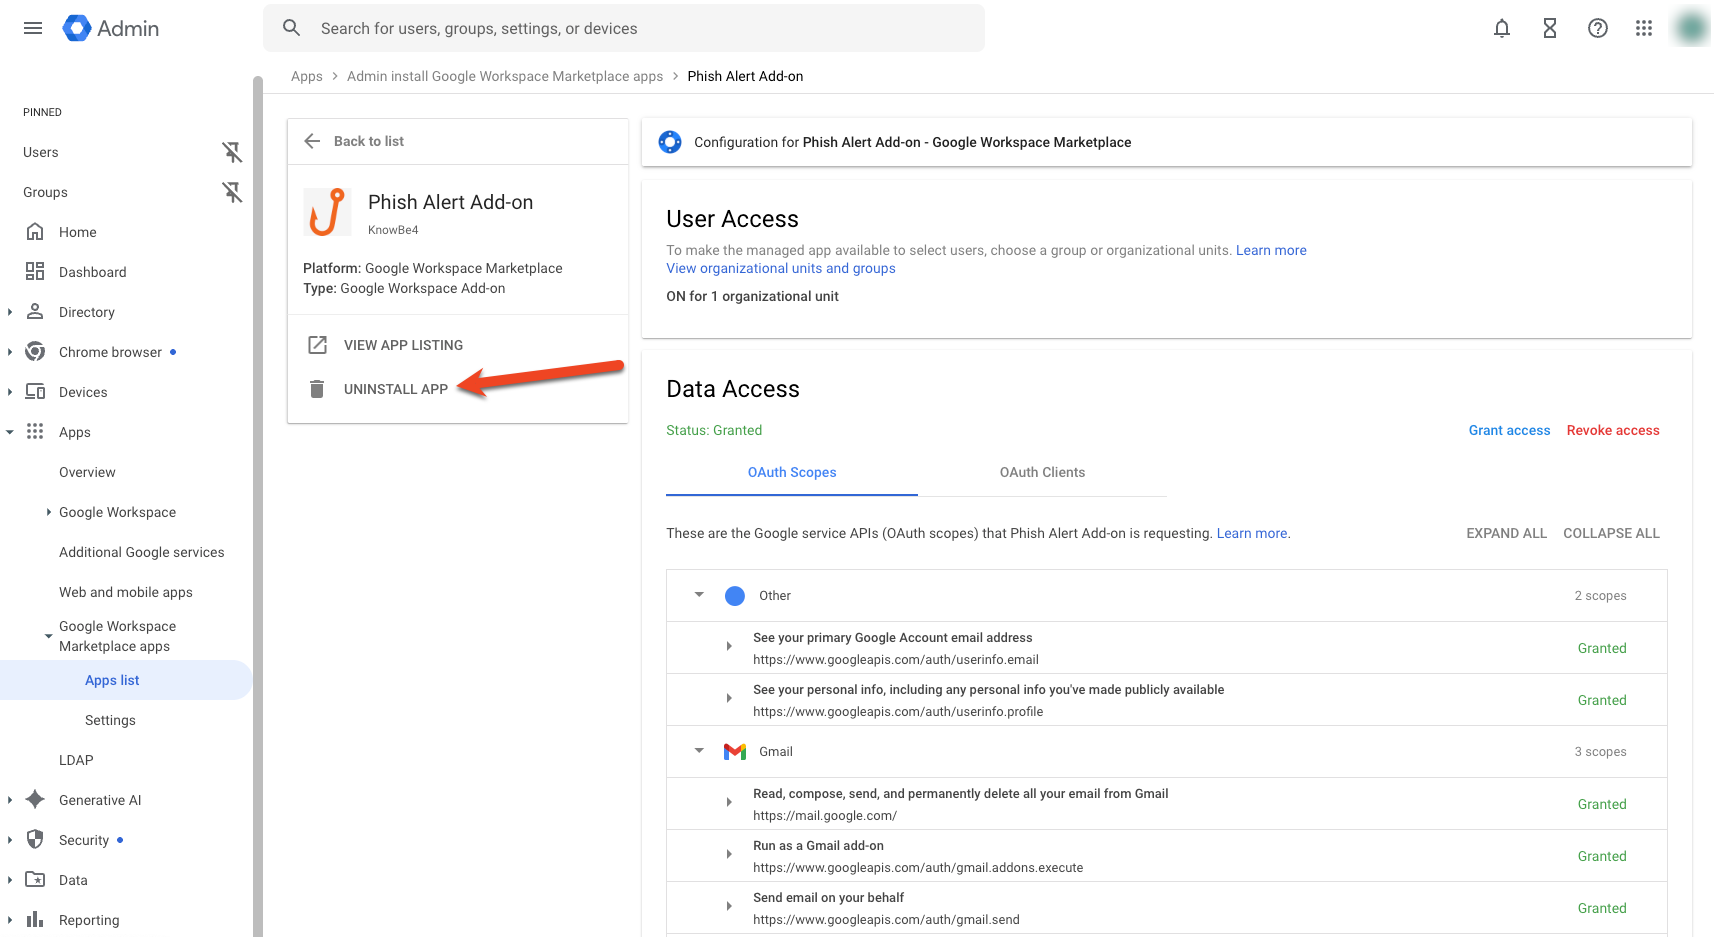
- In the Phish Alert Add-on page that opens, navigate to the Data Access section.
-
Click Grant access.

After you have installed the PAB add-on, your users will see the PAB in the toolbar on the right side of the page. For more information about how your users will see the PAB, see the User Experience section below.
Installing the PAB for Specific Organizational Units (OUs)
You also have the option to install the PAB for specific organizational units (OUs). To install the PAB for specific OUs, follow the steps below:
- Log in to your Google Workspace admin account.
-
Navigate to Apps > Google Workspace Marketplace apps > Apps list.
Important:Please keep the Apps page open during the installation process. You will need to return to this page for step 9 below. - Click here to open the Phish Alert Add-on page.
-
Click on the Install button.
-
In the permissions pop-up window that opens, click Continue.

- From the Turn ON for drop-down menu, select the specific OU or OUs that you would like to install the PAB for.
- Select the check box to agree to the terms of service.
-
Click Allow.

- Click Save.
How to Activate the Gmail PAB Add-on
Once you have installed the Gmail PAB add-on, you will need to activate the PAB. To activate the PAB, you can either enable the automatic activation feature or send activation emails to your users using Magic Mail.
To activate the PAB using the automatic activation or Magic Mail, see the subsections below:
Enabling the Automatic Activation Feature
You can use the automatic activation feature to create a default instance of the PAB for all Google Workspace users in your organization. With this feature, your users will not have to manually activate their PABs. However, for this feature to work, the user's email address must exist in your KSAT console.
The automatic activation feature is disabled by default. To learn how to enable this feature, see our Use Automatic Activation for the Gmail Add-on Phish Alert Button (PAB) article.
Sending Activation Emails Using Magic Mail
You have the option to send activation emails to your users using Magic Mail.
Activating the Gmail PAB add-on in the instance will overwrite your previous PAB license.
To send the activation emails to your users using Magic Mail, follow the steps below:
- Log in to your KSAT console.
- Click your email address at the top-right corner of the page and select Account Settings.
- Navigate to Account Integrations > Phish Alert.
-
At the bottom of the Phish Alert section, click the Send Gmail PAB Add-on Magic Mail link.

- On the Send Gmail Add-on Magic Mail page, enter the email addresses of the users who need activation emails. You can either manually enter your users’ email addresses or upload a CSV file with their addresses. For more information, see below:
- To manually enter your users’ email addresses, click the Quick Email Input button and enter the email addresses in the text field.
-
To upload a CSV file with your users’ email addresses, click the CSV Email Input button and upload your CSV file.

- Once you've added your users' email addresses, click Send Activation Email.
Once your users receive the activation email, they will need to open the email and click the Phish Alert hook icon on the right side of the page. When they click the hook icon, the PAB add-on will be activated in their accounts. The activation email will also include these instructions to assist your users.
If the PAB does not activate properly, your users can also use the manual registration key. This registration key will be included in your users’ activation emails, and you can also find it on the Send Activation Email screen. To manually activate the PAB, your users can enter this registration key in the text box above the Activate Phish Alert Button Now button.
The activation email will also include instructions on how to register the PAB add-on with a mobile device. Your users will need to open the activation email on their mobile device and follow the instructions.
How to Uninstall the Gmail PAB Add-on
If you would like to uninstall the Gmail PAB add-on, follow the steps below:
- From your Google Workspace admin account, navigate to Settings > Google Admin > Apps > Google Workspace Marketplace apps.
- Click Apps list.
- Find and click the Phish Alert Add-on app.
-
Click Uninstall App.
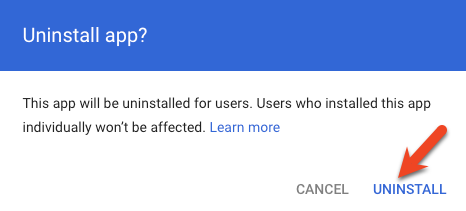
-
Confirm that you would like to uninstall the PAB by clicking Uninstall again.
- To confirm that the PAB has been uninstalled, go back to your inbox and refresh the page.
User Experience
The Gmail PAB add-on will work in your users’ browser inboxes and mobile inboxes. However, your users can’t click the PAB add-on when opening an email in their Spam or Trash folders. Emails in the Spam or Trash folders will need to be moved to the inbox before they can be reported.
To learn how the PAB will display for your users, see the How Do I Use the PAB? section of our Gmail Add-on Phish Alert Button (PAB) Guide article.