The Vendor Risk Management module of your KCM GRC platform lets you centralize your third-party risk management processes. You can prequalify risk, assess your vendors, and conduct remediation efforts all in one platform. The Vendor Risk Management module is available to KCM GRC's Platinum subscriptions.
This article provides an overview of the workflows and areas that you can use in the Vendor Risk Management module. See the sections below to learn how to create questionnaires, create vendor profiles, send questionnaires, and work with issues.
Before You Begin
Before you begin using your Vendor Risk Management module, below are a few things you might consider to better implement this platform into your third-party risk management program.
-
What types of KCM GRC user roles will I create for users working in the Vendor Risk Management module?
- Account Administrators can assign the Vendor Administrator user role to users so they can work in all areas of the Vendor Risk Management module. For more information, see our User Role Guide.
- Vendor Administrators and Account Administrators can create user accounts for the individuals completing questionnaires on behalf of the vendor or third-party organization. You will need to assign the Vendor User user role to these user accounts. For more information, see our User Role Guide.
-
What kinds of questionnaires will I need for the different types of third-party affiliates working with my organization?
- KCM GRC offers industry-standard templates to build questionnaires. You can also create custom questions for your vendor assessments. For more information, see our How to Create and Configure Questionnaires article.
Note: In addition to using our questionnaire templates, you should check your organization's requirements and any frameworks that your organization must follow to determine what types of questions you need to ask your vendors.
- KCM GRC offers industry-standard templates to build questionnaires. You can also create custom questions for your vendor assessments. For more information, see our How to Create and Configure Questionnaires article.
-
What is the best workflow, or order of tasks for onboarding with my Vendor Risk Management module?
- The jump links at the top of this article are listed in the order of the best practice workflow we recommend that you use to implement the Vendor Risk Management module into your risk management program.
Creating Questionnaires
Based on your organization's requirements and required frameworks, you can create your vendor questionnaires from the Questionnaires section of your console. You can use the questionnaire builder to create fully-custom questionnaires, add questions from the industry-standard templates provided, or create questionnaires with custom questions and questions from the templates.
For details, see our How to Create and Configure Questionnaires article.
Configuring and Finalizing Questionnaires
Once you've added questions to your questionnaire, you will configure points for each answer in order to "score" your vendor on their assessment responses. After you assign points to each question, you will mark the questionnaire as "configured", then it must be reviewed once more before it can be sent.
For details, see our How to Create and Configure Questionnaires article.
Adding Vendor Profiles to your Account
Before you begin sending questionnaires to your vendors, you will need to create vendor profiles under the Vendors area of the Vendor Risk Management module. Using vendor profiles can help you keep track of the level of risk associated with the third party. From vendor profiles, you can send questionnaire assessments and work through any issues that you create from the vendors' questionnaire responses.
For details, see the Adding New Vendor Profiles section of our How to Create and Manage Vendor Profiles article.
Adding Vendor User Accounts
Once you are ready to send a questionnaire to a vendor, you can create a user account for the user so they can complete the questionnaire. This user will log in to a separate vendor portal associated with your account. The vendor portal is for answering questionnaires and addressing issues resulting from the questionnaire responses.
For details, see the Adding User Accounts for Vendor Contacts section of our How to Create and Manage Vendor Profiles article.
Sending Questionnaires
Once you have finalized your questionnaire and have added a user account for your vendor who will answer your questionnaire, you can send the questionnaire directly from the vendor's profile.
For details, see our How to Send Questionnaires to Vendors article.
Vendor Experience
This section provides an overview of the vendor's experience when completing your questionnaire. If you'd like to share an instructional guide with your vendors, see our How to Complete Questionnaires and Respond to Issues: A Guide for Vendor Users article.
Once you've sent the questionnaire, the questionnaire assessee will receive an email (click to view example) requesting them to complete the questionnaire. Once they've activated their Vendor User account, they'll log in and see the Vendor Portal Dashboard, as shown below.


From the Questionnaires portion of the screen, the assessee will click the link under the Name or Template columns (shown above) to begin the questionnaire(s) you've assigned.
The questionnaire assessee will answer the questions by selecting one or more checkboxes, selecting a multiple choice answer, or by typing a response in the Answer field–depending on which answer type(s), or template(s) you used for your questionnaire. Then, they must use the Save button to finalize each answer.
The assessee is also able to add comments or upload supporting files for each question by using the Add Comment or Attach File buttons, shown above.
The file attachment limitations for individual questions are as follows:
- File Size: Maximum of 5 MB (for each question)
- File Name: Maximum of 250 characters (including the file extension)
- File Types: See the Do the files that vendors can upload to questionnaires need to meet any specific requirements? question in our Vendor Risk Management Module Frequently Asked Questions (FAQ) article for details
Once the user has finished the questionnaire, they'll click the Finalize Questionnaire button at the bottom of the page. You'll receive an email notification and the questionnaire will be available for review in your account.
Reviewing Questionnaires and Creating Issues
Once your vendor contact has completed the questionnaire assessment, the KCM GRC Vendor Owner (click to view example) will receive an email notification. You can review questionnaires from the applicable vendor profile, under the Vendors tab of your console.
If the vendor provided an undesirable answer to one or more questions, you can create an "issue" to request additional information or to further discuss your concern with the vendor.

For more information about reviewing questionnaires and creating or responding to issues, see our How to Review Questionnaires and Create Issues article. Alternatively, you can watch the following videos:
Responding to Issues (Vendor Users)
This section provides an overview of the vendor's experience when responding to the issues you've created as a result of their questionnaire responses. If you'd like to share an instructional guide with your vendors, see our How to Complete Questionnaires and Respond to Issues: A Guide for Vendor Users article.
When you create an issue in response to the vendor's answer to a question, the vendor receives an email informing them of the issue. See the steps below for an explanation of how the vendor will address the issues you've created.
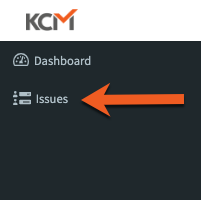
- The vendor logs in to their vendor portal to respond to the questionnaire issues. The vendor can see the open issues from both their Vendor Dashboard or by clicking Issues from the navigation panel on the left-hand side of their account, as shown below.
- The vendor clicks an Issue Description to open the issue, as shown below.

- The vendor enters a response to your issue into the Response field and clicks the Save Response button to send the response to your account.
Closing Issues
Once you're satisfied with the vendor's response, you can close the questionnaire issue. See our How to Review Questionnaires and Create Issues article for instructions.