If you use Microsoft Entra Domain Services (formally Azure Active Directory Domain Services), you can configure ADI to sync your users and groups to your KSAT console. Configuring ADI with Microsoft Entra Domain Services will allow you to manage all your users in one platform.
Prerequisites
Before you can use ADI with Microsoft Entra Domain Services, make sure you meet the following prerequisites:
- Microsoft Entra Domain Services is enabled in your Microsoft Entra portal. For more information on enabling Microsoft Entra Domain Services, see Microsoft’s Create and configure an Azure Active Directory Domain Services managed domain article.
- Microsoft Entra ID LDAPS is enabled in your Microsoft Entra portal. For more information on configuring your LDAPS, see Microsoft’s Configure secure LDAP (LDAPS) for an Azure AD Domain Services managed domain article.
Setting up ADI with Microsoft Entra Domain Services
There are two different methods for setting up ADI with Microsoft Entra Domain Services. You can either install ADI on an internal machine or an external machine. Internal machines are machines that are on your network. External machines are machines that are outside of your network.
To set up ADI using either of these methods, click the method that you would like to use in the drop-down menu below:
-
To install ADI on an internal machine, follow the steps below:
- Run the Active Directory sync tool. This is the ADISyncSetup.exe file that you downloaded from your KSAT Account Settings. For more information, see the Installation and Configuration section of our Active Directory Integration (ADI) Configuration Guide.
-
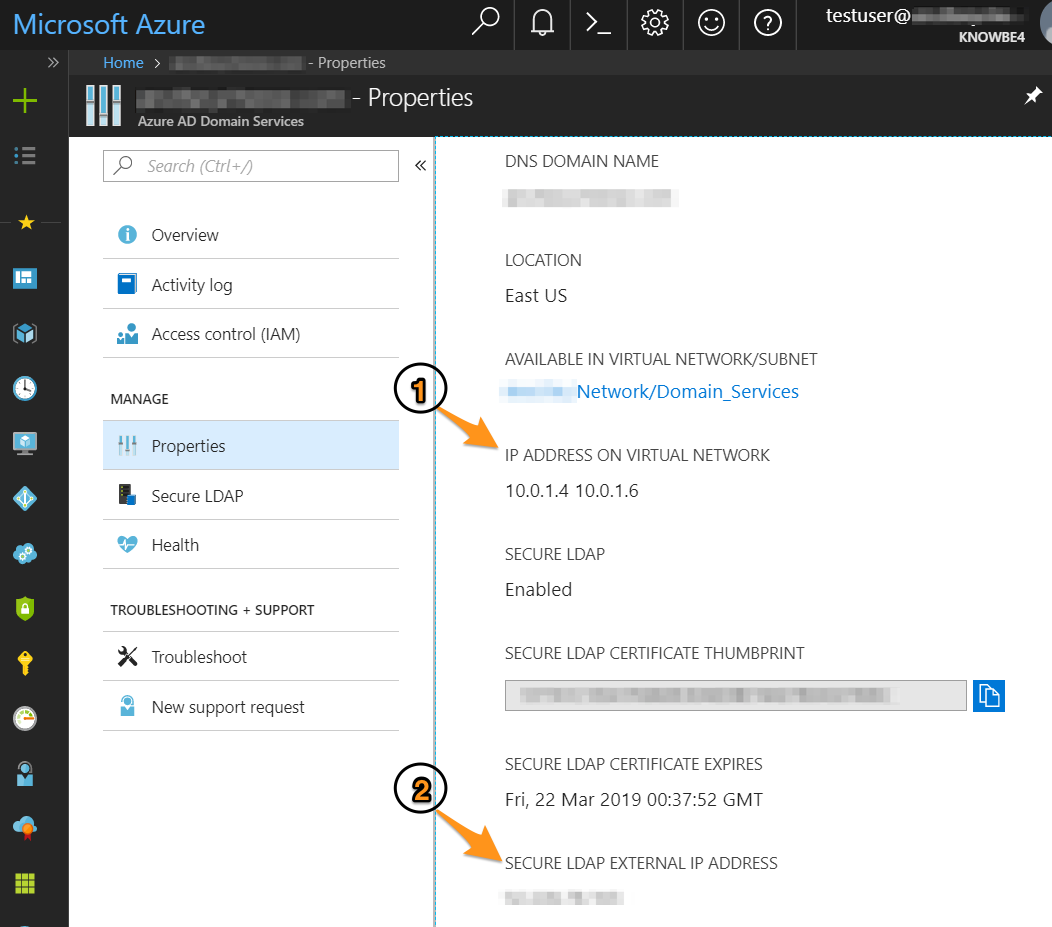
Fill out the fields in the command prompt window that opens. When you’re prompted to enter your Active Directory Hostname or IP address, enter the IP Address on Virtual Network from the Azure Properties section of your Microsoft Entra account. For an example of the IP Address on Virtual Network in Microsoft Entra, see number 1 in the screenshot below:
- In the Enable SSL section of the command prompt window, enter true.
- After you have updated the fields in the command prompt window, press the Enter key on your keyboard to close the window.
-
To install ADI on an external machine, follow the steps below:
- Run the Active Directory sync tool. This is the ADISyncSetup.exe file that you downloaded from your KSAT Account Settings. For more information, see the Installation and Configuration section of our Active Directory Integration (ADI) Configuration Guide.
-
Fill out the fields in the command prompt window that opens. When you’re prompted to enter the Active Directory Hostname or IP address, enter the Secure LDAP External IP Address from the Azure Properties section of your Microsoft Entra account. For an example of the Secure LDAP External IP Address in Microsoft Entra, see number 2 in the screenshot below:
- In the Enable SSL section of the command prompt window, enter true.
- After you have updated the fields in the command prompt window, press the Enter key on your keyboard to close the window.