This article covers how to remove Defend from your Microsoft 365 tenant fully when you don't plan to reinstate it. The removal sequence below follows a specific order. Group membership, transport rules, connectors, and the accepted domain all depend on each other for mail to route correctly and for changes to propagate cleanly. Removing them out of order can cause in-flight mail to fail or bounce.
For a summary of these changes, see the Defend Quickstart Guide.
Prerequisites
To complete the Defend removal process, make sure that you have the following:
- Global Admin or Microsoft Exchange Admin role, plus Microsoft Entra Admin rights.
- An Application Administrator or Global Admin role is required to delete app registrations, as detailed in Step 7 below.
Step 1: Remove Users from the Defend Groups
Before removing users, here's a summary of the groups and what each one is used for:
- Defend_Users: Used for inline SMTP mail processing
- Defend_Override_Group: Used to test banners when the console is in silent mode
- Defend_Users_Graph: Used in Proof of Value (POV) for post-delivery and Graph analysis
Remove all users from the Defend groups first. Do not delete the groups themselves yet. You'll delete the groups in Step 6.
You can follow the steps below to remove users from the Defend groups:
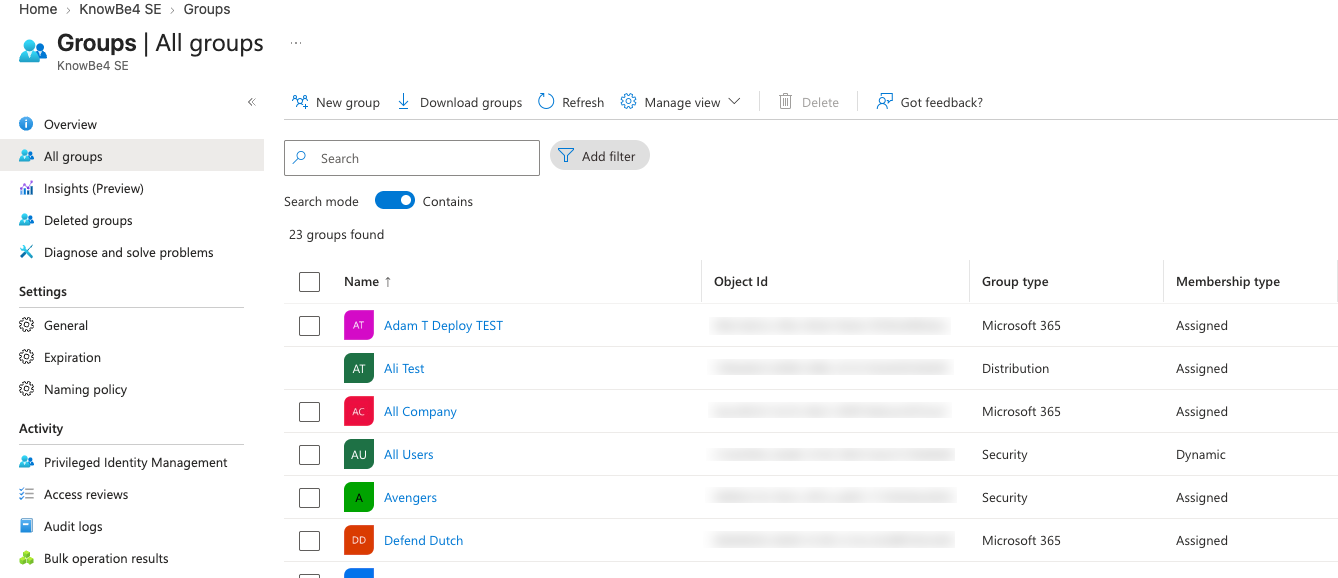
- Navigate to the Microsoft Entra Admin Center > Groups > All groups.
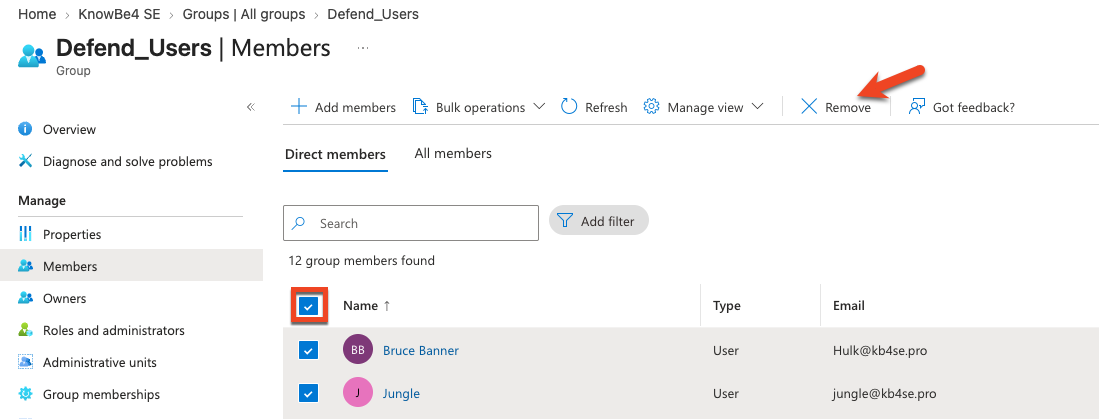
- Open Defend_Users_Group (or the custom name configured on the Defend Settings page) > Members > Select all > Remove.
- If separate Graymail User Group or Spam User Group names were configured, repeat the above steps for those groups.
- If Defend was deployed as part of a Proof of Value (POV), repeat the above steps to remove additional groups, such as Defend_Banners_Override and Defend_Graph_Users, or their custom names.
Step 2: Wait 24 Hours (Propagation Time)
After removing users from the groups, wait at least 24 hours before proceeding.
Step 3: Delete the Transport Rules
Defend deployments create up to 13 mail flow rules, listed in the table below. Older deployments may show rules prefixed "Egress Defend", and the current deployments may show "Defend." Four rules are legacy and may not exist in newer tenants. You can skip any rule not present in your environment.
You can follow the steps below to delete each rule:
- Navigate to the Microsoft Exchange Admin Center > Mail flow > Rules.
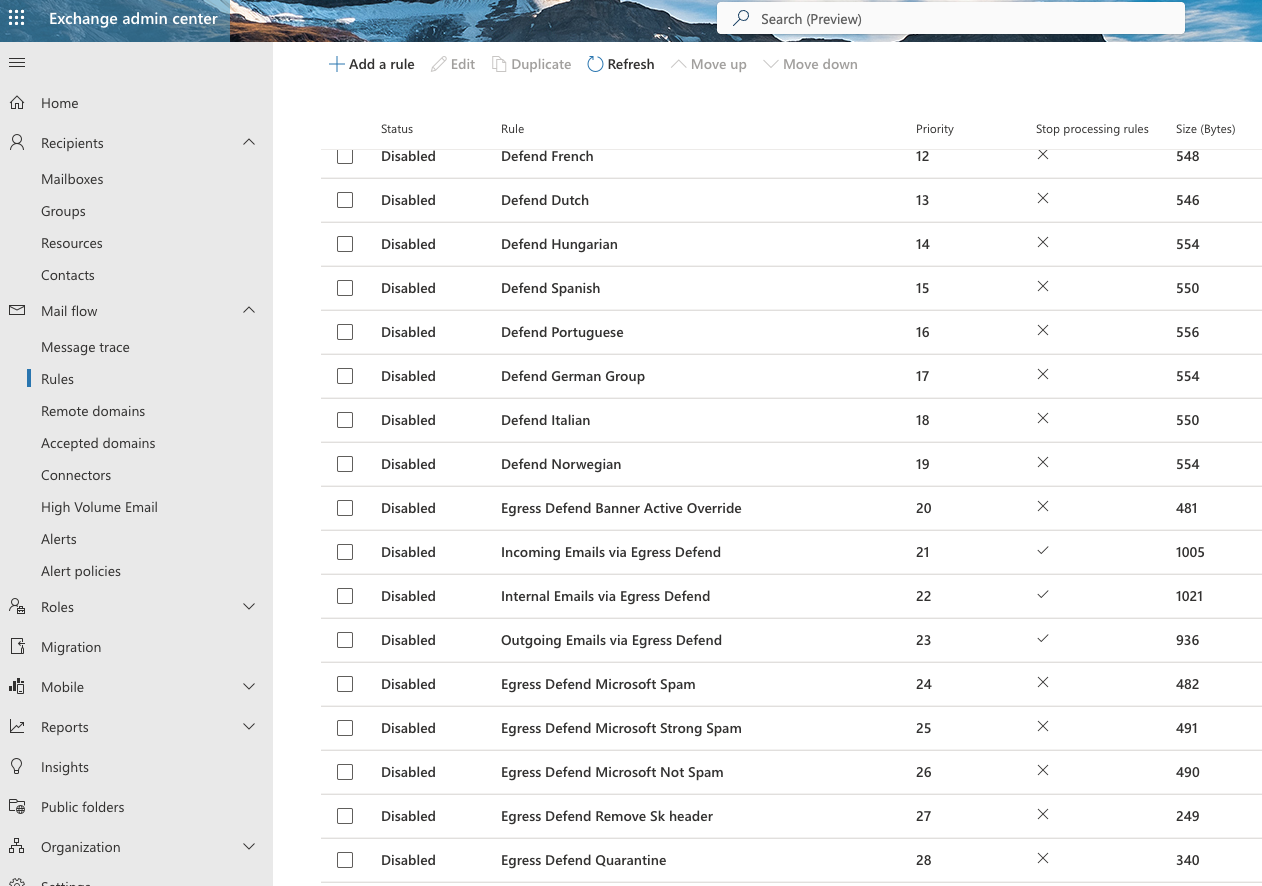
- Locate each Transport Rule listed in the table below.
- Delete each rule.
- Wait a few minutes for the change to propagate, then proceed.
- Alternatively, run the script described in the PowerShell Script for Exchange Reversal section to remove all matching rules in a single pass.
| Transport Rule | Status |
|---|---|
| Egress Defend add Internal Header | Legacy - may not be present |
| Egress Defend add Outbound Header | Legacy - may not be present |
| Egress Defend add Domain Header | Legacy - may not be present |
| Egress Defend Disable ATP Scanning | Current |
| Egress Defend Banner Active Override | Current |
| Incoming Emails via Egress Defend | Current |
| Internal Emails via Egress Defend | Current |
| Outgoing Emails via Egress Defend | Current |
| Egress Defend Microsoft Spam | Current |
| Egress Defend Microsoft Strong Spam | Current |
| Egress Defend Microsoft Not Spam | Current |
| Egress Defend Remove Sk Header | Legacy - may not be present |
| Egress Defend Quarantine | Current |
Step 4: Delete the Connectors
Defend adds the following inbound and outbound connectors for mail routing:
- Office 365 to Defend
- Defend to Office 365
You can follow the steps below to delete the connectors:
- Navigate to the Microsoft Exchange Admin Center > Mail flow > Connectors.
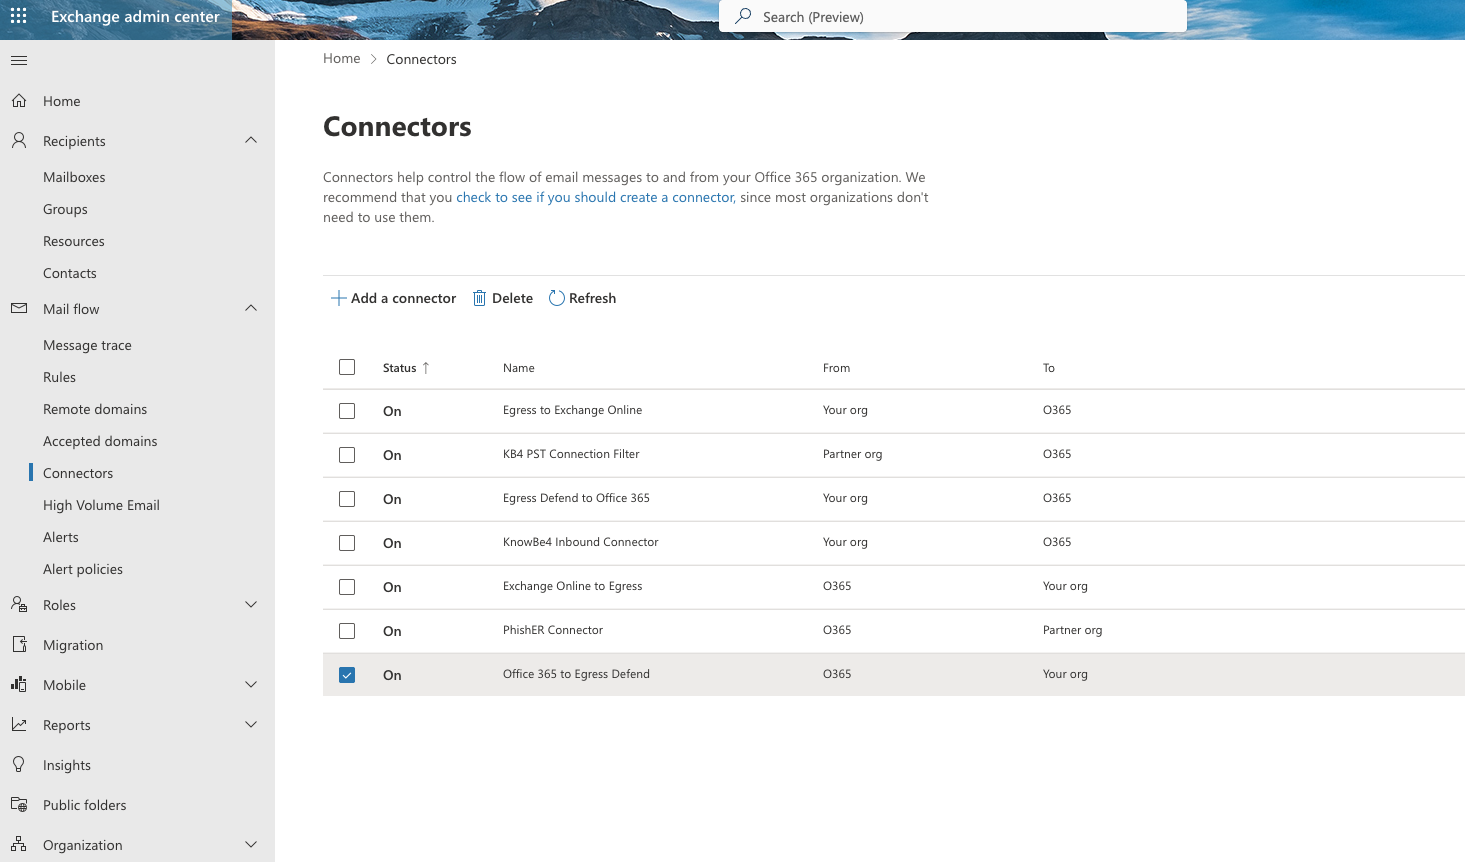
- You will need to delete the Office 365 to Defend (outbound) script identity: "Microsoft 365 to Egress Defend."
- Then, delete the Defend to Office 365 (inbound) script identity: "Egress Defend to Microsoft 365."
Step 5: Re-enable TNEF
Defend disables Transport Neutral Encapsulation Format (TNEF) on remote domains during setup to process rich-text formatting. Re-enable it as part of the decommissioning process.
You can follow the steps below to re-enable TNEF:
- This step is PowerShell only. There is no Microsoft Exchange Admin Center equivalent.
- Run the following command in PowerShell:
Get-RemoteDomain | Where {$_.TNEFEnabled -ne $true} | Set-RemoteDomain -TNEFEnabled $true
- Alternatively, you can run the full script referenced in the PowerShell Script for Exchange Reversal section, which handles this automatically.
Step 6: Delete the Defend Groups
Wait at least 24 hours after removing the members before deleting the groups.
Users were already cleared from these groups in Step 1. This step removes the now-empty group objects themselves. The default user group is Defend_Users_Group. Depending on how Defend was deployed, additional groups may also exist.
You can follow the steps below to delete the Defend groups:
- Navigate to the Microsoft Entra Admin Center > Groups > All groups.
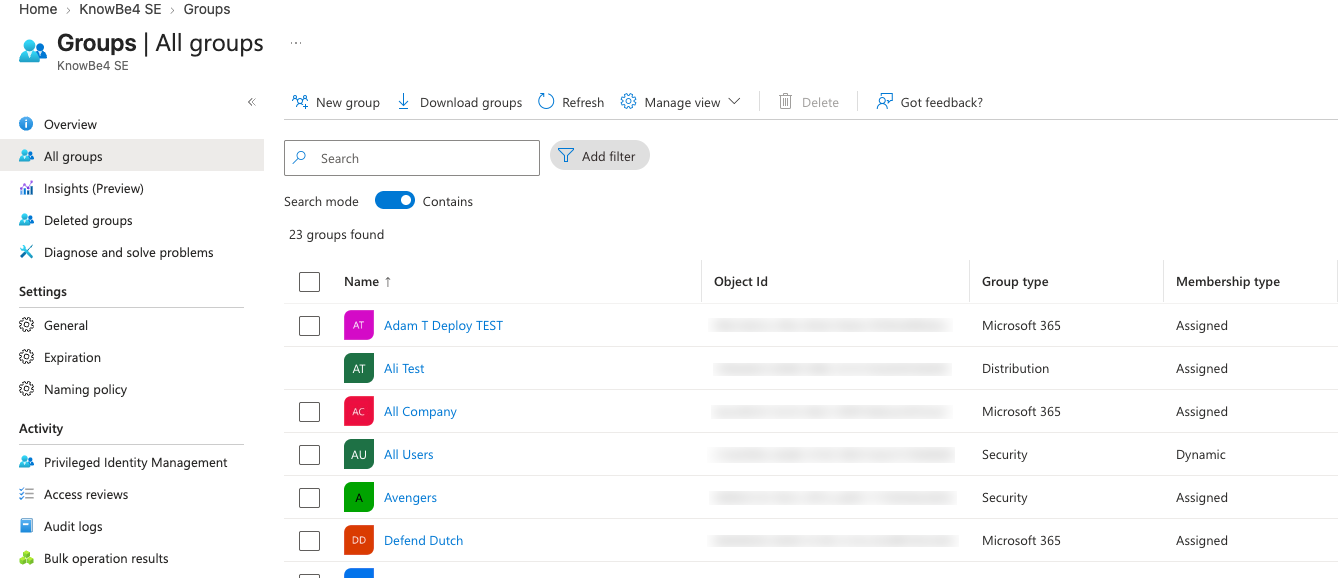 ;
;- Delete Defend_Users_Group (or the custom name configured on the Defend Settings page).
- If separate Graymail User Group or Spam User Group names were configured, delete those too. You can check the Defend Settings page for custom names.
- For POV deployments, also delete Defend_Banners_Override and Defend_Graph_Users (or their custom names).
Step 7: Delete the App Registrations
Up to five app registrations are created for Defend. Two are legacy and may not exist on newer deployments.
| App Registration | Status |
|---|---|
| User Analysis | Legacy - may not be present |
| Admin Features | Legacy - may not be present |
| Egress Software Technologies | Current |
| KnowBe4 Onboard | Current |
| KnowBe4 Deploy | Current |
| KnowBe4 Collaboration Security | Current |
You can follow the steps below to delete the app registrations:
- Navigate to the Microsoft Entra Admin Center > Enterprise applications > All applications > locate and delete each app listed above.
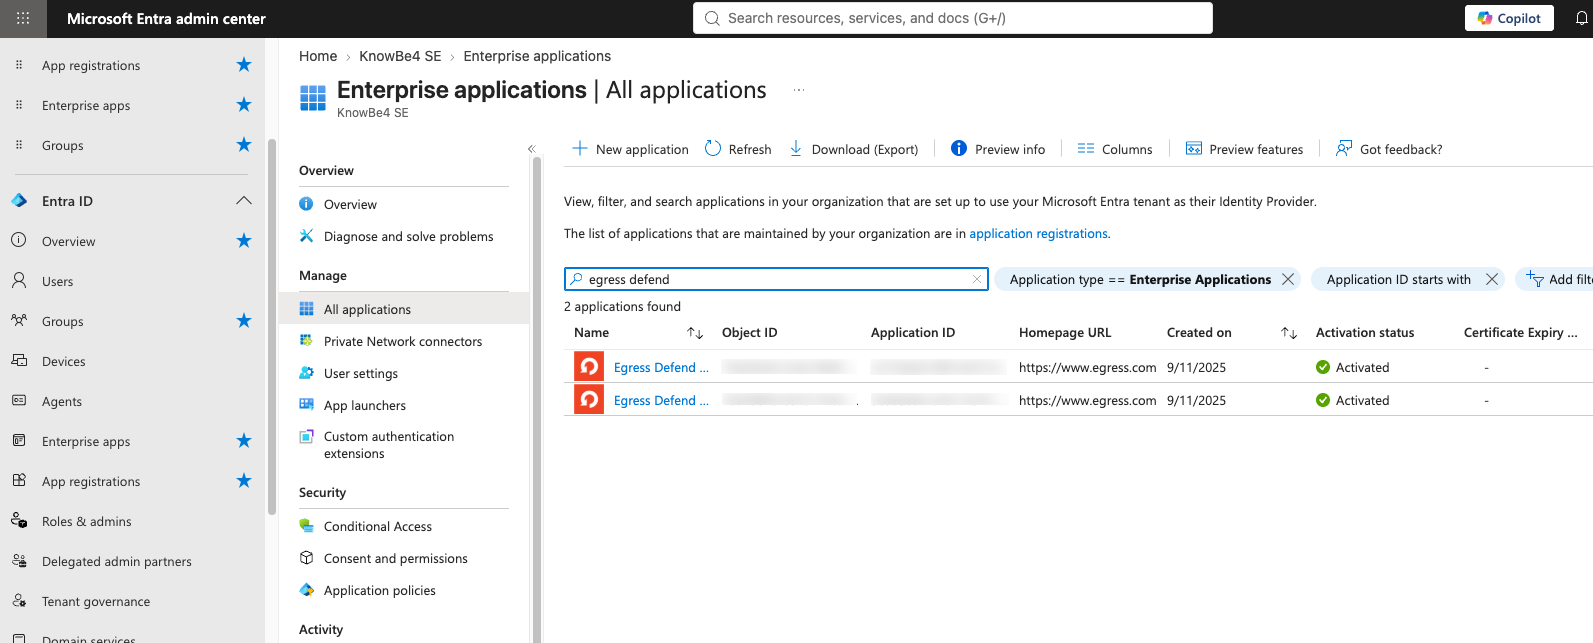
You will need to confirm that no other KnowBe4 Defend or Egress app registrations or enterprise apps remain.
Step 8: Remove the Accepted Domain
Defend adds a unique accepted domain to your tenant (format: [random string].c.us1.defend.com) to validate inbound mail and support DKIM signing.
You can follow the steps below to remove the accepted domain:
- Navigate to the Microsoft 365 Admin Center > Settings > Domains, or the Microsoft Exchange Admin Center > Mail flow > Accepted domains.
- Locate the Defend-assigned domain.
- Remove it.
Step 9: Verify Removal Is Complete
Once Steps 1 to 8 are complete, confirm the removal was successful:
- Microsoft Exchange Admin Center > Mail flow > Rules: Confirm no Defend rules remain.
- Microsoft Exchange Admin Center > Mail flow > Connectors: Confirm both Defend connectors are gone.
- Microsoft Entra Admin Center > App registrations > Enterprise applications: Confirm all Defend apps have been removed.
- Microsoft Entra Admin Center > Groups: Confirm that the Defend groups have been deleted.
- Microsoft 365 Admin Center > Domains: Confirm the Defend-accepted domain is gone.
- Send a test email to an external address: It should route directly, with no Defend gateway hops.
- Microsoft Exchange Admin Center > Mail flow > Message trace: Verify the routing path shows no KnowBe4 or Defend hops.
Step 10: Defend Tenant Removal (KnowBe4 Team Action)
KnowBe4 automatically handles the deletion of the Defend tenant on our infrastructure, and no action is required on your part. Once it is confirmed that no emails have been processed for a designated period, the tenant, along with all associated content, will be permanently removed.
The Defend tenant configuration on the KnowBe4 infrastructure is not removed by any customer-side action. The KnowBe4 account team will remove the tenant from the Defend console to close out the account fully.
Keep the following in mind while this step is pending:
- There is no impact on customer mail flow. The tenant record is already isolated once connectors, rules, and the accepted domain are removed.
- Without this step, an orphaned tenant record remains on the KnowBe4 Platform.
- KnowBe4 will complete the decommissioning process after the steps above are completed.
Troubleshooting
See the table below for any troubleshooting issues you may have:
| Symptom | Reason | Resolution |
|---|---|---|
| Outbound email fails after removing connectors | A transport rule was still active when the connector was deleted | Disable the rule immediately, temporarily re-add the connector, then redo the steps in order (Steps 3-4 before Step 5) |
| Banners still appear after rules are removed | The rule change has not fully propagated | Wait a few minutes and recheck. Confirm the rule status is Deleted, not just Disabled |
| Users are still processed by Defend after group removal | Custom group names not matched by the default script | Check the Defend Settings page for custom Graymail or Spam group names and remove those manually |
| Accepted domain removal is blocked | Domain still referenced by an active connector or rule | Confirm Steps 3-5 are complete before removing the domain |
| Mail validation or DKIM errors after removal | Accepted domain removed before connectors were fully deleted | Temporarily re-add the domain, finish deleting the connectors, then remove the domain |
| App registration deletion fails | Insufficient privileges | Requires Application Administrator or Global Admin role |
PowerShell Script for Exchange Reversal
This script reverses the Microsoft Exchange-side changes covered in Steps 2-6 above, such as:
- Deleting the Defend transport rules and connectors
- Re-enabling TNEF
- Removing the default Defend groups
It does not remove users from groups (Step 1), app registrations (Step 7), or the accepted domain (Step 8). Review the group and rule names against your own tenant before running. Custom-named groups will not be caught by this script.
Connect-ExchangeOnline

#Re-enable TNEF
Write-Host "Enabling TNEF"
$tnefDomains = Get-RemoteDomain | Where {$_.TNEFEnabled -ne $true}
Write-Host "Enabling TNEF on $tnefDomains"
$tnefDomains | Set-RemoteDomain -TNEFEnabled $true

#Delete Rules
Write-Host "Removing Mail Flow Rules"
Remove-TransportRule -Identity "Egress Defend add Internal Header" -Confirm:$false
Remove-TransportRule -Identity "Egress Defend add Outbound Header" -Confirm:$false
Remove-TransportRule -Identity "Egress Defend add Domain Header" -Confirm:$false
Remove-TransportRule -Identity "Egress Defend Disable ATP Scanning" -Confirm:$false
Remove-TransportRule -Identity "Egress Defend Banner Active Override" -Confirm:$false
Remove-TransportRule -Identity "Incoming Emails via Egress Defend" -Confirm:$false
Remove-TransportRule -Identity "Internal Emails via Egress Defend" -Confirm:$false
Remove-TransportRule -Identity "Outgoing Emails via Egress Defend" -Confirm:$false
Remove-TransportRule -Identity "Egress Defend Microsoft Spam" -Confirm:$false
Remove-TransportRule -Identity "Egress Defend Microsoft Strong Spam" -Confirm:$false
Remove-TransportRule -Identity "Egress Defend Microsoft Not Spam" -Confirm:$false
Remove-TransportRule -Identity "Egress Defend Remove Sk Header" -Confirm:$false
Remove-TransportRule -Identity "Egress Defend Quarantine" -Confirm:$false

#Delete Connectors
Write-Host "Removing Connectors"
Remove-InboundConnector -Identity "Egress Defend to Microsoft 365" -Confirm:$false
Remove-OutboundConnector -Identity "Microsoft 365 to Egress Defend" -Confirm:$false

#Remove Defend Groups
Write-Host "Removing Defend Groups"
Remove-UnifiedGroup -Identity "KnowBe4_Defend_Users" -Confirm:$false
Remove-UnifiedGroup -Identity "KnowBe4_Defend_Users_Banners_Override" -Confirm:$false
Remove-UnifiedGroup -Identity "KnowBe4_Defend_Users_Graph" -Confirm:$false