The Microsoft Ribbon Phish Alert Button (PAB) allows your users to easily report suspicious emails and help protect your organization from cyberattacks. When you integrate the PAB with Microsoft's integrated spam-reporting feature integrated spam-reporting feature (link opens in new window), the PAB will appear in the Outlook ribbon. When your users click the PAB to report an email, they can provide your IT team with an early warning about potential threats. You can receive reported emails in the Microsoft 365 Defender platform and the KSAT console. To learn how to install the Microsoft Ribbon PAB and how your users can use the PAB in their mail clients, see the sections below.
Prerequisites
Before you can install the Microsoft Ribbon PAB for your organization, your organization will need to have a Microsoft 365 mail server. The PAB is compatible with the following email clients and requirements:
- New Microsoft Outlook for Windows
- Outlook on the Web
- Outlook for Mac (Microsoft 365)
You will also need to enable and configure the PAB from your KSAT console Account Settings before following the steps in this article. To learn how to enable and configure the PAB in your KSAT account, see the Enable PAB section of our Phish Alert Button (PAB) Product Manual.
Installing the Microsoft Ribbon PAB for Microsoft 365
To install the Microsoft Ribbon PAB in Microsoft 365, follow the steps below:
Accepting Required Permissions
Before installing the Microsoft Ribbon PAB for Microsoft 365, follow the steps below:
- Log in to your KSAT console.
- Click your email address in the top-right corner of the page, and select Account Settings.
- Navigate to Account Integrations > Phish Alert.
- Select the Enable Phish Alert check box.
- From the Select PAB Version drop-down menu, select Microsoft Ribbon PAB.
-
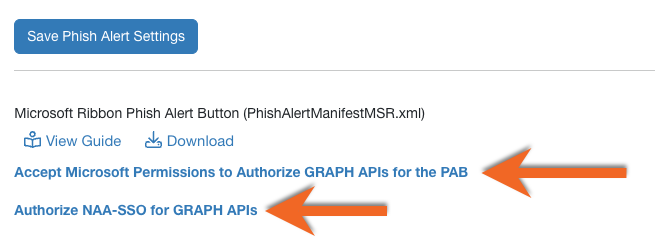
Click Accept Microsoft Permissions to Authorize GRAPH APIs for the PAB. You will be redirected to the Microsoft 365 login page.
- Log in to your Microsoft 365 account using your admin credentials.
-
Once you log in, the Permissions requested pop-up window will display. Read the permissions, then click Accept.

-
Once you accept the permissions, the GRAPH Authorization Successful window will display. Click Back to PAB Configuration to return to the Phish Alert settings.

- Click Authorize NAA-SSO for GRAPH APIs and repeat steps 6 through 9.
Installing the Microsoft Ribbon PAB for Microsoft 365
Follow the steps below to install the Microsoft Ribbon PAB for Microsoft 365:
-
Click the download icon below the Microsoft Ribbon Phish Alert Button option to download the PhishAlertManifestMSR.xml file.
 Note:Each Phish Alert Button (PAB) XML manifest file is unique to the KSAT console based on where it's downloaded. So, if you manage multiple KSAT consoles, you'll need to download and install the correct manifest file for each console separately.
 - In a new tab of your browser, log in to your Microsoft 365 admin center.
- From the menu on the left side of the page, click Settings.
-
From the Settings drop-down menu, select Integrated apps.

-
Click Add-ins at the top-right corner of the page. The Add-ins page will open.

-
On the Add-ins page, click Deploy Add-In. The Deploy a new add-in pop-up window will open.

- In the pop-up window, click Next.
-
Click Upload custom apps.

-
Select the I have the manifest file (.xml) on this device option. Then, click Choose File and select the PhishAlertManifestMSR.xml file that you downloaded in step 8.

- Click Upload to install the PAB. The Configure add-in pop-up window will open.
-
From the pop-up window, select which users will have access to the PAB and which method you would like to use to deploy the PAB.
Note:We recommend that you allow all users to access the PAB. We also recommend that you use the Fixed deployment method.
-
Click Next, and additional app permissions will display.

-
Once you have read the permissions, click Save. The Deploy Phish Alert pop-up window will open.
Note: The expected timeframe for the PAB to deploy can be up to 72 hours, but timeframes can vary. For more information about deploying add-ins, see Microsoft's Deploy add-ins in the Microsoft 365 admin center Deploy add-ins in the Microsoft 365 admin center (link opens in new window) article.
-
Once the pop-up window displays a confirmation that the add-in successfully deployed, click Next. The Announce add-in pop-up window will open and display a message about announcement recommendations from Microsoft.
 Note:After you install and deploy the PAB, you might receive an email from your mail service provider that contains information you can use to help you announce the PAB add-in to your users. KnowBe4 does not send the email about the PAB's intended usage and benefits.
 - Click Close to close the pop-up window.
Install to Shared Mailboxes
The Microsoft Ribbon PAB supports installation for shared mailboxes shared mailboxes (link opens in new window). This feature requires that Graph API and Nested App Authentication single sign-on (NAA-SSO) permissions are authorized in your Microsoft 365 tenant. See steps 6 through 10 in the Accepting Required Permissions section above for how to authorize these permissions.
Prerequisites for Shared Mailbox Installation
Make sure you meet the requirements below to install the PAB for a shared mailbox:
- Your mail environment must support the Outlook add-in API requirement set 1.13 Outlook add-in API requirement set 1.13 (link opens in new window).
-
The PAB XML manifest you deployed in Microsoft 365 must have the following line: <SupportsSharedFolders>true</SupportsSharedFolders>

Microsoft Ribbon PAB User Experience
Once installed, the Microsoft Ribbon PAB will appear in the Outlook mail client's Home toolbar in the Report section. Your users can report an email directly from their Inbox or open and report the email in Outlook's Reading Pane.

If you have enabled the user comments and disposition feature, your users can also add comments and select the disposition of the reported email. For more information, see our Phish Alert Button (PAB) User Comments and Email Disposition Guide article.

When a user clicks the PAB and clicks Report in the PAB pop-up window, the reported email will be removed from their inbox and moved to their Sent Items folder as a forwarded email. Then, the user can close the PAB pop-up window. If a user incorrectly reports an email, they can retrieve the email from their Deleted Items folder or Trash folder.
Updating the Microsoft Ribbon PAB
If you have installed the PAB, you may need to reinstall the manifest file if you make changes to any of the following KSAT console Account Settings:
- Icon
- Enable Microsoft 365 Defender Integration
- Comments & Disposition Settings (either enabling or disabling the overall feature or the Disable Unknown Email Disposition setting)
- Confirmation Message
- Add Language
- Remove Language
Updating the Microsoft Ribbon PAB for Microsoft 365
To update the Microsoft Ribbon PAB for Microsoft 365, follow these steps:
- Log in to your KSAT console.
- Select your email address in the top-right corner of the page, and select Account Settings.
- Navigate to Account Integrations > Phish Alert.
- From the Select PAB Version drop-down menu, select Microsoft Ribbon PAB.
- Select the download icon next to the PAB manifest for Microsoft products option to download the PhishAlertManifestMSR.xml file.
- Go to Settings > Integrated Apps > Add-ins in your Deploy add-ins in the Microsoft 365 admin center Deploy add-ins in the Microsoft 365 admin center (link opens in new window).
- Find your PAB add-in in the list.
- Select the add-in and select Update add-in.
- Upload your updated PhishAlertManifestMSR.xml file.
Uninstalling the Microsoft Ribbon PAB for Microsoft 365
If you need to redeploy the PAB XML manifest file, we recommend first removing your existing PAB installation. To uninstall the Microsoft Ribbon PAB, follow these steps:
- Go to Settings > Integrated Apps > Add-ins in your Microsoft 365 admin center Microsoft 365 admin center (link opens in new window).
- Find your PAB add-in in the list.
- Select the add-in and click Remove Add-In.