Enabling multi-factor authentication (MFA) on your account will add a step to the login process that requires the user to verify their identity. Users with MFA enabled will be required to use an authentication code generated by an authenticator application each time they log in to their account.
Admins can enable MFA for any user on the account. Admins can also enable MFA for admins or all users. For more information, see our KSAT Account Settings: User Management article. Users can also enable MFA for their account within the Learner Experience.
Enabling MFA as an Admin
The steps below outline how to enable MFA as an admin from the admin console. If you would prefer to enable MFA from the Learner Experience, see the Enabling MFA in the Learner Experience section of this article.
To enable MFA from the admin console, follow the steps below:
- Download an authenticator application on your smartphone. See our Multi-Factor or Two-Factor Authentication Applications article for recommended applications.
- Log in to your KnowBe4 account.
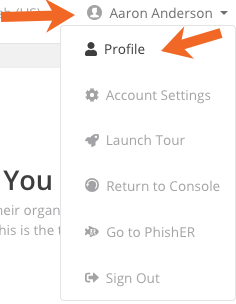
- Click your email address in the top-right corner and select Profile.

- At the bottom of your profile, you'll see the Multi-Factor Authentication option.

- Click the Enable button.
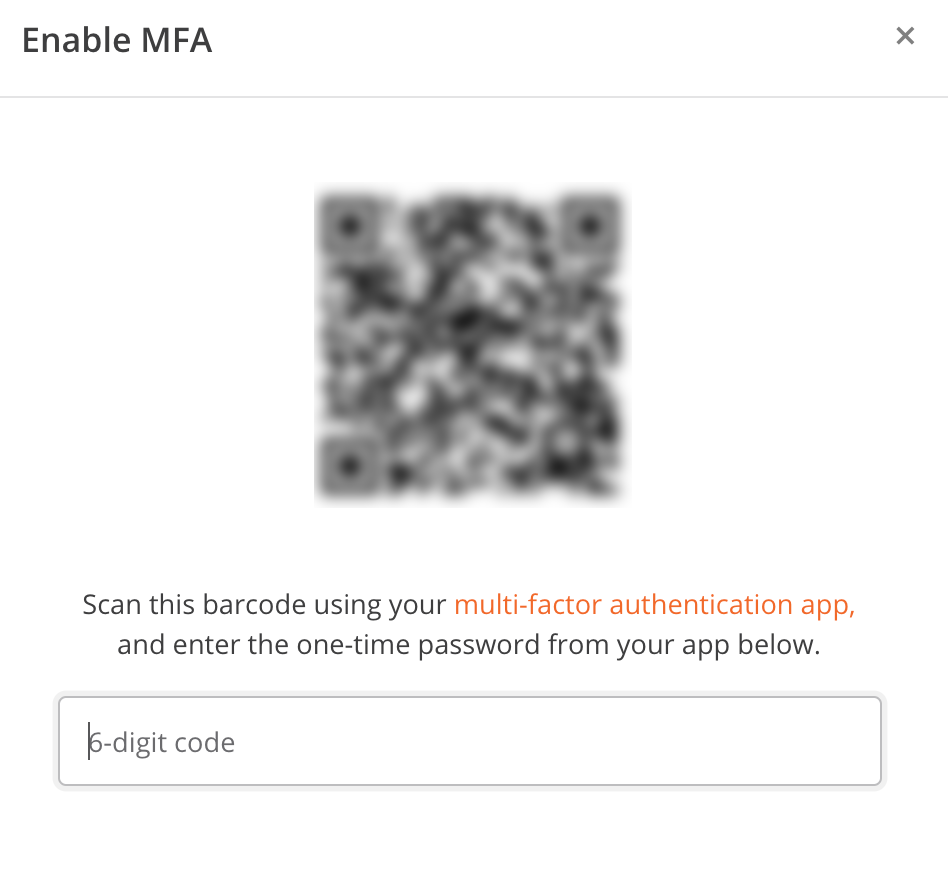
- A modal will display a QR code and an MFA code. You can either:
- Scan the barcode with your authenticator application.—OR—
- Manually enter the unique code provided.

- A six-digit one-time password will display on your authentication app. Enter this password into the field.
- Click OK to close the modal.
- Click the Update Profile button to save these changes.
The next time you log in, you will be asked to enter a code generated by the authentication application on your smartphone. The authentication code will be required each time you log in to your account.
Enabling MFA for Your End Users
The steps below outline how to enable MFA for your users. MFA can be set up for all users at once, or you can set up MFA for individual users. If you would like users to enable MFA on their own, see the Enabling MFA in the Learner Experience section of this article.
- Have your users download an authenticator application on their smartphone. See our Multi-Factor or Two-Factor Authentication Applications article for recommended applications.
- Log in to your KnowBe4 account.
- Click the Users tab.
- From the list on the Users subtab, find the user you'd like to enable MFA for.
- Click the user's name or email address to go to their User Profile.
- Navigate to their User Information tab. At the bottom of your profile, you'll see the Multi-Factor Authentication option.
- Click the Enable button.
- A modal will display a QR code and an MFA code. Then the user can either:
- Scan that barcode with their authenticator application.—OR—
- Manually enter the unique code provided.

- Click OK to close the modal.
- Click the Update User button to save these changes.
The next time the user logs in to their account, they will be asked to enter a code from the authentication application on their smartphone. The authentication code will be required each time they log in to their account.
Enable MFA in the Learner Experience
Follow these steps to enable multi-factor authentication (MFA) from the Learner Experience:
- Download an authenticator application on your smartphone. See our Multi-Factor or Two-Factor Authentication Applications article for recommended applications.
- Log in to your KnowBe4 training account.
- Click your email address in the top-right corner and select Profile.
- On the page that opens, go to the Multi-Factor Authentication section
- Click Enable.

- A modal will display a QR code. You can scan the barcode with your authenticator application.
- A six-digit one-time password will display on your authentication app. Enter this password into the field.
If the OTP is correct, the page will refresh and MFA will be enabled for your account. However, if the OTP is incorrect, MFA will not be enabled and you will need to try again.
Unlocking a User's Account
If a user incorrectly enters their MFA code three times, they will be locked out of their KnowBe4 account. Their account will unlock automatically after one hour. If the user is unable to wait for their account to automatically unlock, you will need to restore their MFA access.
There are two methods for restoring MFA access, depending on whether or not you have configured MFA to be required for all users. For further information regarding requiring MFA for all users, see the User Settings section of our KnowBe4 Console Account Settings: User Management article. Read the instructions below to learn more about restoring a user’s MFA access using either method.
- Log in to your KnowBe4 account.
- Click the Users tab.
- From the list on the Users subtab, find the user you would like to enable MFA for.
- Click the user's name or email address to go to their user profile.
- Navigate to their User Information subtab. At the bottom of their profile, you'll see the Multi-Factor Authentication option.

- Click the Disable button.
- Click the Update User button to save your changes.
If you have chosen to Require MFA for all users, the user will be automatically prompted to reconfigure MFA on their mobile device when they attempt to log in again.
If MFA is not required for all users, you will need to re-enable MFA and send them the QR code or the unique code that generates in order for the user to set up MFA again. See steps 7 and 8 of the Enabling MFA For Your End Users section above for specific instructions.
Unlocking Your Admin Account
If you are an admin on your KnowBe4 account and get locked out due to MFA, please reach out to our support team for assistance.