In this article, you'll learn how to integrate Cloudflare Area 1 Email Security with Real-Time Coaching. Once the integration is complete, data from Cloudflare Area 1 Email Security will be available in the Coaching tab of your KnowBe4 Security Awareness Training (SAT) console. This data can be viewed in Real-Time Coaching reports and used to create detection rules for Real-Time Coaching categories. For more information about Real-Time Coaching, see our overview article.
You can integrate Cloudflare Area 1 email security with Real-Time Coaching through a webhook or through REST API. We recommend integrating via a webhook, as it's highly secure and available across all license types.
Integrate via Webhook
To set up a webhook integration for Real-Time Coaching with Cloudflare Area 1 Email Security, see the subsections below.
Create Your Organization Key in Real-Time Coaching
Before setting up the webhook integration in your Cloudflare Area 1 Email Security console, you'll first need to authorize the configuration and create an organization key in Real-Time Coaching by following these steps:
- Log in to your KnowBe4 SAT console.
- Navigate to Coaching > Setup > Security Vendor Integrations.
- Locate the Cloudflare Area 1 Email Security tile and select Configure > Direct Integration. The vendor configuration page will display.
- From the dropdown menu, select Webhook.
- Select Authorize.
- In the Organization Key section, copy your organization key and save it somewhere you can easily access it later. You'll need this key to set up the webhook integration in Cloudflare Area 1 Email Security.
Set Up the Webhook Integration in Cloudflare
Once you have created an organization key in Real-Time Coaching, you can set up the integration in your Cloudflare Area 1 Email Security console by following these steps:
- Log in to your Cloudflare Area 1 Email Security admin console.
-
Select the gear icon in the top-right corner of the page.

- Select the Email Configuration tab.
- From the left sidebar, navigate to Domains & Routing > Alert Webhooks. An All Webhooks page will display.
- Select + New Webhook. An Add Webhooks window will display.
-
In the APP TYPE section, select SIEM. From the SIEM drop-down menu, select Other.

- In the Auth Code field, enter your organization key.
-
In the TARGET field, enter the URL for your KnowBe4 instance. See the table below for your KnowBe4 instance’s URL:
KnowBe4 Instance URL United States https://area1.vendor.training.knowbe4.com/v1 European Union https://area1.vendor.eu.knowbe4.com/v1 Canada https://area1.vendor.ca.knowbe4.com/v1 United Kingdom https://area1.vendor.uk.knowbe4.com/v1 Germany https://area1.vendor.de.knowbe4.com/v1 -
In the Malicious Style, Suspicious Style, Spoof Style drop-down menus, select Expanded.
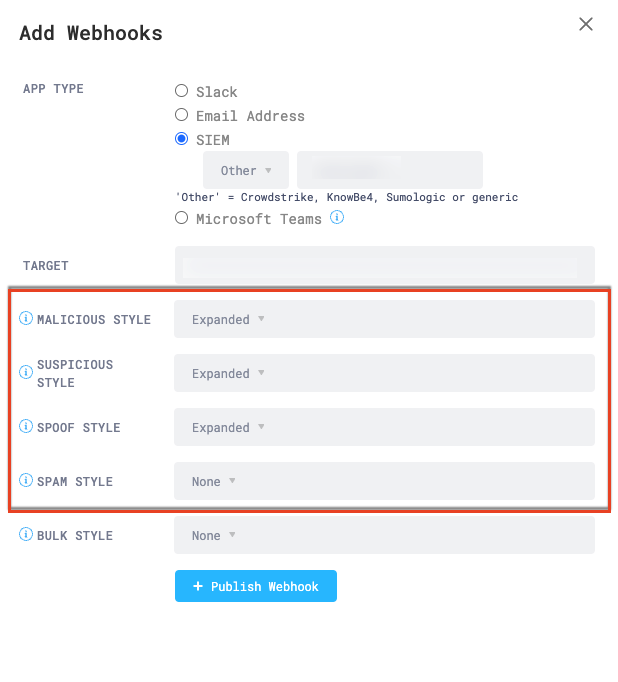
- Select + Publish Webhook.
Delete the Webhook Integration in Cloudflare
To delete the webhook integration, follow the steps below.
- Log in to your Cloudflare Area 1 Email Security admin console.
-
Select the gear icon in the top-right corner of the page.

- Select the Email Configuration tab.
- From the left sidebar, navigate to Domains & Routing > Alert Webhooks. An All Webhooks page will display.
-
Locate the URL you want to remove. To find the URL for your KnowBe4 instance, see the table below:
KnowBe4 Instance URL United States https://area1.vendor.training.knowbe4.com/v1 European Union https://area1.vendor.eu.knowbe4.com/v1 Canada https://area1.vendor.ca.knowbe4.com/v1 United Kingdom https://area1.vendor.uk.knowbe4.com/v1 Germany https://area1.vendor.da.knowbe4.com/v1 - To the right side of the URL row, select the three dots icon, then select Delete from the drop-down menu.
Integrate via REST API
To learn how you can set up an API integration for Real-Time Coaching with Cloudflare Area 1 Email Security, follow the subsections below.
Create Your Keys in Cloudflare
Before you can set up this integration in Real-Time Coaching, you'll need to create a private key and a public key by following these steps:
- Log in to your Cloudflare Area 1 Email Security console as an admin.
-
Select the gear icon in the top-right corner of the page.
- Navigate to the Service Accounts tab.
- Select + Add Service Account.
- In the NAME field, enter a name for your new service account.
- Select + Create Service Account. A pop-up window will open.
-
Copy and save the private key somewhere that you can easily access. You'll need this key to set up the API integration in Real-Time Coaching.

- Select Dismiss to return to the Service Accounts page, where you can view your new public key.
-
Copy and save the PUBLIC KEY somewhere you can easily access it. You'll need this key to set up the API integration in Real-Time Coaching.

Set Up the API Integration in Real-Time Coaching
Once you have created a private key and public key in your Cloudflare Area 1 Email Security console, you can set up the integration in Real-Time Coaching by following these steps:
- Log in to your KnowBe4 SAT console.
- Navigate to Coaching > Setup > Security Vendor Integrations.
- Locate the Cloudflare Area 1 Email Security vendor tile and select Configure > Direct Integration.
-
From the drop-down menu, select API.
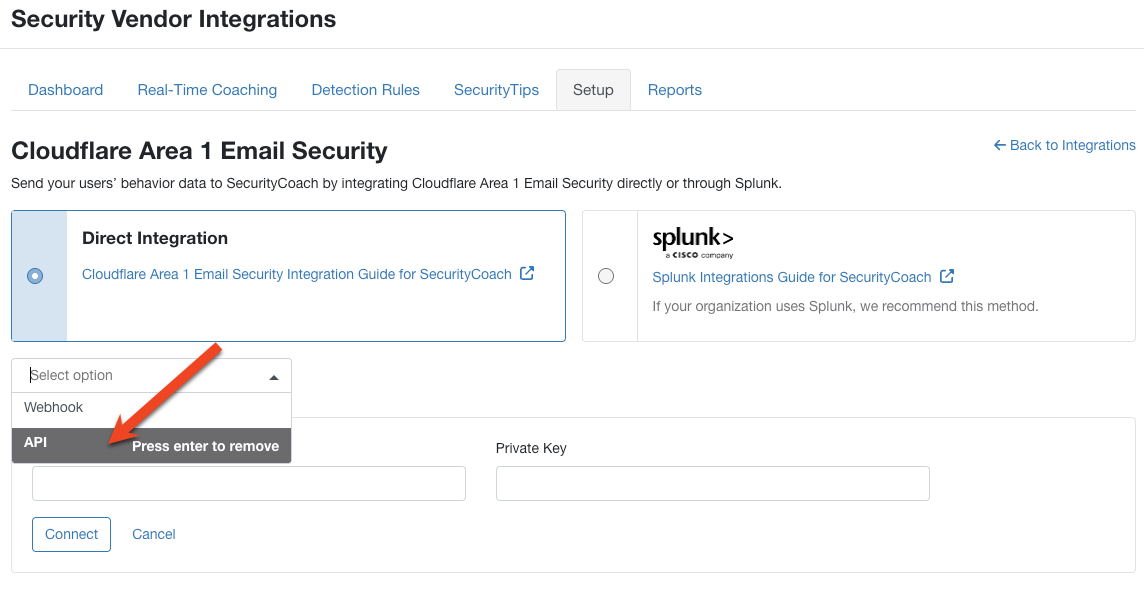
- Enter the Public Key and Private Key that you saved earlier.
- Select Authorize.
Map Your Users
After you’ve finished integrating Cloudflare Area 1 Email Security, we recommend mapping your users using mapping rules or by uploading a CSV file. For more information, see our user mapping article.
Manage Detection Rules
Once you’ve successfully authorized this integration, you can also manage Cloudflare Area 1 Email Security detection rules from Coaching > Detection Rules. For a full list of available system detection rules for this vendor, see our System Detection Rules by Vendor article.
Delete the Integration in Real-Time Coaching
If you want to delete the Cloudflare Area 1 Email Security integration from Real-Time Coaching, follow these steps:
- Log in to your KnowBe4 SAT console.
- Navigate to Coaching > Setup > Security Vendor Integrations.
- Locate the Cloudflare Area 1 Email Security vendor tile and select Edit.
- Select Delete Integration near the bottom of the page.