The PhishER Blocklist feature helps you to prevent malicious or spam emails from reaching your users’ inboxes. When you review users' reported emails, you can update your blocklist to send information about threats or spam to your Microsoft 365 mail server.
Once you enable the blocklist and connect it to your mail server, you can create and manage your blocklist entries. Each entry contains information that your mail server will use to filter future messages. For example, if you create an entry for a malicious email address, your mail server will move future emails from that email address to your users' Junk folders automatically.
To learn more about the PhishER Blocklist, read the sections below.
Enabling and Authorizing the PhishER Blocklist
Before you can create entries, you’ll need to enable the PhishER Blocklist. You’ll also need to authorize the blocklist by assigning the Exchange administrator role to the PhishER Blocklist application in your Microsoft 365 account with Microsoft Entra ID.
To enable and authorize the blocklist, follow the steps below:
- In your PhishER console, navigate to Settings > Blocklist.
- If a Microsoft 365 mail server isn’t connected to your blocklist, click Connect to Microsoft 365 and add a connection.
- Turn on the toggle next to Disabled at the top of the page, then click Save.
-
In your Microsoft Entra ID portal, assign the Exchange administrator role to the PhishER Blocklist application.
Note:For more information about enabling the blocklist, visit the Blocklist section of our PhishER Settings: Integrations article. For more information about assigning the role, visit our How to Assign the Exchange Administrator Role to the PhishER Blocklist Application article.
Creating PhishER Blocklist Entries
You can create entries to add to your blocklist from the Blocklist tab or the Message Details page. If you have enabled PhishML, you can also use PhishML tags to help you prioritize messages with values that you want to add to the blocklist.
To learn how to create entries from the Blocklist tab or the Message Details page, read the subsections below.
Creating Entries from the Blocklist Tab
To create a new entry from the Blocklist tab, follow the steps below:
- Log in to your PhishER console.
- Navigate to Blocklist > Your Syncing Entries.
- Click the Create Blocklist Entry button in the top-right corner of the page. The Create Blocklist Entry pop-up window will open.
-
In the pop-up window, fill out the fields to create your entry. For more information, view the screenshot and list below:

- Attribute: Select the attribute that you would like to use for your entry. The attribute is the type of information that you want your mail server to filter. Select Sender option to use a sender’s email address or domain as the value. For example, you can enter a full email address like "username@domain.com" or a domain name like "domain.com" for your Value. Select the URL option to use a full URL or a host name as the value. For example, you can enter "www.sitename.com/sitepage" or "www.sitename.com" for your Value. Select the File Hash option to use an SHA-256 file hash as the value.
- Value: In this field, enter the specific information that will trigger the mail server to filter a message. For example, if you select Sender for the Attribute field, you would enter the sender's email address in this field.
-
Duration: From this drop-down menu, select the amount of time that you would like the entry to remain on your blocklist. After this duration, entries will be removed from your blocklist automatically. A duration of 30 days is selected by default, which is similar to the default duration for Microsoft's Tenant Allow/Block List Microsoft's Tenant Allow/Block List (link opens in new window).
Note:When the Allow Blocklist entries without an expiration date setting is enabled in the Preferences subtab of your PhishER Settings, the Never Expire option is available.Cybercriminals can change their attack methods quickly, so it's important to keep your blocklist up to date. Setting a duration allows you to update your blocklist with information from your users' recently reported messages.
- Click Save to add the entry to your blocklist.
After you've created the entry, you can monitor its status and other details. For more information, read the Monitoring Your Blocklist Entries section of this article.
Creating Entries from the Message Details Page
To create a new entry from the Message Details page, follow the steps below:
- Log in to your PhishER console.
- Navigate to the Inbox tab.
- Click a message to open the Message Details page.
-
Click the red block icon next to an attribute. The Create Blocklist Entry pop-up window will open.

-
In the pop-up window, fill out the fields to create your entry. For more information, view the screenshot and list below:
- Attribute: Select the attribute that you would like to use for your entry. The attribute is the type of information that you want your mail server to filter. Select the Sender option to use a sender’s email address or domain as the value. For example, you can enter a full email address like "username@domain.com" or a domain name like "domain.com" for your Value. Select the URL option to use a full URL or a host name as the value. For example, you can enter "www.sitename.com/sitepage" or "www.sitename.com" for your Value. Select the File Hash option to use an SHA-256 file hash as the value.
- Value: In this field, enter the specific information that will trigger the mail server to filter a message. For example, if you select Sender for the Attribute field, you would enter the sender's email address in this field.
-
Duration: From this drop-down menu, select the amount of time that you would like the entry to remain on your blocklist. After this duration, entries will be removed from your blocklist automatically. A duration of 30 days is selected by default, which is similar to the default duration for Microsoft's Tenant Allow/Block List Microsoft's Tenant Allow/Block List (link opens in new window).
Note:When the Allow Blocklist entries without an expiration date setting is enabled in the Preferences subtab of your PhishER Settings, the Never Expire option is available.Cybercriminals can change their attack methods quickly, so it's important to keep your blocklist up to date. Setting a duration allows you to update your blocklist with information from your users' recently reported messages.
- Click Save to add the entry to your blocklist.
After you've created the entry, you can monitor its status and other details. For more information, read the Monitoring Your Blocklist Entries section of this article.
Monitoring PhishER Blocklist Entries
From the Your Syncing Entries subtab, you can monitor your blocklist entries. Entries are listed by their values.
Once you create entries, they will display on the Your Syncing Entries subtab of the Blocklist tab. You can also delete entries and view the status of each entry’s sync across your mail servers.
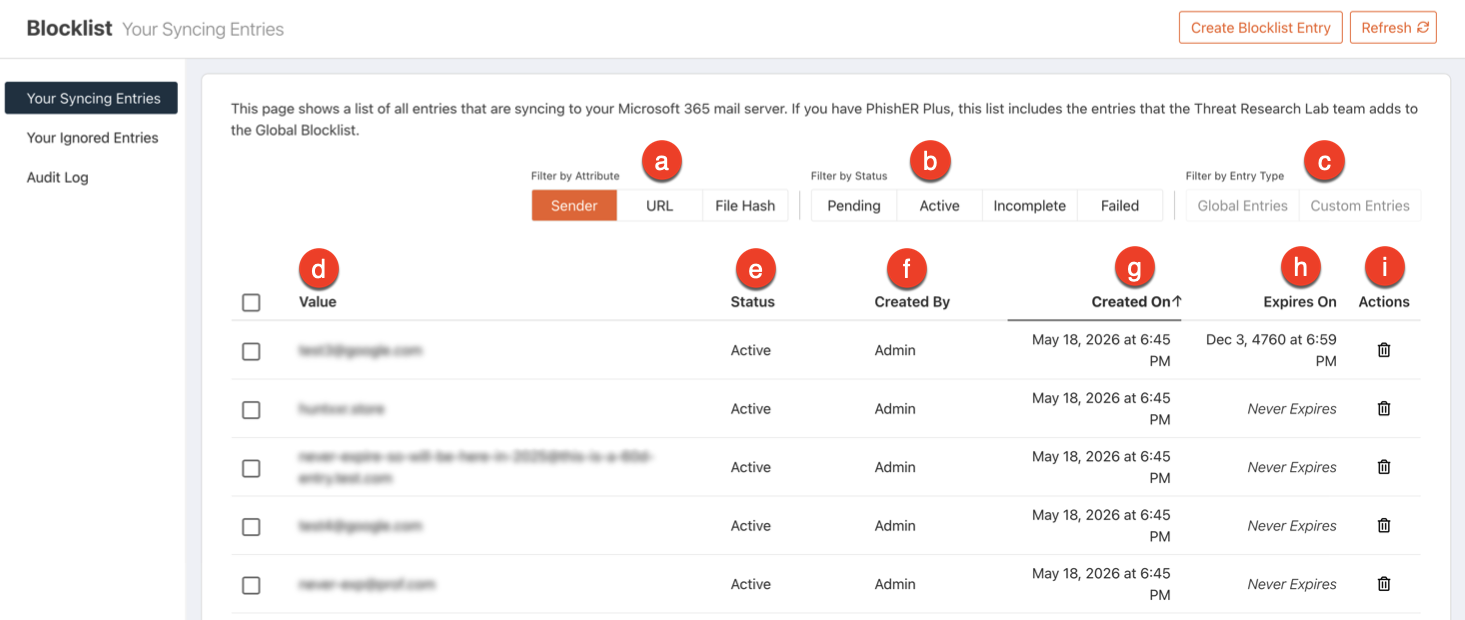
For more information about this subtab, view the screenshot and list below:
-
Filter by Attribute: You can use these filters to view entries with a specific attribute.
Note:The PhishER Blocklist has a maximum of 500 entries per Sender, URL, and File Hash attribute. - Filter by Status: You can use these filters to view entries with a specific status.
- Filter by Entry Type: If you have enabled the Global Blocklist, you can use these filters to view Global Blocklist entries or custom entries on your PhishER Blocklist only.
-
Value: This column displays the entry's value. Values can be a sender's address, URL, or file hash. Your mail server will use this value to filter any emails that have the same value. For more information about how emails will be filtered, view the list below:
- URL or File Hash: If an email contains a URL or file hash value that matches an entry, your mail server will move the email to the Quarantine folder automatically.
- Sender: If an email contains a sender value that matches an entry, the mail server moves the email to the Junk folder automatically.
Tip:You can also click a value in the column to view the Blocklist Audit Log page. For more information, read the Reviewing the Audit Log section of this article. -
Status: This column displays the entry's status. For more information about the statuses, view the list below:
- Pending: This status indicates that the entry is in the process of being added or deleted from the blocklist.
- Active: This status indicates that the entry has been added to the blocklist and synced with the connected mail server.
- Incomplete: This status indicates that an entry has been added and synced to one or more of the connected mail servers, but not all of them.
- Failed: This status indicates that the entry has not been added and synced successfully. If you have multiple mail servers connected to your blocklist and an entry doesn’t sync with all of them successfully, the entry will display as Failed.
- Created By: This column indicates who created the entry. Admin will display if a PhishER admin created the entry for your PhishER Blocklist. KnowBe4 will display if KnowBe4's Threat Research Lab team created the entry for the Global Blocklist.
- Created On: This column displays the date and time the entry was added to the blocklist.
-
Expires On: This column displays the date and time the entry will be removed from the blocklist automatically.
Note:The PhishER Blocklist will sync with your Microsoft 365 mail server every 10 minutes. During this time, pending entries on your Microsoft 365 Tenant Allow/Block List Tenant Allow/Block List (link opens in new window) will be added to the Your Syncing Entries subtab in your PhishER console. The existing entries on your Tenant Allow/Block List may take up to 24 hours to sync with your PhishER Blocklist. In the Expires On column, a synced entry will display the date and time of when the entry will be removed from both blocklists. If your Tenant Allow/Block List entries or PhishER Blocklist entries did not include an expiration date, the Expires On column will display as Never Expires. -
Actions: In this column, you can click the trashcan icon to open the Delete Blocklist Entry pop-up window. Then, you can delete an entry from your PhishER Blocklist. Or, you can delete and ignore an entry to prevent it from being added to your PhishER Blocklist. To learn about ignored entries, read the Ignoring Entries subsection below.
Note: To delete multiple entries at once, select one or more check boxes next to the entries. Then, click Delete Selected and confirm your decision. You can also use the top check box to select all entries shown on the page.
Ignoring Entries
If you would like to prevent entries from being blocked on your mail servers, you can add them to your ignored entries. Ignored entries can't be added to your PhishER Blocklist. Your organization's domain is automatically ignored and can't be manually added to your ignored entries.
When you ignore an entry, any matching entries on your PhishER Blocklist will be in the Pending status to indicate that they will be deleted. You can’t create a matching entry on your blocklist unless the ignored entry is deleted on the Your Ignored Entries subtab.
To ignore an existing blocklist entry, follow the steps below:
- Log in to your PhishER console.
- Navigate to Blocklist > Your Syncing Entries.
- Locate the entry you would like to ignore.
- Click the trashcan icon in the Actions column for that entry. The Delete Blocklist Entry pop-up window will open.
- In the pop-up window, click Delete and Ignore. An ignored entry will be added to the Your Ignored Entries subtab, and the blocklist entry will be in the pending status to indicate that it will be deleted.
To create an ignored entry from the Your Ignored Entries subtab, follow the steps below:
- Log in to your PhishER console.
- Navigate to Blocklist > Your Ignored Entries.
- Click on the Create Ignored Entry button in the top-right corner of the page. The Create Ignored Entry pop-up window will open.
- In the pop-up window, create your ignored entry. For more information, view the screenshot and list below:
- Attribute: Select the type of attribute that you would like to use for your ignored entry. Select the Sender option to use a sender’s email address or domain as the value. For example, you can enter a full email address like "username@domain.com", or a domain name like "domain.com" for your Value. Select the URL option to use a full URL or a hostname as the value. For example, you can enter "www.sitename.com/sitepage", or "www.sitename.com" for your Value. Select File Hash option to use an SHA-256 file hash as the value.
-
Value: In this field, enter the specific value that you want to prevent from being blocked on your mail server. For example, if you select Sender for the Attribute field, you would enter the sender's email address in this field.

- Click Save to add the entry to your ignored entries.
You can monitor all of your ignored entries on the Your Ignored Entries subtab. For more information about this subtab, view the screenshot and list below:

-
Search...: You can use this field to filter ignored entries by using Lucene queries.
Note:To search for entries with similar values, you must use wildcards. For example, you can search for "*yahoo.com" to find all values containing "yahoo.com". For more information, read our How to Use Lucene Query Syntax article. - Filter by Attribute: You can use these filters to view entries with a specific attribute type.
- Value: This column displays the entry’s value.
- Created On: This column displays the date and time of when the ignored entry was added.
- Actions: In this column, you can click the trashcan icon to delete an ignored entry. If you delete an ignored entry, you can use the entry's value to create a new entry on your PhishER Blocklist.
Reviewing the Audit Log
In your PhishER console, you can navigate to Blocklist > Audit Log subtab to view your audit log. Your audit log includes activity for your PhishER Blocklist and Global Blocklist, such as when entries are created, deleted, and synced with your mail servers.
For more information about this subtab, view the screenshot and list below:

- Timestamp: This column displays the date and time of when the action in the Event Action column occurred.
-
Event Type: This column displays the type of action that occurred. For more information about the event types, view the list below:
- Entry Updated: This type indicates that an entry was created or deleted.
- Entry Synced: This type indicates that an entry was synced to the PhishER Blocklist.
- Blocklist Synced: This type indicates that all entries were synced for all connected mail servers.
- Value: This column displays the affected entry’s value.
- Updated By: This column shows the source of the action. When an entry is updated, this column will display the email address of the user who updated it. When an individual entry or the blocklist is synced, this column will display the mail server ID or name of the mail server. If the system performed the action, the row will be blank.
- Event Action: This column indicates what action was performed for a specific entry or for the blocklist. Created will display when an entry is created. Synced will display when an entry or blocklist is synced to the connected mail servers. Deleted will display when an entry is deleted.
- Status: This column indicates whether the action succeeded or failed.